Broken Age

Broken Age

92 ratings
Broken Age Act 2: Step-by-Step Walkthrough
By ike and 1 collaborators
This is a written step-by-step walkthrough to the Act 2 puzzles avoiding as much story or plot spoilers as possible. No need to watch a video to follow the guide. Table of contents on side sorted by character for quick access to the puzzles.
   
Award
Favorite
Favorited
Unfavorite
Part 1a - Shay Puzzles
These are first puzzles you can complete in the order of appearance for Shay.
Please keep in mind these two general ideas while following this walkthrough
  • Items - Avoiding story spoilers, I'm not quoting all the key dialogs you have to pick, unless if it is necessary.
  • For the most part, it has to be done in order due to key elements of the puzzles being locked behind other puzzles.

Choking Hazard
Radiation Suit
Caulking Compound
Heavy Duty AGT Unit
Electronic Genius
S1 - Choking Hazard
Choking Hazard
  • Go to the tree with the snake, west of Shellmount
  • Have the snake choke you, then wait two or three minutes
  • Pick up the snake from the floor, and apply it to the choking Shellmount Mayor
S2 - Superconductive Gyroscopic Hypercam
Superconductive Gyroscopic Hypercam
required prerequisite - Choking Hazard completed
  • Talk to the guy inside the Deadeye Pyramid for items, east of the Shellmount beach.
  • Give the blueprint to the Shellmount Mayor
  • Place the sand sculpture at the sap stain at the Talking Tree
  • Go to the Lumberjack's mailbox and grab Vella's missing flyer
  • Show the talking tree Vella's missing flyer
  • Take the sap costed sculpture
  • Go talk to the Lumberjack and give him the sap costed sculpture
  • Obtain the Superconductive Gyroscopic Hypercam
S3 - Radiation Suit
Radiation Suit
  • Head up clouds, use the ladder at the Lumberjack's house, second floor.
  • Head all the way east, and speak to girls selling cupcakes
  • Head behind them, and talk to grandpa and kid for money
  • Buy a cupcake from the girls.
  • Head back west, to the Fountain Plaza is where the two dads are conversing
  • Give the dads the cupcake.
  • Head back east, and give the cupcake to grandpa
  • Head to the peach tree, which is northwest of the Fountain Plaza, up a short ladder.
  • Talk to the girls at the peach tree, and use the cane on them
  • Pick up the material for the radiation suit on the floor.
  • Head to the Maiden Bird Platform, south of the Fountain Plaza, down a short ladder.
  • Talk to them and give the material AND baby radiation suit to the seamstress
  • Obtain the Radiation Suit
S4 - Caulking Compound
Caulking to Patch up Cracks
  • Head up clouds, use the ladder at the Lumberjack's house, second floor.
  • Head to the Peach Tree, which is northwest of the Fountain Plaza, up a short ladder.
  • Slide down from the base of the peach tree, where it is glowing yellow
  • While on the roots, head left and grab a peach.
  • Talk to the guy who is eating peach and obtain the tool from him
  • Head back to the Fountain Plaza, and use the tool on the blue bird's egg
  • Grab the egg shell at the bottom of the ladder.
  • Head back down to Shellmount beach.
  • If no one is mixing the compound at the pool of fish guts, then talk to the guy inside the Deadeye Pyramid to start the quest.
  • Talk to the guy mixing the compound.
  • Use the spoon to test the pH of the caulking compound, south of the beach
  • Using the egg shell and peach to balance the pH of the caulking compound
    egg shell raises pH levels, peach reduces pH levels.
  • Obtain the Chalking Compound once the pH is balanced at 7
S5 - Heavy Duty AGT Unit
Heavy Duty AGT Unit
  • Head up clouds, use the ladder at the Lumberjack's house, second floor.
  • Grab the ladder to pull down the sewn up cloud
  • Talk to the crying guard
  • Ask for how the knot looks and remember its shape
  • Head back down the Shellmount beach and ask the Fisher Lady for help
  • Talk to the guy inside the Deadeye Pyramid for the item, east of the Shellmount beach.
  • Give the item to the Fisher Lady so she can give you the instructions.
  • Having obtain the item for the instructions to untie the knot, head back up the cloud
  • Grab the ladder to pull down the sewn up cloud
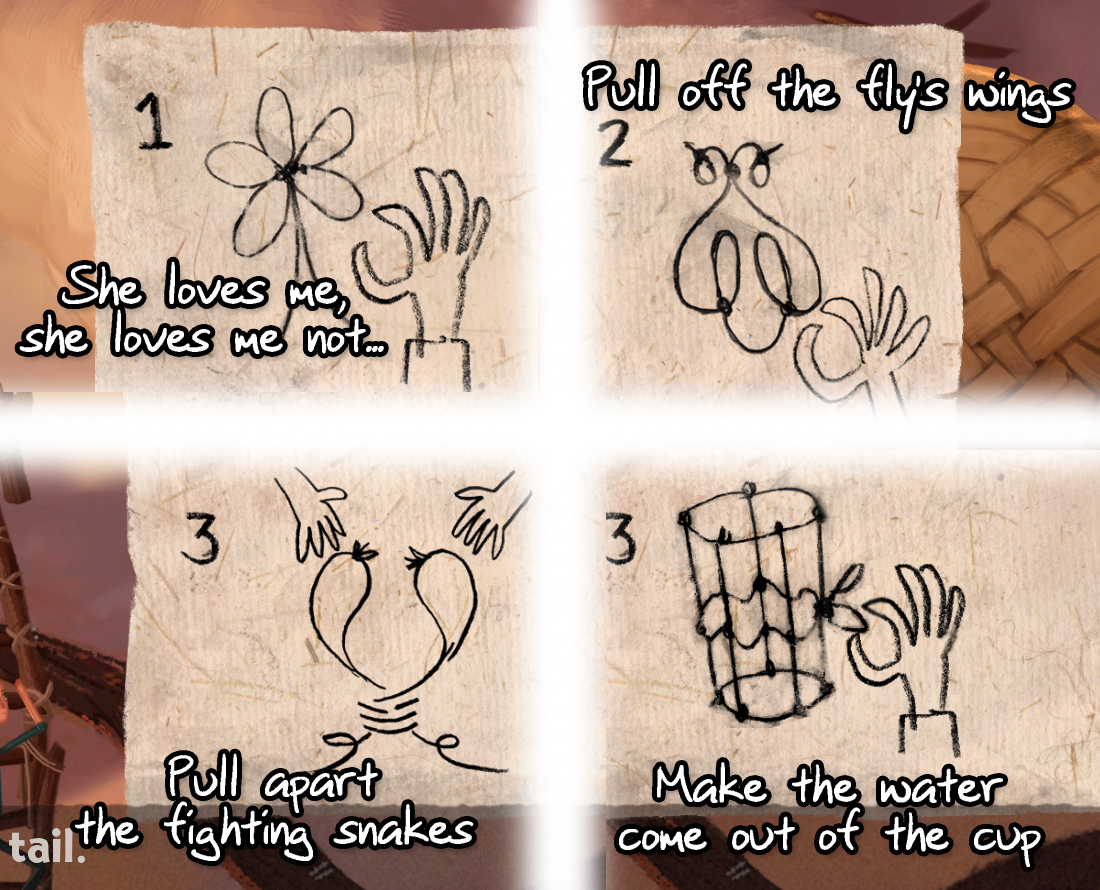
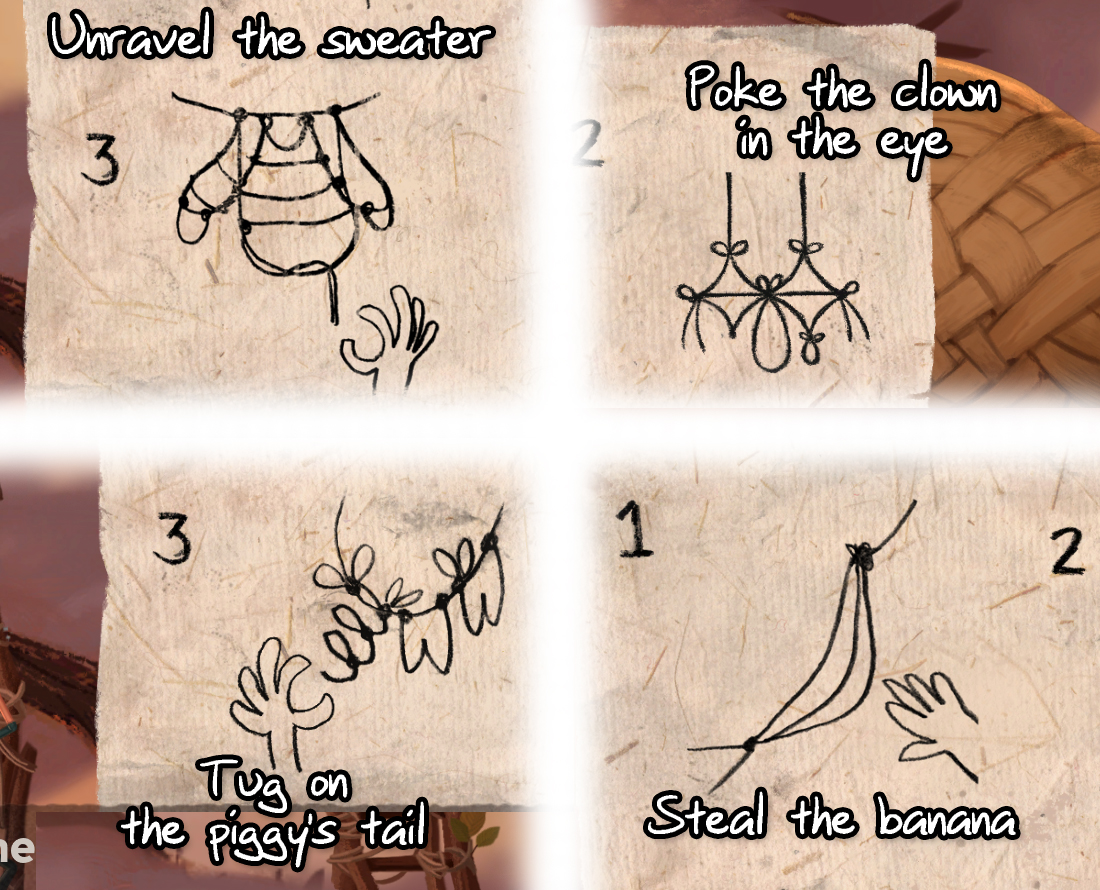
  • Choose the correct instructions steps to untie the knot
    Sometimes the game might not provide the correct choices when given the correct diagram.
    You'll just have to repeat it a few times until it does.
  • If you didn't make any mistakes, you obtain the Heady Duty AGT Unit, otherwise obtain new instructions for new knot and try again.
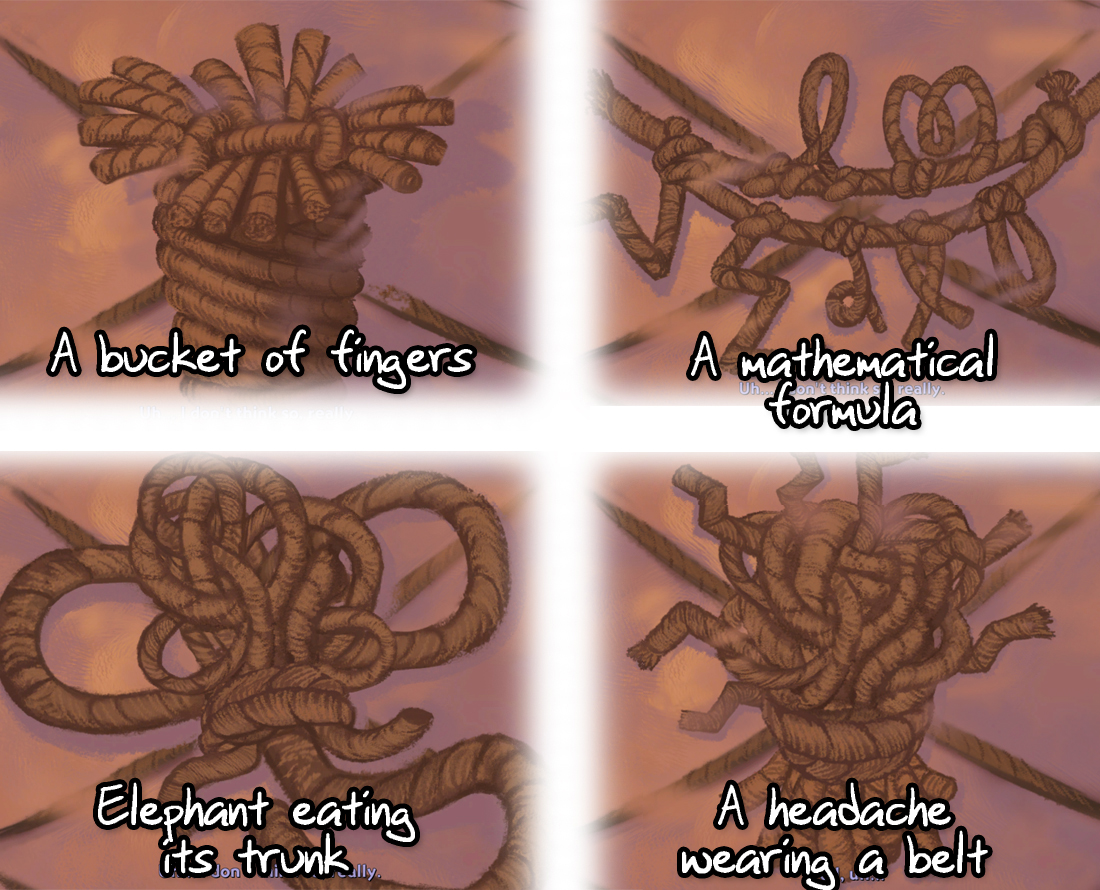
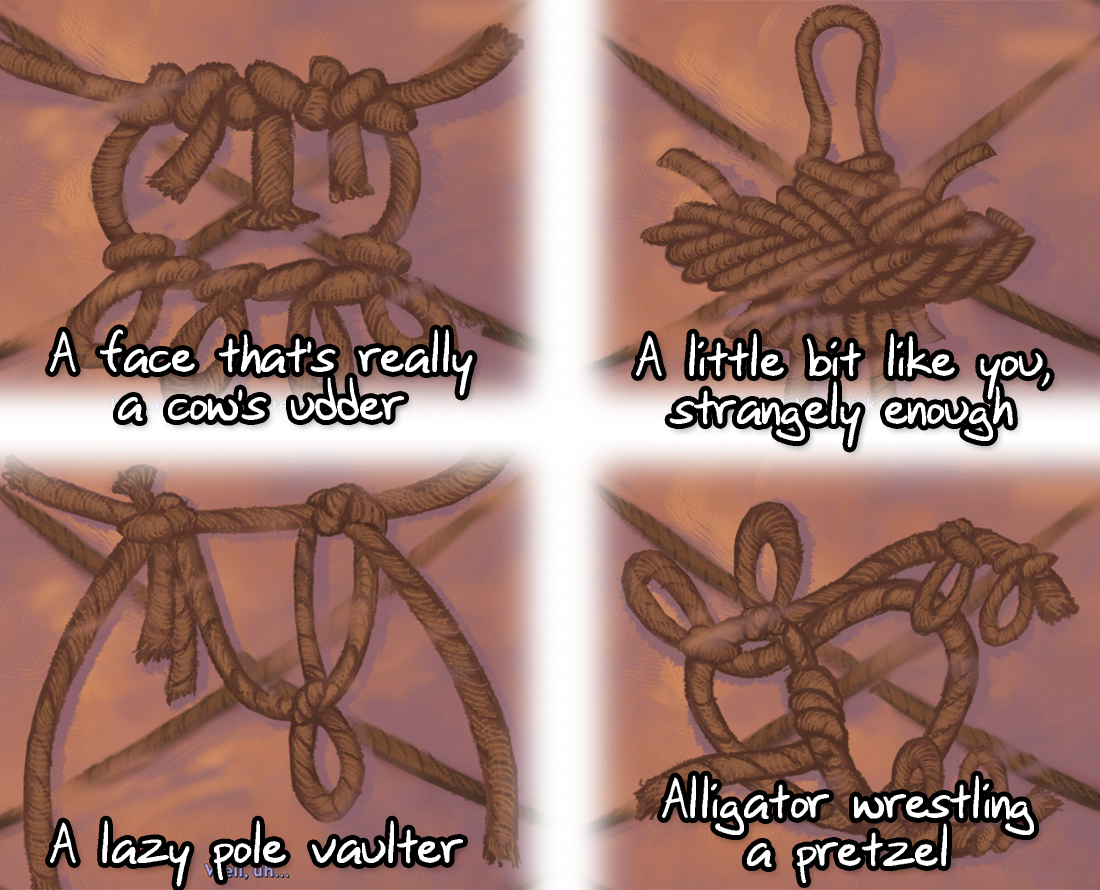
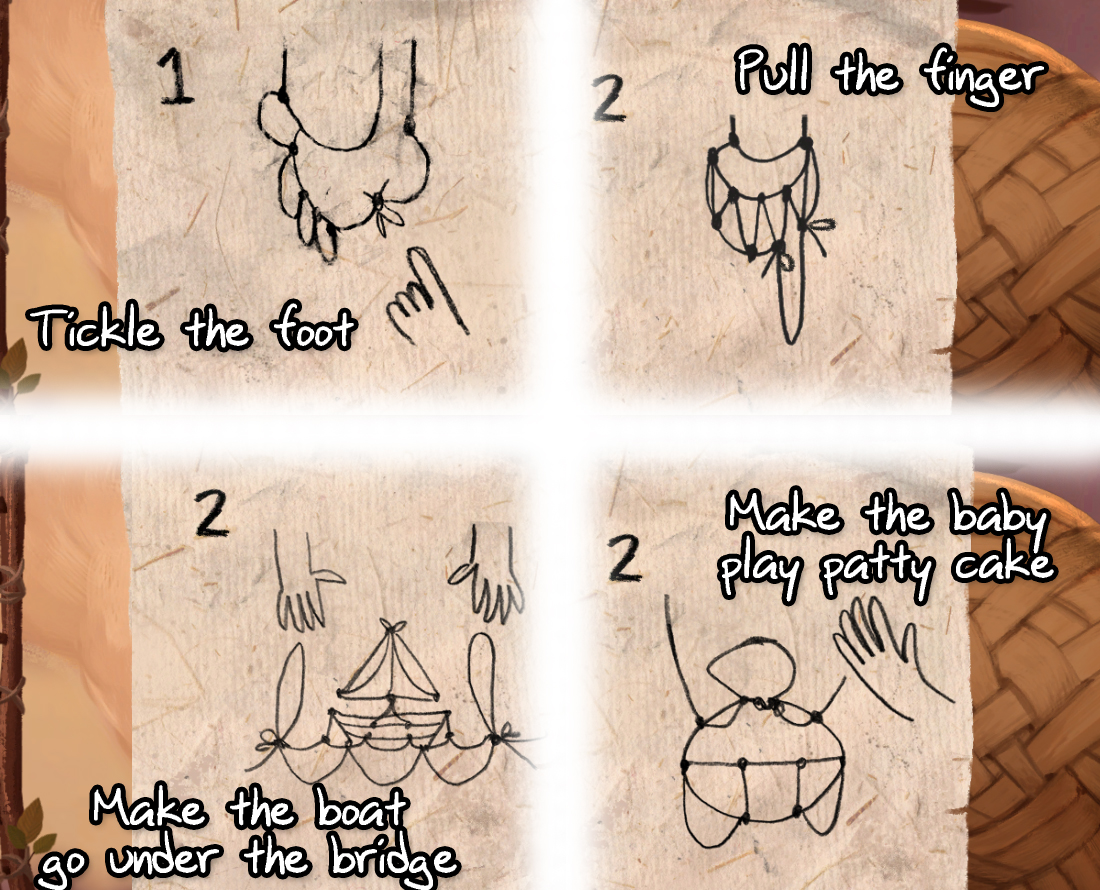
Knot Meanings
If you're having trouble with figuring out the meaning of the knots here are the pictures and their meanings;
S6 - Electronic Genius
Electronic Genius
required prerequisites;
-Heavy Duty AGT Unit obtained
-Vella's Control Room Puzzle
  • Head to the Talking Tree
  • Talk to the Talking Tree
  • Make a tree pun, this is buried in a randomize set of choices
  • Answers; There's a few possible answers, here are the ones I've found so far
    1. 'What's the smallest full-grown tree you ever heard of?' > 'I've seen one no bigger than my hand.' > 'A Palm Tree.'
    2. 'Did you hear about the First National Tree Bank' > 'It closed down' > 'Don't worry. It just started another branch.'
    3. 'Do you know Ol'Pete the Pine Tree?' > 'Well, I hear he got in some really big trouble.' > 'It seems he was being... really knotty.' (thanks to Katjastrophic in comments)

  • Grab the item that has dropped from the Talking Tree
  • Head to the Shellmount Beach
  • Give that item from the Talking Tree to the Fisher Lady
  • Give the Fisher Lady the crochet hook
  • Obtain the metal wire
Wiring your Robot
  • If you don't have the broken bot, pick it up at Shellmount near the stairs to Deadman Pyramid.
  • Head east into the Deadeye Pyramid
  • Use the metal wire on the hexagon robot
  • Vella's Clue: Follow the instructions for the wiring from family photo in the Command Room on Vella side of the game. Each symbol is associated to a node.
  • Use the charging station at the Deadeye Pyramid to see the symbols. The direction of how the wires flow and the order of the colors connected matters.
  • Solution is Randomized - see footnote for more details
    Solving Wiring Puzzle with Charging Station
  • After wiring the three connections, place it into the glowing blue socket left of the ship.
  • Obtain the Electronic Genius
Part 1b - Vella Puzzles
These are first puzzles you can complete in the order of appearance for Vella.
Please keep in mind these two general ideas while following this walkthrough
  • Since I'm avoiding story spoilers I'm not quoting all the key dialogs you have to pick, unless if it is necessary. I'm assuming you as the player are conversing with the NPCs fully along the way.
  • For the most part, it has to be done in order due to key elements of the puzzles being locked behind other puzzles.

Getting into the Airlock Door
Getting into the Control Room
Repairing Broken Locks
Readying the Payload
Setup Navigation
V1 - Getting into the Airlock Door
Opening the Airlock Door
  • Pick up the knife and head right
  • Remove the glass space helmet from the crack
  • Use the knife to cut the bottom half the hose tube hanging from the Airlock Door
  • Use the hose to connect the venting tubes, could be either set of venting tubes.
  • The Solution to this puzzle is randomized, connecting them will make one of three different platforms to pop out. A upper one, a middle one, and lower one.
  • Connect the venting tubes until the middle platform open, that is just above Vella's head height, and reachable.
  • While tubes are connected, Climb up the hanging tubing, and cut the torn tube
  • Grab the longer hose that you've just cut.
  • This puzzle solution is randomized, connect one end to the open vent left on one of the sets, and connect the other end to one of the three open vent on the other set.
  • Airlock Door is now unlocked
Getting into the Airlock Door
  • Use the space helmet on the small yellow arm, this requires timing
  • Use the yellow arm on the boot right of Vella, wait for Giant arm to close, this requires timing
  • Used the combined boot & yellow arm item on the Giant arm
  • Head into the open Airlock Door
V2 - Getting into the Control Room
Getting into the Control Room
sorta...required prerequisites - Shay solves the Choking Hazard
  • Keep heading left until you find a person
  • Talk to the person and have him unlock the door
  • Go through the unlocked door.
  • Use the teleporters to enlarge Vella's head, this is done twice.
    (This might be randomized, but for me it was)
    Teleporting into the Achievement Room enlarges
    Teleporting from the Starboard Hallway to the Nexus enlarges
  • Assuming you're standing at the first teleporter still, enter it
  • While in the Achievement Room memorize everything you can click inside it
  • From the Achievement Room, walk left towards the Fake Control Room, do not use the teleport you came from
  • From the Fake Control Room, walk right towards the Airlock
  • At the next room, Starboard Hallway, use the teleport next to the trash shoot.
  • Now your head should be the largest size.
  • Head to the locked Control Room, this is left of the Fake Control Room, and answer the questions prompted.
  • Answers; __________________
    1. Mister Huggy -- hints are the photograph, and Shay's talking with the python
    2. Please, can we not do this? -- hints are from Act 1 Shay's opening scene...
    3. Purple Polkadot Size 4 boots -- solution is at the Achievement Room
      Possible that the Shoe Solution above is randomized, but clues are the same
    ___________________

  • Control Room unlocks
V3 - Repairing Broken Locks
Repairing Broken Locks
  • Use the monitoring system to control systems around the ship.
  • Click to go right and head all towards the Airlock Door hallway
  • Lure the maintenance bot by breaking stuff
  • Make sure the doors are unlock so bot can pass freely
  • Click on all the energy icons and asterisks looking icons that appears up in order of right to left
  • New clickable energy icons will appear up as you click them, so keep an eye on them as they pop up
  • In kitchen / dining room keep clicking on the hexagon to change the display and call down the arm.
    You want the display to say 'taco pill tuesdays'
  • Resume luring the bot to the Broken Lock
V4 - Readying the Payload
Readying the Payload
Icecream Helmet
  • If you haven't unlocked the rooms, head back to the monitoring system to do so.
  • Head to the icecream room
  • Put on your shoes, you might have to walk further right to put the shoes on
  • Use the helmet on the icecream on top, where the puppets are
  • go to the Reactor Room
  • shove the reactor into the icecream helmet
Opening the Trash shoot
  • blockade the hallway infront of the icecream room with the large blue sliding debris
  • head back to Control Room
  • use monitoring system and view the kitchen / dining room
  • call down the robot arm for cereal, then hit the pause icon
  • exit the monitoring system and walk to the kitchen / dining room
  • shake the cereal box
  • follow the bot, and use the first teleporter you see along the way, which is at the Fake Control Room
  • teleport to the airlock side of the ship
  • catch up to the bot and stop the bot, obtain cereal
  • put the icecream helmet reactor down the trash shoot
V5 - Setup Navigation
Setup Navigation
sorta...required prerequisites - Shay solves the Choking Hazard
Decoy Puppet and Thread
  • head back to control room
  • pick up the fork, if you haven't already
  • use monitoring system and view shay's room
  • use the robot arms to move the rock on the bed
  • unlock the rooms you see while using the monitoring system, if you haven't already done so
  • exit the monitoring system
  • go to the kitchen / dining room
  • pick up the puppet
  • go to the icecream room
  • use the puppet on the whipcream spray
  • go to the train room
  • use the puppet on the traincrew
  • do the wave
  • use the fork on the string
Starchart Destination
  • go to the den where M sleeps, via Achievement Room
  • mess with the exposed wires
  • give cereal to get the hook
  • mess with the exposed wires, again
  • go to the room where M was, via Shay's Room
    note: M will come back if you take too long getting there
  • hit the button on the console to lock the door
  • grab the starchart tablet
  • go to the weaver
  • use the fork string combined item on the weaver
  • give the starchart to the weaver
  • go down the ladder and modify the starchart according to the Shay's clue
  • Shay's Clue: go to Shay's mode, with the flute, ask Alex at the Deadeye Pyramid to play the song
  • Answer: if you're viewing the chart as sheet music, then it's middle, middle, top, bottom, middle.
Part 2 - Flip Flop
As you've probably realized by now that the puzzle requires you to flip flop between Shay and Vella in order to solve them. For Part 2 it is one large puzzle which was designed so that both puzzles to be performed and solved in the correct order, well... sorta.

Solving Wiring Puzzle with Charging Station
The shapes given from the charging station are associated with the order and position the wires are connected on the hexipal. Meaning, each wire is a vector, it flows from the first point of connection to the second point.

The puzzle for wiring in this game might be randomized,
Harp pattern
- in a book in on Shay's side, the first room below
Hazard pattern
- obtained after solving Vella's puzzle, find the bot back in front of the command room waving the flashlight. Memorize the vector pattern behind that bot.

Setup Final Puzzle - Part 1
Start off with Shay mode
  • have Shay use his Grabbing Gary remote

Go to Vella mode
  • go out to the Fake Control Room
  • have Vella use her Laser remote

Back to Shay
  • go through the door
  • read the book in this first room and memorize the Harp symbols
  • head to right, to the music room
  • pick up the broken radio
  • head back up and give the broken radio to the dancing bot
    (you can also memorize the dancing wire pattern for fun)
  • give the radio to Alex (optional)
  • set Shay's bot to a Harp bot, see footnote for more details
    Solving Wiring Puzzle with Charging Station
  • lure the old bots by showing them Shay's bot
  • then have Shay's bot play the harp to distract them
  • go back left and grab the stuff behind the old bots
  • head left more to flip back on the power switch
  • then go solve Vella's puzzle

Back to Vella's puzzle
  • grab Vella's bot in the hallway
  • go to left towards M's room, down into the vent of Shay's room
  • grab the wires on the console
  • use the wires on the bot and set it to a Harp bot
  • go to the weaver, and climb below
  • set Vella's Harp bot at the weaver's cloth
  • go back to Control Room, and flip switch to Manual
  • then go back to Shay's puzzle

Back to Shay
  • Move Shay back up to the top floor if he isn't there already
  • Use the grab controller item, you might also have to head back down if nothing happens
  • Wait for cutscene to appear that it fails, then head back to Vella for the clue

Setup Final Puzzle - Part 2
Back to Vella
After Shay turns on the grabbers, and it is deactivated, the puzzle is reset on Vella's side
  • You'll find the connection Hazard pattern now on the bot outside of the Control Room hallway.
  • Note or memorize the Hazard pattern
  • Re-wire the bot back to Harp pattern
  • Place the Harp bot back at the weave again.
  • Go back to the Control Room and hit the switch for Manual controls.
  • Head outside back to the Fake Control Room to position yourself for the final phase.

Back to Shay
While in Shay mode, change Shay's bot to a Hazard pattern (see above underlined clue)
  • Combine the hammer with the Shay's bot
  • Put Shay's bot next to the drum
  • Make sure Alex is fighting with the Hazard drum bot
  • Make sure the power is still flipped on at the switch room, this is the room all the way to the left in the basement.
  • Head back upstairs to position yourself for the final phase

Final Phase
Go to Vella mode,
Ensure that both setups are correct again, otherwise you'll have set it up again
  1. that is Vella's Harp bot at the weaver,
  2. manual is on at control room
  3. and Vella is positioned at the fake control room
After you confirm everything is ready, head back to Shay's mode.

At Shay's mode
Ensure that both setups are correct again, otherwise you'll have set it up again
  1. that is Shay's Harzard bot at the drum with Alex
  2. power switch is on at switch room
  3. and Shay is positioned at the control room

Have Shay use the grab controller item.
If successful then go Vella's side, and have Vella use her laser controller item.

Otherwise, set up again, and try again.
footnote - Solving Wiring Puzzle with Charging Station
Solving Wiring Puzzle with Charging Station
The solutions for wiring puzzles in this game are randomized.
When wiring your hexipal bot, each node you're connecting has a hidden symbol associated with it.
It is NOT shown on the bot itself, but from charging station.

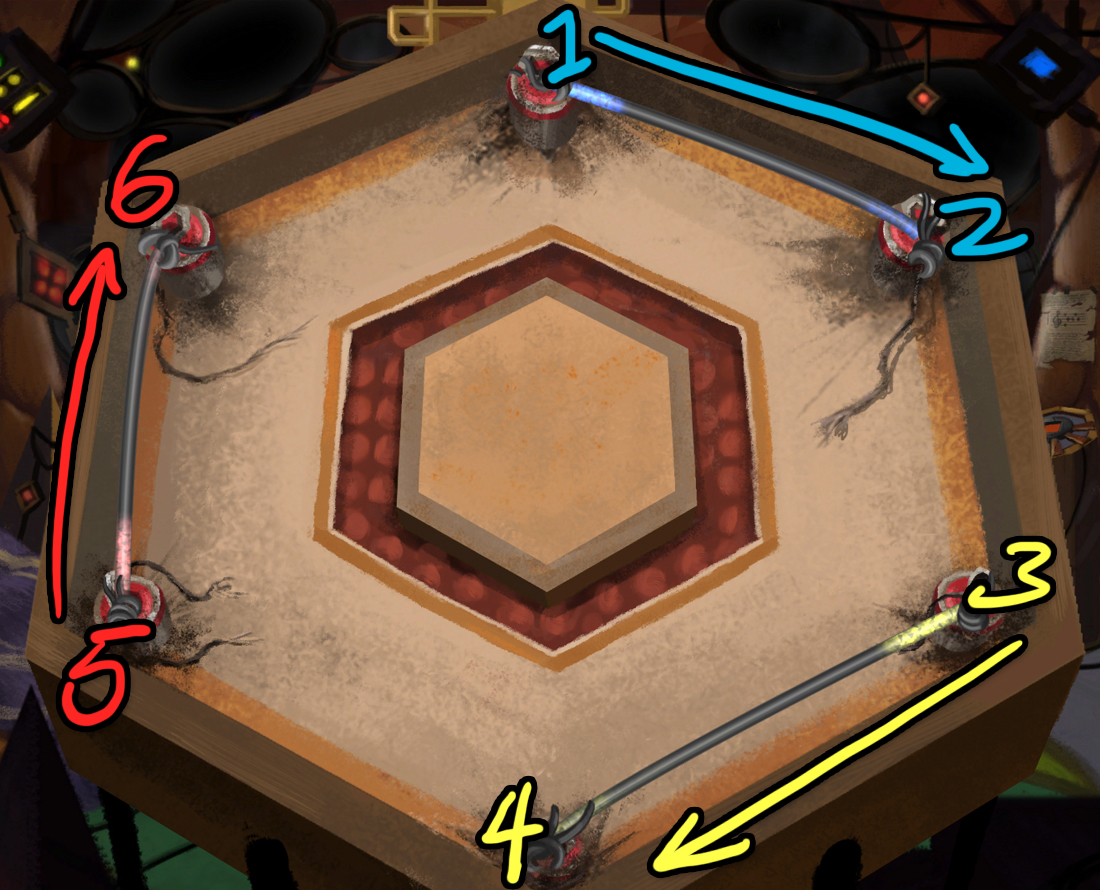
Such as if you wire your bot as depicted in the picture below;
The associated nodes going clockwise
solid up & down triangle is the node #1,
solid up triangle segmented twice is node #2,
solid down triangle is node #3,
hollow down triangle is node #4,
solid left & right triangle is the node #5,
solid up triangle segmented thrice is node #6.


Picture on the left is sample connection. It is wired as such
  1. Node #1 to #2 (blue)
  2. Node #3 to #4 (yellow)
  3. Node #5 to #6 (red)
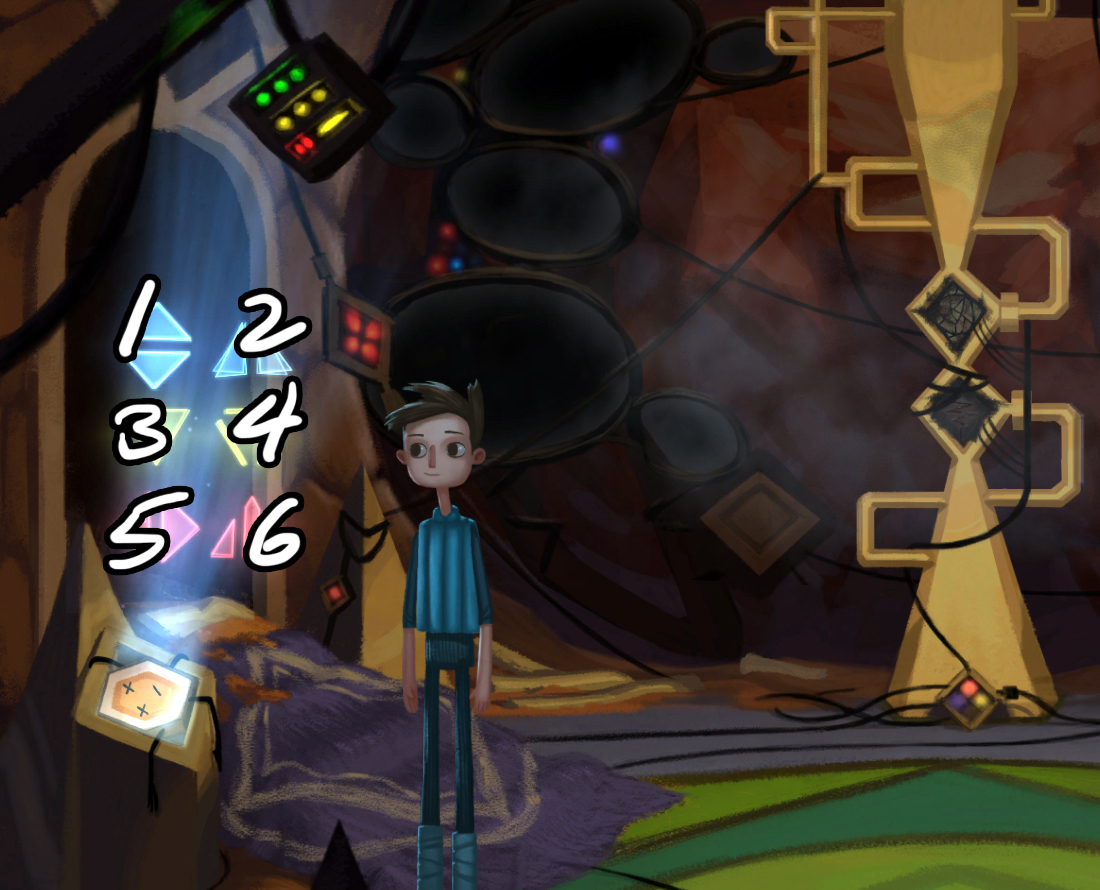
Then you deduce from the picture on the right, which symbol is associated to which node. Again, since the associated nodes on the bot are shuffled each playthrough, your hologram display might not look like this screenshot.

To figure the shapes associated place it in the charging station, begin reading the symbols from top to bottom, left to right. It will be associated to the nodes beginning from #1. That is assuming you've wired it the same way in the picture.

1
2
3
4
5
6

Spolier;

What you want to show up on the charging station is the symbols in this order, read from left to right;
  1. hollow down triangle
  2. solid up & down triangle
  3. solid left & right triangle
  4. solid up triangle segmented thrice
  5. solid down triangle
  6. solid up triangle segmented twice
While the photograph you find in-game with the 'symbols on the blackboard' for the solution is static, the symbols associated on the bot are different each playthrough.

So, if you're going by the screenshot picture above, then the correct wiring would be;
  1. Node #4 to #1 (blue)
  2. Node #5 to #6 (yellow)
  3. Node #3 to #2 (red)
Again, this is not going to always your solution, as the associated nodes are shuffled on the bot each playthrough.
43 Comments
SpicyBeats3435 4 Jan, 2019 @ 2:17pm 
help :SBpenguin: wire is too hard
Leezeebub 16 Jul, 2017 @ 12:08pm 
The wire puzzle its fucking tedious. Any game that makes you write things down IRL and then has you going back and forth, rewiring some shitty little robot over and over again is just irritating... ive wired the bots up a bunch on times now but have to redo the whole things again because i went away for a few hours and forgot the wiring for the tickle bot... if ive wired it up before just let me select which setup i want from a list.
Im going to have to undo what I did with the hammer bot and use the charging station again just to re-solve the same puzzle i did earlier. Not fun...
Katjastrophic 27 Dec, 2016 @ 4:40pm 
Found another working tree joke: 1. Say, do you know Ol'Pete the Pine Tree? 2. Well, I hear he got in some really big trouble. 3. It seems he was being... really knotty.
Uncle-Reagan 17 May, 2016 @ 1:49pm 
I stopped playing this game for 4 months because of the wire puzzle.:facepunch:
Lolling_Chris 1 May, 2016 @ 6:43am 
Jesus christ, ACT2's puzzle is so hard
ike  [author] 14 Apr, 2016 @ 10:32am 
@JordyT You want to read over section "Part 2 - Flip Flop" and under that "Solving Wiring Puzzle with Charging Station" will go over what you need for wiring the two hexipal
Penwoopydo 10 Apr, 2016 @ 10:06pm 
How do I find out what symbols are on Vella's Hexipal?
Penwoopydo 9 Apr, 2016 @ 5:16am 
After I use the enginer, do I have to wait, or do the Vella stuff?
ike  [author] 10 Feb, 2016 @ 1:27am 
@getmemedon I'm sorry, I know it's a bit hard to read my horrible explaination. Gonna try to clean it up a bit.
Redrevolter 9 Feb, 2016 @ 5:46am 
I still don't understand the wiring puzzle...