Borderlands 3

Borderlands 3

46 ratings
"Swamped" Achievement: Eden-6 Named Locations
By DALCOhstangultion
This guide lists and maps all 63 named locations on Eden-6 in Borderlands 3. I produced it because the game currently tends to refuse giving the "Swamped" Achievement for finding all of Eden-6's locations. This is happening even though a person's Eden-6 planetary map lists all 63 out of 63 named locations found and each of the individual Eden-6 local maps also shows all named locations found. It's an attempt to make retracing tracks through that world a bit easier.
   
Award
Favorite
Favorited
Unfavorite
Introduction
Swamped:
Discover all named locations on Eden-6.

Objective:
I've seen many posts that the "Swamped" Achievement in Borderlands 3 is bugged and is not getting awarded even though Eden-6's Planet Progress statistics show 63/63 named locations found. Because of this, many people are having to revisit all 63 locations in an attempt to get the Achievement to pop. I've done my best to design this guide to help those people revisit all those name locations and get the Achievement. Of course, people who just need a bit of help here and there with the Achievement can use it too.

Important Note:
  • As I write this, it looks like Borderlands 3 is resetting the "discovered" status of all named locations when the player visits Sanctuary or quits the game (either to the main game menu or entirely). So, if you're trying to get the Achievement, you'll need to revisit all 63 locations in one session (and don't go to Sanctuary in the middle of things).
  • Also, if you've finished the game at least once and are going through just to get the Achievement, I highly recommend you turn Mayhem Mode off (either in Sanctuary or from your character's menu). That will drop enemies back down to the normal area level caps instead of bringing them up to yours. IOW, running straight through the enemies instead of fighting them will be much easier.

References:
If you want a slightly different look at Eden-6's named locations, I recommend Powerpyx's work at:

https://www.powerpyx.com/borderlands-3-eden-6-all-named-locations/

The maps I'm using are from:

https://mapgenie.io/borderlands-3/maps/eden-6

I definitely recommend that site since you can interact with the maps and customize them in many ways. Note that some of the location markers are incorrect on my screenshots. I have no control over their placement, but will try to mention it when I can. Also, in the material below, I'll refer to the cardinal directions as north, east, south and west as they appear on those screenshots. AFAIK, our main maps in the game don't indicate cardinal directions (though the mini-map does show "N" for north).

Be warned that this guide contains major spoilers since it shows every named location on Eden-6 and what the maps look like.

Also, in case you're using a 21:9 resolution (as I do) and can't see the full legends/instructions on the maps, you can find your total number of found named locations on Eden-6 by doing the following:
  1. Hit "M" to bring up the local map
  2. Hit "X" until you get to the Galaxy map
  3. Select Eden-6
  4. Hit "R" to bring up the Planet Progress statistics.
You can also hit "R" on any of your other maps to see that map's Progress statistics.

Eden-6's Zones:
There are 7 zones listed on Eden-6's planetary map in Borderlands 3. In the order they show up in my map, they are:
  1. Floodmoor Basin (15 named locations)
  2. The Anvil (7 named locations)
  3. Jakobs Estate (10 named locations)
  4. Voracious Canopy (11 named locations)
  5. Ambermire (10 named locations)
  6. Blackbarrel Cellars (8 named locations)
  7. The Floating Tomb (2 named locations)

Though that order is what the game shows me, it might not be the best order to try going back through to get the Achievement. But, I'll try to note any difficulties below. I've ordered the sections below the same way. Also, I've ordered the named locations in those areas in my best guess at a good way to run through the area and visit all of them. In general, I'm assuming the best starting point is a Fast Travel location near a Catch-A-Ride.

Also, it looks like Floodmoor Basin is the only map on Eden-6 that the game remembers the Discovered status of named locations. So, if you're sure you've already discovered all the named locations here, you might be able to save a few minutes by deferring this map until after you've tried all the rest.
Floodmoor Basin (15 named locations)
The 15 named locations in Floodmoor Basin are:
  1. Reliance
  2. Lumberhold
  3. The Timbermills

  4. Dead Man’s March
  5. Primeval Grotto
  6. Jason Waterfalls (should be against "Do Not Go" sign by waterfall)

  7. Hangman’s Garden
  8. Slickhouse Garage
  9. Mudhaven
  10. Lonesome Isle (you have to jump three ramps to get to the top of this)
  11. Lumberton Junction
  12. Fort Sunshine

  13. Knotty Peak
  14. Headlift
  15. The Witch’s Peat
I've artificially broken the list up by Fast Travel just because it's so long. There are three Fast Travel locations on the map. I'm starting by Fast Traveling to Reliance since its Catch-A-Ride is the closest. Grab a vehicle from the Catch-A-Ride and go forward into the town to get Reliance. Drive out the right town opening and follow the tracks right across the main road for Lumberhold. Get out of the vehicle, climb the ladders and go towards the center of the town for The Timbermills. Fast Travel directly back to the vehicle.

Head back to down to the main road and turn left. Follow it all the way north towards The Anvil transition. You should get Dead Man's March by the Catch-A-Ride just before it. Get out of the vehicle and head into the town just to the left of the Catch-A-Ride. Travel through the town staying to the right and you'll get Primeval Grotto and Jason Waterfalls (just past the Eridian Writing right at the "Do Not Go" sign in the waterfalls - you might have to move around a bit). Fast Travel back to Reliance.

Grab another vehicle, but leave town via the left exit. On the right, at the path/town entrance that leads to Ambermire, get out of the car and enter the area. That should bet you Hangman's Garden. Get back in your vehicle, take it directly back and over the cliff. Just to the left will be the shack where you got the "Get Quick, Slick" side quest. Enter that and you should get Slickhouse Garage. Drive directly across, get out of your car and enter the town. That will give you Mudhaven. Return to your vehicle and take it across the map to the northeast. There's a house on top of an island mesa that you had to jump to during the Get Quick Slick side quest. You'll need to repeat that jump of three ramps in your vehicle to get there. Once up there, you should get Lonesome Isle. Drive off the island and head to the northwest. There will be a Catch-A-Ride and a compound with the sign "Building 5" on it. Enter that area and you should get Lumberton Junction. Get back in your vehicle, go back and around to the right. Follow that road until you run into the door of Fort Sunshine. That should get you that location.

Fast Travel to Knotty Peak and you should get the Knotty Peak location. Go directly across to the elevator and take it down. As you reach the bottom, you'll get Headlift. Grabl a vehicle, head down the road, and at the first "dock" on the left, get out of the car and run back towards the back of the area. That should get your The Witch's Peat.

Note: it looks like Floodmoor Basin is the only map on Eden-6 that the game remembers the Discovered status of named locations. So, if you're sure you've already discovered all the named locations here, you might be able to save a few minutes by deferring this map until after you've tried all the rest.
The Anvil (7 named locations)
The 7 named locations in The Anvil are:
  1. Hector’s Lament
  2. West of Gross
  3. The Yard
  4. The Devil’s Saucepan
  5. Shankland
  6. Central Security
  7. Ultramax Spire
The Fast Travel location for The Anvil is at the far southern tip of the map. Run forward to the second open area and you should get Hector's Lament. Jump up to the sewer outflow on the left wall and enter the area behind it to get West of Gross. Head back out and continue through the area to the open area beyond where Tina was based. That will give you The Yard. Go to the northwest past the Crimson Radio antenna and into the corridors. Follow them to the end area where you fought the Sky Bullies and you should get The Devil's Saucepan. Head back down the entry corridor and take the turn to the south. Enter the area, loop around to the left, turn right and cross the bridge. As you enter the opposite room, you should get Shankland. Return to The Yard and enter the building to the north. That gets you Central Security. Turn around back to The Yard and go towards the far northeast peninsula on your left. Before you get to that area's Crimson Radio antenna, you should get Ultramax Spire.
Jakobs Estate (10 named locations)
The 10 named locations in Jakobs Estate are:
  1. Leery Hamlet
  2. Unhallowed Bog
  3. Grotto
  4. Servant’s Lift
  5. Jakobs Manor (press button on lift to get there)
  6. Welcoming Chamber
  7. Archives
  8. Ancestor’s Hall
  9. Theater
  10. Monty’s Den
The Fast Travel location is at the southeast corner of the map. From there, head northwest past Murl into the swamp for Leery Hamlet. Take the boardwalk to the back and continue north and then east. As the area opens up, you should get Unhallowed Bog. Retrace you tracks to just before Leery Hamlet again, but take the bridge to the right. As the path into the cave it enters forks, you should get Grotto. Turn around and head back into Leery Hamlet. This time, go north up some stairs, around a house and across a bridge. Continue on that path across two more footbridges and as it opens out, you should get Servant's Lift. On the other side of the building there, push a button to call the lift and ride it upwards to the north. Go through the gates and you should get Jakobs Manor. Enter the manor and you should get Welcoming Chamber. Getting to the remaining four locations is a bit twisty turny, but you can't miss them. Go up the stairs and to the right. Continue to the back, turn right then open a door on the left out to a porch-like area and loop around the the right. Go down the stairs, turn left, and continue to the Archives. Go straight across one floor up, then go right to the Ancestor's Hall. Continue straight through then turn right and left to the Theater. Get up on the stage, drop into the hole on the stage, crouch walk through the low hole in the wall and you'll be in Monty's Den.
Voracious Canopy (11 named locations)
The 11 named locations in Voracious Canopy are:
  1. The Green Labyrinth
  2. Science Outpost
  3. The Terradome
  4. Kingdom of Bobo the Great

  5. Wreck of the Family Jewel
  6. Outer Hull
  7. Cargo Hold
  8. Distribution Corridor
  9. Security Bay
  10. Private Shuttle Bay
  11. Bridge of the Jewel
The Fast Travel location is in the middle of the map at the far west end. From there, run out to the open area and you should get The Green Labyrinth. At this point, you could choose one of two routes through the area. I chose to go straight for a bit and then head northeast following the path to the Science Outpost (you have to make a little jog to the left by the Keep Out sign to get the location to pop) and, just beyond it, The Terradome. From there, go out the other exit to the northwest and continue until you get to the Kingdom of Bobo the Great. That should pop as you curve around to the right and jump up onto a wooden deck. Then Fast Travel back to the spawn point. Again, run out to The Green Labyrinth. But, this time continue southeast until you get to the water at the bottom and the Wreck of the Family Jewel. The remaining route is twisty, but you should get the remaining six locations as you go. You should get Outer Hull as you enter the ship. Then Cargo Hull is an open area where there's a bunch of Ravagers. Then up a ramp and along a corridor until Distribution Corridor pops. Continue on and just to the right of a save location is an open area which is the Security Bay. You might have to move around that room to get the location to pop. I had to go the right hand wall as I entered. The first time through, I just ran from the entry door diagonally across to the exit door and didn't get the location. From there, continue on forward (and usually to the right) until you get to the Private Shuttle Bay. Continue out the other side and you'll eventually get to the Bridge of the Jewel (which popped just before dropping down into the actual bridge).
Ambermire (10 named locations)
The 10 named locations in Ambermire are:
  1. Ambermire
  2. Curltail Warren (have to have accepted/finished the Raiders of the Lost Rock side mission from Claptrap in Sanctuary for door to be open)
  3. Delvin’s Dock

  4. The Mudneck’s Hideout
  5. Tig’s Big Rig
  6. Mirefall Rigs

  7. Rogue’s Hollow
  8. The Moist Hoist
  9. Soggybog Rigs
  10. Highground Folly
There are two Fast Travel locations in Ambermire, but no Catch-A-Rides. So, I chose to start at the plain old Ambermire one in the northeast corner of the map. There's no obvious path through the area, so feel free to choose one different from what I took.

From the Fast Travel location head south and jump down past the vending machines. You should get Ambermire there. Continue south to the peninsula that juts out to the left about halfway down the map. You'll need to jump down from some "docks" near a "Keep Clear" sign and go left towards that peninsula. Go near its end and you should gett Curltail Warren. Go back to where you jumped down, turn left and jump down from the little waterfall. Bear left and continue south to near the bottom of the map. You should get Delvin's Dock right by a big, rotating drill. From there, switch to a westerly, then northwesterly direction.

From Delvin's Dock, head west through the town until the area opens up. There's an obvious path to the north. But a more direct route is to ignore that and jump up the small cliff just west of it and continue northwest. Somewhere around a big cage in the middle of the path (I had to move around a bit to find it), you should get The Mudneck's Hideout. Continue a bit farther and you should get Tig's Big Rig near a big drill. Leave the town to the north and cross the water to the northwest. As you enter the concrete tunnel over there, you should get Mirefall Rigs. Fast Travel to Rogue's Hollow.

From the Fast Travel location at Rogue's Hollow, enter the control room and you should get the Rogue's Hollow location. Turn around an leave the Fast Travel location down some stairs to the north. Follow the path and take the first exit to the left. As you approach that, you should get The Moist Hoist. Head westerly until your at some stairs south of the Crimson Radio Antenna. Go up those stairs and follow the path and you should get Soggybog Rigs. Continue on a bit, turn right and you should see a lift going up. Take it, continue past the vending machines, and you should get Highground Folly.
Blackbarrel Cellars (8 named locations)
The 8 named locations in Blackbarrel Cellars are:
  1. Premium Casks
  2. Norton’s Study
  3. Gunpowder Mill

  4. Forgotten Halls
  5. Copperstill
  6. Estate Gardens

  7. Observatory Grotto
  8. Neglected Solarium
The Fast Travel location is at the southeast part of the map. It's a straightforward path to get the locations. Head south past the vending machines near the Fast Travel location. Then head straight west from room to room to get Premium Casks (before first stairs), Norton's Study and Gunpowder Mill (just after opening a set of doors). From there, you'll head along a conveyor belt to the east for Forgotten Halls (at the end of the belt), then continue north to the hole in the floor where you fight Aurelia (that's Copperstill). Go out the door to the north and you'll get Estate Gardens. Go all the way to the north of the gardens and you can choose your direction. Go left (west) for Observatory Grotto and right (east) for Neglected Solarium (you'll have to open a set of doors).
The Floating Tomb (2 named locations)
The 2 named locations in The Floating Tomb are:
  1. Altar of the Guardians
  2. Vault of the Graveward (in the Vault after beating the Guardian)
This one's easy-peasy. You'll get Altar of the Guardians as you Fast Travel into The Floating Tomb. Jump down into the arena where you fight the Guardian, Graveward. Note that the Vault of the Graveward location marker is wrong. You get that after beating the guardian and entering the Vault.
Text List of Eden-6 Named Locations
In case anyone wants a text list of just the named locations to print out (as a checklist), I'll put this here:

Eden-6:
The 15 named locations in Floodmoor Basin are:
  1. Reliance
  2. Lumberhold
  3. The Timbermills

  4. Dead Man’s March
  5. Primeval Grotto
  6. Jason Waterfalls (should be against "Do Not Go" sign by waterfall)

  7. Hangman’s Garden
  8. Slickhouse Garage
  9. Mudhaven
  10. Lonesome Isle (you have to jump three ramps to get to the top of this)
  11. Lumberton Junction
  12. Fort Sunshine

  13. Knotty Peak
  14. Headlift
  15. The Witch’s Peat
The 7 named locations in The Anvil are:
  1. Hector’s Lament
  2. West of Gross
  3. The Yard
  4. The Devil’s Saucepan
  5. Shankland
  6. Central Security
  7. Ultramax Spire
The 10 named locations in Jakobs Estate are:
  1. Leery Hamlet
  2. Unhallowed Bog
  3. Grotto
  4. Servant’s Lift
  5. Jakobs Manor (press button on lift to get there)
  6. Welcoming Chamber
  7. Archives
  8. Ancestor’s Hall
  9. Theater
  10. Monty’s Den
The 11 named locations in Voracious Canopy are:
  1. The Green Labyrinth
  2. Science Outpost
  3. The Terradome
  4. Kingdom of Bobo the Great

  5. Wreck of the Family Jewel
  6. Outer Hull
  7. Cargo Hold
  8. Distribution Corridor
  9. Security Bay
  10. Private Shuttle Bay
  11. Bridge of the Jewel
The 10 named locations in Ambermire are:
  1. Ambermire
  2. Curltail Warren (have to have accepted/finished the Raiders of the Lost Rock side mission from Claptrap in Sanctuary for door to be open)
  3. Delvin’s Dock

  4. The Mudneck’s Hideout
  5. Tig’s Big Rig
  6. Mirefall Rigs

  7. Rogue’s Hollow
  8. The Moist Hoist
  9. Soggybog Rigs
  10. Highground Folly
The 8 named locations in Blackbarrel Cellars are:
  1. Premium Casks
  2. Norton’s Study
  3. Gunpowder Mill

  4. Forgotten Halls
  5. Copperstill
  6. Estate Gardens

  7. Observatory Grotto
  8. Neglected Solarium
The 2 named locations in The Floating Tomb are:
  1. Altar of the Guardians
  2. Vault of the Graveward (in the Vault after beating the Guardian)
11 Comments
[S] Kodama 15 Mar @ 10:40am 
I know I am almost 5 years late and this could have been mentioned before but last location that was giving me an issue for Eden 6 achievement for me was Jason Waterfalls next to Eridian Writing which you need to walk in it.
Xanadu 25 Jun, 2020 @ 11:19am 
I was able to get the promethea one just fine, not this one though
DALCOhstangultion  [author] 25 Jun, 2020 @ 11:09am 
A bit over a month ago, the developers broke general Achievements for a good segment of the community. You might be getting bit by that. Have you been able to get ANY Achievements lately?
Xanadu 25 Jun, 2020 @ 10:33am 
Ive done this twice and it hasnt worked sadly, anyone else had any luck recently?
CyPHeR369 6 Jun, 2020 @ 9:12pm 
Great guide, this chivo was drivin me crazy. :happy_creep:
Mr. X 31 May, 2020 @ 6:02pm 
I have Master Of All You Survey - Discover ALL named locations.
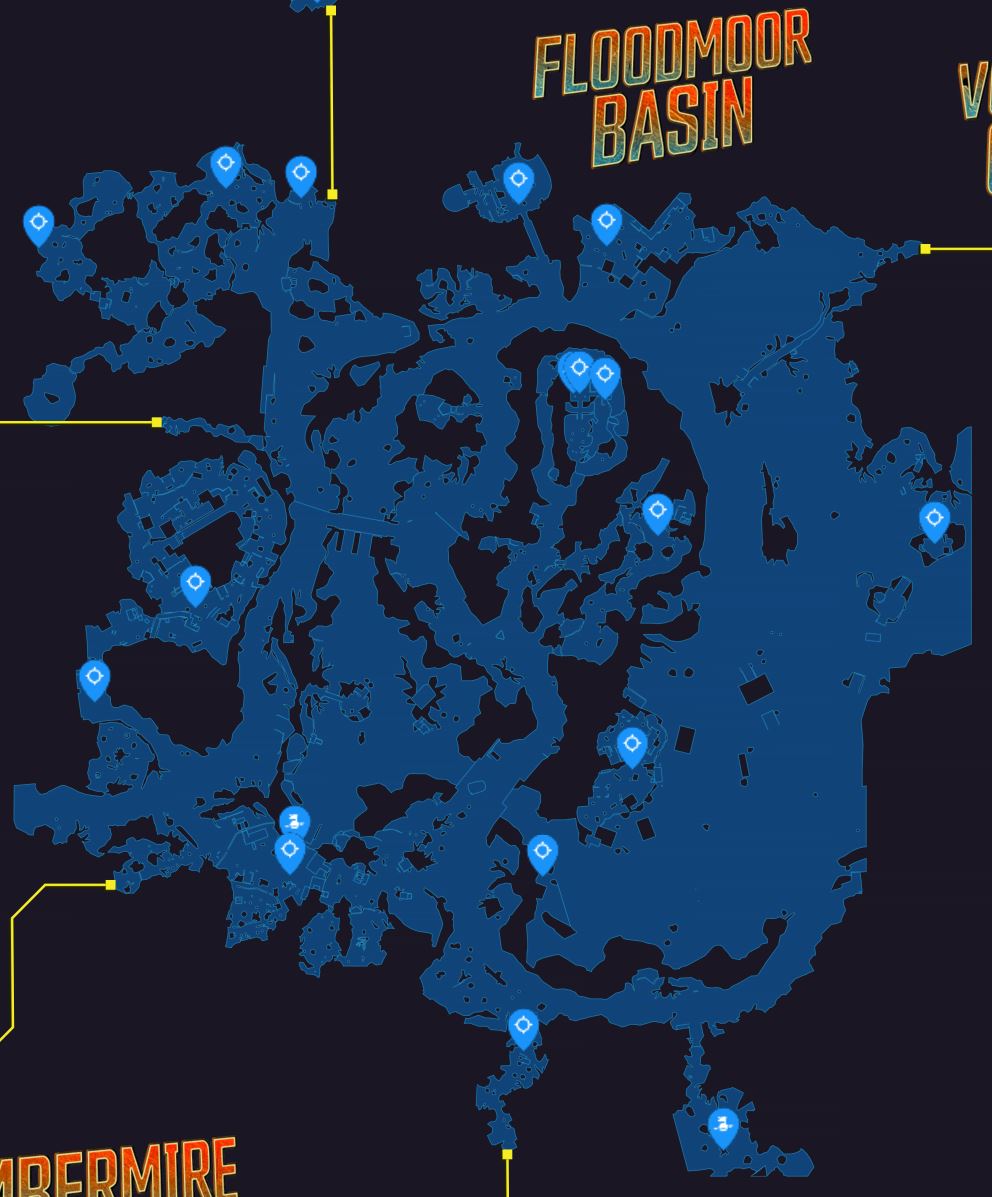
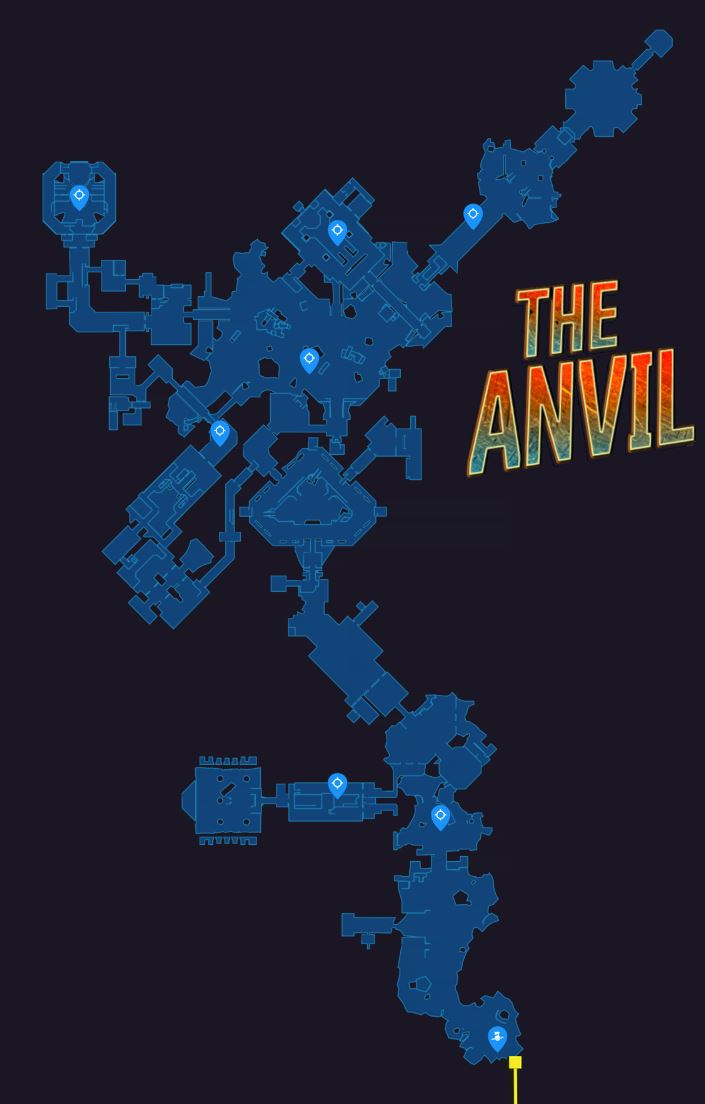
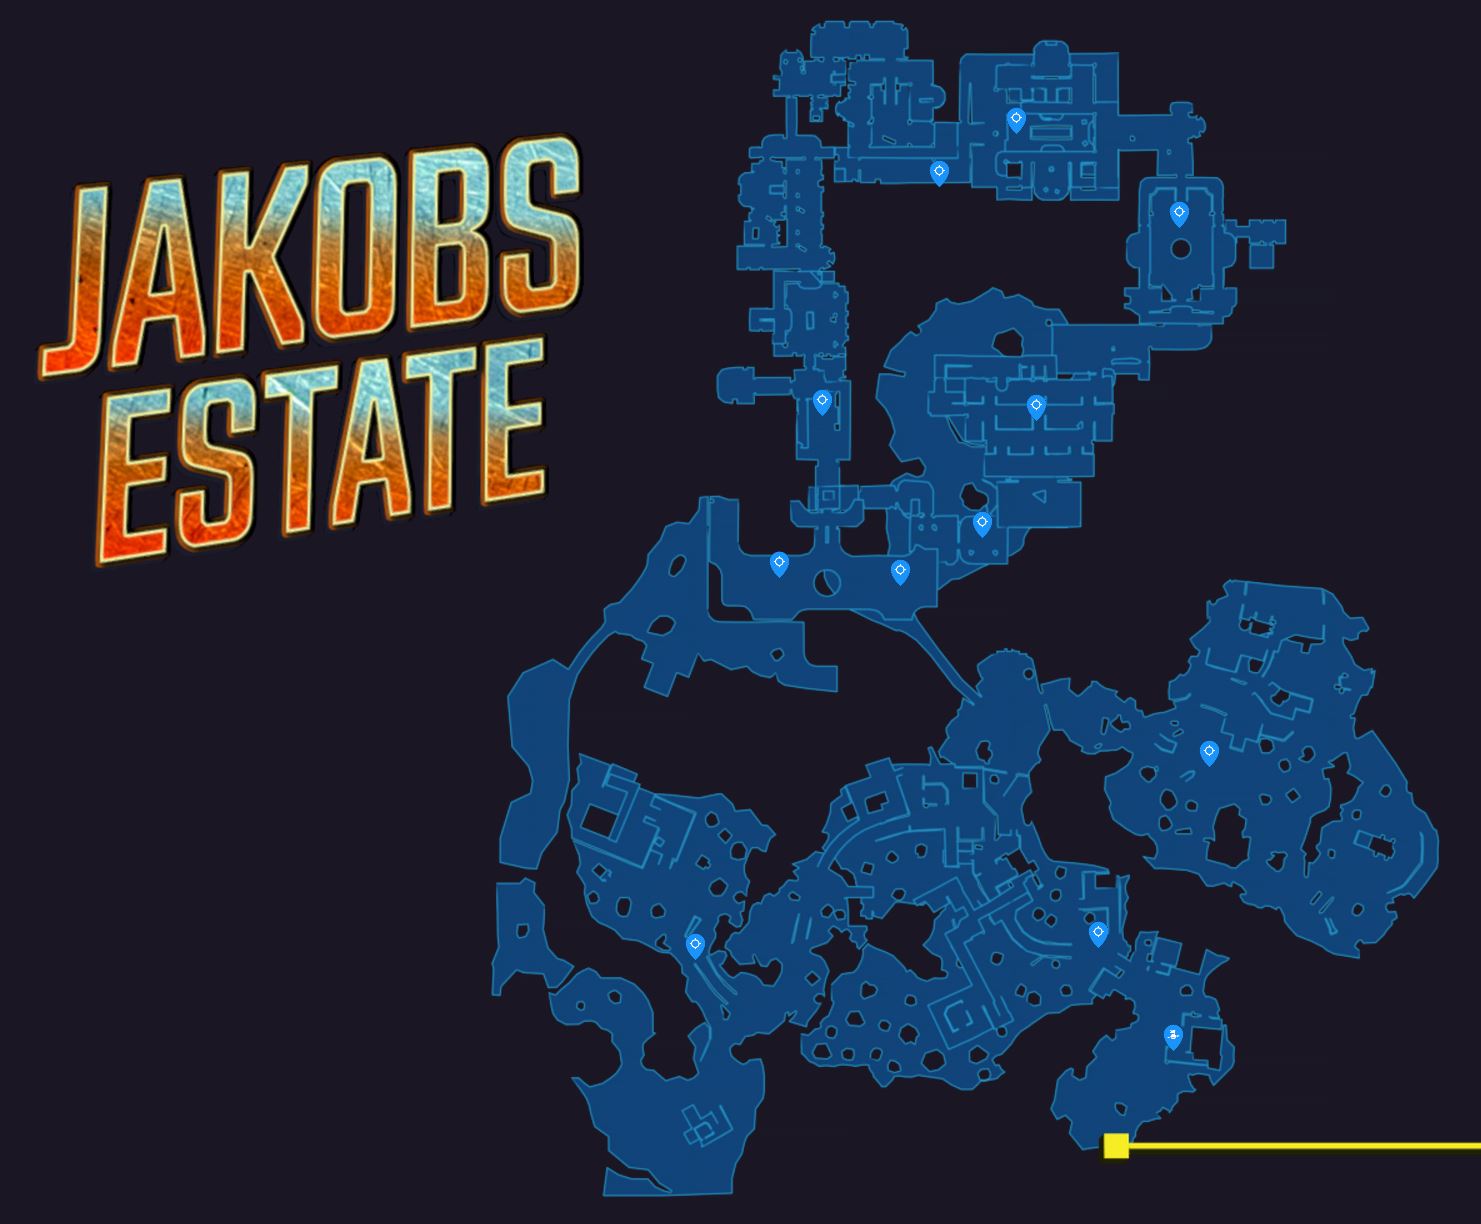
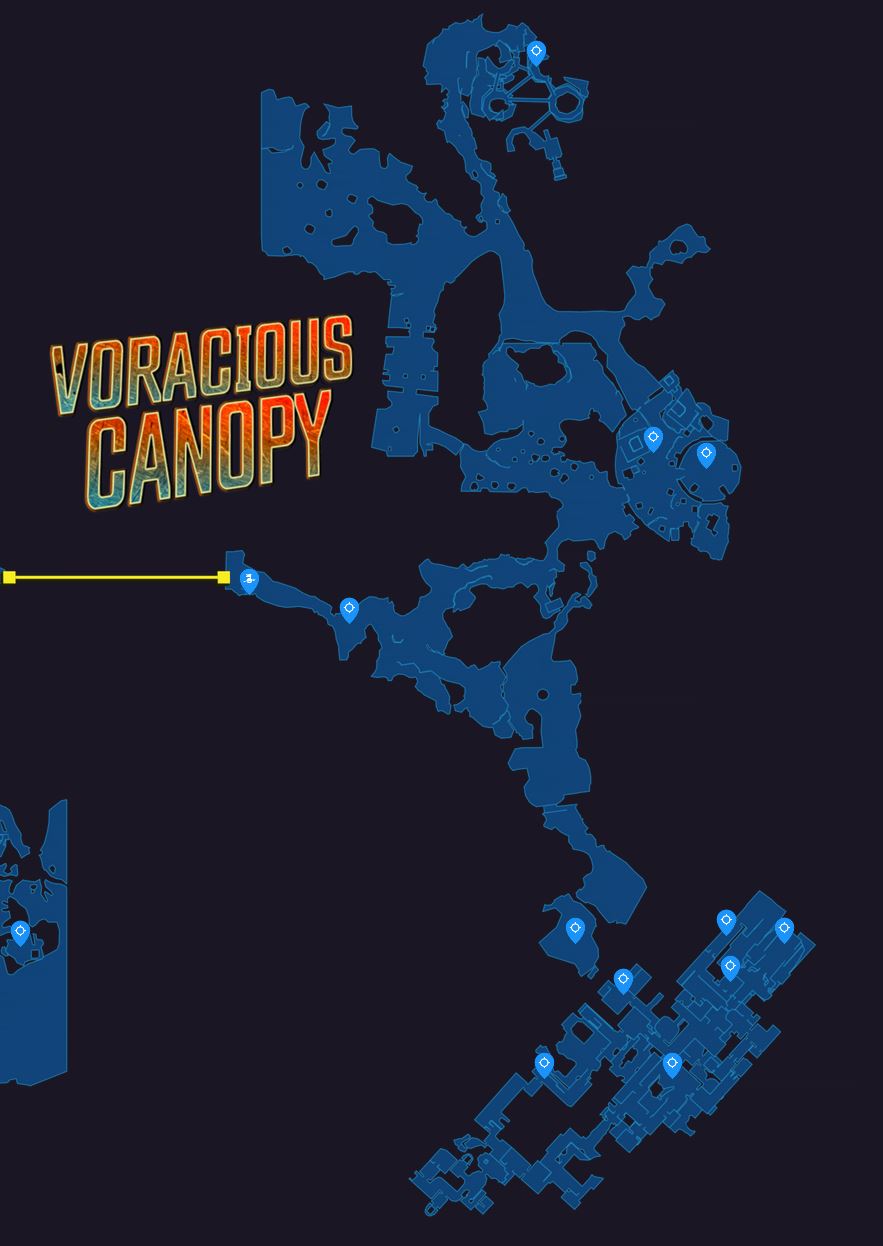
Maybe the devs can explain how I have THAT achievement, but.... A Hundred Names For Sand, Swamped and City Slicker haven't popped. My galaxy progress shows that I have 223/223 Locations. I just did this run and "re-discovered" all the areas on Eden-6 and the achievement is still locked.
The devs really shit the bed on achievements in BL3. I have 41/68 and 11 more that should have unlocked. I'll have to change my review of this game now.
Ariel (GB) 11 May, 2020 @ 9:52am 
WoW, that has taken me 4 hours to do, but it worked. :steamhappy:
Crème de Cassis 9 May, 2020 @ 11:01pm 
Can confirm, this works. You have to visit all the locations in one run without entering the menu screen. You can also do what Snipe said, but it feels much more rewarding getting that achievement popping up legitimately
ben 8 May, 2020 @ 12:03pm 
if anybody else is struggling with the bug (has happened to me on promethea, eden-6 and pandora) i can personally recommend S.A.M.

ty for the guide though, i was nearly at the end and then i crashed
Zer0 6 May, 2020 @ 2:08am 
done all this and still no achievement, fucking bullshit devs