Starship Troopers: Extermination

Starship Troopers: Extermination

50 ratings
DSV Trooper's Guide to the BUG
By hoosdatGuy
Your enemy: ruthless, barbaric, and downright ugly. The BUG.

From the best Federation scientists comes intel that will enable you, a Trooper in the elite Deep Space Vanguard, to eliminate this menace as quickly and efficiently as possible.

Learn the weapons to use, where to shoot, and how much ammo to dump into the bugs to keep them a pincer's length away!
Remember the motto: "We are the threat!"

I will try to keep this guide updated as things change with 1.0 and beyond.
5
3
2
5
2
2
2
3
5
4
2
2
2
3
2
2
2
2
2
2
2
2
2
   
Award
Favorite
Favorited
Unfavorite
Armor and Weakpoints
Before we get into the specifics of what makes each Bug variant tick, we should cover the basic essentials every Trooper should be aware of before going into combat against the Bugs.

Every Bug has an Armor value ranging from 1 to 5, which determines how much Armor Penetration your weapon needs in order to do full damage. Expect bigger Bugs to have thicker armor.

Bugs also have unarmored Weakpoints which take increased damage based on your weapon's Weakpoint Damage Multiplier. This means that hitting a Bug's weakpoint with a low-penetration weapon can potentially do more damage than firing a high-penetration weapon at its carapace. Aim for the nerve stem, Troopers!

Hit Markers will give you feedback on whether you're hitting a weakpoint or doing less damage because of armor. The following graphic will explain (lightning hands guy is the Bug in this case):

Having insufficient Armor Penetration will reduce the amount of damage you do to a bug when not hitting its weakpoint. The reduction is based on the difference between your Armor Penetration and the bug's Armor. On Easy and Normal, the reduction is a linear -25% damage per missing penetration. On Hard, the scale is more severe, but the maximum damage reduction is still capped at -75%.

Here is a summary of the damage done by each Armor Penetration value against each Armor value:

Equal or Greater = No Reduction
Easy/Normal
1 Less = -25% | 2 Less = -50% | 3+ Less = -75%
Hard
1 vs 2 or 2 vs 3 = -45% | 1 vs 3 or 2/3 vs 4 = -60% | 1 vs 4 or 1-4 vs 5 = -75%

The same information in chart form (here it is damage dealt instead of damage reduction):

Some damage is always better than no damage, so not being able to see the weakpoint is no excuse (snipers excepted) to ease off the trigger. Keep shooting and kill those Bugs, Trooper!

With the basics out of the way, we can now look at the individual Bugs.
Bug Stats
Sorry, I lied. One more thing to get out of the way before you can go on learning about what makes the Bugs tick.

In the individual Bug sections there will be several different stats displayed. Some are self-explanatory, but others will be abbreviated and are less well-known. Below is a legend for these stats, the abbreviations that will be used, and what they mean.

HP
Hit Points - How much damage a Bug can take before it dies. Does not regenerate. HP is increased by +10% on Hard!
XP
Experience Points - The XP earned from taking down this Bug.
ST
Stagger Threshold - How much Stagger Damage is required to "Stagger" (stop moving for a fraction of a second) a Bug. Suppressing weapons like the SAW do more stagger damage. Some higher-caliber weapons like the Emancipator have a "Stun" effect (causes the Bug to stoop over for a couple seconds), but I don't believe this is part of the stagger system.
SR
Stagger Recovery - How much Stagger Damage is removed from the bug per second. This makes it so that a Bug must be under heavy fire to be staggered. For a Warrior, "heavy fire" can come from a single Trooper with a Morita Mk1, but a Tiger will take multiple Troopers firing continuously to be suppressed.
AV
Armor Value - The thickness of a Bug's armor, see the previous section for details.
WP
Weakpoint - A description of where the Bug's weakpoint is. The Weakpoint Damage Multiplier is based on the weapon used, not the Bug or the particular weakpoint.

Finally it is time to look at the individual bugs.
Drones
Description
The Drone is basically a juvenile Warrior. If you get up close to one you can see that clearly. You can also see that it is UGLY. Its diminutive stature also makes it PATHETIC. But be warned; even little ankle-biters, in a large enough group, can overwhelm an over-confident Trooper.

Strategies
Up close you can take care of them with your knife (or shovel, fist, etc.), even taking out multiple at a time. At range, your trusty sidearm is a good tool against individual Drones, and will save ammo for your primary weapon. For packs of Drones, accurate automatic weapons such as the Morita MK1 and MK1 Carbine are good at eliminating these small targets. The piercing abilities of the FU-17 Flamethrower and E-Pulse Pistol A1 make them ideal against clusters. Area-denial weapons like the Napalm and Chem grenades will melt any Drone entering the AoE almost instantly. Utilities such as the Guardian UAV and Deployable Turret can target any Drones that try to harass you.

A hit by a Drone, while dealing very little damage, will slow you down and allow its buddies to catch up to you, so don't take them for granted.


Exclusive to Boreas, the Frost Drone is adapted to the cold, but is also susceptible to fire weapons.

Stats
Present at all threat levels
HP - 30
XP - 1
ST - N/A
SR - N/A
AV - 1
WP - N/A - The only time you won't kill one in a single shot is with a low-damage weapon at extreme range
Bombardiers
Description
Known affectionately as TimBits or rolly-polies, they may be tiny but these Bombardiers have an out-sized impact. In fact, their size just makes them an even more difficult threat to deal with. After popping out of the ground, they will roll along at high speed until finding a target. When attacking, Bombardiers will shoot up in the air and emit a distinctive sound that haunts the NIGHTMARES of many a mangled Trooper, before dropping into your defenses. They then open up and start producing sparks to ignite a volatile gas that results in a powerful explosion, doing massive damage to structures and sending Troopers flying.

Strategies
If you hear the dive noise, look up. If you hear sparking, run. Or crouch, if you're a Guardian and it's on the other side of your wall.

Bombardiers will not explode if they're shot before they've opened up, although some say that fire, explosives, and E-Pulse weapons can cause them to explode prematurely. They will always explode if they take damage after opening up. This is often used as a cheeky way to send fellow Troopers flying without repercussions. When hitting a structure from the side they will even explode on contact.

When trying to deal with Bombardiers before they reach your position, unless you're a deadeye, automatic weapons are the way to go. At medium range the Morita MK1 will serve admirably, while close in you can spray-and-pray with the MK3 SAW, TDW-99 SMG, or TW-2 SPLIT Shotgun. When facing multiple at once, you can try panic-spraying the FU-17 Flamethrower in the air. The Deployable Sentry utility as well as the Automatic Sentry Turret buildable will sometimes target Bombardiers, with robotic precision of course. The best way to deal with them is to deploy area-denial weapons such as the Napalm and Chem grenades between yourself and the Bugs, as any Bombardiers that roll through will be immediately destroyed. Cluster grenades are also effective.

Any sort of scanning device will make the Bombardiers much easier to see and deal with in the fog of war.

Stats
Present starting at Threat Level 2
HP - 1
XP - 10
ST - N/A
SR - N/A
AV - 1
WP - They have 1 HP
Gunners
Description
Gunners are essentially the Bug version of a sniper. They use air-filled sacs to accurately nail Troopers with sharp spikes at medium range. Easily one of the UGLIEST Bugs, the Gunner is also one of the PESKIEST, especially for Troopers who like to get up close and personal. Even when missing, the Gunner's shots will apply a suppressive effect that makes it harder for Troopers to return fire accurately. Thankfully, the snipers of the Deep Space Vanguard can out-range, out-think, and out-shoot these Bug marksmen, and they are much more photogenic to boot.

Strategies
Gunners are ranged Bugs, but they can't shoot at long range like a Grenadier or Inferno. When out of range, they'll creep up then immediately open fire when they are close enough, so unless they spawned right in front of you they will tend to be clustered at their maximum range. This can be a problem for Troopers with short-range weapons. They tend to target Troopers who are closer, so if you have the ability to deal with them but the suppression is making it difficult, move farther away until they target someone else. Gunners are less accurate against moving targets (unless you're running straight towards/away from them, obviously).

Longer-ranged weapons are clearly the best choice against Gunners. The TW 202-L Morita Hawkeye is the ideal weapon for most situations. While the Morita XXX Sniper can kill them in one shot, it's easier to miss with when suppressed and shots come at a premium for that weapon. Great if you can get somewhere they can't shoot you. The MK3 SAW and E-Pulse 88 CSW, especially when used in the Guardian's Siege Mode, are good at suppressing the Gunners right back.

Another strategy is to stun the Gunners, whether it's with a Shock or Cluster grenade, or by shooting them with the TW-109-e Emancipator or TW-2 SPLIT Shotgun (Slug). After being stunned, it's easier for you and your fellow Troopers to move in on the Gunners and eliminate them with closer-ranged weapons. When all else fails, you can try chucking a regular old MX-90 Grenade at them. And nailing them at range with the C-32 Chi-Hong Grenade Launcher is always satisfying.

Stats
Present starting at Threat Level 2
HP - 1000
XP - 10
ST - Unknown
SR - Unknown
AV - 2
WP - The glowing air sacs on either side of its back; much easier to hit from the sides.

Warriors
Description
Warriors, while the grunts of the Bug army, are much more than mere cannon fodder. Armed with deadly forearms used to impale their foes, and a devastating charge attack, it's best to keep your distance. A single Warrior has been known to decimate an entire squad, while there have been reports of lone Troopers taking out entire hordes. Fail to remain vigilant, and you'll end up like the former. On the bounce, Troopers!


Exclusive to the volcanic jungles of Agni Prime, beware the red hot Fire Warrior. Not only can it beat the heat, it will beat you with heat by leaving a fiery present should you eliminate it with explosives.


The Frost Warrior is a variant adapted to the frozen wastes of Boreas. Fire is your best friend against this new enemy.

Strategies
The best strategy when facing a Warrior, or any melee bug, is to stay out of reach. Being a standard, basic enemy, most weapons have some use against the Warrior. Basically, the benefits and shortcomings of using a certain weapon against a Warrior, are the normal benefits and shortcomings of that weapon. So if you want a weapon that works in most situations, stick with your venerable Morita MK1. It can pierce a Warrior's armor, allowing it to deal with them efficiently, and can stagger them to buy additional time. Taking advantage of their weakpoint, you can even kill them 50% faster. However, it's not going to mow down a horde.

Warriors can outrun most troopers, but sometimes running is the only option, especially during extraction when there is a constant flow of Bugs. Using stunning weapons, especially the C-32 Chi-Hong Grenade Launcher, or Shock or Cluster grenades, can help you make your escape.

Stats
Present at all threat levels; spawns greatly increased at Threat Level 5
HP - 1000
XP - 5 (6 for Fire and Frost variants)
ST - Unknown
SR - Unknown
AV - 3
WP - The nerve stem!

Tigers
Description
The Tiger Elite, or simply Tiger, is the Warrior's bigger brother. These JUGGERNAUTS have thick armor and can take a load of damage, while their attacks can quickly take down a wall and the entire squad of Troopers standing on it. They also shrug off grenades and rockets like firecrackers. It takes a concentrated effort to eliminate just one. The Tiger's lone weaknesses come from its large size, which prevents it from entering small spaces as well as making it an easy target. DO NOT go face to face with one of these alone!

Strategies
Like the Warrior, and any melee bug, the best way to counter one is to stay out of its reach. Unlike the Warrior, the Tiger's Armor Value of 4 makes low-penetration weapons a risky option, especially on Hard. One consolation is that most of the time you won't have to deal with more than one, or maybe two, Tigers at once. Watch out for that Tiger Ambush mutator!

Hitting the Weakpoint will help a great deal considering how much health it has, especially when using a weapon that doesn't have high penetration. Equipping FMJ on these weapons is an option if you want to play it safe, but if you have good aim you can use weapons like the Morita MK1 Carbine, the TW-2 SPLIT Shotgun (any variant), or equip Hollow Points. When multiple troopers focus fire with high-stagger weapons, such as the MK3 SAW and TW 202-L Morita Hawkeye, they can effectively keep a Tiger at bay or even push it back.

On the other hand, this is one of the bugs the Morita XXX Sniper was made for. Its high damage, penetration, and weakpoint damage multiplier, combined with the Tiger's large profile, make it ideal for hunting these Bugs. Not to mention its ability to stun.

If you think the Shock grenade is lame, it might just save your life if there's a Tiger in your face. Or anything that stuns, really. While stunned, its weakpoint is also exposed so you can get in some quality shots. If you're a Sniper or Ranger, the Hi-Ex grenade is the ideal option with its massive damage and ability to stick to targets. And of course, scanning the big Bugs always helps to make them more manageable.

Stats
Present starting at Threat Level 3
HP - 8000
XP - 35
ST - 2000
SR - Unknown
AV - 4
WP - The exposed, fleshy parts of its face; easier to hit from the side. A lesser-known weakpoint is on top, where the armor plates meet.

Plasma Grenadiers
Description
Plasma Grenadiers are by far the most EXPLOSIVE Bugs you'll encounter, and you can only hope it's them exploding and not you and your fellow Troopers. They are the smaller cousins of the Artillery Bugs that can be seen firing into space at our ships and transports. Essentially, the mortar to the Artillery Bug's heavy howitzer. These are high priority targets as they can easily create a breach in your defenses, do massive damage to the ARC, and blast your fellow troopers over a mountain. Sometimes they'll bombard a location from off map, but the only way to deal with these events is to keep an eye on the sky or simply wait them out.

Strategies
As with any big Bug, scanning really helps, the Morita XXX Sniper will obliterate them, and if you can get close enough, the Hi-Ex grenade will blast them to smithereens. The XXX is even more favorable (or at least, other weapons less favorable) against them because they bombard the base from long range. Plus, Grenadiers are shy and have a tendency to burrow and re-emerge somewhere else when approached. Going after them during a horde is not recommended for anyone besides a Ranger (which is sometimes the only option when they're positioned on the other side of a structure or land form).

It is rumored that they are vulnerable to explosives, though. If you're lucky enough to find one, hit them with a Pilum Rocket Launcher. Barring that, a volley of grenades from the C-32 Chi-Hong Grenade Launcher can do one in. If you really have to shoot them with something that's not explosive or the XXX, go with an armor-penetrating E-Pulse weapon. Or aim for the weakpoint with the TW 202-L Morita Hawkeye.

Stats
Present starting at Threat Level 4
HP - 8000
XP - 70
ST - Unknown
SR - Unknown
AV - 4
WP - The big white abdomen when firing; the rest of its white torso is unarmored, but not a weakpoint.

Infernos
Description
The Inferno Bug definitely has a FIERY disposition. Similarly to the Grenadier, they'll bombard your base as well as you and your squadmates. Except this is in the form of balls of a napalm-like substance that explodes mid-air into a cluster of fireballs, blanketing the area in deadly flames for a few seconds. It is even more of a pain to deal with, as it has a smaller profile and stronger armor than a Grenadier. Don't let their numbers build up too much or you'll quickly find there's no place to go that isn't on fire.

Strategies
Much like the Grenadier, they'll bombard your base from afar. The Morita XXX Sniper, scanning, and explosives are your best bets for dispatching them quickly. They are more mobile than Grenadiers and sometimes creep towards the base making it easier to hit them with close-range weapons, but they will also sit on the other side of buildings and land forms, forcing you to seek them out. With its extremely thick armor, targeting the weakpoints is a must, especially on Hard where anything under 5 Armor Penetration does 25% damage! The fire-projecting tip of the tail can be hit from the front, but only when firing. The projectile will release its payload prematurely when shot.

When approached, an Inferno will use its claws to shield its face, backing away and keeping its front towards you to protect its vulnerable rear. While doing this, it won't fire. This behavior can be exploited to turn the Inferno around so the rest of your squad can rain fire on its unarmored backside. Or you can unload on it with an E-Pulse weapon instead. Just be careful when approaching, as a cornered Inferno will do a devastating charge that can take down a Trooper in one hit.

Stats
Present starting at Threat Level 3
HP - 6000
XP - 70
ST - Unknown
SR - Unknown
AV - 5
WP - Face; rear and tip of tail
Royal Guards
Description
The Royal Guard is a Tiger on steroids. It can be distinguished by its royal red markings, larger size, and TERROR-INDUCING SHRIEKS. They are typically called upon to guard hive cores and can rarely be seen roaming the surface. When guarding a hive, a Royal Guard will tend to stay close to its charge. Do not attempt to take one on alone, killing a Royal Guard is a team effort (unless you can find a perch to snipe at it from). Thankfully, you'll almost never fight more than one at a time, and once it's gone, you don't have to worry about any more showing up in the same hive.

Strategies
As with normal Tigers and any other melee bug, the only foolproof strategy is to stay out of its reach. This can prove more difficult, though, as its shriek will slow your movement to a crawl, allowing the Royal Guard and its retinue to close in for the kill.

With its higher Armor Value and the more claustrophobic spaces it tends to inhabit, taking one down takes a stronger loadout, more skill, and a larger squad than for a basic Tiger. If you can find a high perch and lure it into the open, the Morita XXX Sniper works very well, but it's more difficult to use in the tight confines of a hive. E-Pulses are the only other weapons (well, there is the FU-17 Flamethrower, but you must be foolishly brave to use that against it) that can pierce its armor, otherwise you must target the weakpoints, especially on Hard where all other weapons will do 25% damage against the armor.

As with all of the big Bugs, scanning will hasten the Royal Guard's demise, and a High-Ex grenade can severely weaken one. A Shock grenade or other stunning weapon can buy you a few seconds and also give you and your squad an opportunity to get a few well-placed shots in.

Stats
Usually present near any hive; also appears as a random event
HP - 24000
XP - 200
ST - 4000
SR - 400
AV - 5
WP - The exposed, fleshy parts of its face; easier to hit from the side.

Tankers
Description
The Tanker is a big, bad, BOSS BUG. You thought the Royal Guard was scary? The Tanker is an existential threat to any surface operation. It's capable of effortlessly steamrolling through your walls and the bug corpses piled up in front of them. And to make things worse, the Tanker can also spew a napalm-like substance in a wide arc to immolate Troopers near instantly. When a Tanker enters the field, drop whatever you're doing and throw everything you've got at it!

Strategies
Concentrate fire with the biggest guns you've got, especially those with high armor piercing.
Tryin' to be a hero? The Tanker is covered in thick armor, but perhaps there's a way to get past it...? Filling the grey stagger bar will cause the Tanker to stoop down for a short time, making it easier to climb on and dish out punishment where it can't squash or incinerate you. Staying on can be a difficult balancing act as the Tanker constantly tries to buck you off, but the Ranger's boost jets can easily cope with this.

Stats
Appears after a few minutes (ARC) or at the start of the ARC slam phase (AAS) if the Tanker Attack! mutator is active
HP - So much it has its own HP bar
XP - 400 (everyone in the match also automatically gets 600)
ST - Also has its own bar
SR - Unknown
AV - 5
WP - Fire into the top of the abdomen enough and a crack will form; the underside of the abdomen is unarmored but not a weakpoint.
Appendix A - Weapon Armor Penetration Values
This is a list of all weapons sorted by Armor Penetration. The number after each weapon is its Weakpoint Damage Multiplier. Weapons in bold can stun.

Weapons that can equip Full Metal Jacket or Hollow Point rounds are indicated with FMJ and HP, respectively. FMJ sets Armor Penetration to 4 but reduces Weakpoint Damage Multiplier to 1.25x. HP sets Armor Penetration to 2 but increases Weakpoint Damage Multiplier to 2x.

AP 1
TDW-99 Morita Tactical SMG | 3x - FMJ
TW-2 SPLIT Shotgun | 3x
TW-2 SPLIT Shotgun (Auto) | 3x

AP 2
TW-109-e Emancipator | 2x - FMJ
Morita MK1 Carbine | 2x - FMJ
TW-2 SPLIT Shotgun (Slug) | 2x

AP 3
TW-102-s Peacemaker | 1.5x - FMJ HP
Morita MK1 | 1.5x - FMJ HP
TW 202-L Morita Hawkeye | 2.5x
C-32 Chi-Hong Grenade Launcher | 1x

AP 4
Morita MK3 SAW | 1.25x - HP

AP 5
E-Pulse Pistol A1 | 1.1x
E-Pulse 44 A2 | 1.1x
E-Pulse 88 CSW | 1.1x
Morita XXX Sniper Rifle | 2.5x
FU-17 Flamethrower | 1x

Bullet weapons with AP under 4 can typically equip FMJ, while those with an AP over 2 can typically equip HP. Weakpoint Damage Multiplier is typically inversely proportional to AP, with the exception of the sniping weapons which have relatively high multipliers. The grenade launcher and flamethrower are special weapons whose projectiles don't interact with armor the same as bullets, slugs, and buckshot. However, the grenade launcher has an area stun effect and the flamethrower has a slowing effect.
12 Comments
Rear Admiral Futt Bucker 12 Jun @ 11:32am 
small update to the Tanker based on personal experience:
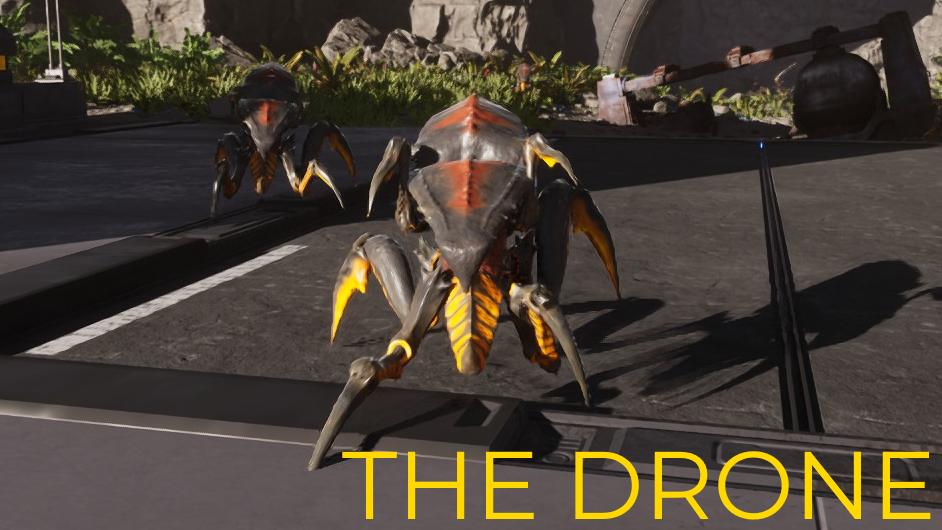
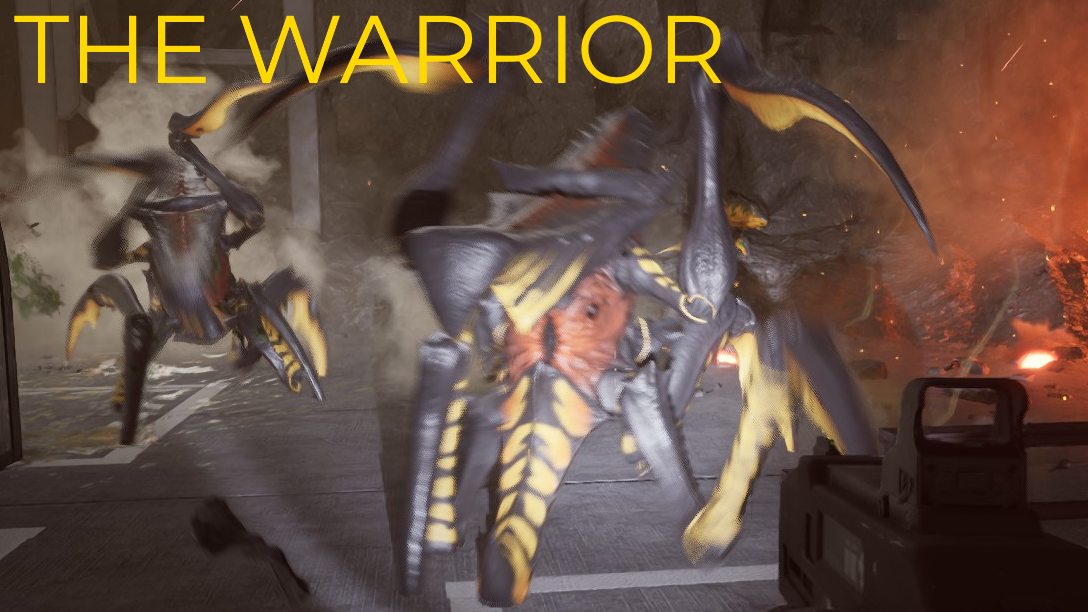
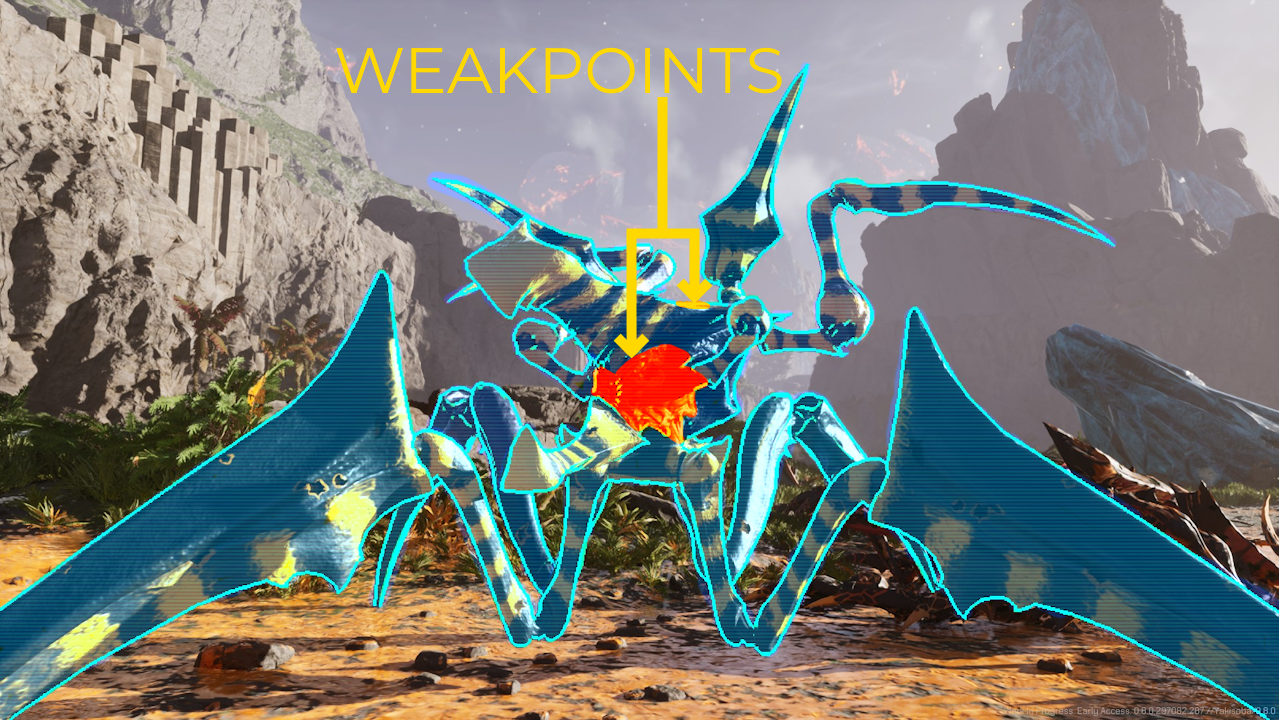
Shooting it in the Eye seems to deal more Stagger damage
MechaTails 19 Oct, 2024 @ 2:23pm 
Thanks for the info.

Oh yeah, didn't notice the 1x Crit bonus on flamethrower, guess it doesn't matter if it hits a weakspot or not at that point lol.

For sure will try to unlock it for some other classes. I don't find Engineer fun anyway because people just destroy my structures and build whatever they saw on youtube or whatever.
hoosdatGuy  [author] 19 Oct, 2024 @ 11:03am 
This guide is mainly about the Bugs, but I have had thoughts of making a "DSV Trooper's Guide to the Federation Arsenal". If that were to happen, I would probably incorporate Appendix B into that guide, while leaving Appendix A as a quick reference for the weapon AP values.

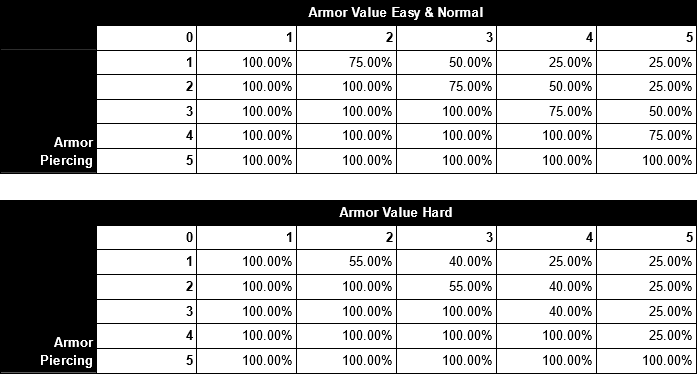
As for the flamethrower, it has 5 AP and 1x Crit so it basically ignores everything. It is pretty good for base defense, especially when you have two making a wall of flame in front of a gate. Part of the reason it suffers out in the field is because the Engineer has the weakest overall constitution, with abilities suited mostly towards a stationary, defensive play style. Add to that a weapon with minimal range and a slow TTK and you can see why they are always the first to go down. If you have the patience to master that thing, I would try it on the Guardian or Ranger. Still, hopefully it will get a range boost at some point.
MechaTails 18 Oct, 2024 @ 7:36pm 
Any more info on the flamethrower? Like, does it benefit from weakpoints? Is it mainly for clearing corpses/suppression, not actual killing?

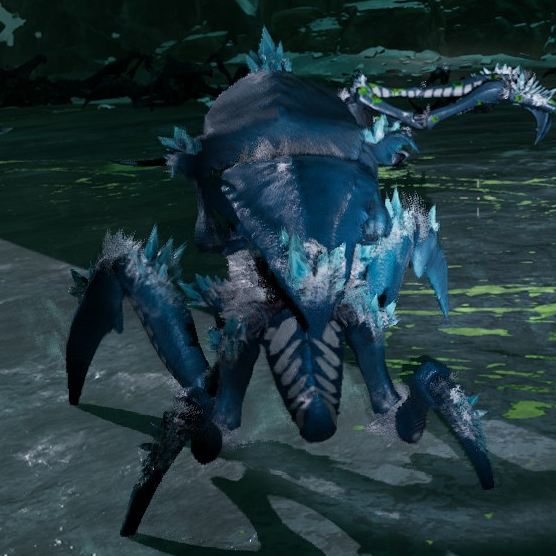
I find it's useless at suppressing with the slow effect, if there's more than one Warrior you just get flanked and murdered lol.

Works okay on hordes amassing along the walls though.
Ka800m 5 Oct, 2024 @ 12:50pm 
Great guide highly recommended.
✯Lynx✯ (Partner) 5 Oct, 2024 @ 11:37am 
This guide gets a 11/10 Federal Handbook rating :warband:
hoosdatGuy  [author] 27 Aug, 2024 @ 7:50pm 
Just added weakpoint screenshots for the Tiger and Inferno (not a great picture for the Inferno but it's the most obvious one in the game...). Also added a case study to Appendix B showing how to calculate how precise you need to be to make Hollow Points worth it.
MehMeehMeeehMeeeeh 26 Aug, 2024 @ 8:09pm 
Nice guide, possibly the best this game has so far.
Glove 25 Aug, 2024 @ 6:58am 
more weakpoint images would be nice
AnAnonymousSophont 22 Aug, 2024 @ 5:12pm 
can you add a picture of the weak-point of the Tiger?