Dead by Daylight

Dead by Daylight

102 ratings
Strategies and Tactics
By Bucketsmith
There's a lot more to the game than you see at face value.
Originally, I had merely collected some information I didn't see widely available, but I'm working on making it a complete guide.
Also admire the excellent artwork thrown into this masterpiece, will you? ;)
   
Award
Favorite
Favorited
Unfavorite
Foreword
Please don't read any segment of this guide as 'factual'; don't think that these strategies are the only way to play. This guide reflects my subjective collection of what I think works well in specific situations.
And since the game is about behaviour and predictability, if you were to follow a specific pattern somewhere, it might become too predictable for the killer in your session, or in the playerbase overall.
Look at these individual segments with a grain of salt and think about how it might apply to your playstyle, your character and perks and even the situation you are in at any given time during the match. There's no single strategy that can be applied 100% of the time.

Some definitions to get out of the way
In this guide I define;
'strategy' as an encompassing idea or list of goals you wish to apply/achieve during a match, usually thought up before the start. ("Will I go for a specific order of generators?" "Will I focus on sabotage?" "Will I try to keep the killer busy so the rest can work?");

'tactic' as a specific action for a specific situation. Like when to complete sabotage on a hook, or pushing a pallet over to stun the killer so he realeses that Dwight he naturally is carrying;

Credits
I've had help from some marvelous monkeys in shooting some videos.
Credit where it's due: Thank you Thiil(check out his Twitch), Haunted, OscuroNebbia and P*ssyOnFire!
Co-operation vs Survival
Let's clear something up.
Although there are options and mechanics for cooperation and you do get rewarded for it, Dead by Daylight is not really a cooperative game.
Right from launch a lot of people, myself included, got frustrated quickly with the lack of cooperation by teammates and the lack of a decent reward vs the huge risks.

Here's some crucial information in regards to that mindset, skip to exactly one minute, then you can stop at 1m50s.

So remember, don't be afraid to play like an ♥♥♥♥♥♥♥ when you don't like the odds of a specific situation!
Teams
Because of the speed boosts, it's a lot better to work in pairs of two.
Plus, you get bonus points in Objective when repairing and completing a generator together. (This will help with getting a pip!)
This will also increase chances of both of you escaping a chase, as opposed to being the lone target a killer can focus on. But don't be scared to use the other guy to make sure you get away safely, that's the spirit of the game.
Side-note; you get points if you distract the killer from chasing someone else!
Sprinting
Sprinting leaves a very visible trail for the killer to follow. It is not visible for survivors.
By default, it lasts 5 seconds and fades over time.
As a survivor, you can reduce the time this trail is visible by 3 seconds via a level 3 perk called Lightweight.
As a killer, you can increase the time this trail is visible by 3 seconds via a level 3 perk called Predator.
You might not know where the killer is, when you finish a generator.
If he is close-by, you could sprint away to gain distance and time, but also give the killer a very easy trail to follow right to you, until you stop sprinting somewhere.
To minimize the chances of the killer finding you, walk away from the generator for a few meters, and only apply sprint from that point on if you are certain it is safe and not easily found.
You can also use this trail to decieve the killer to follow your path, leaving you an easy option to double-back without a trace. This requires the right enviroment and timing.

With Lightweight on, you have more freedom to sprint without the killer picking up on it.
It is a bit of a gamble as you won't know if the killer is carrying Predator until you see the tally screen.

You could also disorient a less capable killer in the cornfields when you don't use Lightweight.
Keep zigzagging and running in circles around the killer to give a massive amount of trails, before breaking away to escape. The killer will have a hard time figuring out what is going on if he's not paying enough attention.
Tactic: Generators at the start
This tactic is about the start of the match and can go two ways, with the same goal.

Option A
Once the match starts, find the nearest generator and start repairs on it so that it will make noise.
Now go find the next generator and continue until all generators make noise.

Option B
Once the match starts, instead of finding a generator and repairing it as fast as possible (or going for option A), wait a safe distance away in a spot that you can hide in. (Be wary of escape routes!)
Once the killer has passed the area thinking there's no one there, begin work on the generator as usual.

Put yourself in the perspective of the killer. You'd be walking around the map going from generator to generator looking for any clues as to where your first victim will be.
Obviously, there being more generators than survivors, even if every survivor worked on their own generator, that still means there will also be generators that aren't being worked on.
Those will be quiet.
During their initial patrol, most killers will quickly move on thinking that the survivors are simply at another generator.

Generators make noise once they have been fiddled with. It takes time for that noise to die down again.
So by either applying that noise to every generator(option A), or by waiting for the killer to pass on the first time (option B), you maximize the time available for you to work on that generator until the next time the killer patrols your area.
This works well if you spawn separated from your teammates, as teammates are unpredictable and will not be aware of your plans.

If you spawn with others and you're moving as pairs or a team, the speedboost you get from repairing the same generator at the same time will most often make it a better choice to just join in the repairs.
Tactic: Sabotage at the start (vs Trapper)
If you have the Saboteur perk and/or a toolbox, this one is for you.

After spawning, check your local area. Go to your generator of choice and see if there are any traps.
Always sabotage these first, so that the killer will not be coming to your area to pick that trap up!
You're also removing traps from the playing field early on, reducing the options the Trapper will have from there on.
After clearing these traps, continue on normally.
Tactic: During the chase
These require timing. You might not always be close enough to try these and even then you will need the right timing for them to be effective.

If you're close to a teammate being chased, you could attempt this tactic below.
The timing in the video is a bit off, like in most of the videos in this guide, but you get the drift.
By throwing your healthy body in between the wounded survivor and the killer, you take a hit, but you increase the chance of the wounded survivor to escape.
You get a short speed burst if you get hit, so plan an escape route to make sure you get out alive yourself!

Here's a short clip of what a pallet stun looks like for the killer.
During the stun the killer has no control and is locked in place by the animation.

Now watch the video below to see what happens if you manage to throw a pallet in the face of a killer who is carrying a survivor!
Tactic: vs Hook Campers
At the time of writing, the devs have announced multiple times they feel 'hook camping' is a legit strategy for the killer to use. It's just one of his options. And as always, every choice has consequences. It is up to you to exploit those consequences to their maximum effectiveness.
As mentioned before, if a killer starts hook camping, he is denying himself doing anything else.
That is a lot of valuable time that you can use, guaranteed not to be bothered by the killer!

So what do you do when you're going against a presistent hook camper?
First and foremost, you need to confirm if the killer is hook camping.

You've got valuable time on your hands, so you want to spend it wisely.
Sabotaging hooks and traps might look like a sweet deal during this guaranteed time of not being bothered by the killer, but doing generators is infinitely more valuable.

Below is a staged video representation of how much the other survivors can get done during a single hook camp.
We manage to complete just over 4 generators before the killer can intervene. The amount of generators you can finish will obviously depend on the travel distances involved and how lucky you get with skill checks.
The three of us start repairing a generator on our own the moment our buddy gets on the hook.
You can't tell from this POV, but I got unlucky with not having a lot of skill checks, so that third generator finishes late. Nevertheless, we even got a fourth generator done before the killer gets there!
Tactic: 'The bodyblock unhook'
If you're playing against higher skilled killers you will notice that they won't smack you straight away if they see you in the vicinity of a hooked survivor.
They do this because hitting you will lock them in a cooldown animation where they cannot do anything but move slowly. If they managed to hit you, you'll still only be wounded and not instantly downed. (Unless the exit gates are powered and the killer has the perk No One Escapes Death!)
Instead, they will wait for you to start the unhook animation. They can grab you and instantly put you into carrying-over-their-shoulders mode, just like when they grab you when you're doing any other action like repairing a generator, searching a chest or vaulting over stuff.

Here's a video of my buddy Thiil succesfully applying 'the bodyblock unhook' with his random teammates. What's great is that this one wasn't staged!
Tactic: Stealth generators
This might be considered a bug by the devs. It might get patched out.

Generators start their animation and make noise once they've been fiddled with. The amount of noise they generate is directly proportionate to the progression of repair on it. The more repaired it is, the more noise it will make.
After quite a long while of leaving a generator alone, it will also stop making noise. (Need confirmation on this.)
That's a cue the killer can use to keep an eye on survivor activity. If the noise of a generator has changed since his last visit, it is likely a survivor is hiding nearby.

Get the generator all the way up to 99%. Almost fill that bar entirely and then stop repairing it.
Now, just start lightly tapping LMB on it to only repair the slightest amount. You should be getting only a few bloodpoints worth of Objective.
At some point, it will reach 99,999~% and magically stop making noise.
Leave the generator at that point and the killer might be fooled when he runs past thinking it is making no noise, thus has not been repaired yet.
Note that it will still be animated!

Alternatively, you could try and hope to get a skill check right near the end of the progress bar, and purposely fail it. This will stop the noise the generator makes and stop the animation.
It will set you back further, though, as you'll have slightly more to repair to finish it.
Strategy: Denial
Denial is a big part of any competitive game. It has a number of applications.
By being chased by the killer, you are automatically denying him the ability to attend to other survivors and generators.
By throwing down a pallet, you are denying him that straight path forward.

Denial is about the indirect consequence that is opposite of your actions, and benefits you and/or other survivors.
It is not something you get direct feedback on. You have to roughly keep in mind what's going on during the match to keep that overview. Then, whenever you, other survivors or the killer does something, think about what they're automatically not doing. That's it. That's what this is about.

By repairing generators all over the map instead of in a row, you will deny the killer an easy patrol area at the end of the match.

By preparing sabotage on a hook and destroying it just as the killer gets close to put a survivor on it, you are denying him that sacrifice.
But there's more; by forcing the killer to walk to the next nearest hook, you're keeping him to his current task; carrying that survivor. That denies the killer more time patrolling the generators.
Strategy: The order of repairing generators
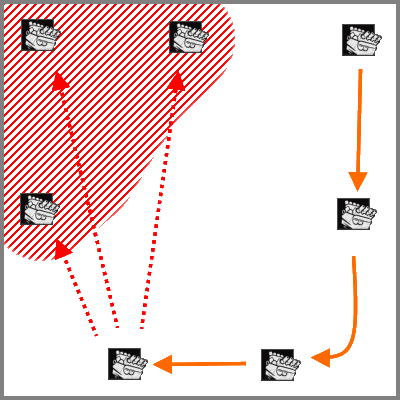
Here, we see a simple representation of a generated map.
It is square and we have 7 equally distanced generators, of which 5 need to be repaired to power the exit gates.
Nevermind the location of the exit gates, basement and hatch for now.
Also ignore the fact that you have other survivors that might be doing their own thing, for now.


Most of the time, regardless of where people spawn, they will go to the nearest generator and start repairing it. Then, they move (counter-)clockwise to the next one and repeat. As seen by the solid orange route marker. This is obviously rather predictable.

More importantly, you will end up with 1 out of 3 available generators to repair, and they will be right next to eachother. This means the killer will have a very short and easy patrol area, as seen by the red diagonally marked area.
Possible routes for survivors at this point are shown by the solid red route markers.
What often happens in this scenario is that you simply don't get enough time to fix one generator. You will have to navigate the patrol area and hide nearby, then look for windows of oppertunity to repair any of the three gens, any chance you get. A lot slower than just repairing one generator, isn't it?

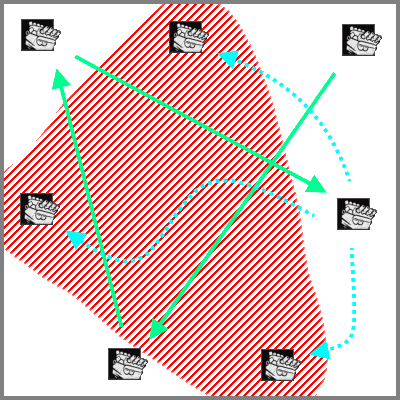
Instead, go for a less predictable pattern. Finish a generator, then go for one that is much further away.
As you can see, the killers' patrol route at the end is now much larger, covering the entire map.
Side-note: Don't make a habit of going for any perfect pattern, as that might turn out to be predictable as well. After all, always going for the furthest one is predictable too, so don't be afraid of repairing two generators in a row here and there.

When you apply this strategy, you are working towards denying the killer an easy patrol area during the match and the crucial end stage where you only have one generator left to fix.
Strategy: 99% (silent) repairs
If you want to try something a little more advanced, and subsequently make it easier for yourself and harder for the killer, do not complete repairs on a generator completely. Get it almost done and then move to the next generator.
Since you get points based on the amount you repaired a generator, there is almost no loss between doing the 99% repair and never applying the last 1%, or repairing it completely.
On the other side, it creates a lot more options and possibilities to your advantage.
If you manage to hit exactly 99%, the generator will stop making noise.

For instance, finishing a generator is a huge "HEY I'M HERE" sign for the killer, obviously.
As long as the killer has no other leads, they will most likely be going to a finished generator straight away. You obviously want to stay undetected as long as possible, so it is not favourable to be where a generator just got done.

The killer constantly sees generators through any walls or objects with an overlay feature.
It's the killers way to keep track of the match progress.
If you manage to get a team going with this segments' strategy and succesfully avoid the killer the entire time, he won't have an idea of your progress until it is late into the plan.
By repairing a generator completely, you are also removing the overlay for the killer and they will no longer patrol that one. (Since it's finished.)
Thus, by keeping all gens at 99% until the 'grand finale', you force the killer to keep patrolling all generators. If the killer catches on to your plan and focuses on the generators that are not prepared by you, you can fire off one or some of the prepped gens to put pressure on the killer.

Upon rapidly finishing the generators at the 'grand finale', you will also create more confusion via information overflow for the average killer. Ideally at the same time, coordinated with other survivors.

Two video representations this time.
In the first one we attempt to show a more realistic delay between each generator. This is more in tune to both solo and SwF play, when keeping in mind travel distance and time between each generator.

Here's one with a more coordinated and timed 'grande finale'. You'll need to play SwF with voice comm if you want to pull this off this well timed. Without voice comm, you'd have to rely on everyone knowing what they're doing.

Stealth Generators
This could be considered a bug so it might get fixed at some point.
See the segment "Tactic: Stealth Generators".
Strategy: vs No One Escapes Death rank 3
If the killer has No One Escapes Death rank 3, he will get the ability to instantly get you into dying state(prone/crawling) if he hits you the moment the exit gates are powered.

I've seen some hilarious bad timing moments where someone was vaulting over a window and got hit. Between the start of the vault animation and the killer hitting the survivor, the last generator was repaired, triggering NOED. The killer instantly brought the chase to an end, as the survivor ended up prone on the other side of the window.

Do not underestimate NOED. Especially if the killer has a higher latency thing going on where he'll be able to hit you even though you thought you were a safe distance away. (That's the problematic result of peer-to-peer hosting and having host-sided hit registration.)

You won't know if the killer has NOED until the tally screen, or you see someone instantly go down from healthy to dying state. (Always keep an eye on your HUD elements to see if things change!)
Or, you know, you find yourself at the wrong end of NOED and get chopped.

So what can you do against NOED?
First off, don't get too cocky after the exit gates are powered. You're gonna have a bad day if you get caught when you could have escaped. That's a loss of a potential 5000 bloodpoints for survival that you instantly lost there, buddy.

Let's look at how a match usually goes, generally speaking.
  • Survivors repair generators, there's some chases here and there.
  • People might get hooked, might get saved.
  • They'll want the exit gates powered & opened as quickly as possible.
    Then comes the relevant part;
  • People will want to try and get extra points by repairing those leftover generators and/or sabotaging more hooks (and traps).
They usually open the gates first because they want to maximize their chances of a quick getaway if the killer comes after them.

But then in comes NOED3. That 'quick getaway' suddenly becomes a lot harder, especially if the killer is using the bottleneck that the exit gates are, as a bottleneck.
So how do you 'counter' this?
By extending the '99% generator strategy' to all generators, not just the needed amount!
You get points based on progression, afterall. So if you repair a generator to 99%, it is as good as a complete repair, points wise.
You do your sabotaging too, just remember those aren't progression based points, but completion based.

And by leaving that final generator unrepaired, you stop NOED3 from triggering until you're ready for it.

Last survivor standing
This is especially useful when you're the last survivor standing. If you did not get the order of generators right, you'll have a hard time getting that last one repaired on your own.
That will become extra problematic if the killer has NOED3.
You're the last person standing. The moment you trigger that generator, the killer has nothing else to do but go straight to that area.
If he sees you, you will get in a chase where you have only a slim chance of losing him, let alone going through the hatch.
Once your position is known, you can forget about repairing more generators or opening the gates. What is that killer gonna do, have his lunch break?
Strategy & tactic: Sabotaging hooks during a 'carry'
I'll just call it a 'carry' when the killer is carrying a survivor to a hook! ;)

There's more to sabotaging than just points.
One other obvious benefit is denial of option for the killer. By removing a hook or beartrap from the playing field, the killer has less options when he is searching for one.

Unlike generators, you only get points for completing a sabotage, but leaving a hook not sabotaged completely can have several benefits.
You might want to leave it for another survivor to get the points, if you are feeling alruïstic.

But you might also leave it nearly done for the following tactic.
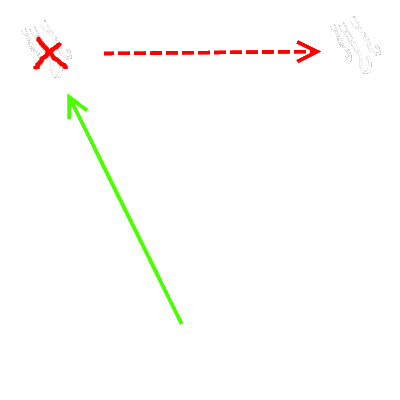
Here we see a simplistic representation of two hooks and a survivor that was just picked up by the killer.
The green arrow signifies the path of the killer to the nearest hook. In this scenario he chose to go to the left hook.
What the killer did not know was that this hook has been prepared by a sabotaging survivor.
Once the killer was right around the corner, the saboteur would give the hook the finishing touch and destroy it. Now, the killer has to walk all the way over to the next hook on the right. This gives the one that is being carried much more time to wiggle free!

Here's a staged video representation of what happens.
You might notice the crappy timing on our survivors here, most of us would have gotten hit, if not twice. Getting the timing right requires a little practice. We did it all in one take without practice, so suck it. :D
The staged video will show you an ideal situation; multiple hooks prepped and a killer that will go from prepped hook to prepped hook. In reality, be prepared for the killer dropping his current prey to let them crawl and bleed out, and chase someone else that is in range. Or they go straight for the basement, with or without the Iron Grasp perk.
Final Word
Regardless of you playing with teamwork or playing selfish, you will have to make decisions constantly. That's part of the game.
So think about what you're doing and anticipate what your teammates are doing, and act accordingly.

Coincidentally, this guide could be useful for killers to read into strategies survivors use.

As always, if you have any feedback, please let me know. :)
A thank you if you thought I was any help to you, would be appreciated.
42 Comments
Bucketsmith  [author] 14 Feb, 2017 @ 5:46am 
Thanks. The guide was written when the game was only out for a little bit.
I've stopped playing when it became apparant the devs would not listen to their playerbase and kept making faulty decisions, so I'm unsure if the guide is still accurate or helpful. :)
Jean-Bernard de Murol 14 Feb, 2017 @ 5:34am 
Great guide. All these tips is actually kind of common sense if one plays this game for awhile. I had to discover all those tips myself during 200hours of gameplay. Well done OP making this guide! One of my favorite guides right here!
Alp 26 Aug, 2016 @ 4:34am 
this is pretty good
Bucketsmith  [author] 22 Jul, 2016 @ 11:27am 
Check out the latest updates, if you haven't checked in a while!
Always open for feedback.
Thiil 17 Jul, 2016 @ 3:59am 
Hook trick is best trick - also Flashlight/Pallet save BEFORE a guy gets hooked is golden!
LadyKash 13 Jul, 2016 @ 6:38am 
Nice job. I love using the hook trick, I am sure I have made a few killers mad taking the hook down just as they are about to use it :) so satisfying
Noodle 8 Jul, 2016 @ 4:10pm 
Nice job. I hope you add more details as time goes on.
OfficerTerror 8 Jul, 2016 @ 4:01pm 
Thank you for the tips!
Would save you everytime 10/10
Angoose 8 Jul, 2016 @ 2:40pm 
:D :whiteward:
Ashen Tarnished 8 Jul, 2016 @ 1:01pm 
I have to admit, I hate it when people dont get me off the hook (pun not intended), But also sometimes i dont go for the hook either. Its just the idea that every person focuses on themselves, and when your hooked, the idea that you have to be saved comes into play, whereas when a teammate is on the hook, you dont think hes important and that you have to get those generators.