Tom Clancy's Splinter Cell: Double Agent

Tom Clancy's Splinter Cell: Double Agent

Not enough ratings
Splinter Cell Double Agent Hard 100% Stealth Score Walkthrough
By Ryder.J
This is 100% Stealth score guide,i decided to do this because the PC version of the game is different than the console version and there are intricate situations and higher standards to the 100% Stealth Score due to random elements and harder AI and also some bugs, there is not a lot of information guide out there for the hardcore perfectionist gameplay on the PC, and the very few that there is on youtube or other is not really accurate or does not cover every detail that i felt is important to cover the most intricate matters of the game.Also the Steam community hub guide didn't have anything to this effect already.
   
Award
Favorite
Favorited
Unfavorite
Intro
Before we start i want to get a few things out of the way.

The steam version of the game is not patched, you can find the patch here:

https://support.ubi.com/en-GB/Faqs/000011967/Where-can-i-find-the-Splinter-Cell-Double-Agent-1-02a-1364550316408

The reason that patch 1.02a is important is because it fixes the unlockables bug, basically even if you unlock the things by completing star marked objectives, the game will not let you use them in the next missions, now most of the unlockables are not that important, but the one that will make a difference is the hack device v2.0, because in later missions it will help a lot with the hacking, if you try to hack in later missions with the v1.0, it will be very hard as there is very little time and the decryption will be very slow getting the numbers, many times making you fail the hack and if your lucky getting the hack done with 1 second remaining.
Your peripheral vision must be really alert for this to work consistently, specially if you are doing no save dry runs only to fail at a hack later in the mission and have to restart all over.

The patch also fixed the shadows for me, i had no shadows as you can see in my first couple of missions.There is also a tweaked .ini that you can find easily by searching the steam hub guide or a google search, that supposedly fixes the shadows dynamic range and other glitches but i have not tried it.

Important:

if you get an error: "Unable to retrieve installation folder, aborting!" when trying to install the patch, you don't need to copy the patch inside the game folder like some people claim.You only need to launch and run the game once and exit and then the patch will work as intended.

Also there have been people saying that the patch did not fix the unlockables bug for them, that is because of the save data information, if you load a save game from a time line where you didn't have patch 1.02a installed, the unlockables will not work because that data is pertinent to the very initial release of the game, but you don't need to create a new profile, just instead of loading a save game, load a mission instead and go from there and your unlockables will work then.

Also make sure you run the patch with administrator privileges.

Also the sound bug, the audio effects and ambient slider are set by default at 50, if you move the sliders or toggle the music option off, you will get no sound ingame and very low music in the menu, i dont know a fix for this, what i did was reinstall the game and it fixed it for me.

Also on a side note the game has some considerable amount of bugs but we can work around them as you will see.

General notes:

In the last mission ( JBA HQ 4) if you are getting a freeze or a crash on the final swat cut scene, just change your resolution to 1024x768 after you disable the bomb and after the cut scene starts.

Also if you want the bonus mission NYC coast Guard Mission you have to save 2 out of 3 targets and have NSA trust above 33%.

The three targets are the cruise ship in JBA HQ part 2, if you frame Enrica she dies and you don't lose any JBA trust, if you block the signal Enrica dies and you lose JBA trust, if you destroy the Cozumel cruise ship Enrica lives and you lose NSA trust which you can back later anyway.
Other targets are Hisham in the Kinshasa mission and Lambert in the JBA HQ part 4.

Finally i play the game in the most professional way possible, the way i feel Sam Fisher would do it and the way the game is meant to be played, and for the most part this were dry runs no save missions, if fail restart mission, which was quite chalendging.
MISSION 1 - ICELAND GEOTHERMAL PLANT
Nothing much to say about this mission, it is pretty simple and straight forward.

Couple things:

At 8:24 there is a small building to the left with a guard and a computer inside which you can use to open the gate instead of just cutting the electric power to the fence, you can hack the computer without the guard being alert to your presence.

At 10:33 you can also go left and take the bottom route to come up the stairs and go to the upper platform instead of using the pipe route.

Once you reach the missile silo perimeter i only know of this way to reach 100%, timing and method is important, and sometimes is left to randomness as guards are tricky and very sharp and their patrol routines and behaviour changes, so sometimes it is not unlikely to fail.Any other methods i have tried did not result in the 100% stealth score.

MISSION 2 - KANSAS ELLSWORTH PENITENTIARY
Couple things:

At 2:55 after you drop down, sometimes the guard will notice the ceiling door is open and sometimes he wont, it is random.

At 7:12 you don't need to drop a smoke tactic there i just did it as good measure because sometimes they do see you, i did no save runs, so i adopted a safe behaviour, but you can just roll there most of the times and get away with it.

At 7:45 sometimes the benches are there for cover and sometimes they aren't, i am not sure if this is a dynamic level random change built within the game or if it is just a bug.

After this the climbing the control tower can be done also differently by using outside pipes to climb.


MISSION 3 - NYC - JBA HQ - PART 1
At 3:00 you don't need to pick the lock and go trough the timed lasers, you can just just climb the pimp to your right and go safely above it all.


MISSION 4 - SEA OF OKHOTSK
Now the fun begins.

This mission is different from the normal splinter cell parameters, it actually allows you to kill or take enemies out in a non lethal way without losing any score at all.

Video one is a perfectionist run without touching a single enemy, i have seen people doing it with smoke grenades to reach the detonation hacking device, but i feel those tactics are quite unrealistic, because if enemies see smoke in the camp they would know a threat is there and the whole camp would be on full alert, instead of just wondering what is going on, so to keep it in the most realistic way possible i avoid those tactics unless i absolutely have to.

At 5:03 it is critical that you do the crouch roll because if you don't and you are just crouch moving the guard will see a considerable glance you something he feels that needs to be investigate, and he will come to your position breaking the routine of the guard near the detonation hacking device looking at the big cooking fire and then you wont be able to hack the device without some ruthless action.So the trick is to actually roll on that precise moment and then the guard will see something but not enough to come investigate and break the other guard routine, he will remain inside the building.

When you detonate the explosives a guard will be killed in the blast, don't forget to put his body in the water, like i did at 7:02.


This next video is also part one but i kill everyone instead in a stealth behavior.


Now part 2 is where the fun truly begins, there is a lot of confusion about this mission because people where not getting 100% due to bodies found, some believed that you needed to drop the bodies out of the ship, some believed that it was the explosion body of part 1.The truth is it has nothing to do with part 1 explosion body or dropping bodies out of the ship.

You can hide the bodies inside the ship on crates, and as a matter of fact the upper deck guards you can leave their bodies as is, no need to move them.

The first part after you board the ship is really complicated and tricky, guards get easily alerted for nothing at all and the game attributes different random elements to guard routines depending on how and where and how fast you boarded the ship, so it is very intricate and takes quite a lot of time to find every route and possibilities.

The guard at 7:14 on the above platform from the regular level will see guard bodies even if there is snowstorm making it impossible for him to see, he will still see them, even if they are hidden behind crates or machinery, so it is important that you clear the first left side leaving the bodies out of his line of sight.

A good measure for this is if you see the guard beacons on the radar red, chances are you will not be getting that 100%, even if the general status is not red alert.

One important pattern to avoid in the beginning of part two, if you do this:


You will get a body found at the end.The two enemies are talking to each other, lets call them guard 1 and guard 2, if you knock out the ice guard 1 will come investigate, and guard 2 will remain in place, if you swim and take guard 2 out, guard 1 will come see what happened to guard 2 due to the noise you made, now sometimes as guard 1 runs back quickly he will see you even if you are under the water and red alert, but if you're fast enough he wont, the problem is even if he wont see you this still counts as a body found, now is it a bug or did they intended for this to be like this i don't know, it does make sense because they were talking and all of a sudden ice starts breaking on one side and then ice breaks down on the other side and his buddy disappears out of nowhere so.............most definitely avoid this, i was doing it countless times only to finish the mission with one body found and it was this one which i never even tough of it.

So lets get to the actual part two, i did use lethal action, but it really doesn't matter because you would have to neutralize them anyway and the difference between lethal and non lethal is what button you press and i like the knifing move better than the punch one.


Now the first 3 guards you can actually leave them untouched and just move on to the ship, you can break the ice and let the confusion end and then look when the guards are not looking and just jump into the water.

At 2:28 i used the rope but you can also use the boat lift to the left side to board the ship.
Once i boarded the ship everything i do has a meaning and triggers other elements and guard actions and routines so timing and position is very important.

At 4:22 the body position of that guard is perfect because it is immediately directly below the upper platform where the eagle eye guard is and thankfully he does not see him usually, sometimes he does but rarely, it is a game of chance, high stakes.If you notice also his body drops in a way that he is flowing with the wall direction and not towards the back of the ship so it is perfect.

At 4:40 is imperative that you knockout that guard and not get lethal fifth freedom on him because if you knife him the guard on the opposite side of the crates will hear it and no more 100%, also make sure you hide his body where i did otherwise the guard going for the upper deck will see him even tough he has crates and machinery making him out of his line of sight.

Again keep in mind timing and position is critical on this part before the ship crew part.There are at least another 4 unique ways of doing it, but this one is my favorite because u get to drop like a bad ass ninja on that guard at 7:10, dropping that knowledge on him.
If you get even the slightest alert of noise, or red beacons on the radar, forget your 100% most likely.

The guard at 7:58 is imperative that you knock him out and not knife him because the other guard will hear it if you do and all of a sudden the situation gets quite interesting.
Same with the guard at 8:10, don't knife him or the guard on the last upper deck directly above you will hear it and see the body.
As you can see i hidden the bodies of the lower platform on the middle behind the crates just as good measure.
The guard at 12:48 is bugged and is constantly on walking animation without moving, so you have to draw his attention otherwise he won't move anywhere.

At 17:00 as you can see i hidden the crew bodies on the shadow location, but i do not think it is needed.

After 18:00, after the captain runs, the 3 guard bodies i hidden them inside the container in the shadow location, but again i do not think it is needed, just as good measure.
Also hidden the body of the guard at 26:08 in the shadow area in the hallway, but i do not think it is needed.
After that the last two guards you can just ignore them, the killing quota for the mission has ended with the guard at 26:08.

If you want an easier alternative route approach to the captain at 27:29 you can use the stairs on your right side and go up to find the main entrance to the location where the captain is, if you do choose this route you will encounter a guard to deal with, either by passing him or dealing with him directly, the other guard is on the lower deck.

Major bug that happens quite often, at 28:10 if you take too long to get on the platform and hanging in the above rain ledge, the captain walks to the left side and turns his line of sight to every possible area where you can surface from, and because it is all light and no shadows makes it impossible to finish the mission.If so just reload the checkpoint, what you can do to prevent this, be really fast to go and hang on the rail ledge, or also sometimes as he walks to the center get directly beneath him and a bit to the left, this forces him to take the right path.


MISSION 5 - SHANGHAI - HOTEL
Another one with some tricky behaviours.

At 8:54, make sure you are all the way to the left, as far as you can go, because the guard will see you if you don´t.Also before you climb that window make sure he was already passed the corner of the wall because sometimes he will see you if you move to the right while hanging on the ledge as if he has eagle eyes, seeing trough walls and stuff.

After this guard you can take the route i did with the vents all the way to the meeting room or at 9:55 go left instead of right to find an elevator to the meeting room, but this is a messy route.

At 13:30 you can use the dragon statue to drop down instead of the elevators but it is messy and you will take damage and this is not the way Sam Fisher would do it.

At 15:02 there is a guard smoking, he is also sick, sneezing and coughing and sometimes he will be dead in that elevator lobby instead of coming to the window to smoke, i don't know if this is a bug or if it was intended this way as a dynamic level change behaviour.

VERY IMPORTANT:

As you can see at 16:34 i placed the wall mine to kill Aswat in that wall near the elevator lobby and not at 17:05 at his hotel room entrance, the reason for this is because if you place it near the elevator lobby Aswat will be dead sooner and faster resulting in you not losing so much JBA trust as they wait for you in the helicopter.

But there is a catch to this, once you crack the safe you must do like i do at 18:48, you must go to the door and watch Aswat talk to the other guard in the elevator lobby, this triggers the event for him to start moving towards this hotel room and get blown up by our wall mine, but be careful just stay within an inch of the hotel room door like a did in the shadow, if u walk even a bit further he will see a glance of something suspicious and most likely he will walk in the opposite direction of our wall mine and everything is ruined because we are on a time sensitive event.
So it is very important to go to the door and watch him talk to the other guard to trigger that event so he starts moving, if you crack the safe and wait for him inside the hotel room, he will never come, i don't know if this is a bug or intended for you to go look for him.


MISSION 6 - NYC - JBA HQ - PART 2
Nothing really much to say on this one, i didn't do the training course because it is just repetitive, it is the same thing as in JBA HQ part 1 and it doesn't count towards the 100%.

I did do the firing range because if you beat the score the guy on the weapons cabinet room will say a unique phrase like "You shoot better than Moss, but don't tell him i said it", or something along those lines.

Major bug, you can't access Emile personnel quarters because the door is bugged and you don't have the interaction to open it making it impossible to get his professional background info, you can get this later on on JBA HQ part 3, if you really want to get it done on part 2, you can wait for Emile to open the door for you, he goes into his quarters after you crack the safe and scan the blueprints, after he opens the door use your sound emitter towards his office entrance door or shelves and as he goes investigate go into his quarters or you can wait for him to open the door and as soon as he starts moving you start moving towards the door too, if your hiding on the corner of the bookshelf parallel to that door like at 27:32 you probably can get to the door as it it about to close and if the door is not totally closed you will be able to use the interaction to open it.

MISSION 7 - COZUMEL - CRUISE SHIP
At 8:44 there is a major bug, if you let the conversation take place, one of the guards comes out trough the right side door, and after a few seconds the second guard will come out the left door, problem is the left door is bugged, it is a double door so when the guard opens it another comes from the wall and the path stays blocked and the guard remains frozen in the walk animation while sitting there still making it impossible for you to get past this part without force, to go around this just do like i did, and get their attention and the guards path will change to the right door or the other guard will keep the left one open for him.

At 17:46 if you are not fast enough moving after they cross the corner those two guards will always get suspicious once they reach the upper deck even tho you didn't make any noise and they haven't seen anything, it is a bug, if you are fast enough good, if not they will come investigate and eventually go away.

MISSION 8 - NYC - JBA HQ - PART 3
Nothing much to say about this mission.

I did the firing range again just to beat the previous score, did 116 on this runs, my personal best was 120.

I didn't do the training course as it is repetitive, it is the same as previous JBA HQ parts and it doesn't count towards the 100% stealth score.

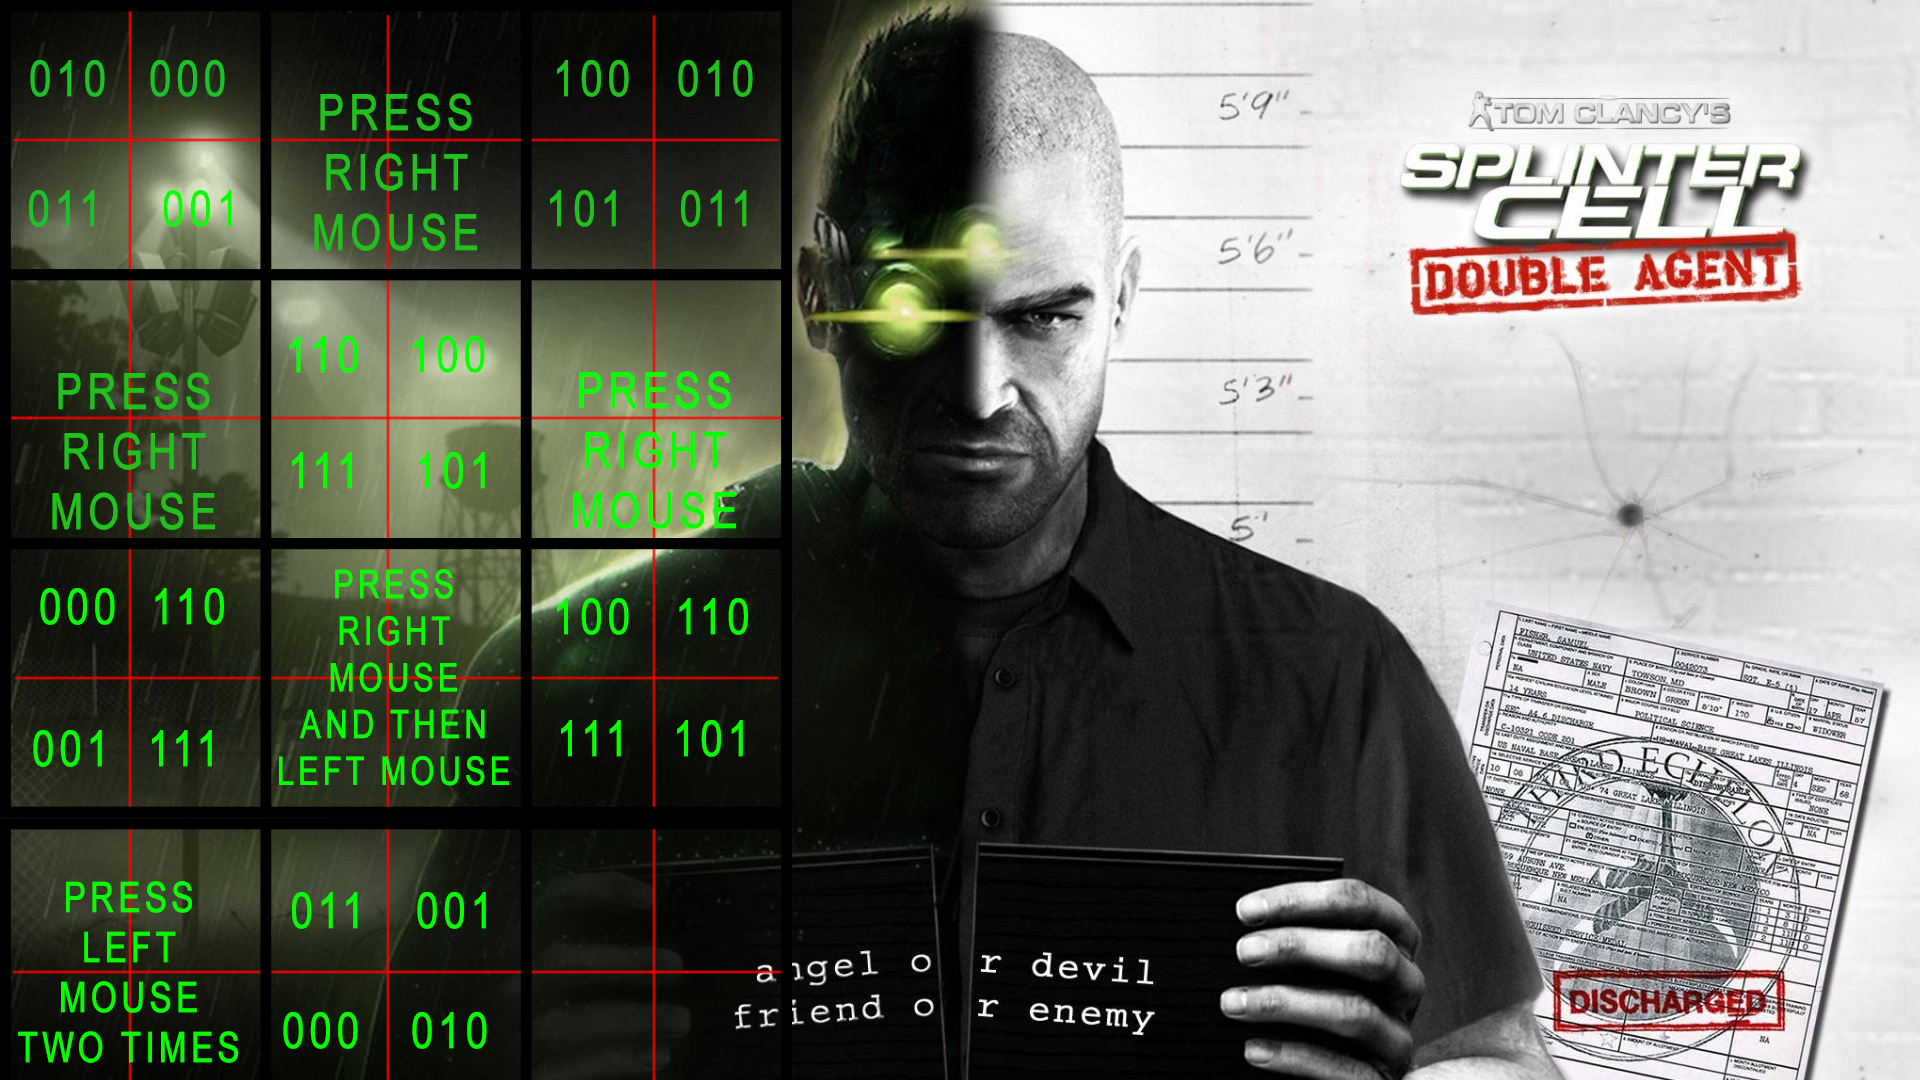
The decryption puzzle is in the video, but here is an image with the solution anyway, the order goes from left to right and then down and again left to right and so on.


Here is the video:

MISSION 9 - KINSHASA
All right, so into this great but bugged mission.

First thing, on part 2 you cannot prevent the execution (NSA objective) because if you do you will get a deduction in percentage and no 100%, you will get deducted for knocking two enemies out and for bodies found, i even tried hiding the bodies inside the house to no success and it wouldn't matter because just for knocking them out you get deducted.

Second thing no matter what i tried, if i wanted to save Hisham in the end i would always get a body found and 80% stealth score which was from the guy we must kill in order to save Hisham, now this is one of the options they give you and therefor it should not count towards a body found, but it does, i tried killing that guard in different positions as he moves inside the palace in the hopes that somehow his body drops in a place that the two guards that come after wouldn't see his body but no joy, in the end one body found, mission is bugged if you do choose to save Hisham you wont get 100%.

Keep in mind if you kill Hisham part 3 of the mission will not be unlocked and mission will be over then.

Now the good news is if you do kill Hisham you will get the 100%. If you make it a point in saving Hisham because of the 2 out of 3 targets just take the -20% deduction and after you beat and finish the game, repeat the mission and kill him to get that 100%.

This first video is the one where i choose to save Hisham and unlock part 3, and i guarantee you this is 100% but the mission is bugged and because of that body i get 80%.

At 3:10 i am aware that i don't need to use the glass cutter, there is a window on the left side with no glass, but i feel that the way the game was intended to be played like Sam Fisher would is by using the glass cutter.Also you don't really need to hang on the ledge and climb the pipe there is an alternative route to the left side, stairs going up.

On a side note at 5:20 right in front if you climb the balcony and hang on the outer side, the guard will see you trough the wall, it is a bug.

In this run i show you at 17:00 the most stealth way to get to the first chaotic fighting part, just be careful at 17:18 the dying enemy drops a frag grenade to commit suicide so you must be fast and get out of that building.

Also at 19:08 i use the truck underneath, to travel safely and undetected to the camp.
At 20:24 it is important that once you cut the tent material you go inside and hide, if you stay by the place where you cut the tent the guard on the computer will not leave to go talk to the arriving helicopter guards ruining your chance to retrieve the plans from the computer undetected and without fuss.

At 27:08 going down the rope sometimes you get detected with red alert, i am not sure if it is the guards from part 2 in the camp that see or the guards ahead that see me trough walls or if it just a bug.

At 27:32 as you can see it is possible to cross that firefight zone and avoid being hit by the blind fire, its just timing the shots and a bit of luck.Sometimes at 27:42 you need to crouch roll there to avoid some blind fire.


Now on this next video, i get the 100% but i killed Hisham, i also show you in part 2, another two alternative routes, the upper balcony at 16:34 and the minefield at 18:50.


If you decide to prevent the execution you can do it like this below:


Or you can drop a gas grenade on them to the same effect, again if you do knock this enemies out you wont get the 100%.

To finalize, the firefight near the bus accident, it is high stakes chances, very rarely you can go trough it all without using smoke grenades, most times it is better to use smoke to conceal your movement, and that is a war zone so it is not that unthinkable smoke is being deployed by one of the two factions fighting, Sam has that going for him, it is realistic.
The guard routines and behaviours there, are very random to, so it might take a couple of tries to get trough there without being detected.

MISSION 10 - JBA HQ - PART 4
All right, first thing is this mission is bugged, every time no matter what you do you will get 99% stealth score, that is due to a NBR of Bullets Fired, the game detects that you fired a bullet and deducts you 1% and that is the bullet that we use to kill either Jamie or Lambert, but that is one of the objectives so it should not be deducted, and in the console version it is not, so this mission is bugged and i will prove it later when i display the mission list stealth score, because there the stealth score for this mission is 100%, the game does correct it there.

Second thing, you cant knock Emile out to scan his retina if you want the 100%, the body will be found even tough it is inside the bomb control room in the shadows, or if you hide it somewhere else for that matter, you will get deducted for a body found -20%. If you want to scan his retina you can repeat it later again.

At 13:10 that guard is not always there, it is random, also it may have to do with the fact that at 10:24 as you can see that guard was already suspicious over nothing and then when i dropped down from the rail i didn't crouch as i fell so i made some noise and that got him even more alerted to the point that he didn't follow his normal routine of going to the right side down the stairs and look at the wreckage blocked path near the door hacking device, this might have triggered some alert also that have led to that guard at 13:10 being there, but i am sure he isn't always there.

At 15:48 you don't need to go all the way around like i did, i just do it like that because i feel it is the way splinter cell is meant to be played and how Sam Fisher would do it.But you can just distract the guards either by making them see a glance of you or by using the sound emitter right from there.

Now on the final showdown part, this part is incredibly bugged and it is frustrating.

At 16:15 many times the guards will ignore the sound emitter making it very hard for you to pass that part, when i mean many times i do mean many many times.

At 16:42 as you can see Emile and the guards will very often ignore your whistles and noise emitter making it extremely hard and frustrating to do this part specially if you are doing dry runs no saves fail restart mission type of thing like i did.What i find to be more consistent in drawing their attention is smoke grenades and that is what eventually worked for me.All guards on this area including Emile will many times ignore whistles and sound emitter, really i mean a lot, sometimes it gets pathetic.It is the most bugged part in the whole game specially because you require and depend on such distractions to get that 100%.

It took me a lot of tries to get this done right, and it wasn't because i didn't knew how to do it, it is just because its completely random, sometimes it bugs out and sometimes it does not, sometimes the guards also react to your distractions but they bump into each other wasting precious time for you to go inside and handle the bomb, like for instance you distract Emile and the two guards on the door with a whistle and by a miracle they do hear you and start coming to you they bump into each other and your chance is blown or Emile stays in front of a guard for 40 seconds and so on, you can see on my run that even with the first smoke grenade i got Emile's attention but not the two guards.

It will take a lot of tries so good luck.It is completely random how they will react and sometimes the smallest guard movement or detail might ruin it all.Or even how many times you got it all going well and Emile and the guards are coming back and you need a distraction but you are out of smoke grenades and the sound emitter just wont work no matter where you aim because they ignore it.

Video here:


Again i will prove this is 100% on the mission list stealth score below.

At 19:12 i had to change resolution to 1024x768 because the next final cut scene will make the game froze or crash unless it is on that specific resolution.

MISSION 11 - BONUS MISSION - NYC - COAST GUARD BOAT
Nothing much to say about this one, it is a small and short bonus mission.

One thing if you hang on the ledge of the right side of the boat guards will always detect you, i don't know if it is a bug or if it is the lightning being reflected towards that part of the boat, this doesn't happen if you hang on the left side ledge of the boat.

MISSION LIST STEALTH SCORE - HARD DIFFICULTY
As i said on the JBA HQ part 4 mission, here is the proof the game does correct the 99% to 100% on that mission.

JOHN BROWN'S ARMY PERSONNEL FILES
Short video on the JBA personnel and their files.

TAKEDOWNS, MOVES AND BEST MOMENTS MONTAGE

Thank you for watching and for reading.
20 Comments
Princess 21 Oct, 2024 @ 12:49am 
God I hate the boat. The enemies on the deck on my end just kept staring at a corpse across the entire deck and saying the same 2 lines over and over instead of doing anything. I got 16 alarms in the result screen because of that, and my rating plummeted to -44%.
kripcision 2 Jul, 2024 @ 8:51pm 
thanks for this, helped me out in a few missions, not really going for 100% stealth so this walkthrough was a bit overkill but much appreciated none the less. :crashthumbsup:
aDm 14 May, 2019 @ 2:52am 
there is 1% getting 100% on kinshasa and is pure rng sadly. of thousands of playthroughs i got it only twice
13ushwacker 13 May, 2019 @ 2:47pm 
LOL yeah, I do that a lot when working on a video.
Ryder.J  [author] 13 May, 2019 @ 8:23am 
Thanks mate, so much time to make this guide, dry runs if fail i restarted map, but it was a lot of fun to do it.Blacklist is not a bad game, my favorites are 1 and 3.
13ushwacker 9 May, 2019 @ 5:48pm 
Top notch guide JR, way to go! I liked SC Blacklist a good bit. Of course I played it my way and left no man standing using stealth to take them all out. Old habits die hard LOL.
Ryder.J  [author] 23 Jun, 2018 @ 5:57pm 
Thanks man, i am glad some people can make use of this.Yeah that mission is really one of the hardest for 100%.Yeah so much time man, countless hours doing dry runs, if fail restart mission. :steamhappy:
Tzanetos 21 Jun, 2018 @ 6:27pm 
Thanks for this guide, it was very helpful especially for the Sea of Okhotsk mission where I kept getting bodies found. It's clear you spent a lot of time and effort making this :steamhappy:
Citizen Cook 3 Jul, 2017 @ 6:56am 
I was loading a manual save at the start of the mission.
At this point I'm done with the game. If I decide to revist it again in the future I was start the mission fresh from level select.
Thanks for all your help!
Ryder.J  [author] 3 Jul, 2017 @ 5:20am 
About the sound issues i would say just do a clean reinstall and install the patch again.
About the three killed soldiers it is hard to say, it could be the game is detecting those KIA's and counting them, if that is the case the game is bugged, the game is very buggy on the PC.

If you are willing to try further, i would say do a clean reinstall of the game and install the patch right away and start a new game clean save.

The three bodies killed is indeed very weird.Are you loading a save into kinshasa or are you starting the mission again?If you are loading a manual save that is not ideal, best to load the mission from 0 entirely.