Hover
66 ratings
Gamegirls: Admin District, E-Tower & Orbital Station
By Nada Afterwards
How to get all gamegirls starting from Admin District to all the way to the end of the game, with illustrations and descriptions on the routes you will need to take.
3
   
Award
Favorite
Favorited
Unfavorite
Introduction:
In this guide I'll be covering 96 out of 206 gamegirls (GGs). I have heavily based the guide on Theihe's which covers Haven District, Sewers and E-Prison. If you want a guide for those zones, Soleil has reworked the original guide by Theihe to adjust to the current version of the game.

https://steamproxy-script.pipiskins.com/sharedfiles/filedetails/?id=1419502436
Why would you want to collect all GGs:

Collecting all 206 GGs unlocks the true/good/secret ending, required to get the achievement "Revolution!", the following line describes how the ending plays out, you've been warned. Do note the ending is nothing too special, there are no pre-rendered custcenes or anything mindblowing, it's just like the regular ending, characters talk and the game goes back to normal.

If the ending doesn't interest you collecting GGs is a good source of XP, useful for leveling up your characters. Each GG is worth 600 XP and when you complete a zone you get a bigger bonus XP reward.

As of patch 1.7 collecting all GGs AND beating the game will also grant you a new DNA kit, the Breaker E-Cop skin.

How do I take my screenshots:

You can go into free camera mode by entering in chat "/freecam" without quotes, this will remove your character from the map and turn you into a camera that can go everywhere and through anything.

You can increase your momentum with the mouse wheel, move up and down the Y axys with jump and slide respectively. Note that the camera has inertia and its panning is not affected by mouse sensitivity.

And also note that you're still in the server, just not as a playable character. To get out of freecam go to the menu and load a character.

Tips on how to climb easy:

If you are not used to climbing up tall buildings read this, it will be important to collect GGs.
  • When climbing tall buildings always make sure you are in hoverheat. With it you will have more energy to climb plus it will boost all your stats slightly.
  • An easy way to enter into hoverheat mode is to charge your energy by standing still, tapping and then holding slide. Don't do it too quick or you will simply duck.
  • Try to climb on the corners where two walls meet and jump from side to side. This allows you to climb faster because you spend less time in the air and more time grabbing onto surfaces.
  • If your energy is depleting before you can rest on a surface to recharge do not give up or try to bounce back up. Instead slide to one of the sides as quick as you can to regain energy.
  • If none of the tips above are working for you, you will either need to get better chips or try with a character that is more appropiate for climbing.
  • Jump and slide chips are important for climbing, they allow you to launch yourself up higher, lose less energy for each jump and regain it quicker when sliding.

Do not fear if this sounds complicated as the routes are designed to be doable for all players.

Summary of GGs per map:

Haven District: 86
  • Garbage Village: 15
  • Fusty Place: 7
  • Humble Suburb: 10
  • Slippery Speedway: 6
  • Majestic MoreMoreMore: 12
  • Red Avenue: 9
  • Sunny Roof: 12
  • Flock of Sheep Boulevard: 5
  • Korupa Archipelago: 10
Sewers: 13
E-Prison: 11
Total: 110
Admin District: 79
  • LazyTech Center Place: 14
  • Level Up Agencies: 10
  • Flybox Industries: 8
  • Flock of Sheep Land: 4
  • HP+ and PopExpo Laboratories: 26
  • MoreMoreMore Factories: 10
  • Breaker Territory: 7
Total: 189
E-Tower: 6
Orbital Station: 11
Total: 206

To do list:
  • Complete guide.
  • Complete: LazyTech -Level Up - Flybox - Sheep Land - HP+ - MMMore - BT - Tower - OS.
  • Give guide a proper thumbnail.
  • Check for grammar errors and punctuation until I'm dead.
  • Be a good boy and show the missing GG from Theihe's guide [extra goal].
  • Add video guides [extra goal]. Thanks Soleil! 👍
  • Figure out why headers sometimes ignore spacing [extra goal]. Can't be fixed apparently.
LazyTech Center Place
Total GGs: 14

Video guide provided by Soleil:


Otherwise proceed to the written walkthrough:

We will be starting this zone by standing at the entrance of E-Prison, pretend as if you have just gotten to Admin District for the first time.

Gamegirl #1

From the entrance looking into the district head left where you will find some crates and a graffiti of a Breaker, you will need to climb up where the two walls of the buildings meet.


Gamegirl #2

Go back to the starting point and take the right way from the building in the center. Then you want to cimb up the wall with the two vertical green windows. You will see the second GG right in front of you then move to the support beam indicated on the last screenshot.


Gamegirl #3

From that support beam you will have to jump forward and to the right. You will see an upper platform with a smaller shorter support beam bellow it, there's the third GG. Once you collected it rewind back to the first bridge.


Gamegirl #4

You will want to look upwards towards a cylindrical building, you need to climb it all the way to the roof.


Gamegirl #5

Now find the other cylindrical building which is taller than the one you're standing on, fall down between the two. You will se a pile of crates and the fifth GG will be hidden between them.


Gamegirl #6

Now you have to climb the second cylindrical building we just mentioned, depending on your build it might work best if you rewind and bounce to the roof of this building. This GG is located on top of the second disc.


Gamegirl #7

Find a small building with a balcony next to yet another cylindrical building, you will find the seventh GG there.


Gamegirl #8

Now here comes the ugly part, and the only one thankfully. You have to climb all your way up to the tallest building of this zone, where you meet Grind-E. Get on the roof and jump off to the direction of Level Up Agencies, if you did this on the right side you should see the GG right below you.


Gamegirl #9

With the worst GG out of the way get back on the roof and look down until you see the building indicated in the screenshot, jump to it and land at the top. The ninth GG is towards the left side of this building.


Gamegirl #10

Now run on the rooftops in the direction where the big eye is. There is a bridge that comes out of a building and conects to the tower just outside the map. This is where the tenth GG is.


Gamegirl #11

You need to jump down to a circular platform then look towards LazyTech and in the corner of a building's roof you will find the next GG.


Gamegirl #12

This one is rather far away, read carefully to avoid confusion. You need to jump down to the floor of LazyTech, face opposite to the eye and follow the rail until you reach the end at a building. Look up and to the left, there is a beam support in the form of an arm that holds the platform from Level Up Agencies, you need to get in there.


You will find the twelfth GG resting on the support beam and from here you might be able to spot the next GG.


Gamegirl #13

This GG is resting on a small balcony not too far from the beam from GG #12.


Gamegirl #14

Jump down to the floor again, follow the rail and jump down to the highway, you will see a tunnel on the side of LazyTech, get in there. Now just go forward until you find a few crates with the last GG hidden between them.

Level Up Agencies
Total GGs: 10

Video guide provided by Soleil:


Otherwise proceed to the written walkthrough:

We will start this zone on GG #4 from LazyTech Center Place, jump off the building and land on the bridge that leads to Level Up Agencies. Your screen should look something like this.


Gamegirl #1

Go ahead and cross this bridge, when you go up the stairs take a left and look up to the three support beams. The first GG is on the furthest one right next to a wall, it's highlighted with a dashed circle line on the first screenshot.


Gamegirl #2

Jump off to the floor and continue on the left side where you will reach a dead end, climb the wall and you will find the second one.


Gamegirl #3

Now climb upwards from the dead end to the left (where Haven District is), find the indicated building and climb to the very top to find the third GG. Then head to the green hover car to find the next one.


Gamegirl #4

This one is right next to a door where you'll find the green hover car. Then climb to the top of the building right in front of where you are.


Gamegirl #5

Just like the third GG this one is on a smiliar looking roof, there is a taller building next to it. I want you to remember the spot indicated with an arrow in the screenshot, we will be heading there soon.


Gamegirl #6

Get close to the edge of the building you're standing on and fall down to a lower roof between you and the taller building.


Gamegirl #7

Either rewind or climb back up to GG #5 and bounce to the spot previewsly shown. Then just run along to the other side, jump off and go left to find a balcony with the seventh GG.


Gamegirl #8

Hopefully this one is easy to follow. Get to the edge of the balcony facing into the distant cities, look down to the left to find a cubical shape poking out the building, jump off here. Then jump off to the column from the same building with the blue glowing parts aiming to where the arrow indicates in the second screenshot.

You will find the eigth GG hidden away here, now take a look at the crates on the third screenshot, we will be heading there for the ninth one.


Gamegirl #9

This one is hidden between some crates on a slightly lower part of the floor. Take a look at the container next to the arrow, this is where the final GG is.


Gamegirl #10

You need to go behind the golden container from the last screenshot (just FYI that container might not appear for you if your team rank is too low). There will be a path you can walk on behind the building, the last GG is at the end.

Flybox Industries
Total GGs: 8

Video guide provided by Soleil:


Otherwise proceed to the written walkthrough:

Because 6 out of 8 GGs are located in "the pit" the route was designed so you would pick the "ground level" ones at the beginning then continue down to the pit. Moving around will be easy and the hunt ends near a bumper to get out from the pit if you choose so.

We will start the hunt on the limits of Flybox Industries and Flock of Sheep Land where two GGs are nearby, you will be looking at something like this:


Gamegirl #1

Go up the stairs on the left and reach the post light, you will want to jump off into the pit from the left side of the post light. Once you collect the GG rewind back.


Gamegirl #2

Go to the roof from the building indicated in the very first screenshot to get your second GG then drop off to the ground.


Gamegirl #3

Now just run along to where B-Ball and the exit to Haven are. You will pass a second set of stairs that we will return to for the next GG. After these stairs you will see four support beams with a GG on the third one.


Gamegirl #4

Go back to the stairs you passed by and drop off between the two post lights. There is a pipe to the left of this GG that you will use to get the next one.


Gamegirl #5

Drop off between the walls and the pipe to find the fifth GG then rewind back to the fourth GG. Dropping through the hole from the pipe and the walls is not needed but recommended for being able to rewind back.


Gamegirl #6

The next one is close by, just follow the screenshots and you will get there (yes I realize the previous GG is not the one you just picked up, my bad).


Gamegirl #7

Same deal as before, follow the screenshots.


If you're struggling to reach this one read this:

From the sixth GG jump down to either the support beam or the cylinder, then you will want to climb up high enough that you can make it to the small surface you can stand on from the blue structure, follow the surface to the corner then just jump up from there side to side.

I tried it on a chipless anon so it should be possible for anyone.


Gamegirl #8

One more time, screenshots are self explanatory. You have a bumper next to the last GG that gets you out of the pit if you need.


Flock of Sheep Land
Total GGs: 4

Video guide provided by Soleil:


Otherwise proceed to the written walkthrough:

We will start the hunt at the same place we did for Flybox but this time we will be facing the other way.

Gamegirl #1

Before you enter Sheep Land you will see a few e-swaps below, to the left are some crates hiding away the first GG. Once you pick it up go inside and reach the second pillar.


Gamegirl #2

Stand on the ring of the pillar at the same height of the second floor of this place, the GG is right next to you. Then go outside through the main entrace on your left (if you're facing the same direction as the screenshot).


Gamegirl #3

The next two GGs are higher up. Climb Sheep Land from any side you wish as the first screenshot shows. Take the less steep slope first, then climb onto the second and then reach the purple part, the rest is straight forward.

Head to the back to find a bumper that launches you to where the merry-go-round is. The GG is right there.


Gamegirl #4

Now take the bumper in the center and use the balloon pets to reach the top of Sheep Land to get the fourth and last GG.


Done! Man I swear these zones are getting easier each time!
HP+ And PopExpo Laboratories
Total GGs: 26

Video guide provided by Soleil:


Otherwise proceed to the written walkthrough:

We will start at the exit that leads to Haven, it's right across the E-Prison entrance from LazyTech. We will head to the stairs shown in the picture.


Gamegirl #1

Go up the stairs and jump off to a lower level with two doors to find the very first GG.


Gamegirl #2

Drop down to the platform with the entrance to HQ, the second GG is hidden near the elevator.


Gamegirl #3

Use the elevator to climb on top of the entry to the highway then jump to the furthest HP+ balcony. For the next GG you will want to use the bumper to gain altitude.


Gamegirl #4

Grind on the glowing wire and go behind the pillar, there is a GG next to a few crates.


Gamegirl #5

Go to the upper platform using the bumper (which I forgot to leave un-blured on the last screenshot, oops) and below the camera is the fifth GG.


Gamegirl #6

Now take the stairs and start heading to Flock of Sheep Land until you see a cylinder with a bridge going into the district wall. Climb the bridge from the district wall and you will find a GG next to a bumper on the cylinder, we will use it for the next one.


Gamegirl #7

From the bumper you will want to reach a skyway, bounce and try to land on top of the advertisement then climb to the skyway. Run along to the other side to find a GG on top of a balcony roof. Then head to the other balcony, the one that lets you get inside of the glass dome.


Gamegirl #8

Once you're inside of the dome climb the scaffolding (?) on any of the sides that are next to the glass, jump alternatively from the glass to the scaffolding. The GG is right on the center, go back outside after this.


Gamegirl #9

Now you need to climb up to the balcony where thre is a moving platform. You can use the pillar that holds the balcony to reach it or climb from the skyway using the blue pannels. Another GG can be roughly be spotted not too far away.


Gamegirl #10

As shown on the last screenshot the tenth GG is on the second circular platform next to the other balcony in front of you. Get it and go back to GG #9.


Gamegirl #11

Drop down to a new balcony that is facing an identical one. The GG we're looking for is on a lower over hanging roof and we also have another GG a bit higher up on a new skyway.


Gamegirl #12

Climb up to the aforementioned skyway to find the twelfth GG and then head to the identical balcony.


Gamegirl #13

Drop down to the ground and bounce to the balcony, the GG is in fact resting there. For the next one you will want to go behind from here where there is a security camera guarding an entrance to inside a building.


Gamegirl #14

Before we go inside the building we will take a quick GG to the left side, it's resting on a balcony roof (I'm sorry that I repeat that word so much). Once you pick it up rewind back.


Gamegirl #15 & gamegirl #16

That's right! Two GGs next to each other, your eyes do not deceive you! Go inside the building and after taking a second turn you should find two GGs to your right behind two "benches".


Gamegirl #17

Continue to the exit where you will see a building right in front of you, climb to the roof and on a narrow section you'll find the GG. Then head to the building with the E-cop antenna, Oto is also here.


Gamegirl #18

This GG is next to a few crates and a door (common trend huh?).


Gamegirl #19

Look behind you and climb the building all the way to the roof, on the other side you will find a wide balcony with a GG on the roof. There is also another one near on a lower level for that you will want to drop off from the skyway shown in the screenshot.


Gamegirl #20

From the skyway drop off to the GG then rewind back.


Gamegirl #21

You will need to reach another skyway that is higher up and from there just climb up the building from where you picked the last GG, you will see the twenty-first one on your way up resting on a blue L-shaped section.


Gamegirl #22

Finish climbing the building, the roof is "divided" in four parts and you need to reach the opposite corner to you.


Gamegirl #23

Turn around and head to the taller building, you will find the GG in one of the white platforms.


Gamegirl #24

Go ahead and climb to the second highest point on this building, run to the other side and drop down to the shorter building where the GG is.


Gamegirl #25

Like before, run to the other side drop down to the GG on a blue L-shaped section. Back on the taller building there is a balcony below you, the last GG is there.


Gamegirl #26

Just jump off and drop or bounce to said balcony, congratulations! You just completed the largest zone in the game.

MoreMoreMore Factories
Total GGs: 10

Video guide provided by Soleil:


Otherwise proceed to the written walkthrough:

This zone is entirely located on the pit and because some GGs are too far apart I had to split this zone into two routes. Both routes will start at the entrance to Flock of Sheep Land.

First Route:
Gamegirl #1

Go ahead and enter Flock of Sheep Land, go to the bottom level and enter the skyway connecting o LazyTech, when you see Power Pink hug the left wall to find the first GG.


Gamegirl #2

Now find your way above the skyway standing to the side of LazyTech, you will see two support platforms sticking out that hold a industrial chimney each, the GG is resting on the first support platform.


Gamegirl #3

Now you'll need to drop down and land on an orange skyway and get inside in one of the two holes you'll see in front and behind you. The orange skyway will become handy later on so remember your way back to it. For now pick the GG and follow the path indicated in the last screenshot.


Gamegirl #4

You'll reach a part where there's a slope and to each side a lower floor with doors, drop down to the one in your right. Now pay attention to the second screenshot as it indicates how to get to the next GG, once you understand what to do head back to the orange skyway from the third GG.


Gamegirl #5

Once you make your way up you will see a circular bumper and next to it the fifth GG. Use the bumper to get out of the pit. We completed the first route and you should now be on HP+ go back to Flock of Sheep Land.


Second Route:
Gamegirl #6

Gamegirl #6 & gamegirl #7

Is not exactly like in HP+ but these two GGs are really close to each other. Go to the wall of the glass dome and in the pit you will see a balcony with one GG on its roof, below when the gray scheme starts you will spot the next GG right below the balcony.


Gamegirl #8

Screenshot is self-explanatory, you will want to face towards Flybox and reach three crates then get behind them.


Gamegirl #9

Find the "arm" indicated in the screenshot, move there and get to the next side. Do note: You will be standing right in the boundaries between three zones: Flybox, Breaker Territory and MoreMoreMore. Do not worry the next two GGs are in fact part of the zone we're completing.

Look down right on the edge, you will find the ninth GG resting on a lower surface. You may also be able to spot a bit of magenta all the way down, that is in fact the last GG so drop down there next.


Gamegirl #10

Just pick the last GG :)

Now, to get out of here you got three options: Use the LazyTech Teleporter in Krow's throne room; if you haven't infiltrated the breakers yet find one of the exits to the sewers, the lower one sends you directly to the sewers but the one higher up sends you to HQ. Then you'll want to use HQ's entrance to Admin District to get to ground level.

Alternatively you can rewind back to the previous GG and chase the spy-drone, it will show you the way out and is not too difficult to follow.

Or if you plan to collect GGs in Breaker Territory just stay where you are :P

Breaker Territory
Total GGs: 7

Video guide provided by Soleil:


Otherwise proceed to the written walkthrough:

Breaker Territory is a relatively small zone, perhaps the second smallest in the game. It expands on the floor of the pit in a straight line but thankfully we can find a teleporter to easily get out.

Gamegirl #1

We will start from the last place where we left of in MoreMoreMore, to your left head to the corner of the pit. You'll find the first GG here then head to the suspended containers, you will want to stand on top of a container that's behind the one indicated in the second screenshot.


Gamegirl #2

This GG is on the over hanging roof from the door of the container.


Gamegirl #3

Drop down if you want and head to the other side of the pit, you will see a pile of white crates hiding a GG and next to these a bumper you'll need to take to progress.


Gamegirl #4

Take the bumper which will send you towards a cylinder, climb it and you'll be on a large platform, on the other side you'll find another one. To get there wallslide on the pannels to your left.


Gamegirl #5

You will want to drop down where the screenshot indicates, after you pick the fifth GG head to Breaker HQ.


Gamegirl #6

Drop down to the container on the left, pick the GG then continue to the bottom.


Gamegirl #7

You should be looking straight to Krow's throneroom and to your right you'll see more white crates, the last GG is there. Now to exit out of the pit head to the throneroom and take the teleporter. If you can't go through it means you don't have the key and therefore haven't infiltrated the Breakers yet. If you see a Breaker guarding the door do the mission, it will unlock the door when you beat it.

E-Tower
Total GGs: 6

Video guide provided by Soleil:


Otherwise proceed to the written walkthrough:

Although is not difficult to follow the guide I highly recommend you first get familiar with this map as it can be overwhelming at first with all the security lasers. You will also find out some GGs can be reached through the easy "intended" way or by the hard "cheesy" way. I'll describe both ways when applicable.

Gamegirl #1 & gamegirl #2

The first and second GGs are easy to get, when you go through the vent drop down to the alarm floor and find the first GG hidden between some boxes.

Next to it you will find another vent commonly used to escape Secuboxes, go all the way in and before you come out of the other side you'll get the second GG.


Gamegirl #3

Now start climbing, use the tips I teached you a lot if needed (always climb fully charged and wallslide to recharge). When you reach Liff you will see more boxes behind him, the third GG is between them and the wall.


Gamegirl #4

The next GG is not too far from here and has two ways to reach it.
  • Easy way: Go through the security shields (you need 35 speed to break them), follow the path and when you come out of the vent you will want to drop down one level and go left.
  • Hard way: Face the center of the tower and climb up one level to the left.


Gamegirl #5

  • Easy way: Reach Krumball, solve the puzzle then go through the monitored hallway where Wata is. You will then go down and come out of a vent next to a rail and more security shields, when you get to the next side you will find the GG resting above the box.
  • Hard way: Climb the walls and if you're in the wrong side grind your way there.


Gamegirl #6

The last one is all the way at the very top, you will want to find the exit out of the tower into Orbital Station, turn around and look up to find a short small industrial catwalk. Or just climb up anywhere and slide around until you see the GG.

Orbital Station
End game spoilers here! Do not hover the spoiler text!

Video guide provided by Soleil:


Otherwise proceed to the written walkthrough:

Total GGs: 11

It is suggested that you first get acquainted with this map before starting the hunt. It is nothing like like you have seen so far, Orbital Station (OS) is secured to the teeth and has a ton of E-cops. That said though, the map is pretty much straightforward and like E-Tower all GGs will be in your way to the end (save for one).

Being caught 3 times on this map will not send you to prison, instead it puts you in a small jail section of OS near the beginning.

Gamegirl #1

When you enter OS you must find an alternate entrance as the door will not open for you. Find a vent on the sides of the ramp and you will be met with two options, go left or go right. Any will do as the left way loops around to the right.

If you take the left turn however, you will spot a GG behind some iron bars, to get it come out of the vent and when you see Veelan take a left and reach the end of the corridor.


Gamegirl #2

Continuing your way, you are required to activate a switch to open a door on your left. To reach it you need to take a right and avoid the security lasers and cameras. You have the option of going low or high. If you take the high path you will soon find a security camera hanging from a small support beam with the second GG on top.


Gamegirl #3

Once you activate the switch you will have 30 seconds to get to the door, when you go through you are met with three directions to take. Left and straight forward take you to a vent that loops around while right lets you advance to a big open room. The third GG is in the middle of the looping vent.


Gamegirl #4

If you had taken the low path in your way to the switch you might have seen another GG behind iron bars. This one is by far the trickiest to get and is in a secret route. Once you reach the big open room with the sound alarm floor you will see two entrances you can take on the right.

The upper one is the entrance you normally go through but the one below it is the secret path. To get there you can either follow the industrial catwalks on the left and later drop off from the upper entrance, or if your bounce is good enough use the circular generators (?) to reach the secret door.


Once you successfully went through the secret door you need to take a right and follow the path to the end. Do note there are lasers in your way which will trigger an e-cop to spawn right in front of you. Be very careful here and use a character with the lowest jump you got if needed.

If you manage to go through the lasers you will reach a vent that ends on the GG you were looking for.


Gamegirl #5

From here you need to go back and take the normal route. Like before you are met with 3 choices: Left takes you nowhere but there is a Rehabilitation Platform, straight forward is the way to go but right sends you to the next GG where you can also talk to Watabax.


Gamegirl #6

Go back and take the straight forward path (now being your right). You will come out on a new big open room with lots of vehicles flying by, you are supposed to wallclimb/bounce your way to the left but first check behind the ladder to get the sixth GG.


Gamegirl #7

Now comes probably the worst part of OS, to advance you have a spy-drone that is mandatory to chase. It will make you go through alarm floors, cameras and lasers all which can spawn either a secubox or an e-cop.

You have to hit the drone 17 times before you can reach the next room. Like I suggested before try using a low jumping character to help you not overshoot lasers. Also if you've never noticed you can slide through alarm floors without activating them, you do need enough grind chips to do this or you will lose speed.

I should also mention this spy-drone is mandatory everytime you enter OS and so is the mission right after it. If you're planning to take breaks on the hunt try to leave this and the remaining GGs for one single session.

Once you reach the new room go right and enter the looping vent. This is normally used to outrun e-cops but at the other end you will find your reward.


To continue the hunt you need to do a mission, read this text if you don't know how to beat it:

The mission requires you to charge 6 condensers, to do this you need to land a trick score of 100 or better near them, doing this causes your character to send a shock wave to nearby objects. This is also how you open containers locked by an antenna or how you can charge/discharge allies/rivals on team based missions.

Gamegirl #8

After you've done the mission the reistance will tell you where to go, eventually you will reach the end of OS which consists of a giant looping ring. To get the remaining GGs take a left and make your way through.

You will soon find an alarm floor, on the right are two big crates hiding a GG behind them.


Gamegirl #9

At the end of the second alarm floor there is another GG on a platform high above to your left.


Gamegirl #10

Right after you go through the last set of lasers there is a platform on your left with yet another GG hidden behind a crate.


Gamegirl #11

Past the long alarm floor you will find more lasers, right before them climb to the platform on the left.


CONGRATULATIONS!
You should have all GGs by now.

Just challenge the Great Admin to a race, then beat him on a match of gameball and you've won the game \o/

You should definitely bring your buddies to the match though... you'll see why.
Did you wish the guide was in your native language?
Then you're in luck because I'm allowing everyone to reupload my guide on a different language!

If you're planning to translate this guide ask me in the comments so I can provide you with a "raw" version (has all the formatting in plain text) which I will post in Pastebin. You can also reuse my screenshots which I will upload to Google Drive, with the same names so you don't have to insert them again!

Do note though, I didn't FULLY think this through so I can't provide with unedited screenshots. That means you'd have to write over the text if you want it translated, or retake those screenshots. Sorry! No one is perfect :C

If you don't know how to do the blur effect let me teach you:

Download Gimp, it's a freeware software much like Photoshop. Open a screenshot, use the selecting tools to mark which parts of the screenshot you want to leave unblured. I used the rectangle select tool for GGs and the free select tool for objects, you can draw straight lines if you click anywhere with this tool. You can also trace them if you hold the mouse button.

If you're making multiple selections you need to head to the tool options dialog and change to the second mode (add). After that you will want to invert the selection with the hotkey Ctrl+I or go to Select>>Invert.

Then right click on the canvas and go to Filters>Blur>Gaussian Blur. I set the Gaussian Blur to 15 on both axes. Now your screenshot should be blurred justl ike mine, next time you want to apply blur just use the hotkey Ctrl+F, so long as you keep Gimp open or don't use another filter it will re-apply the same effect with the same parameters.

For the other details:

For arrows and squares I use the pencil tool (hotkey N) with a size of 5. To make straight lines click somewhere then hold shift and click where the line should end.

My texts are in the font Arial Bold Italic, with a size of 108 for GG numbers and 54 for words.

That's all you should need to know to replicate my style. If you care that much...
Update log
July 5, 2017.

-The guide was created.

July 6, 2017.

-Added update log.
-Changed guide thumbnail to something more professional yet memey.
-Fixed screenshot layout on the LazyTech section of the guide.
-Tweaked text in the LazyTech section.
-Included more categories to this guide.

July 7, 2017.

-Added Level Up Agencies.

July 8, 2017.

-Tweaked text in the Level Up section.
-Removed "Why I update slowly" from the introduction because I update faster than expected.
-Shortened and removed redundant/intuitive text from the freecam paragraphs.
-Added tips on how to climb easier on the introduction.

July 9, 2017.

-Added Flybox Industries.

July 13, 2017.

-Added first half of HP+ and PopExpo Laboratories.
-Removed text from the guide description as it started to get flood-y.
-The removed text is now included at the beginning of the introduction.
-Improved text in LazyTech again.
-Changed some iterations of the word GG in Level Up.
-Added some more explanation to Flybox (why to drop through the "pipe hole").

July 14, 2017.

-Added the second half to HP+.
-Tweaked text in the HP+ section.

July 21, 2017.
-Added MoreMoreMore Factories.
-Added the E-Tower.
-Changed note at the beginning of the guide to remark the zones that HAVE NOT been covered yet.
-Merged the notes section with the introduction.
-Added the individual zones of Haven to the list of GGs in the introduction.

July 28, 2017.

-Expanded on the reasons to collect GGs in the introduction.

July 29, 2017.

-Added Orbital Station.
-Added Flock of Sheep Land.
-Added joke text to HP+ holy heck dude im dyin right now :joy: :okhand:
-Removed one of Grub's guides on the intro and rearranged the other guide.

August 13, 2017.

-Added Breaker Territory. Finally. Woohoo! Guide is complete now \o/
-Removed Grub's guide for Breaker Territory.
-Removed update text on the introduction as the guide is now 100% done.
-Added a new section regarding translations for the guide.

August 24, 2017.

-Tweaked first paragraph on introduction since it was heavily redundant (too many reiterations of the word "guide").

September 10, 2017

-Tweaked first paragraph on introduction again and rearranged text.
-Added the wrongly believed missing GG from Theihe's guide on the beginning of the introduction. It turned out a gamegirl was simply part of a different zone.

September 11, 2017

-Confirmed that the prison layout has not changed since alpha, at least for the route Theihe took. This has been clarified on the introduction.

July 5, 2018

-Added Soleil's guide on the introduction to the other gamegirls, removed Theihe's as it can be found on hers.
-Updated introduction to mention that collecting all GGs and doing the ending unlocks a skin for the E-cop.

Fun fact: Today it's the guide's first anniversary, hooray!
and i do miss hover somewhat

July 6, 2018

-Updated the first spoiler text in the Orbital Station section to account for changes made in patch 1.6.

August, 28, 2018

-Added video guides to each section, videos made by Soleil. She's also covered the first half of the game too if you're interested! Link to the playlist
31 Comments
Nada Afterwards  [author] 4 Jun, 2023 @ 5:34pm 
I wish I could help you but I haven't played this game for over 3 and a half years 💀
They must have never fixed the 205/206 bug, I don't even think Fusty Games exists anymore 💀💀
DarkPlasticBag 4 Jun, 2023 @ 5:24pm 
collected every single one and didnt get the different ending. so much work for NOTHING.:steamsad:
Vanessa 23 Sep, 2018 @ 5:00am 
Sure wish the 205/206 was fixed...
Enata 14 Sep, 2018 @ 3:24pm 
Thank you for your help!
I just wanted to let you know that I gave credit to your guide here [astats.astats.nl]
Crowbar Jones 28 Aug, 2018 @ 10:24pm 
Nevermind, I was completely idiotic :2017eyeball:
Nada Afterwards  [author] 28 Aug, 2018 @ 2:02pm 
Added videos for all the zones. Big thanks to Habijob/Soleil for taking the effort of doing these! You can find a link to the playlist on the changelog, to watch the videos on the rest of the game.

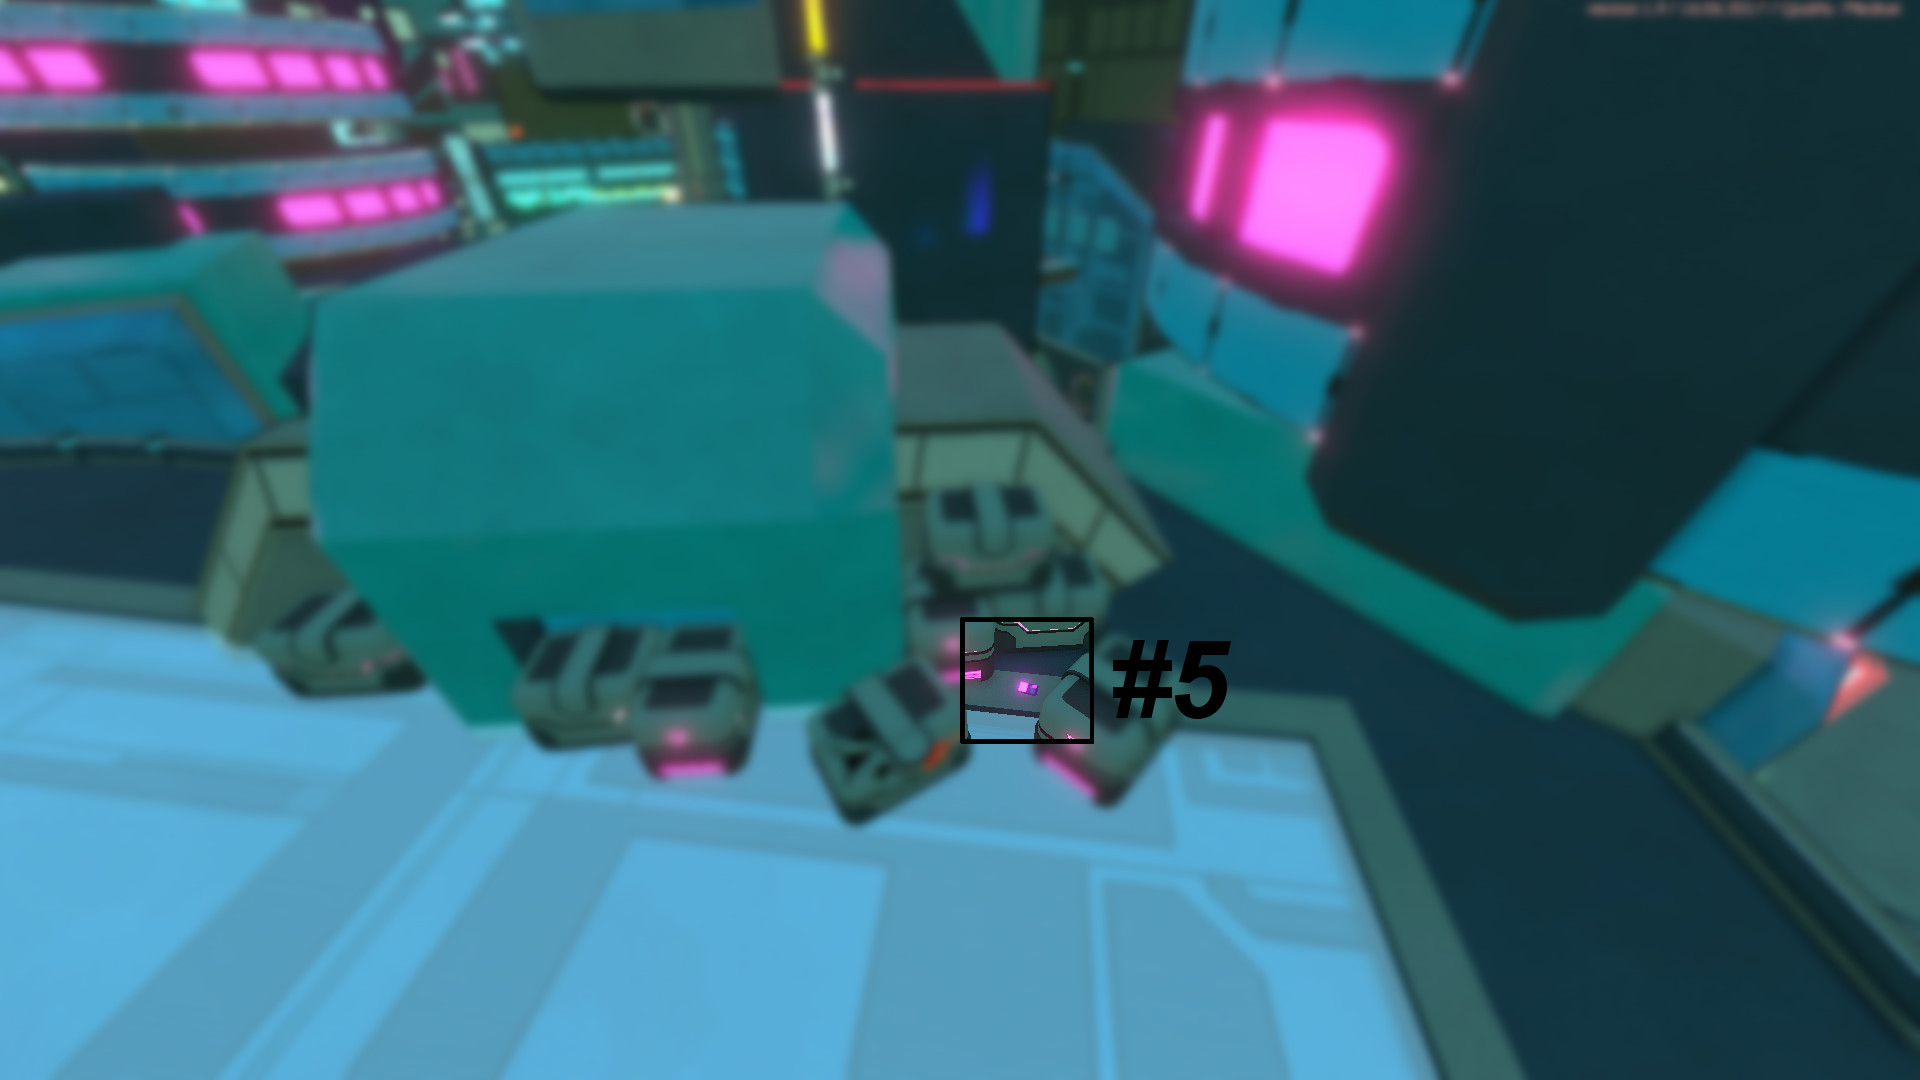
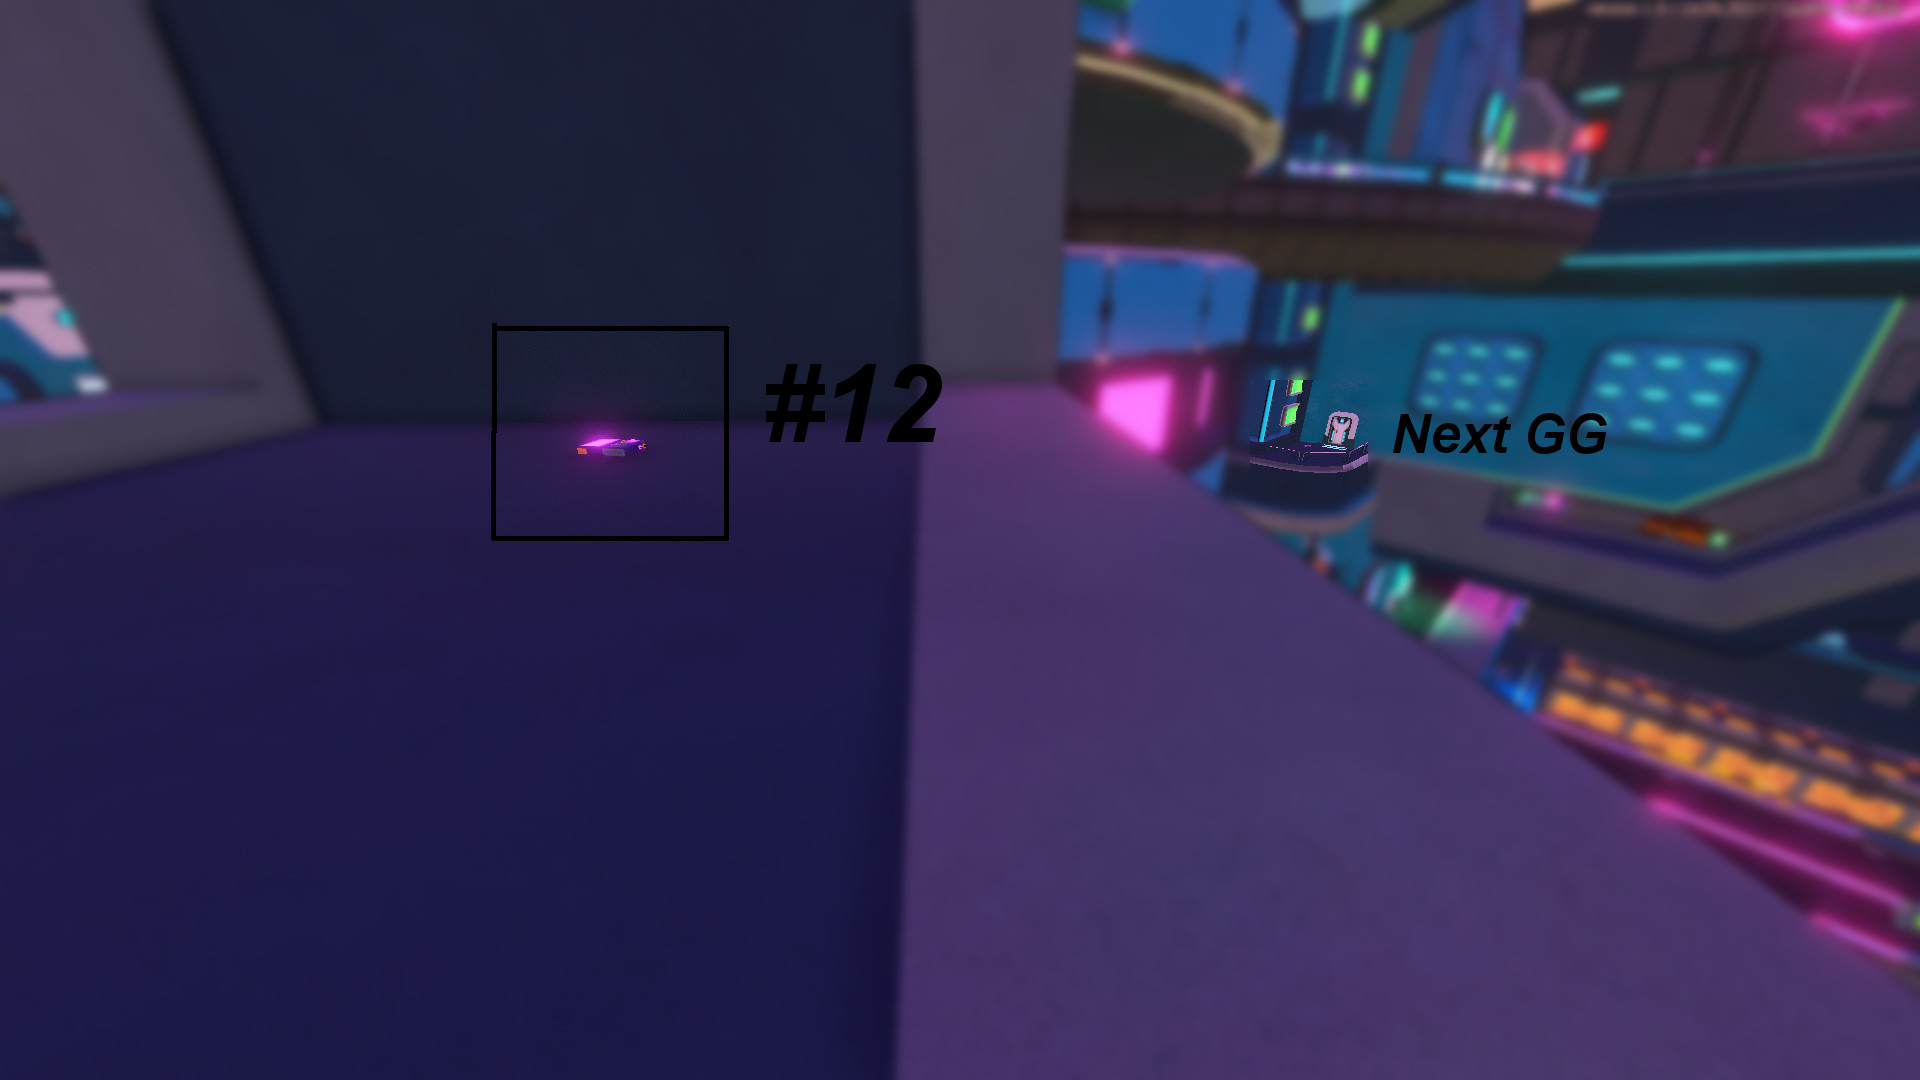
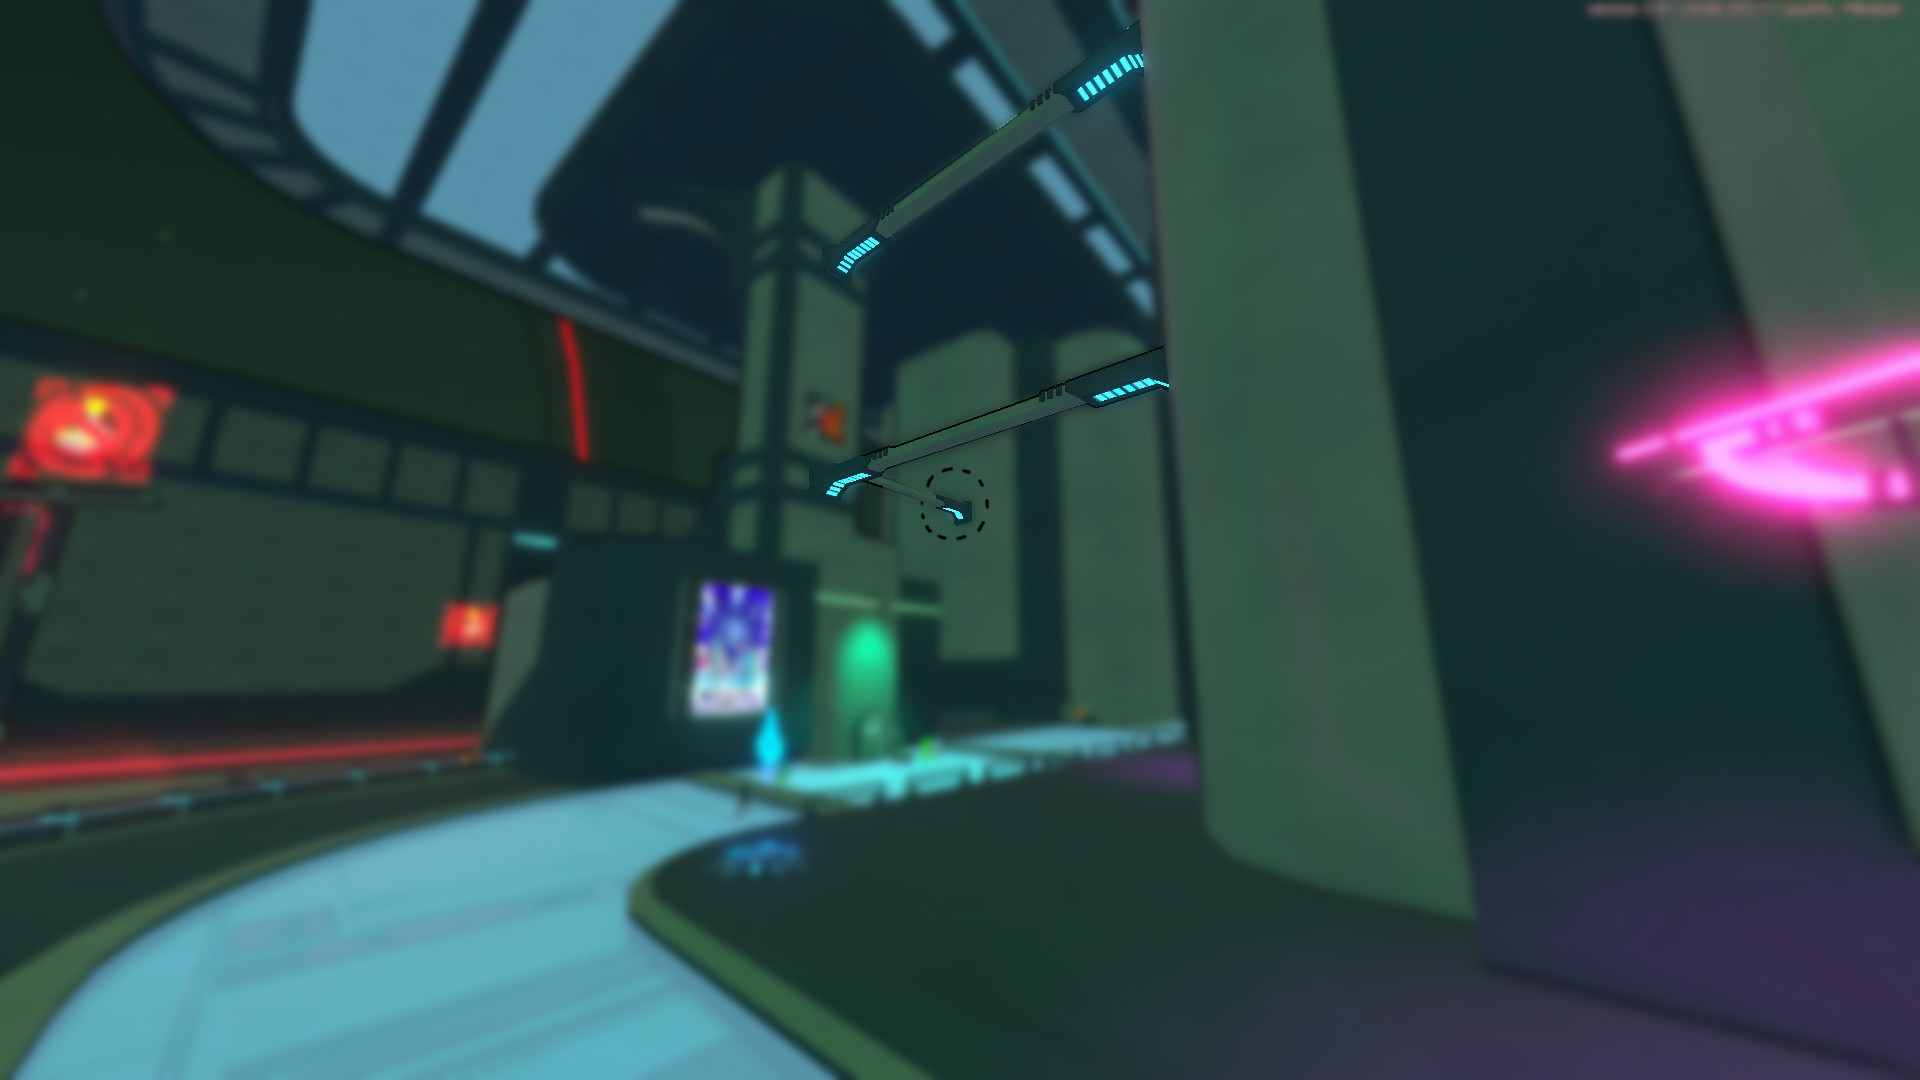
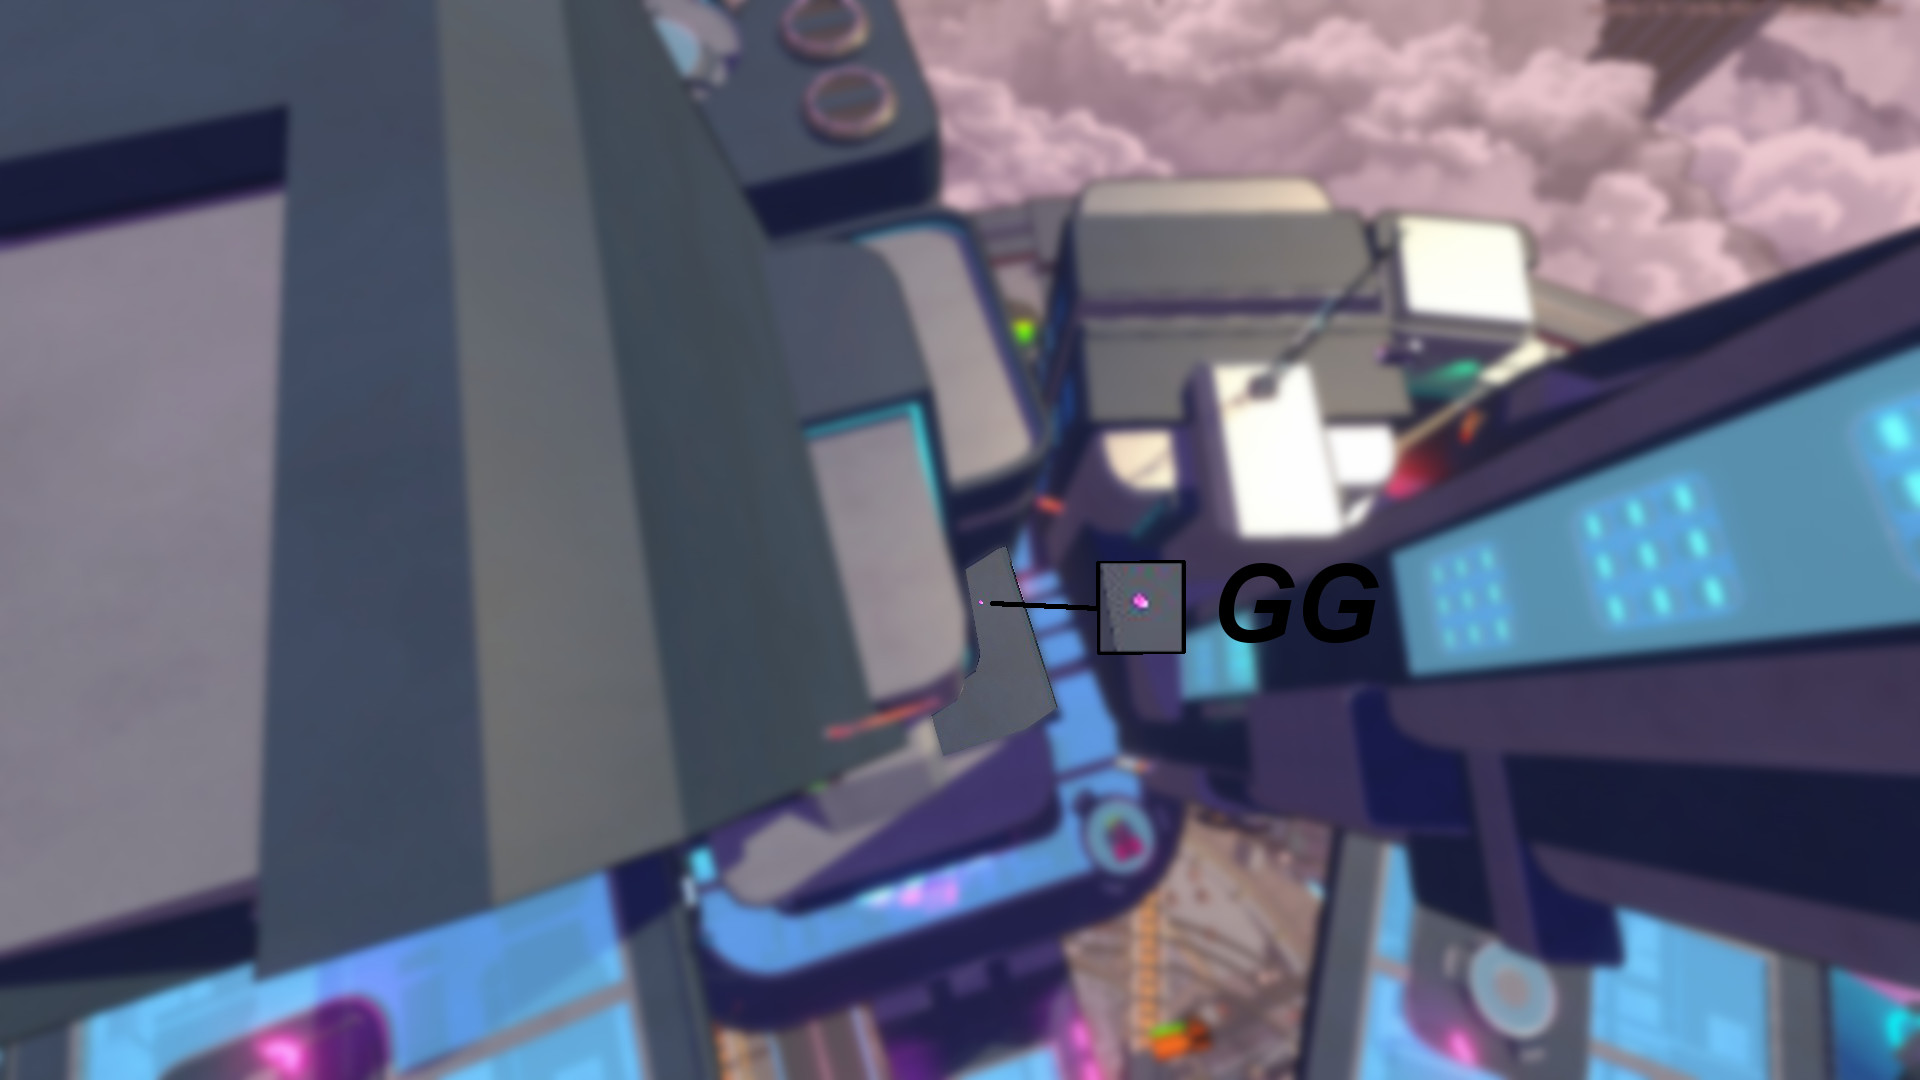
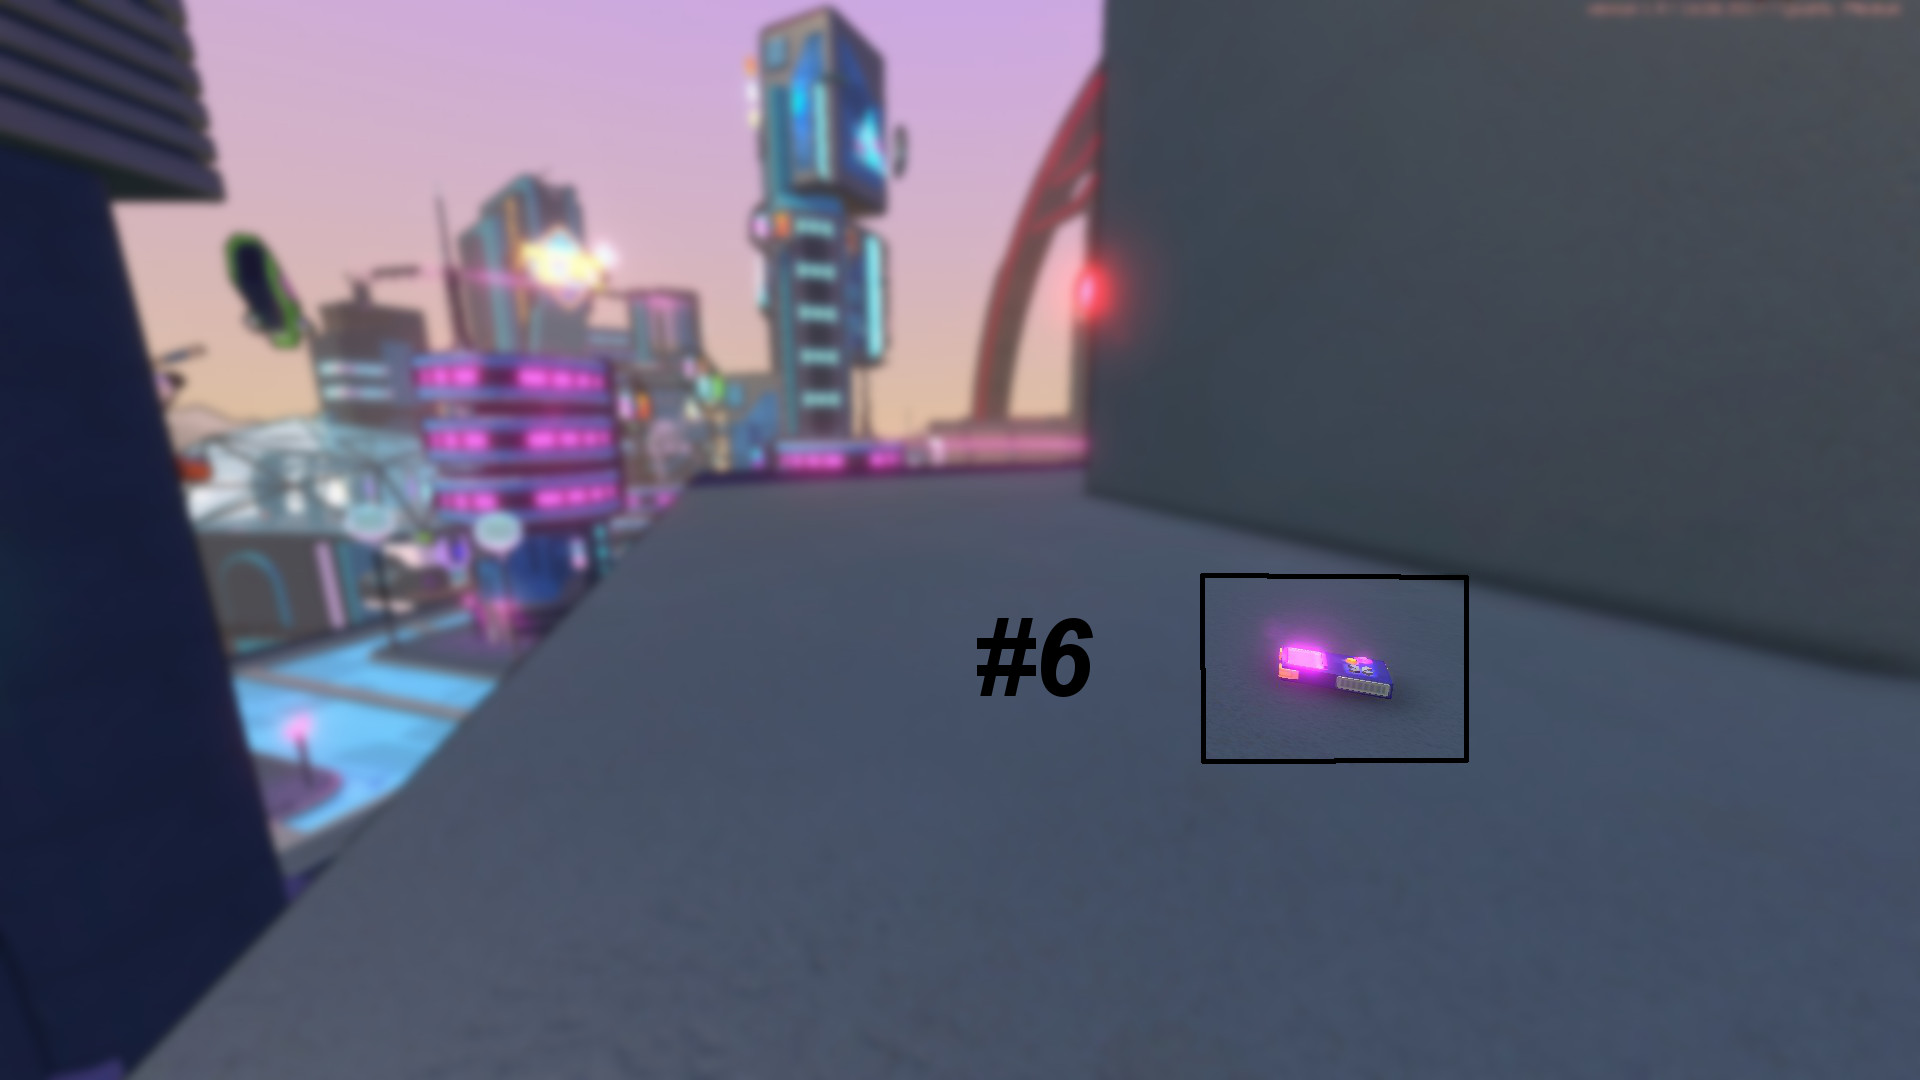
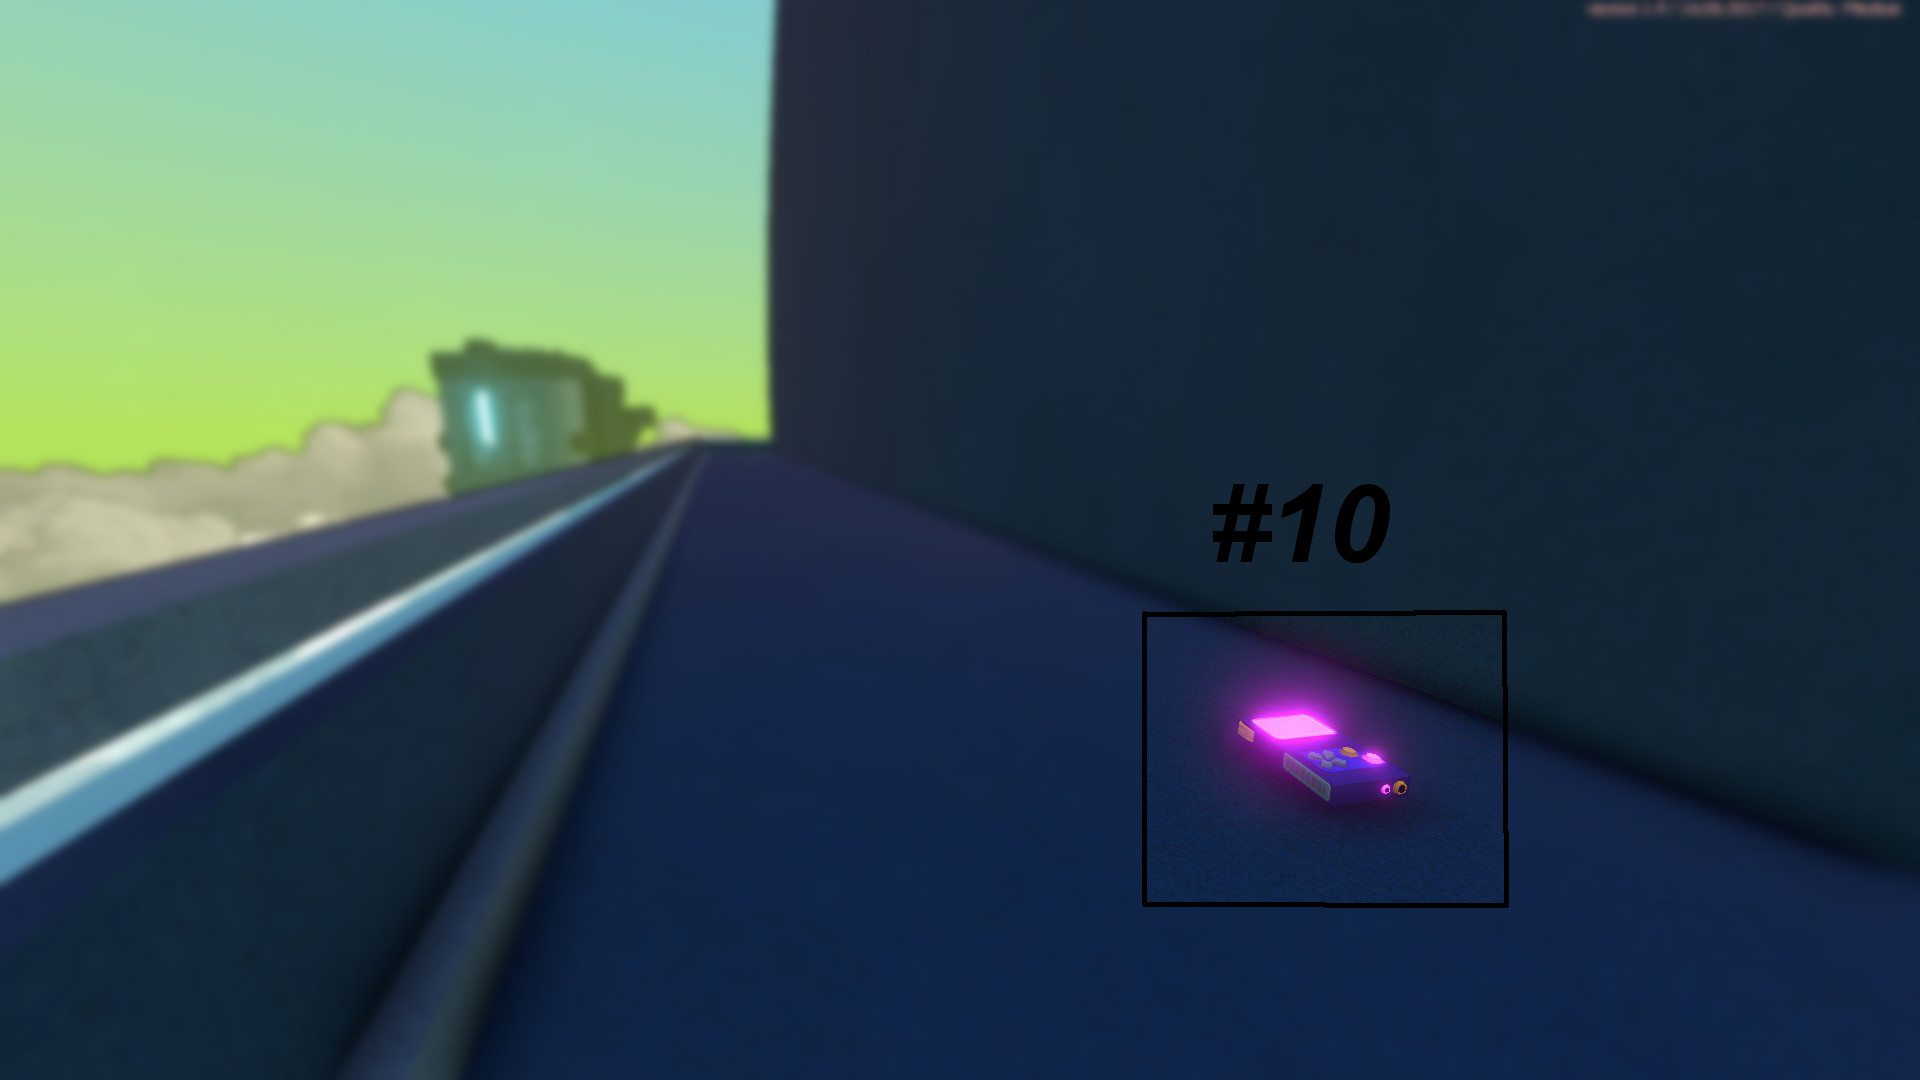
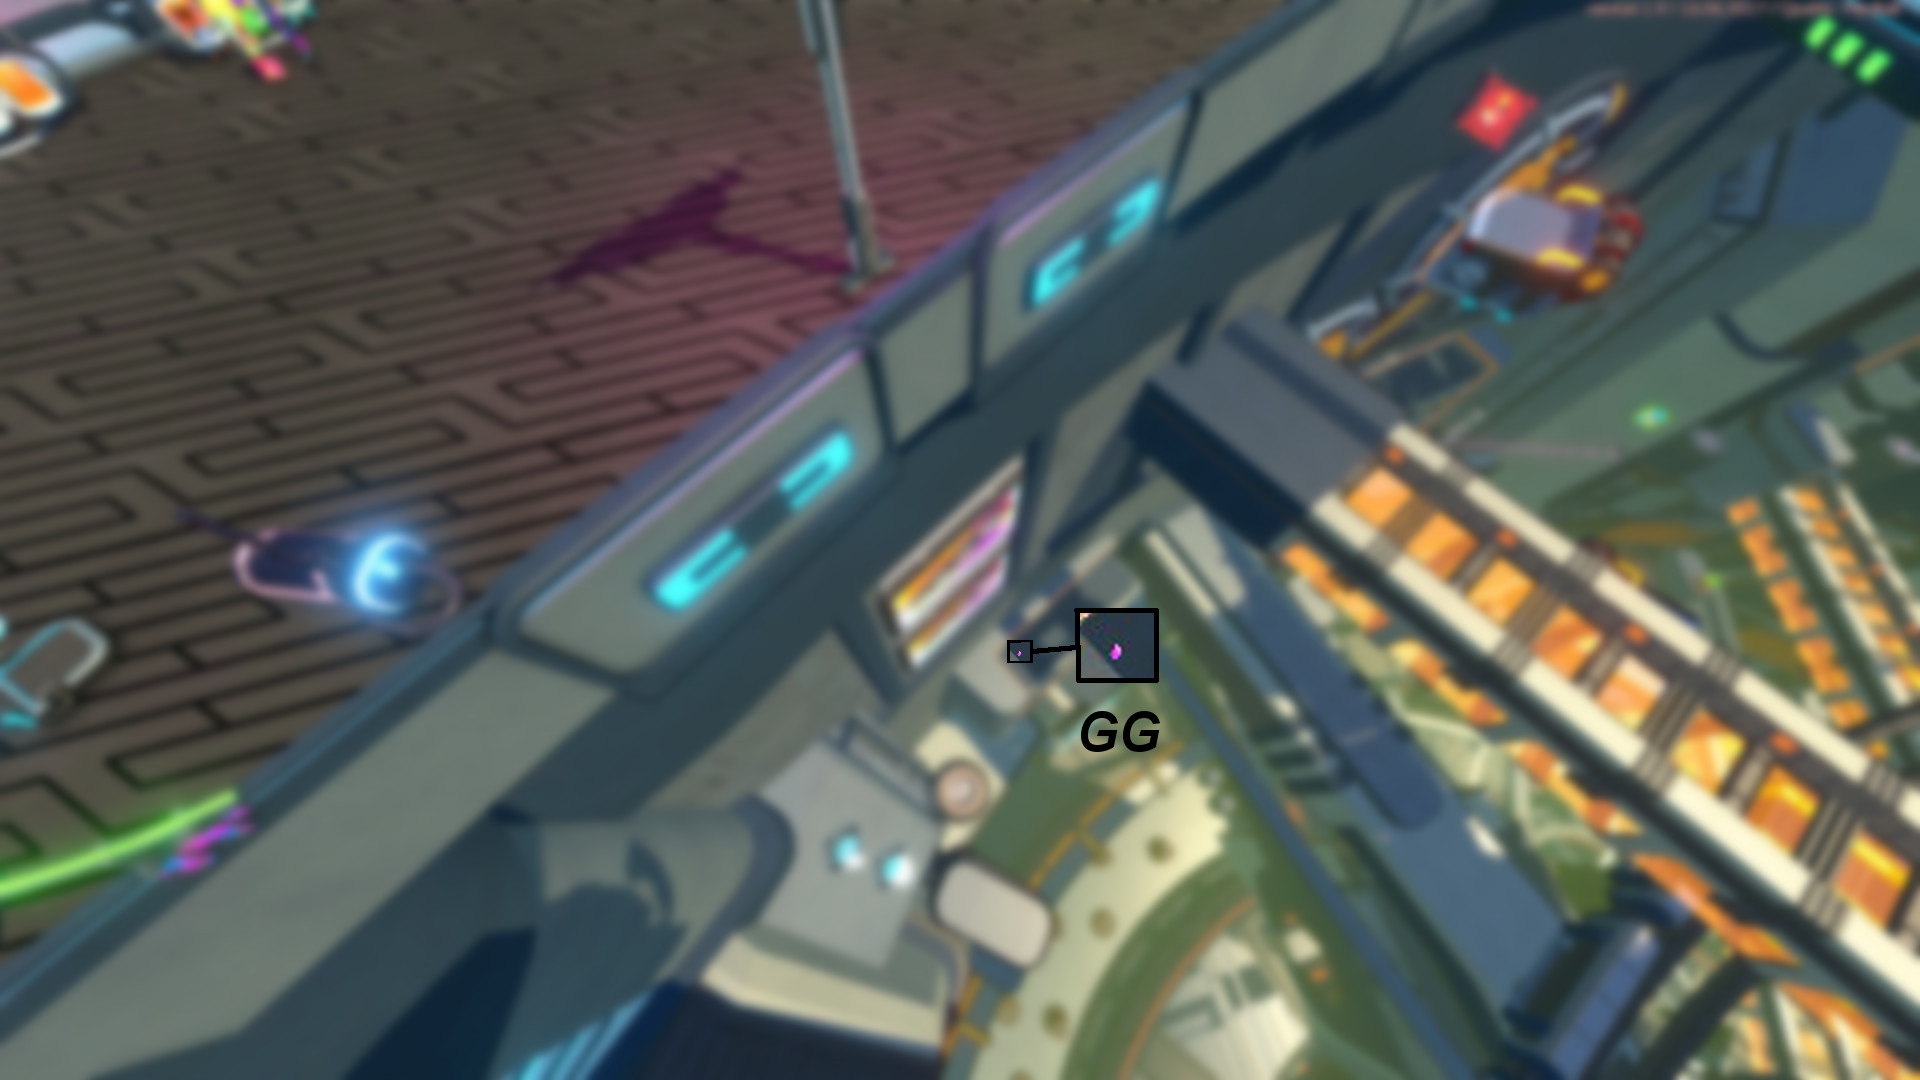
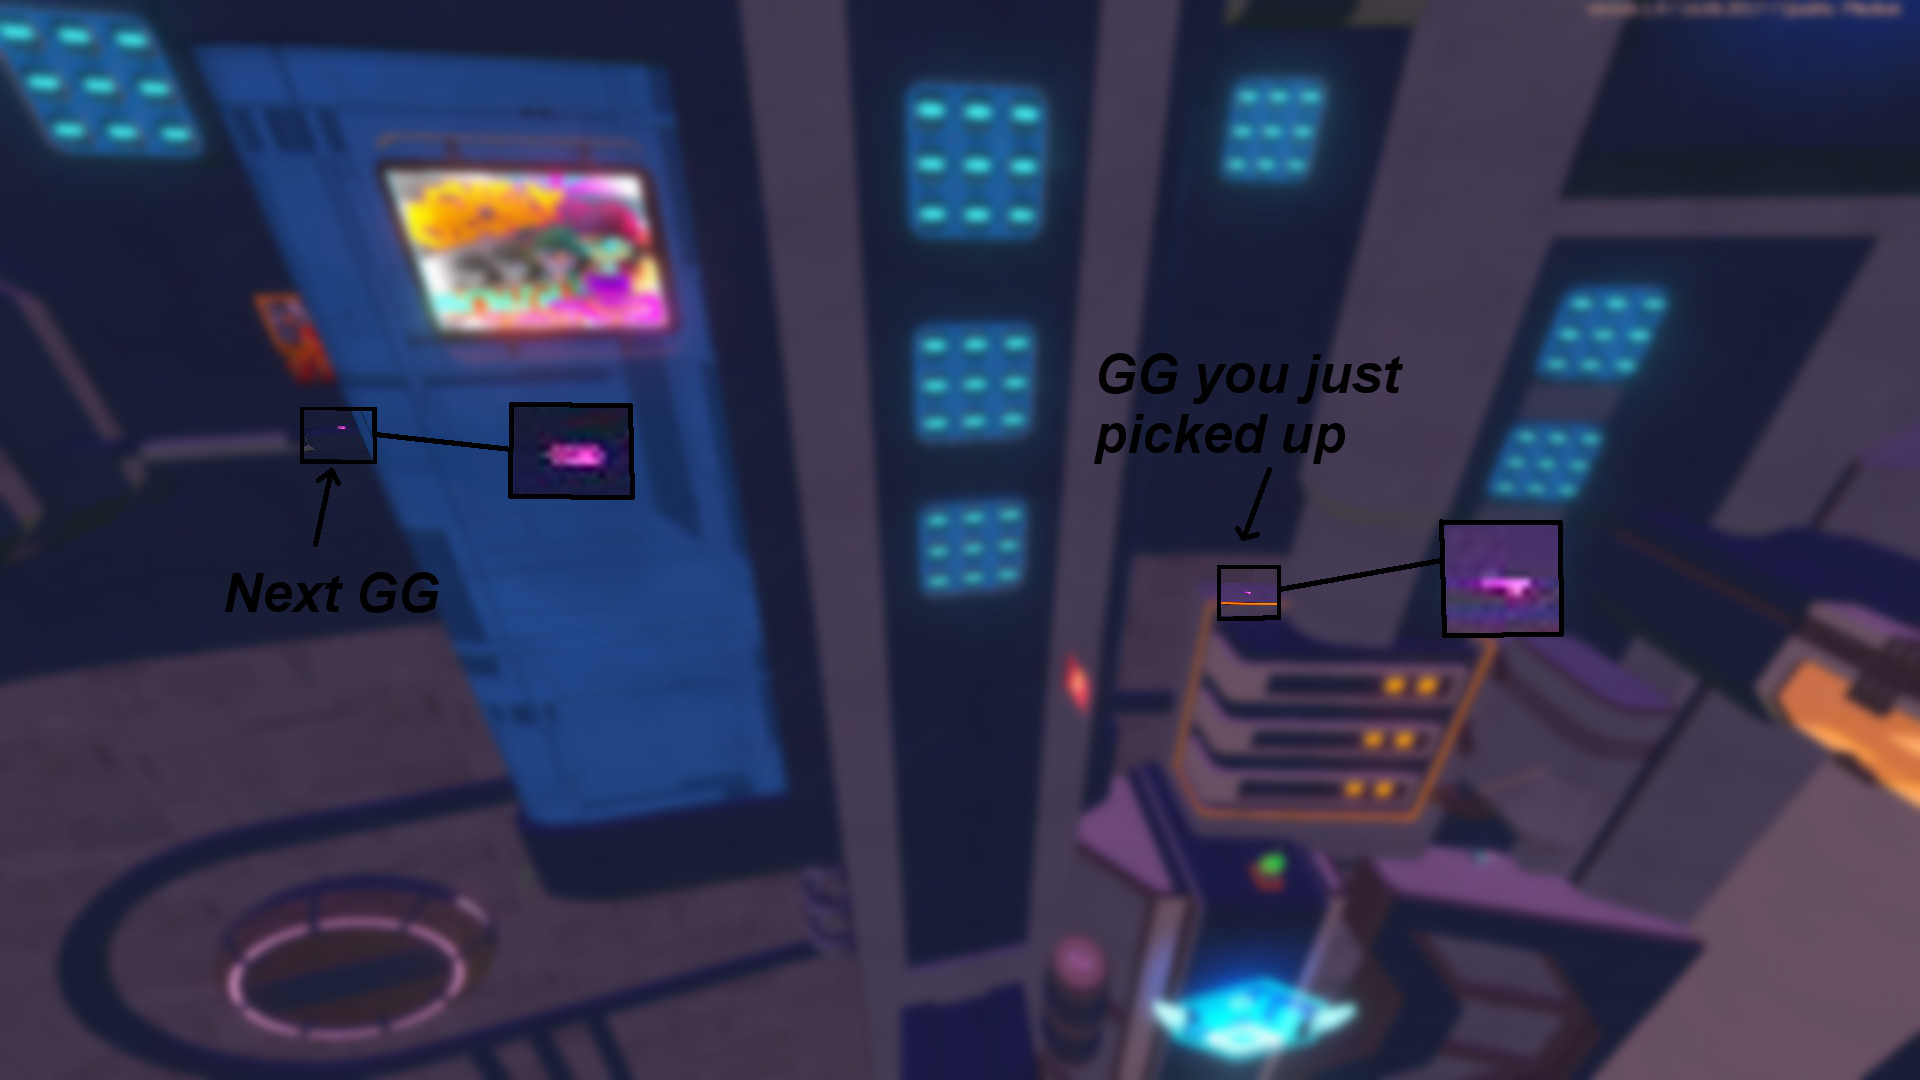
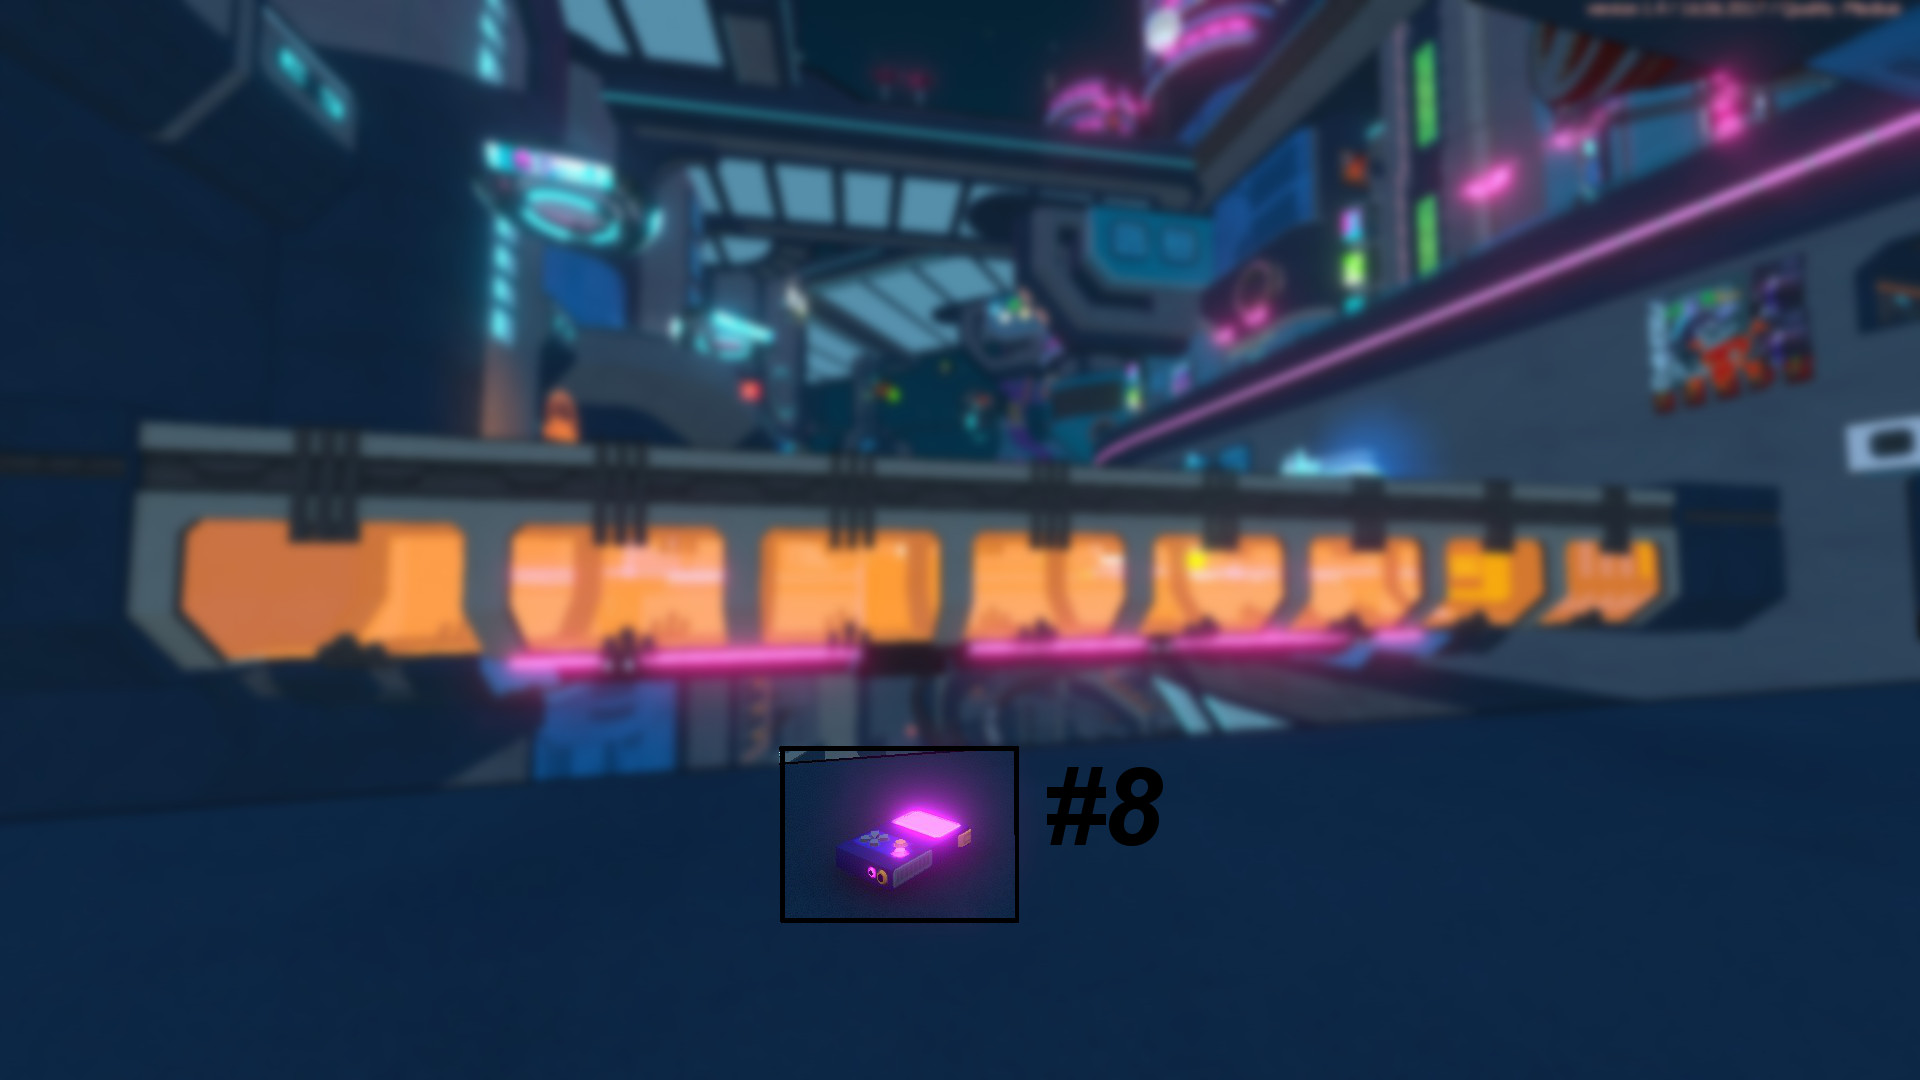
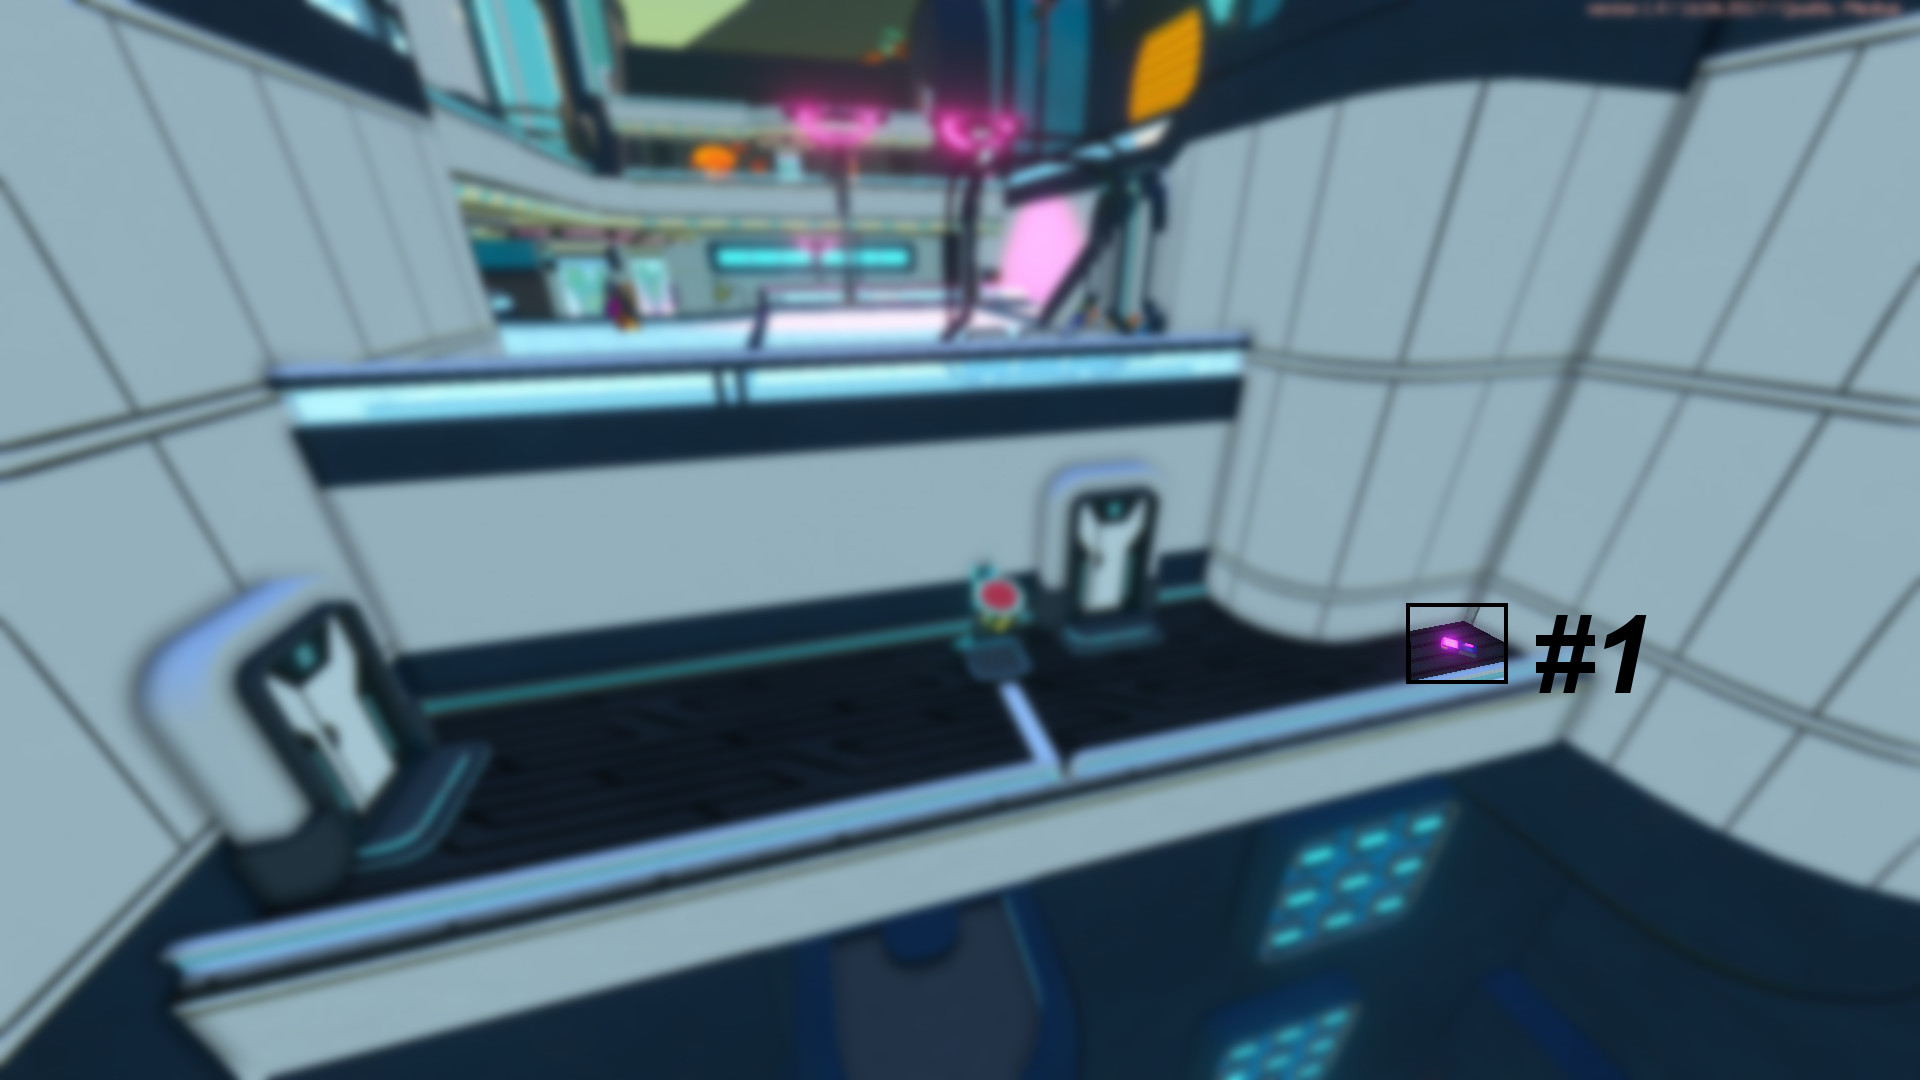
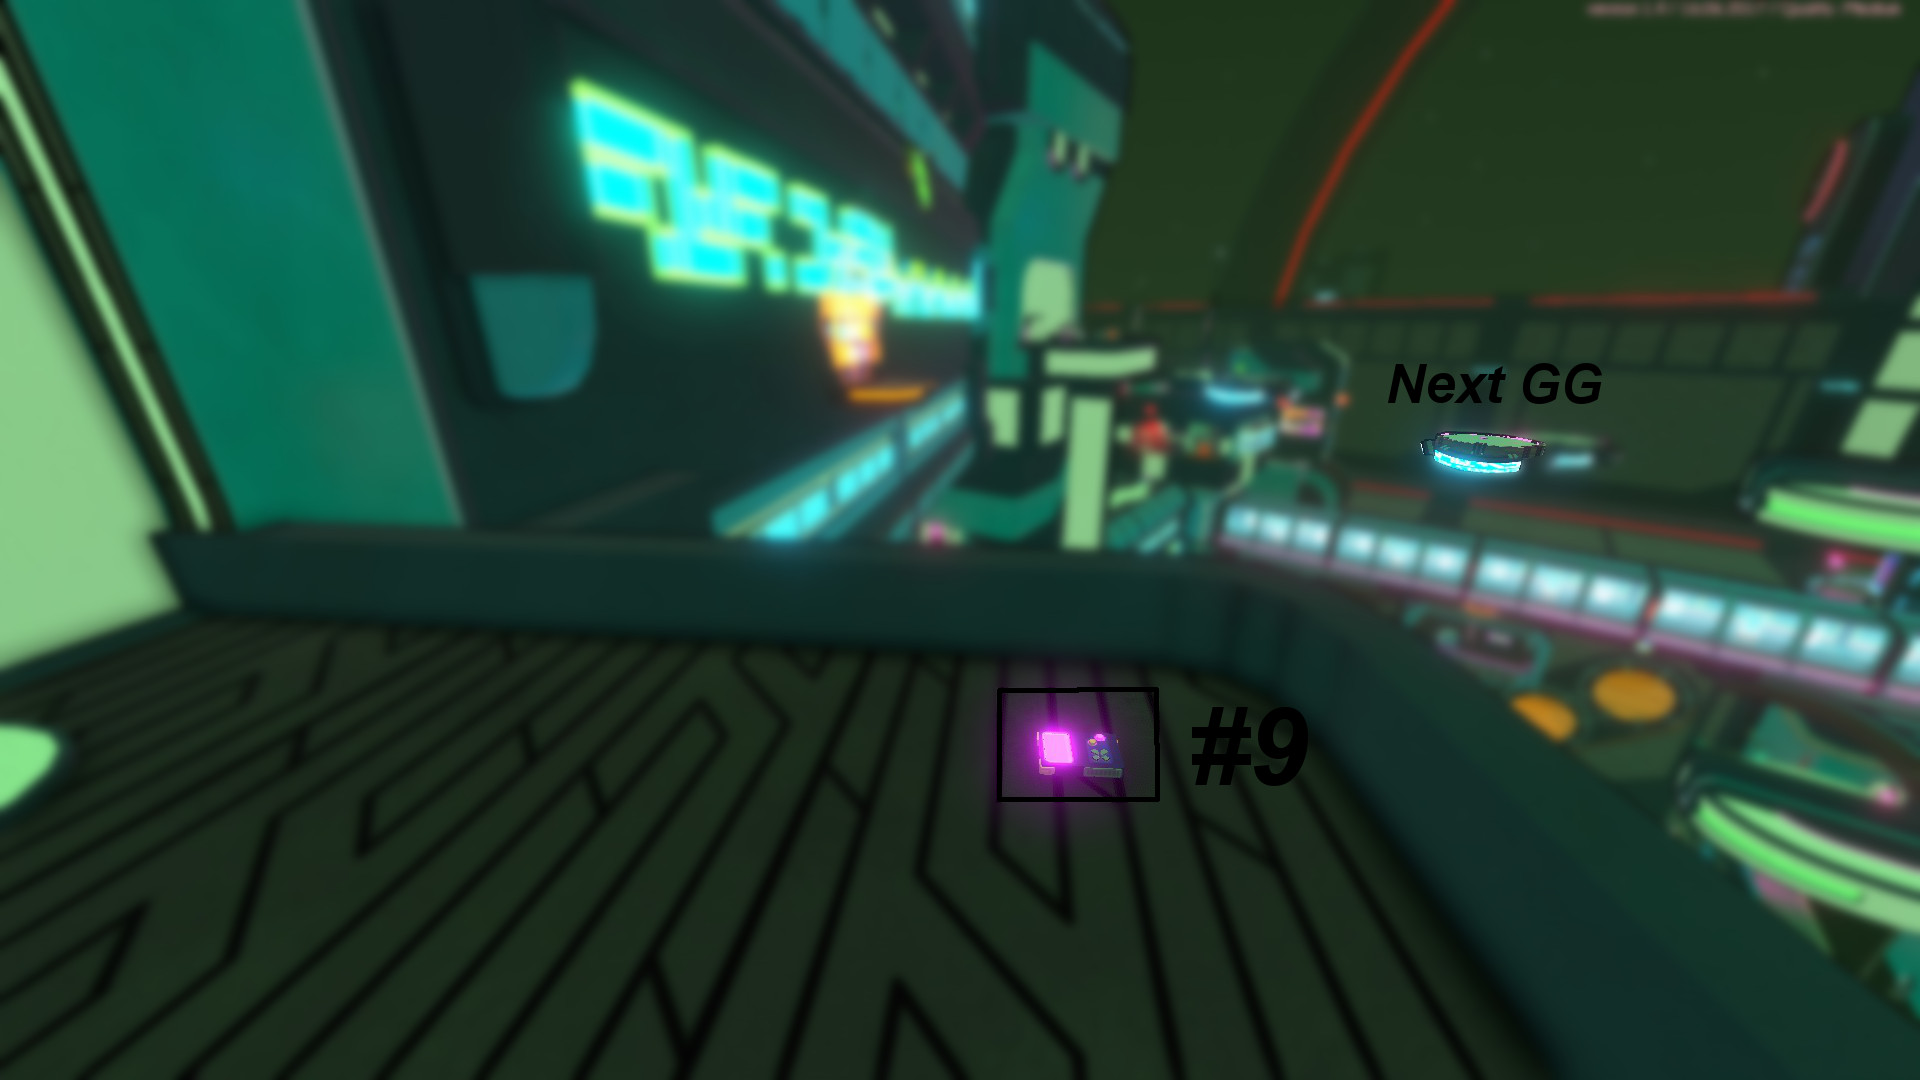
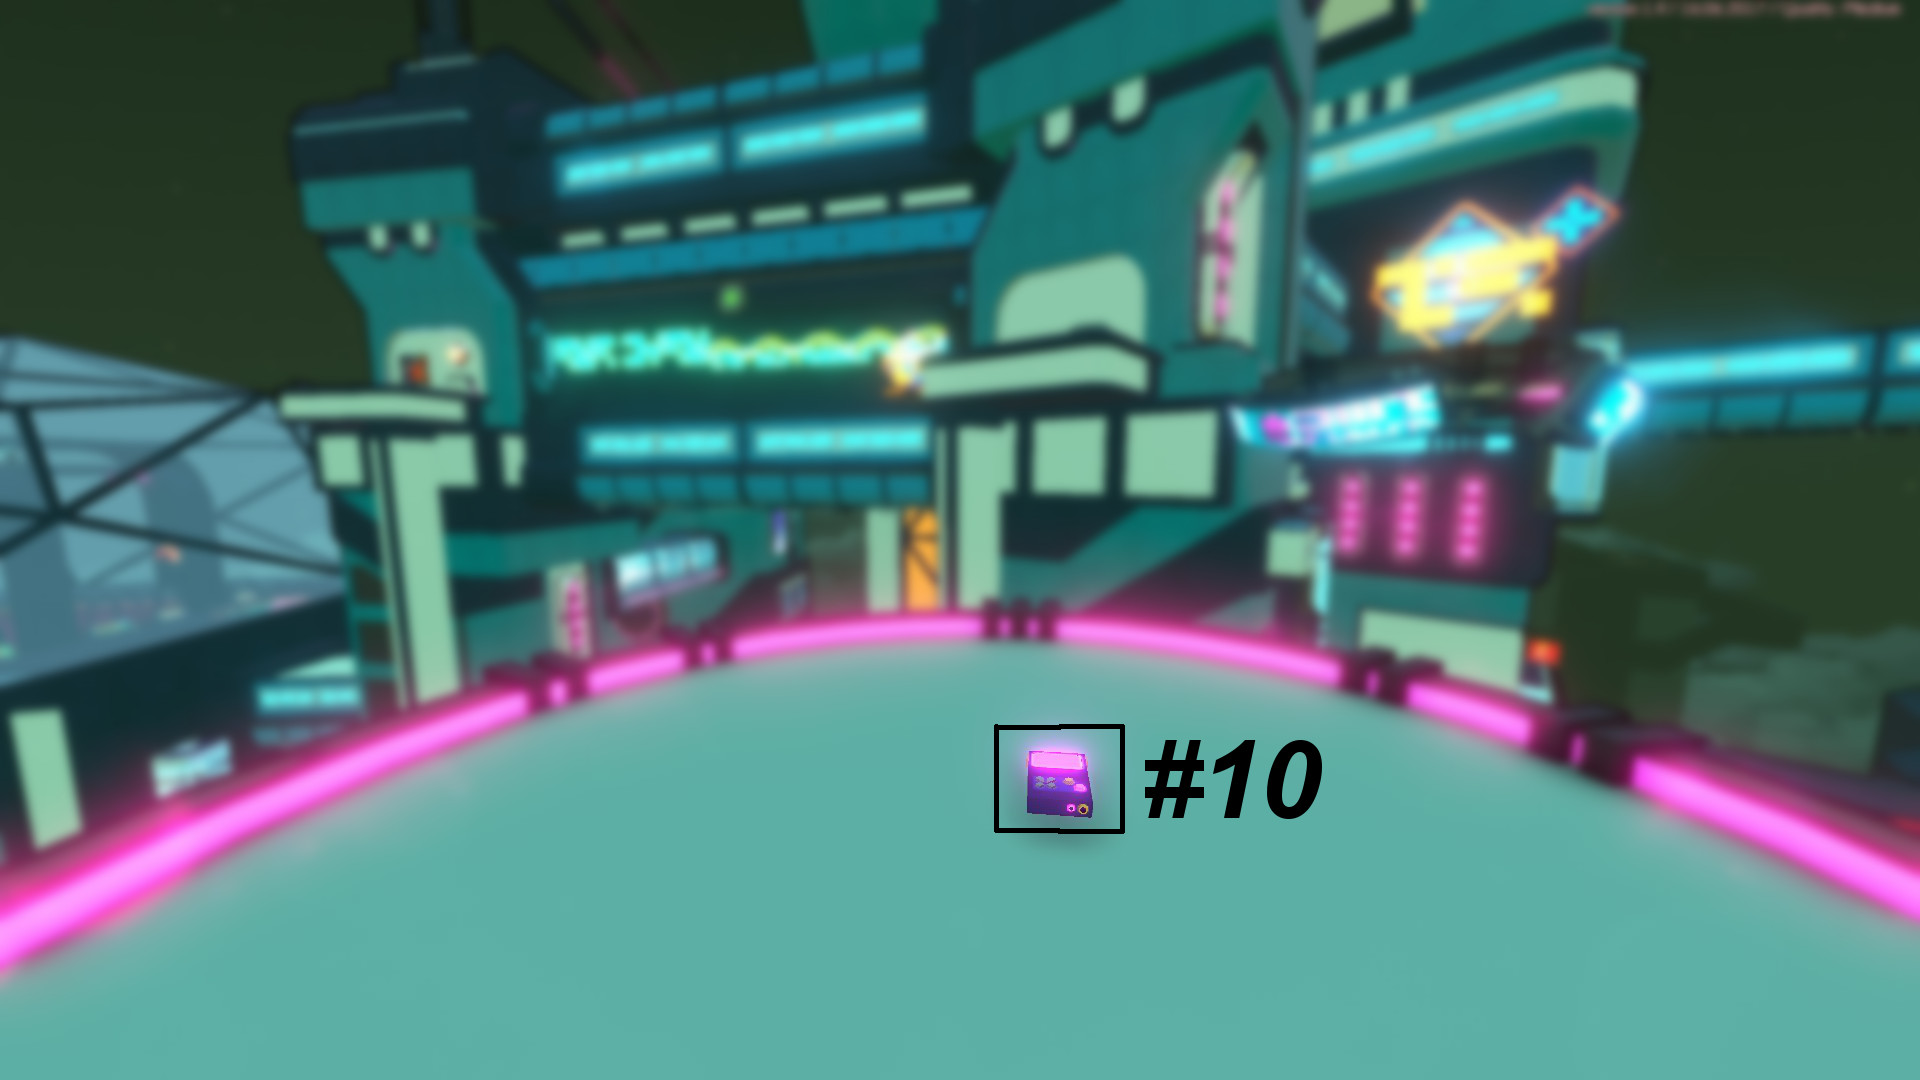
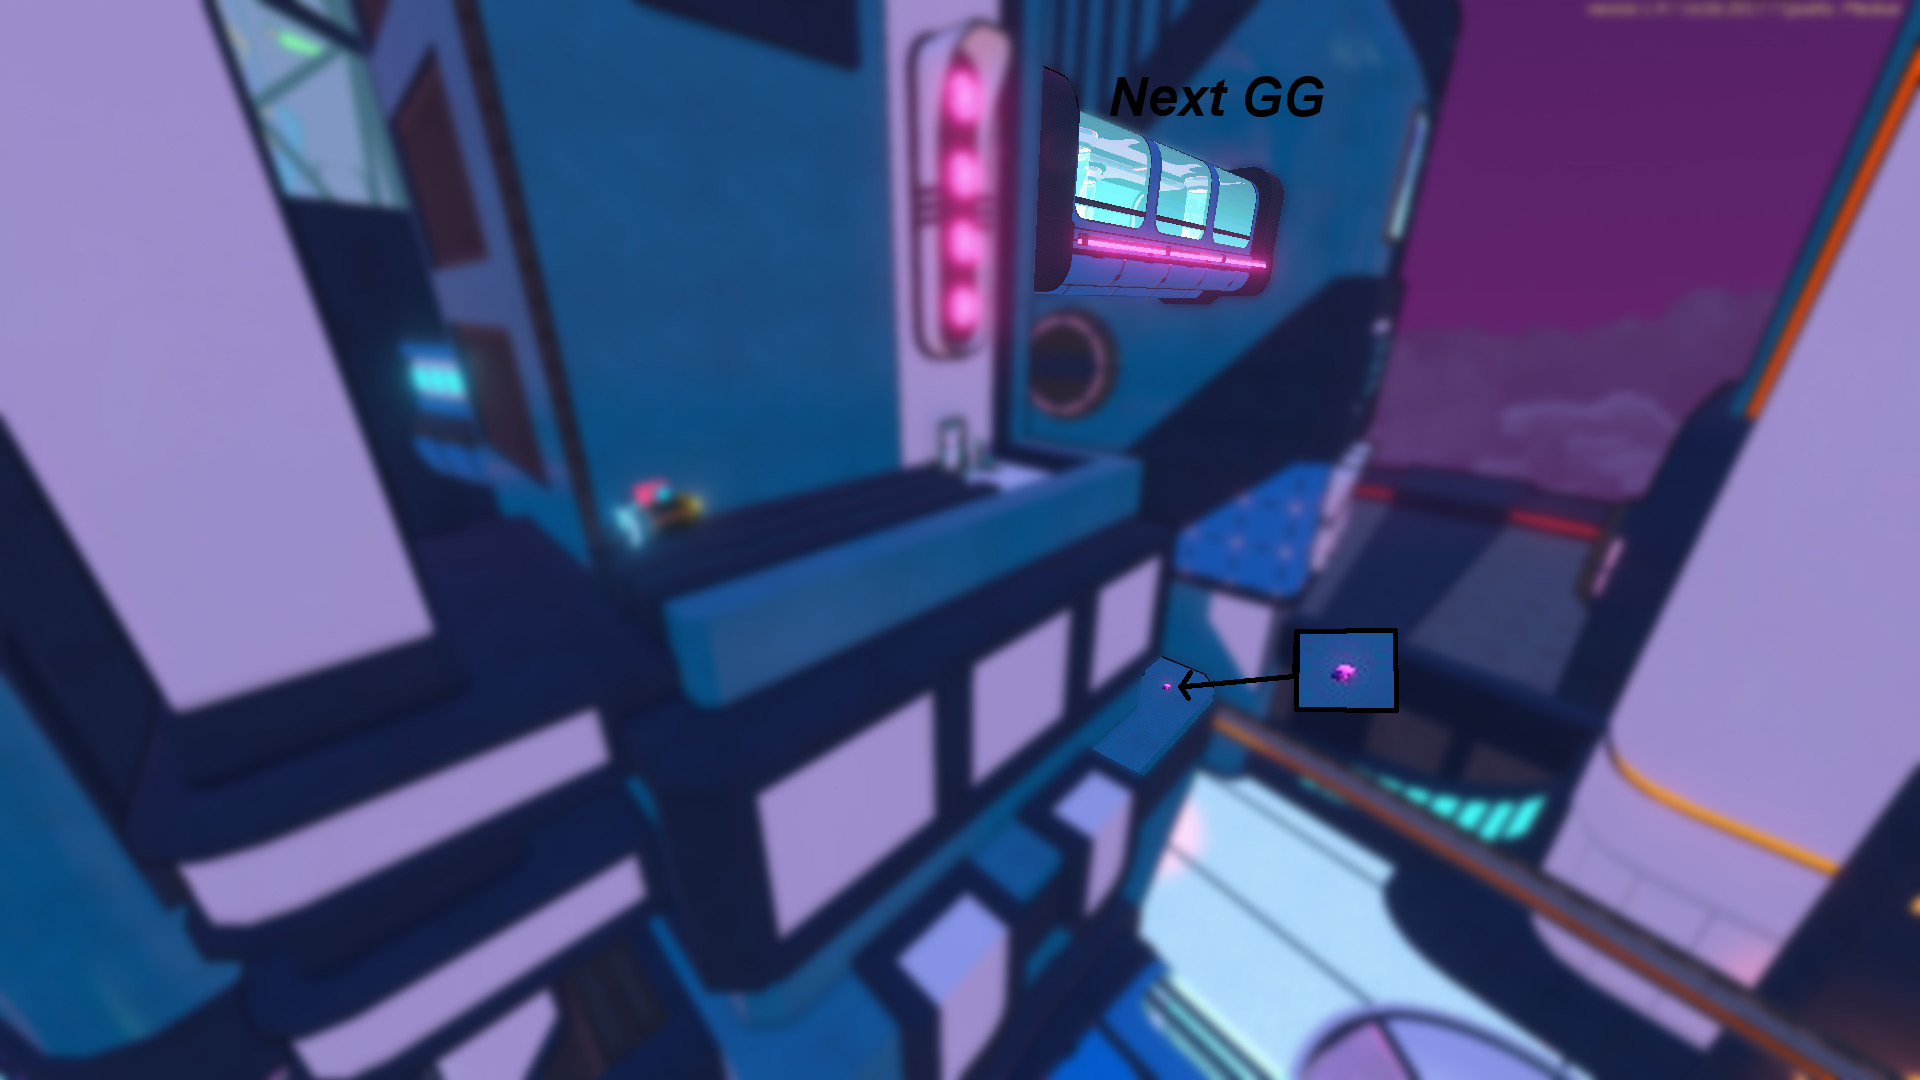
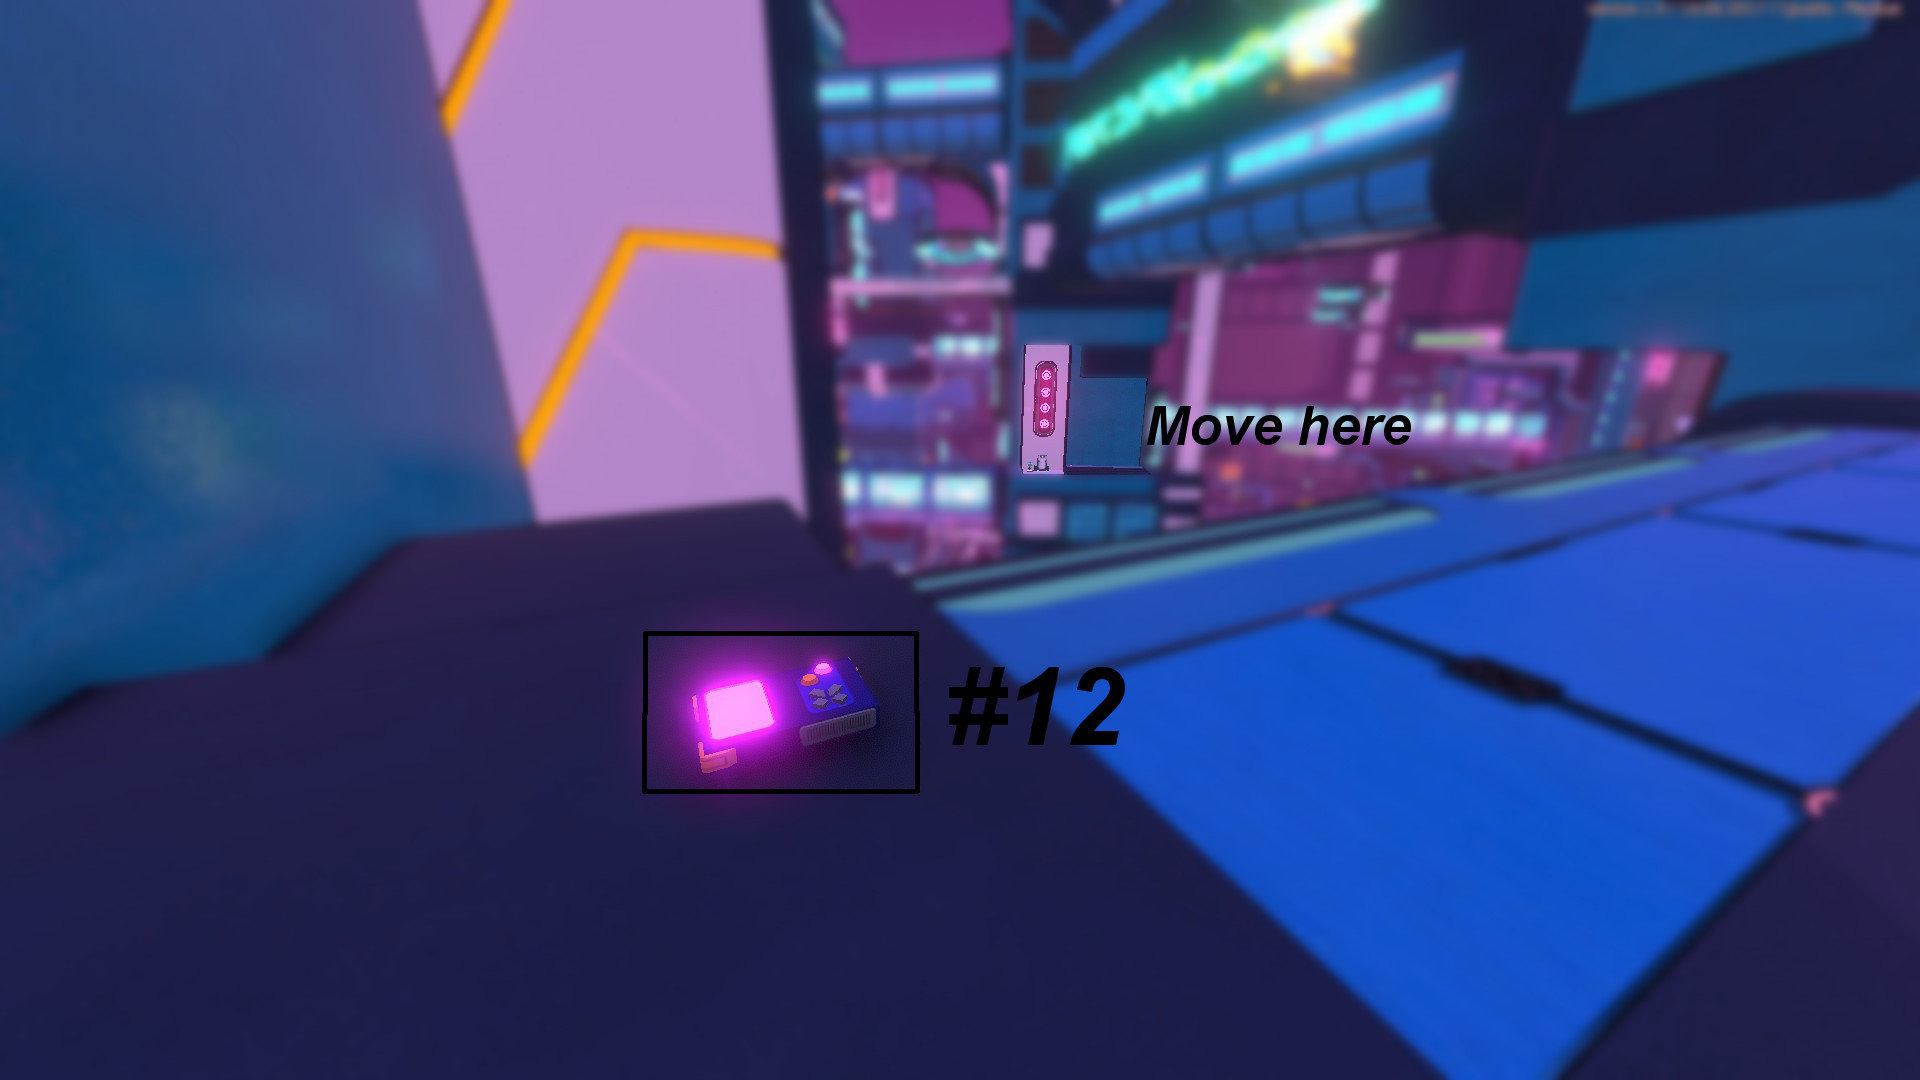
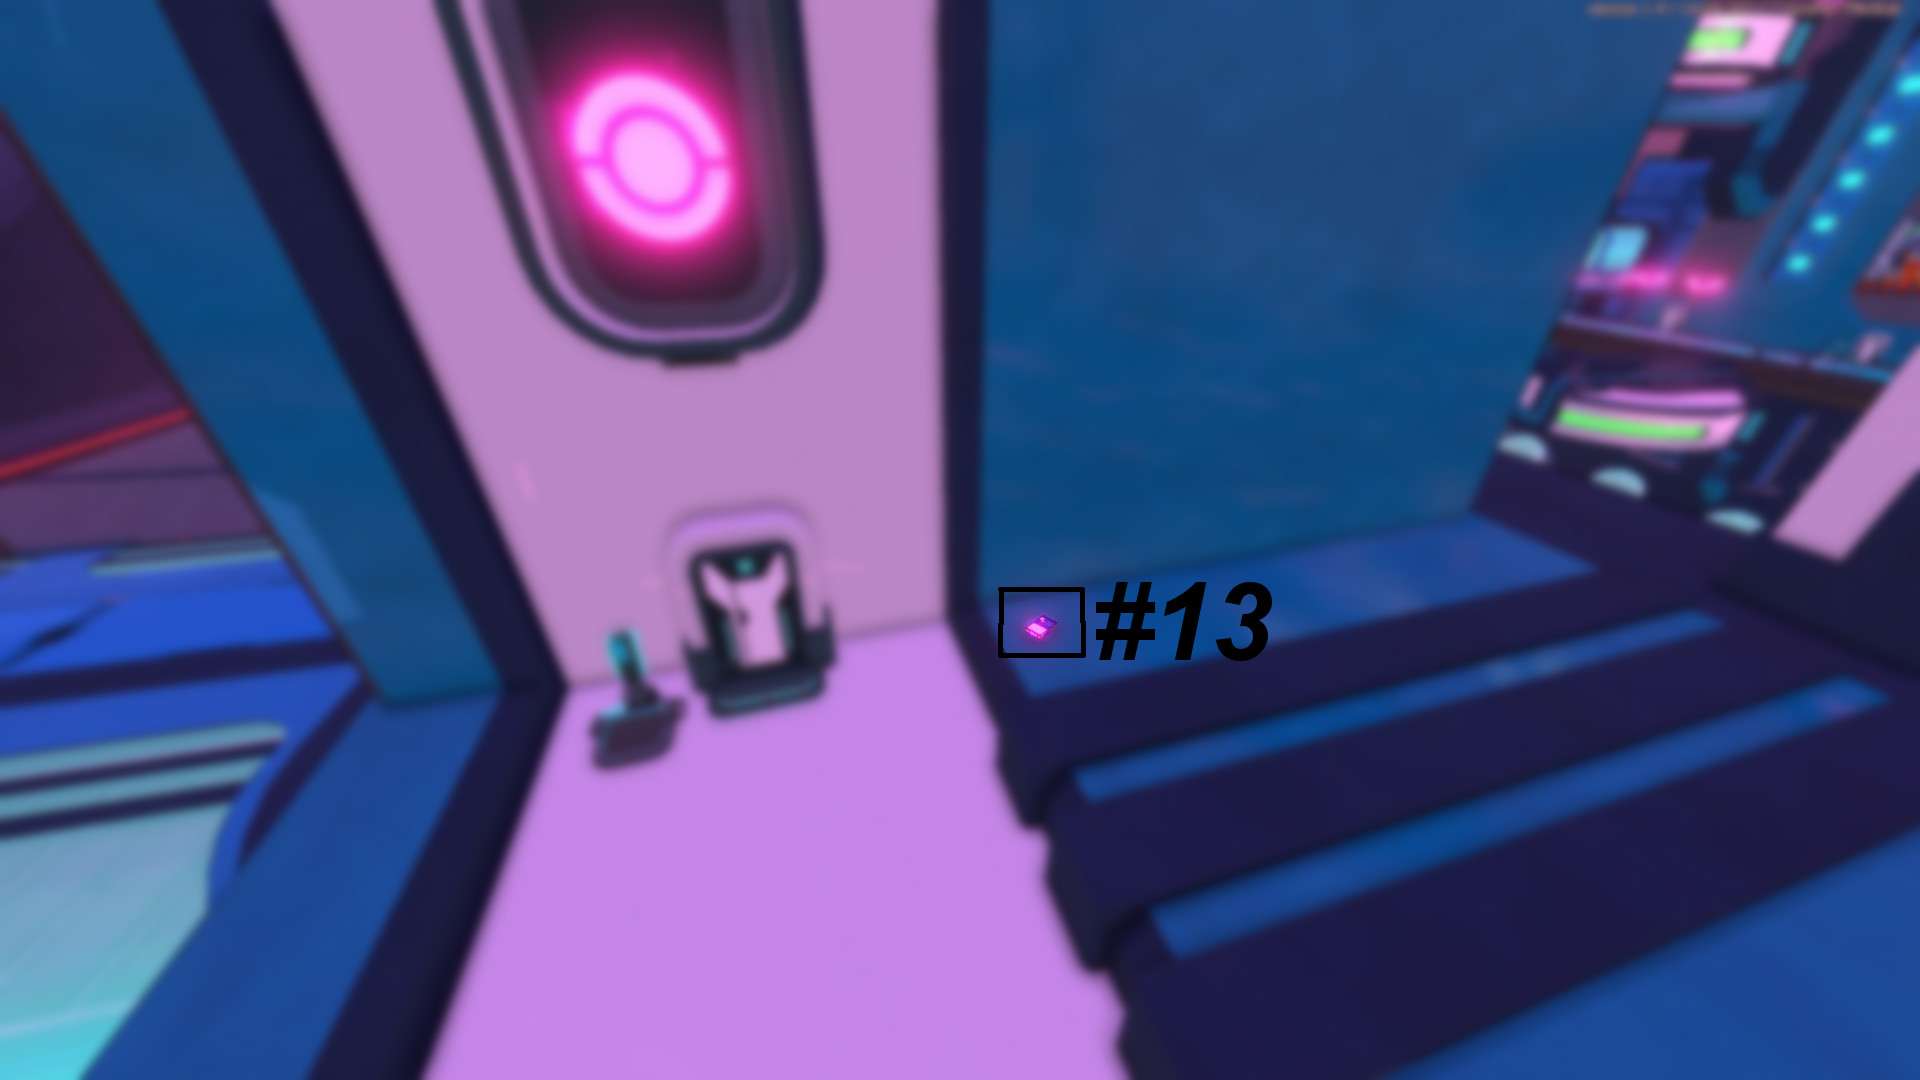
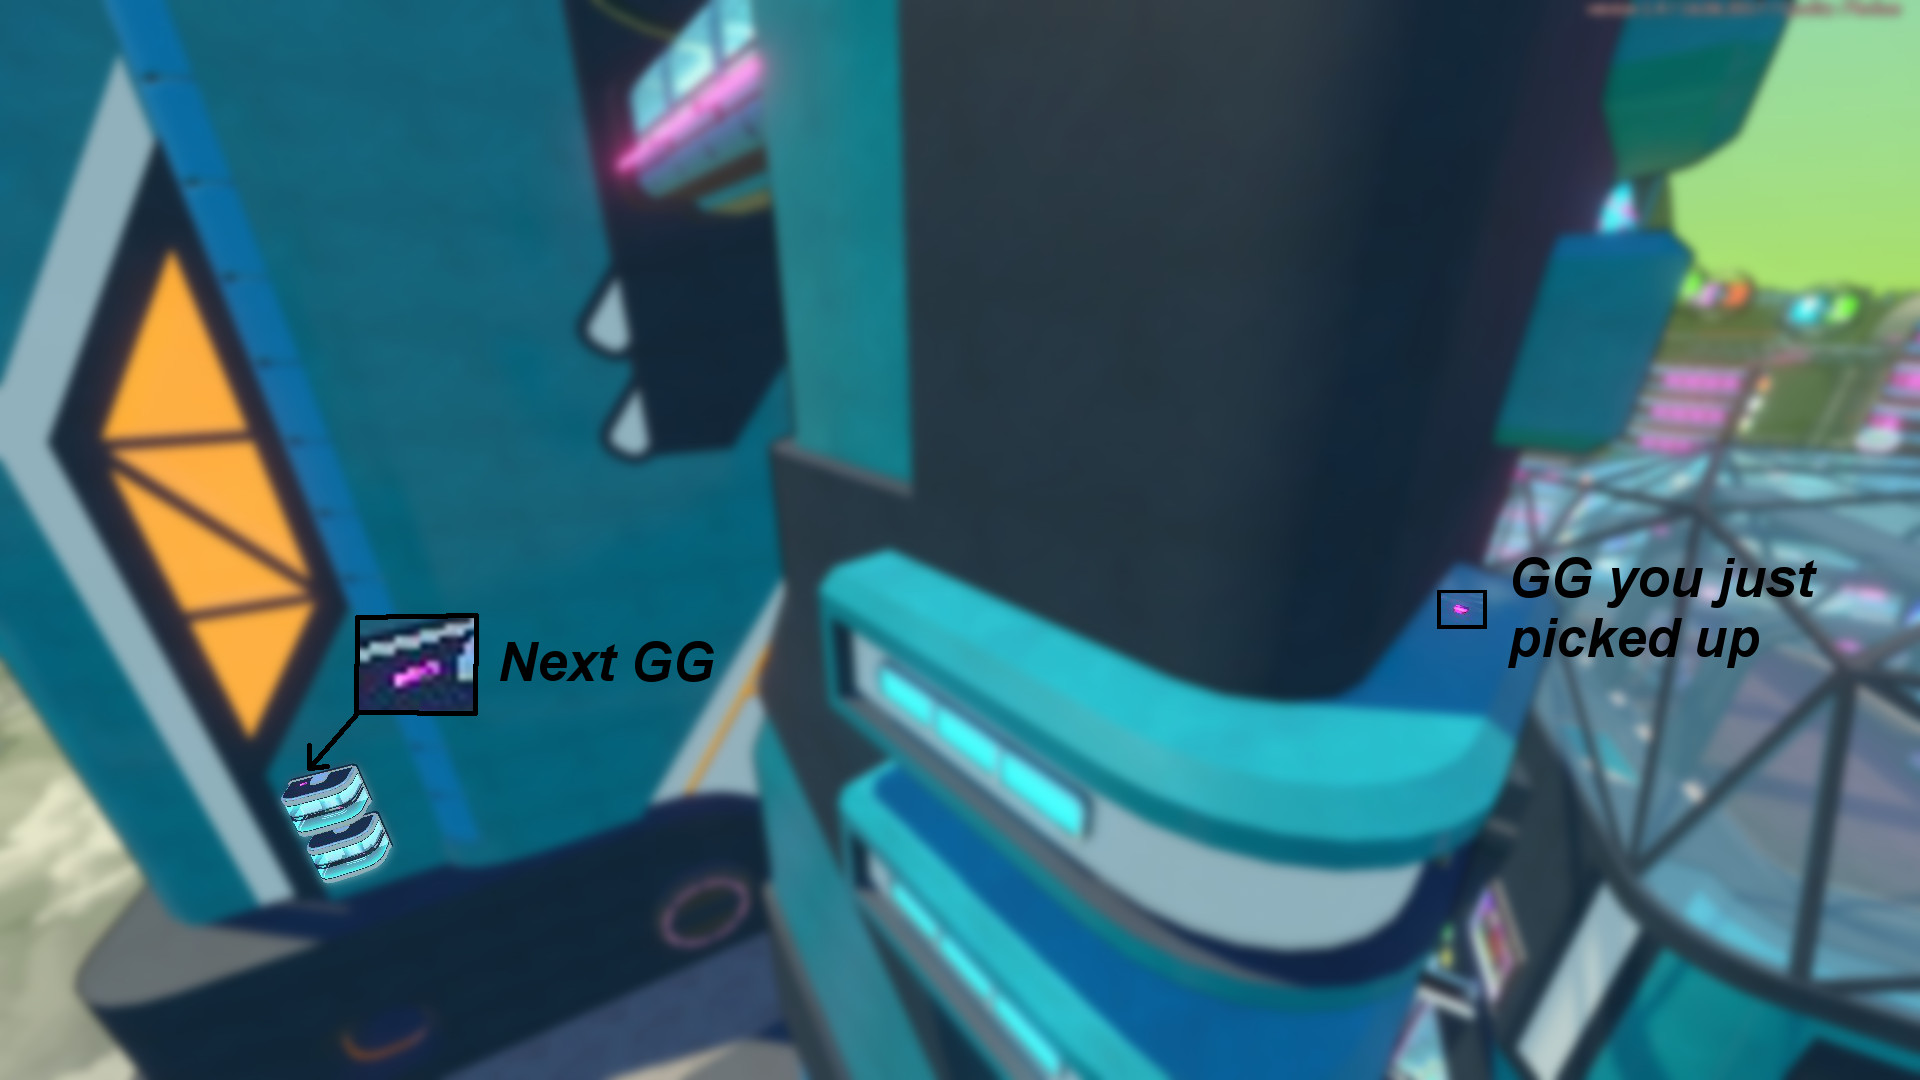
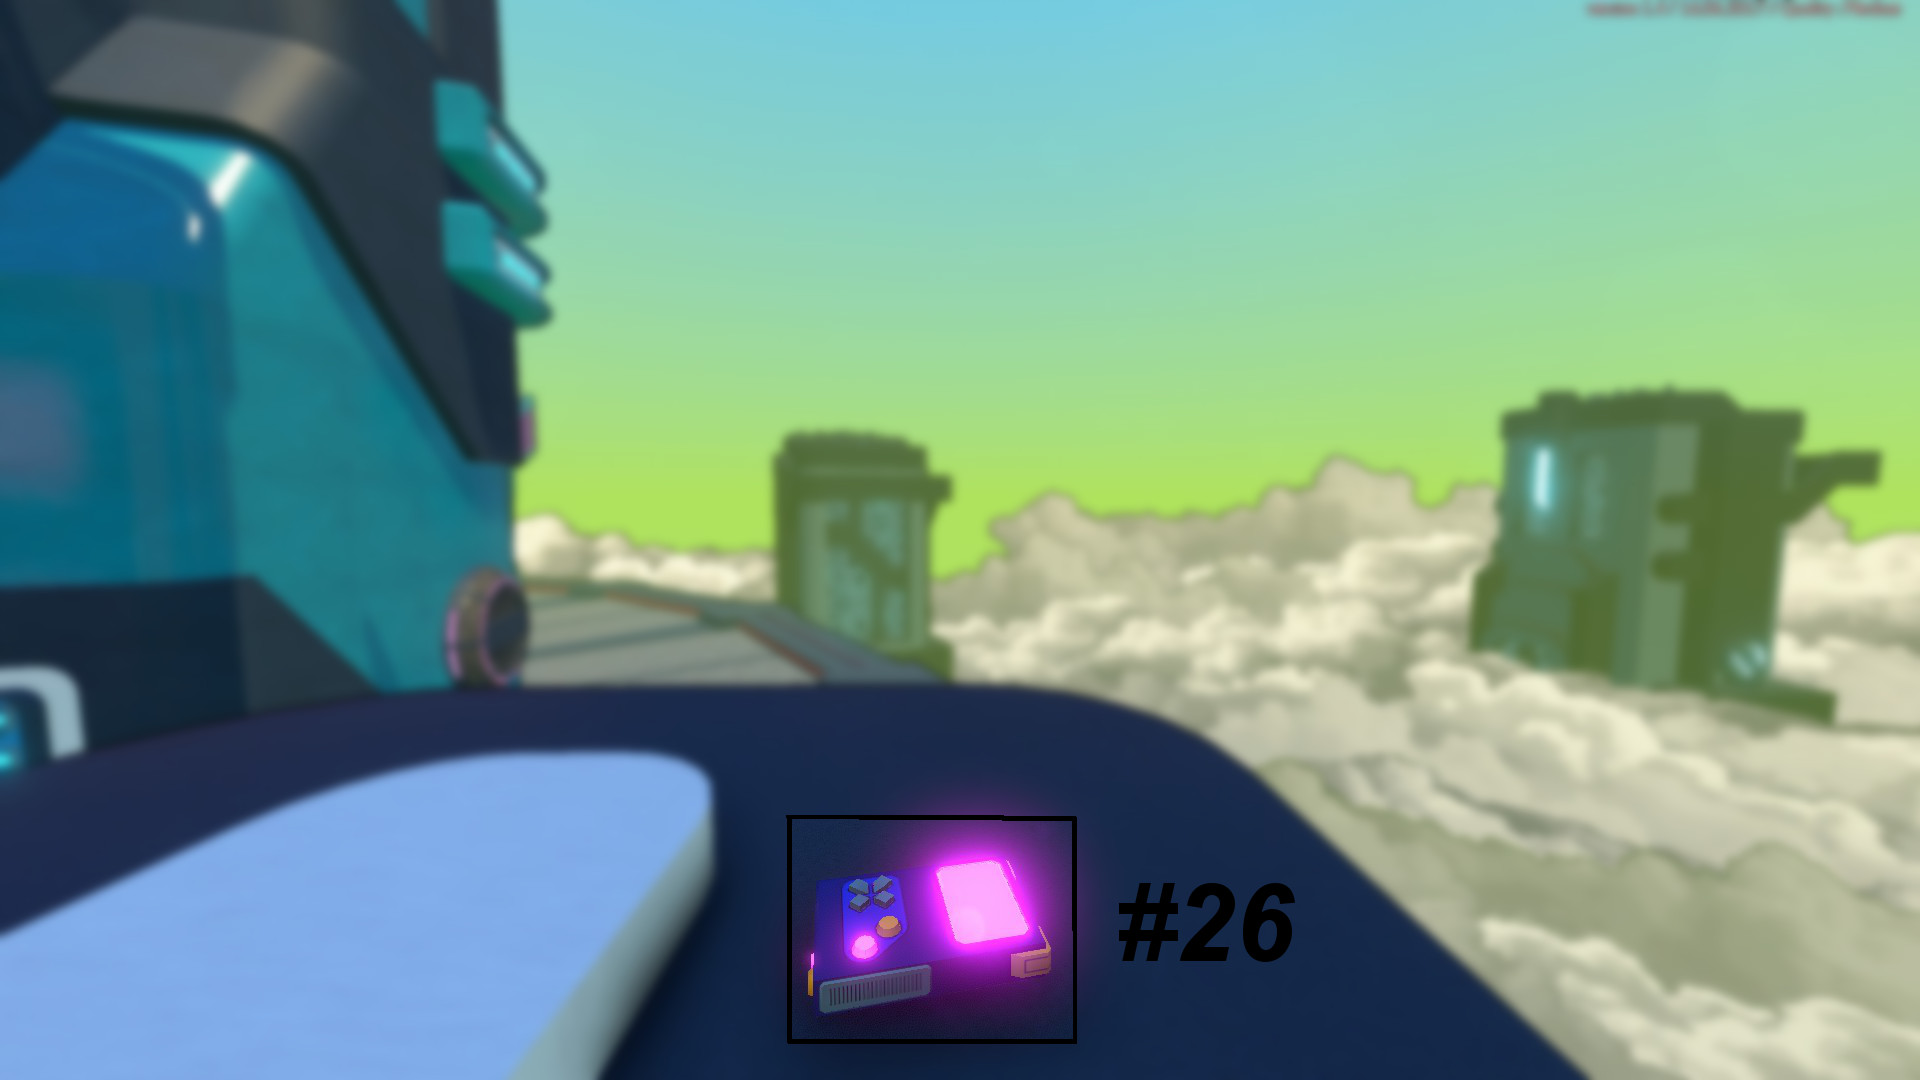
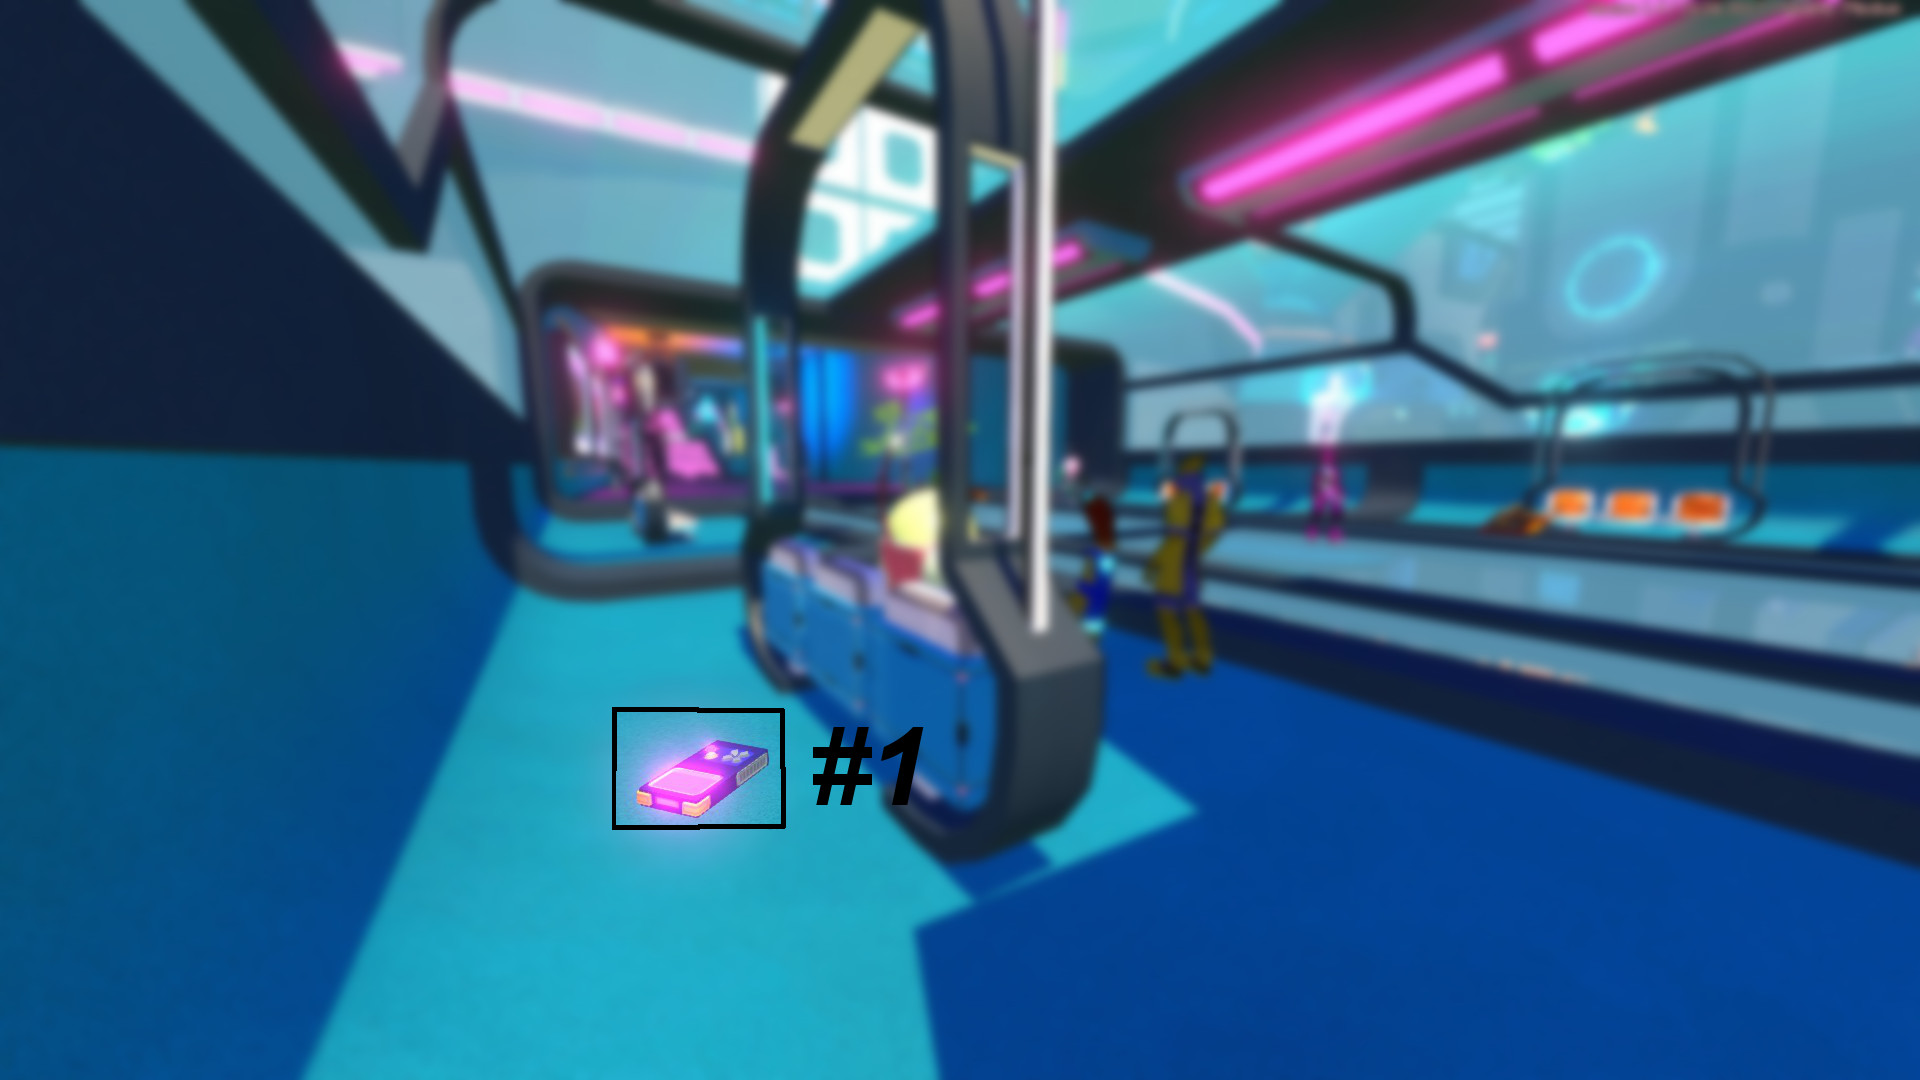
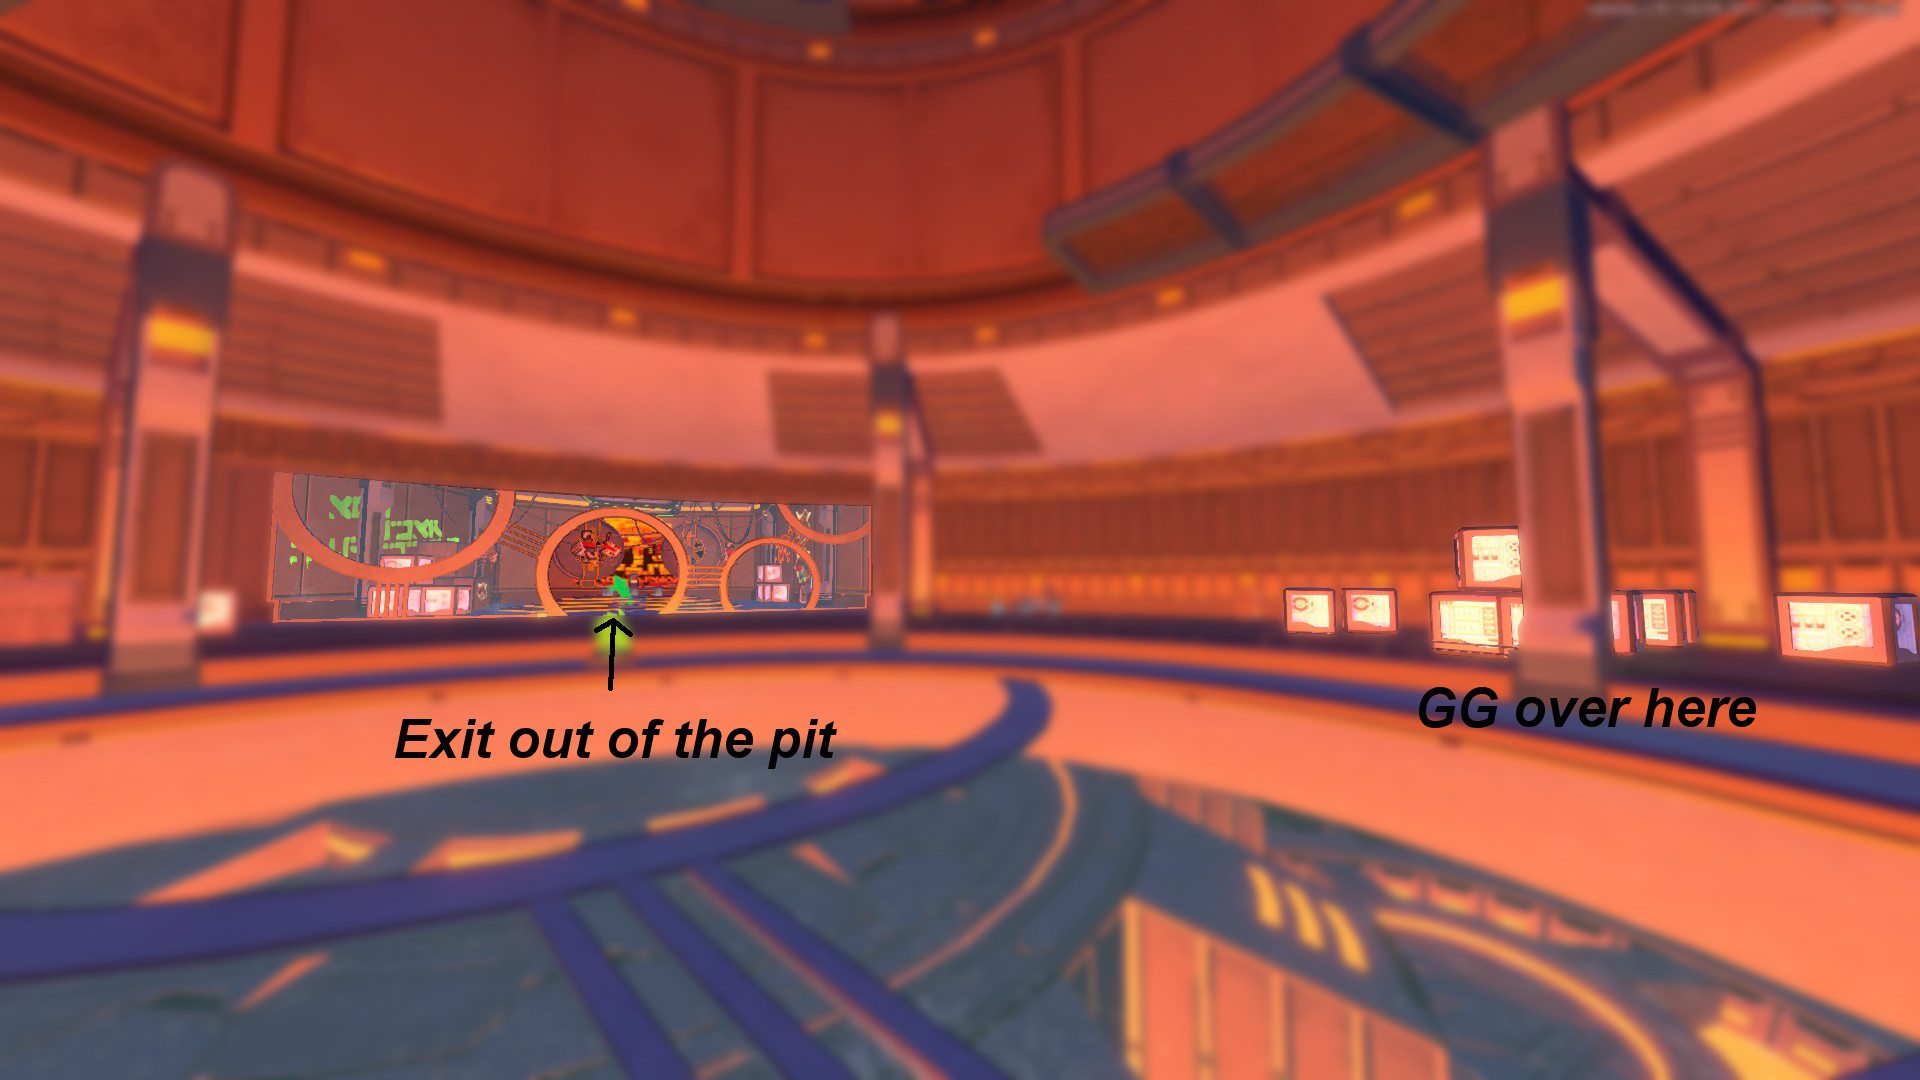
@MacaliteFG, sorry for the late response. Do you mean the Orbital Station map or the last gamegirl within Orbital Tower? If it's the former I guess you didn't have that level unlocked at the time you wrote your comment.

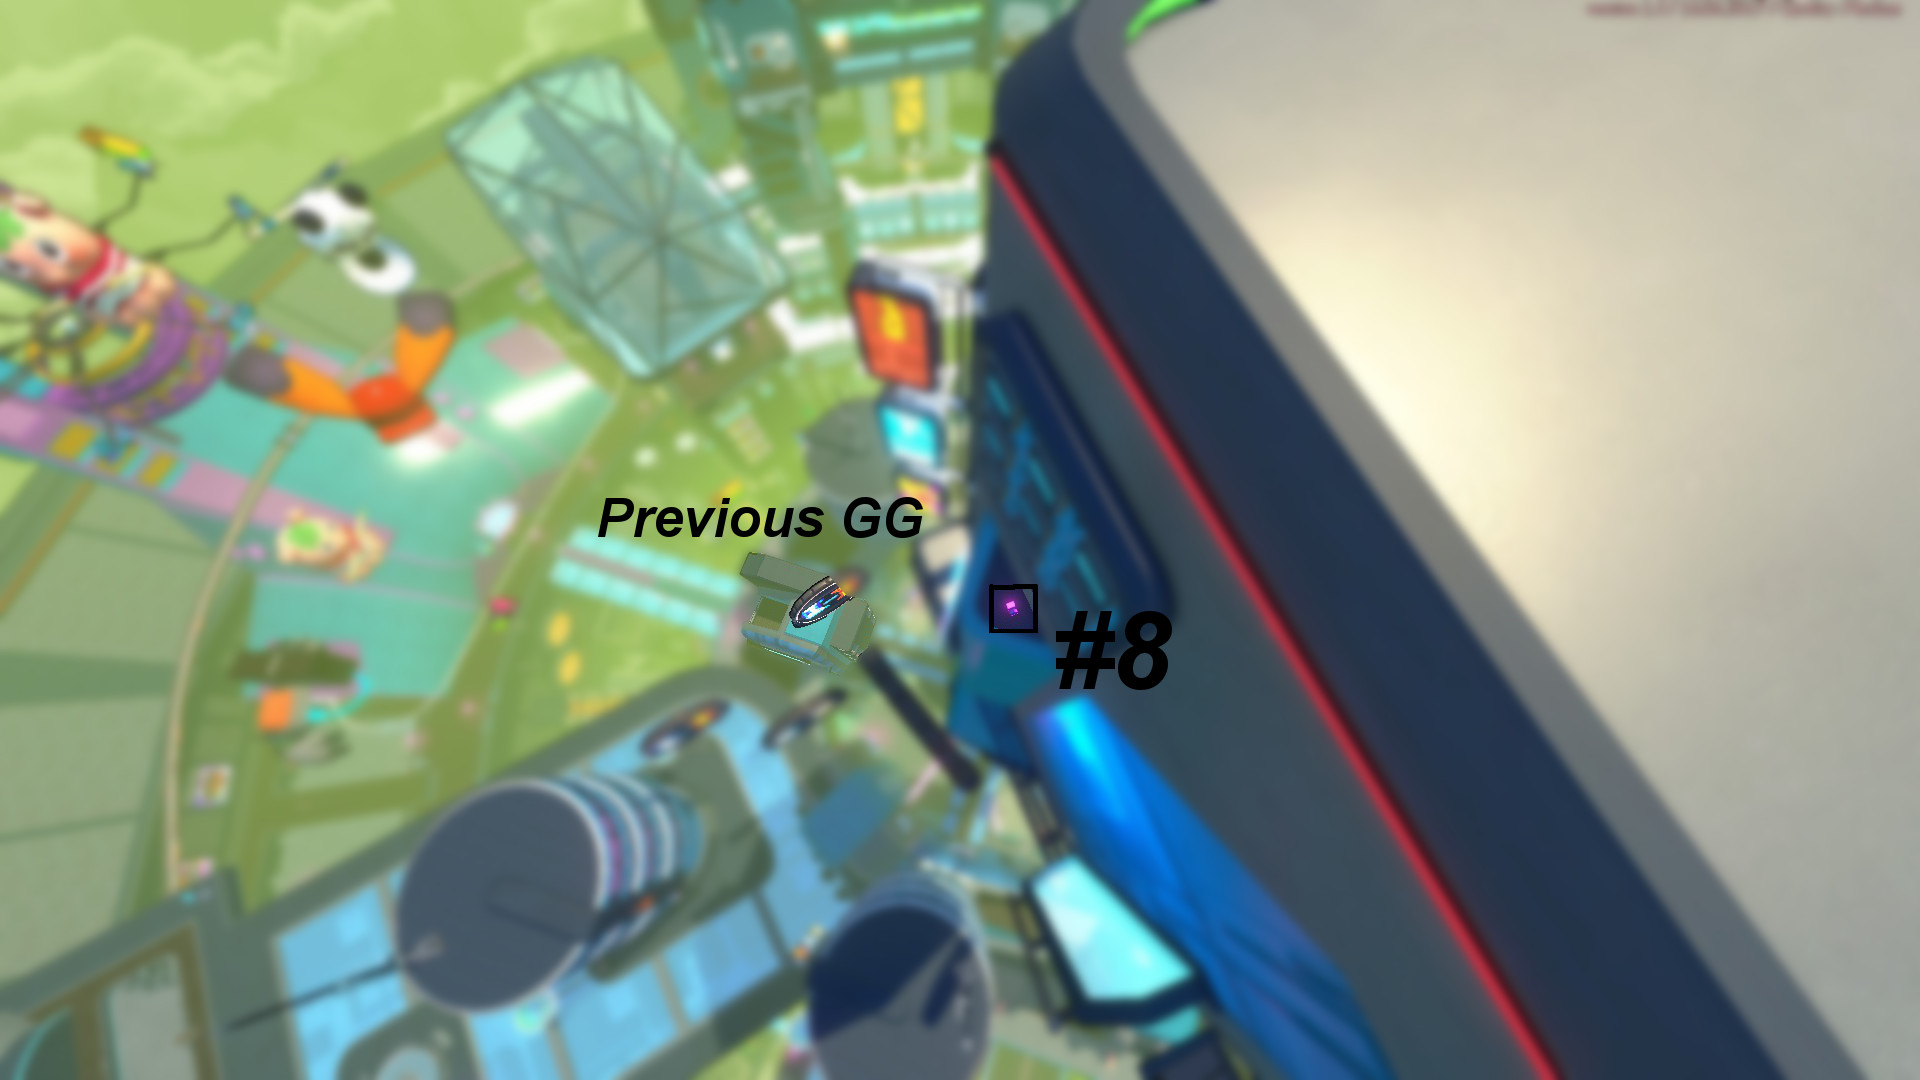
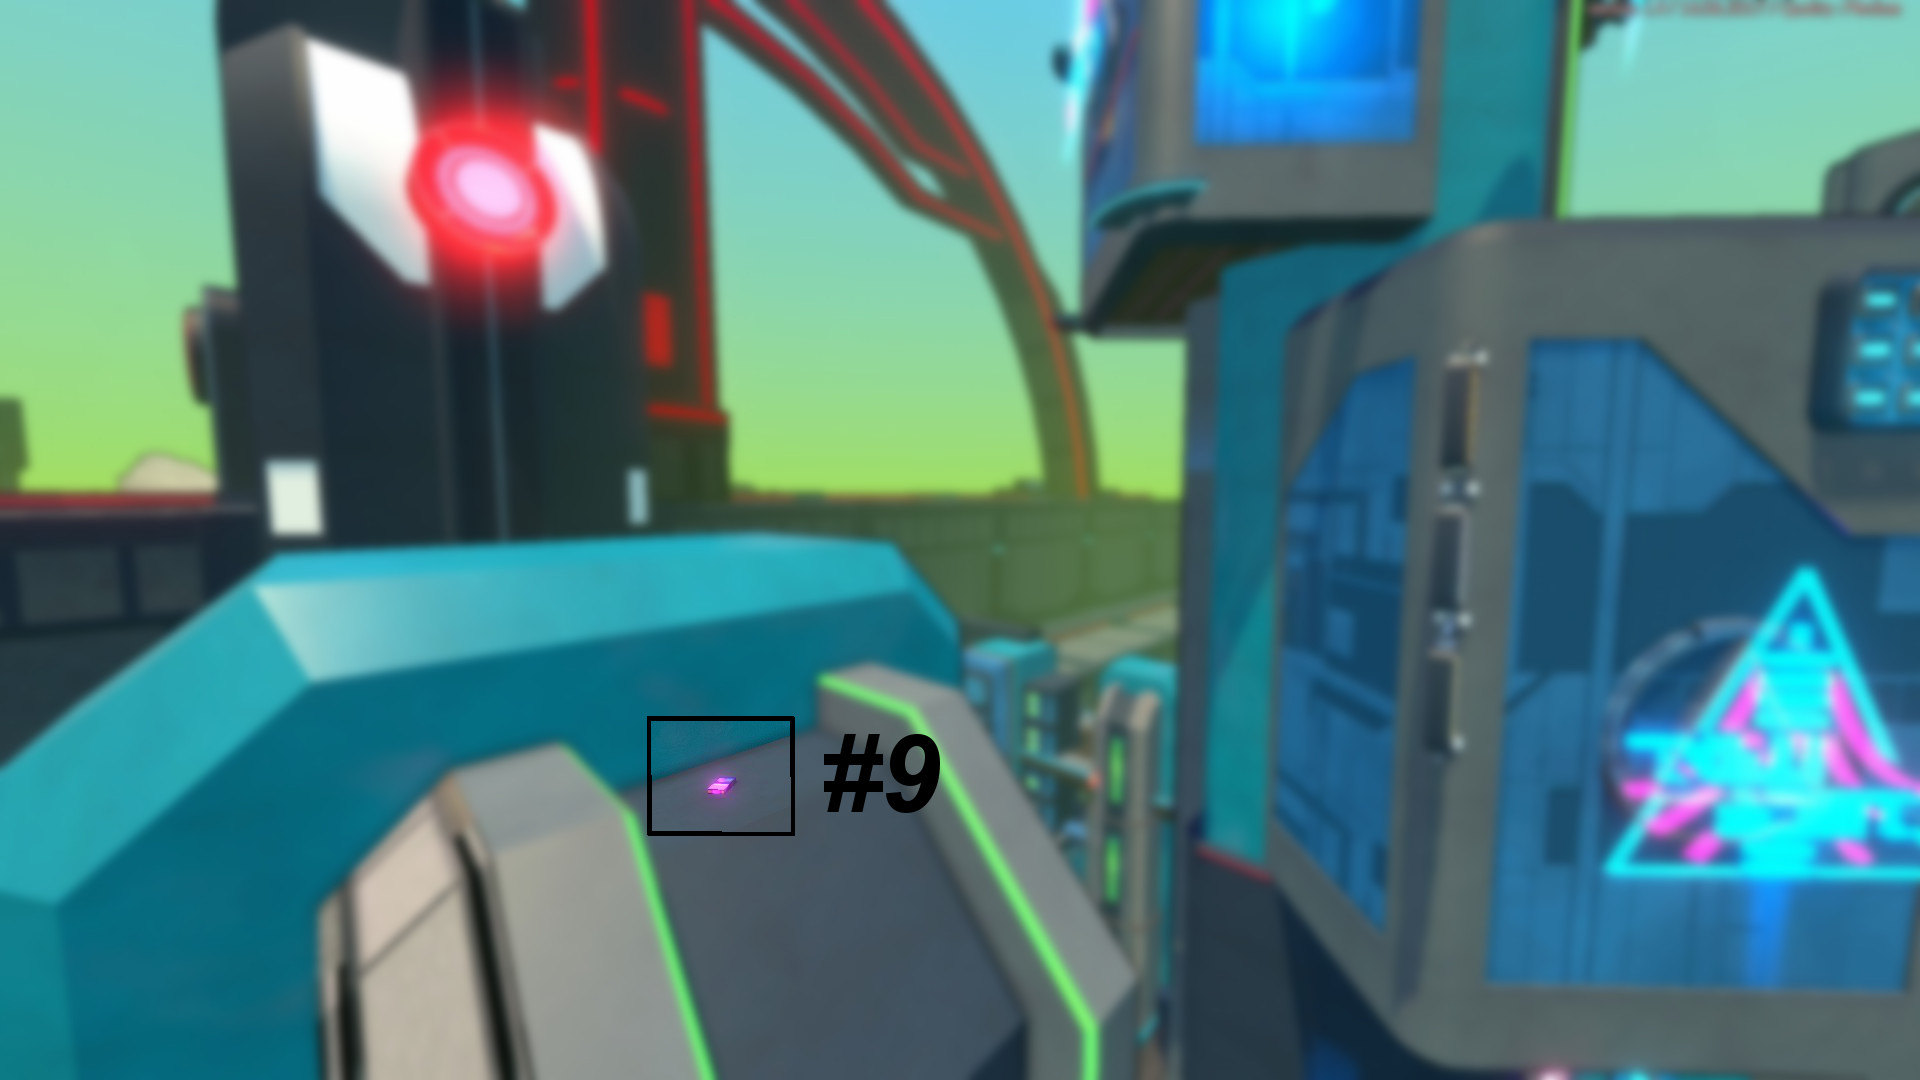
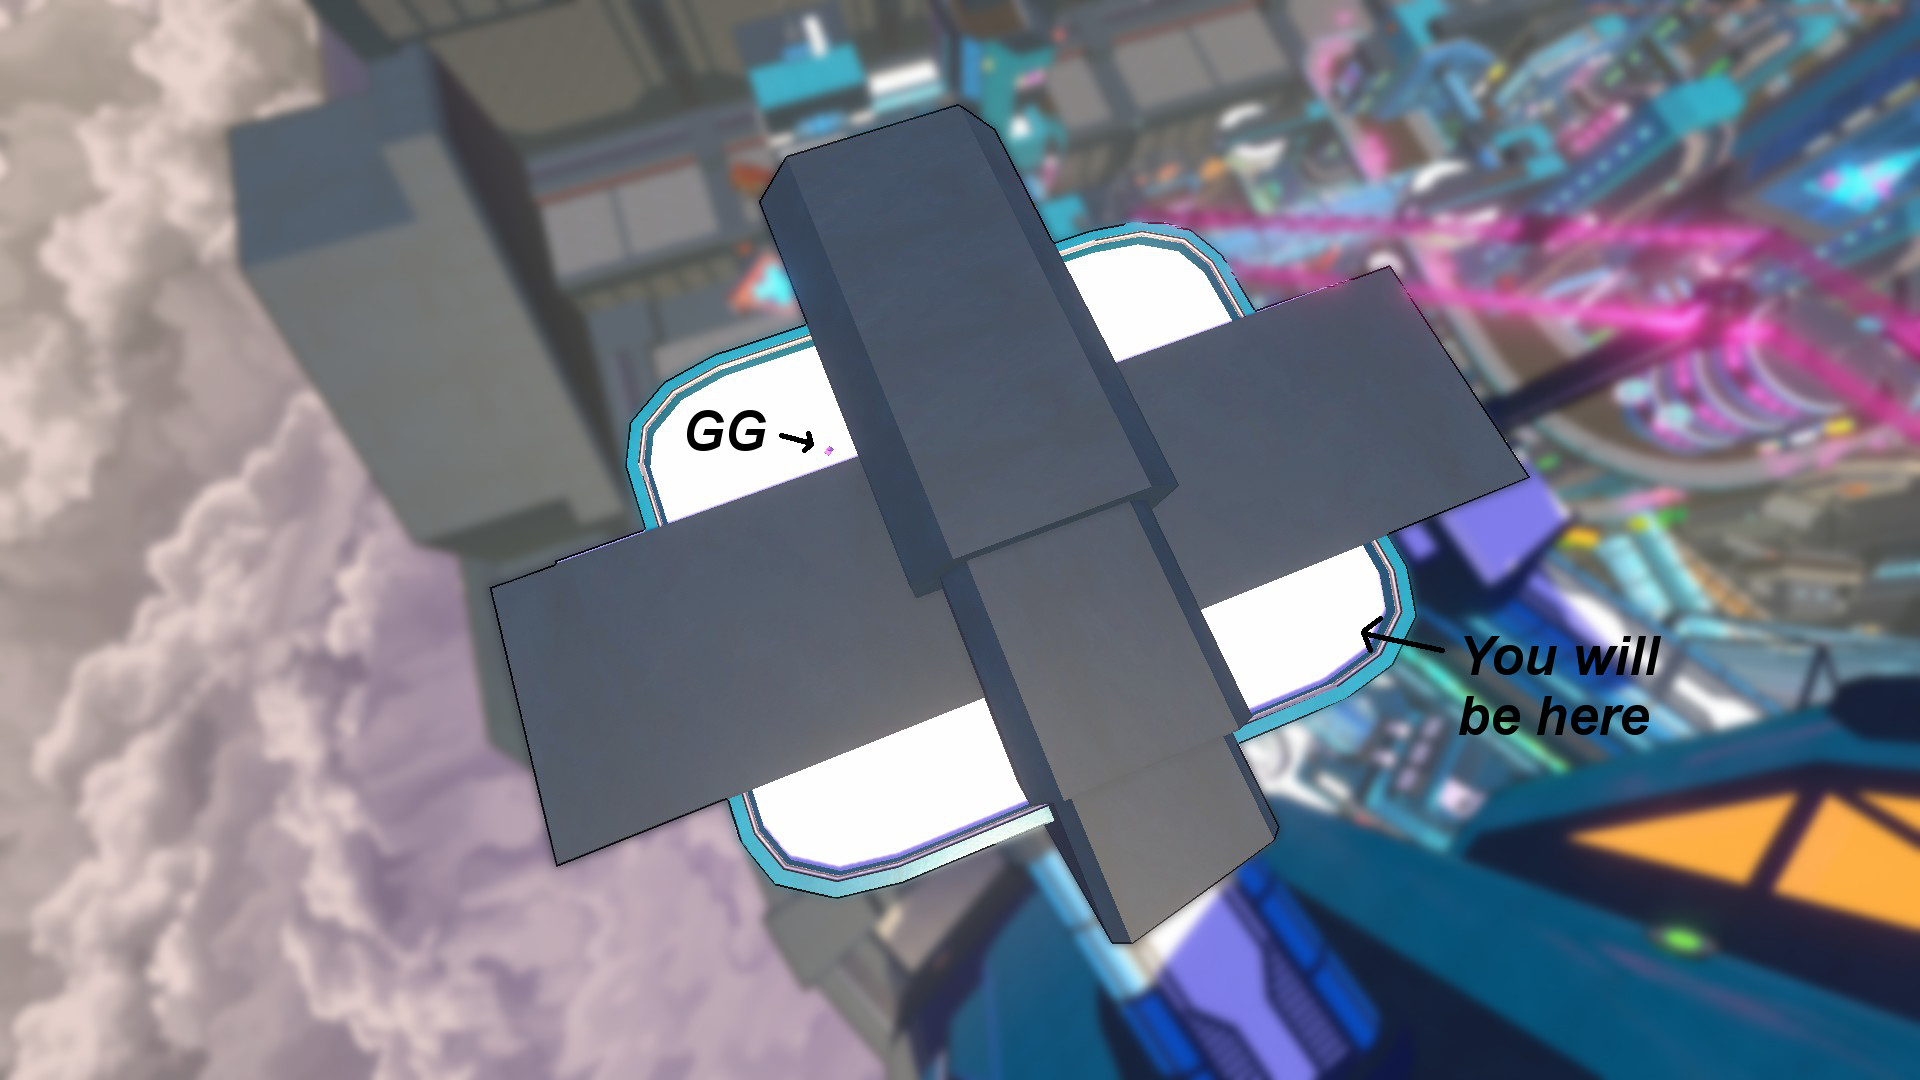
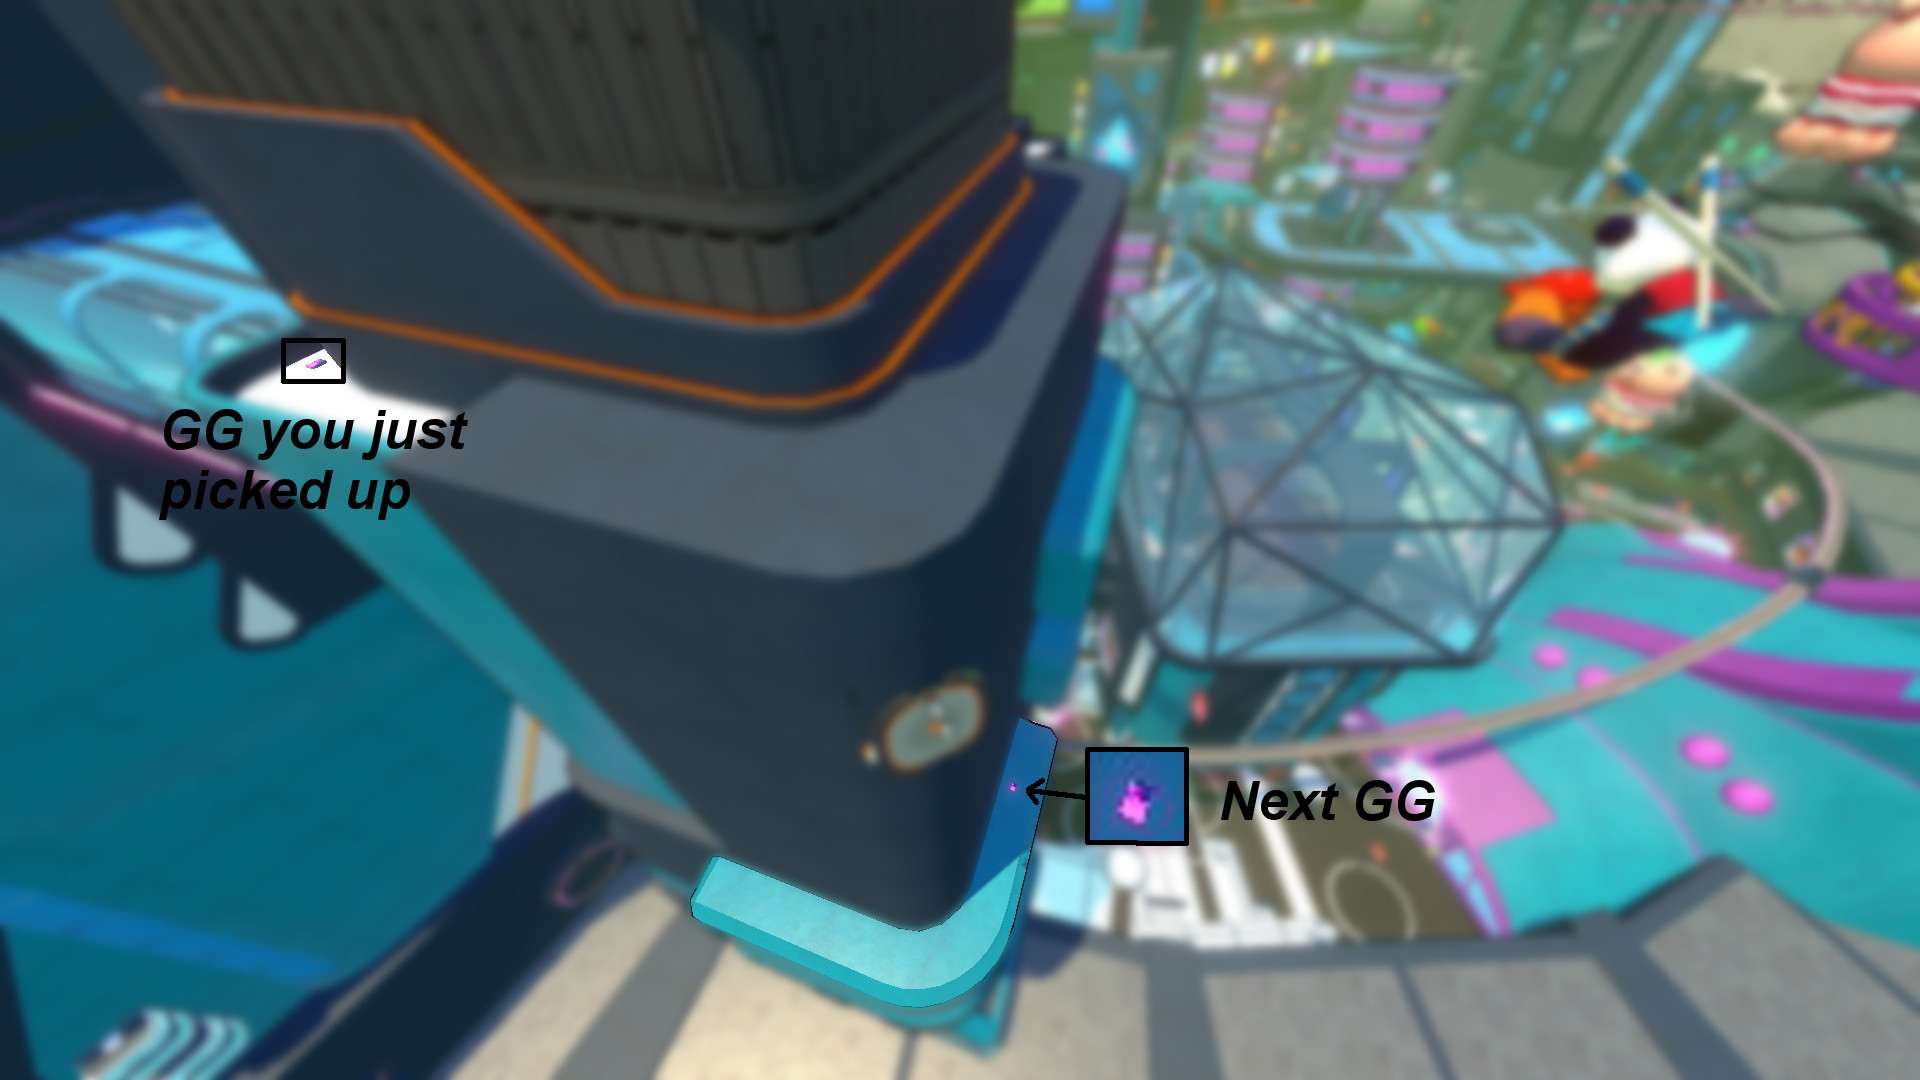
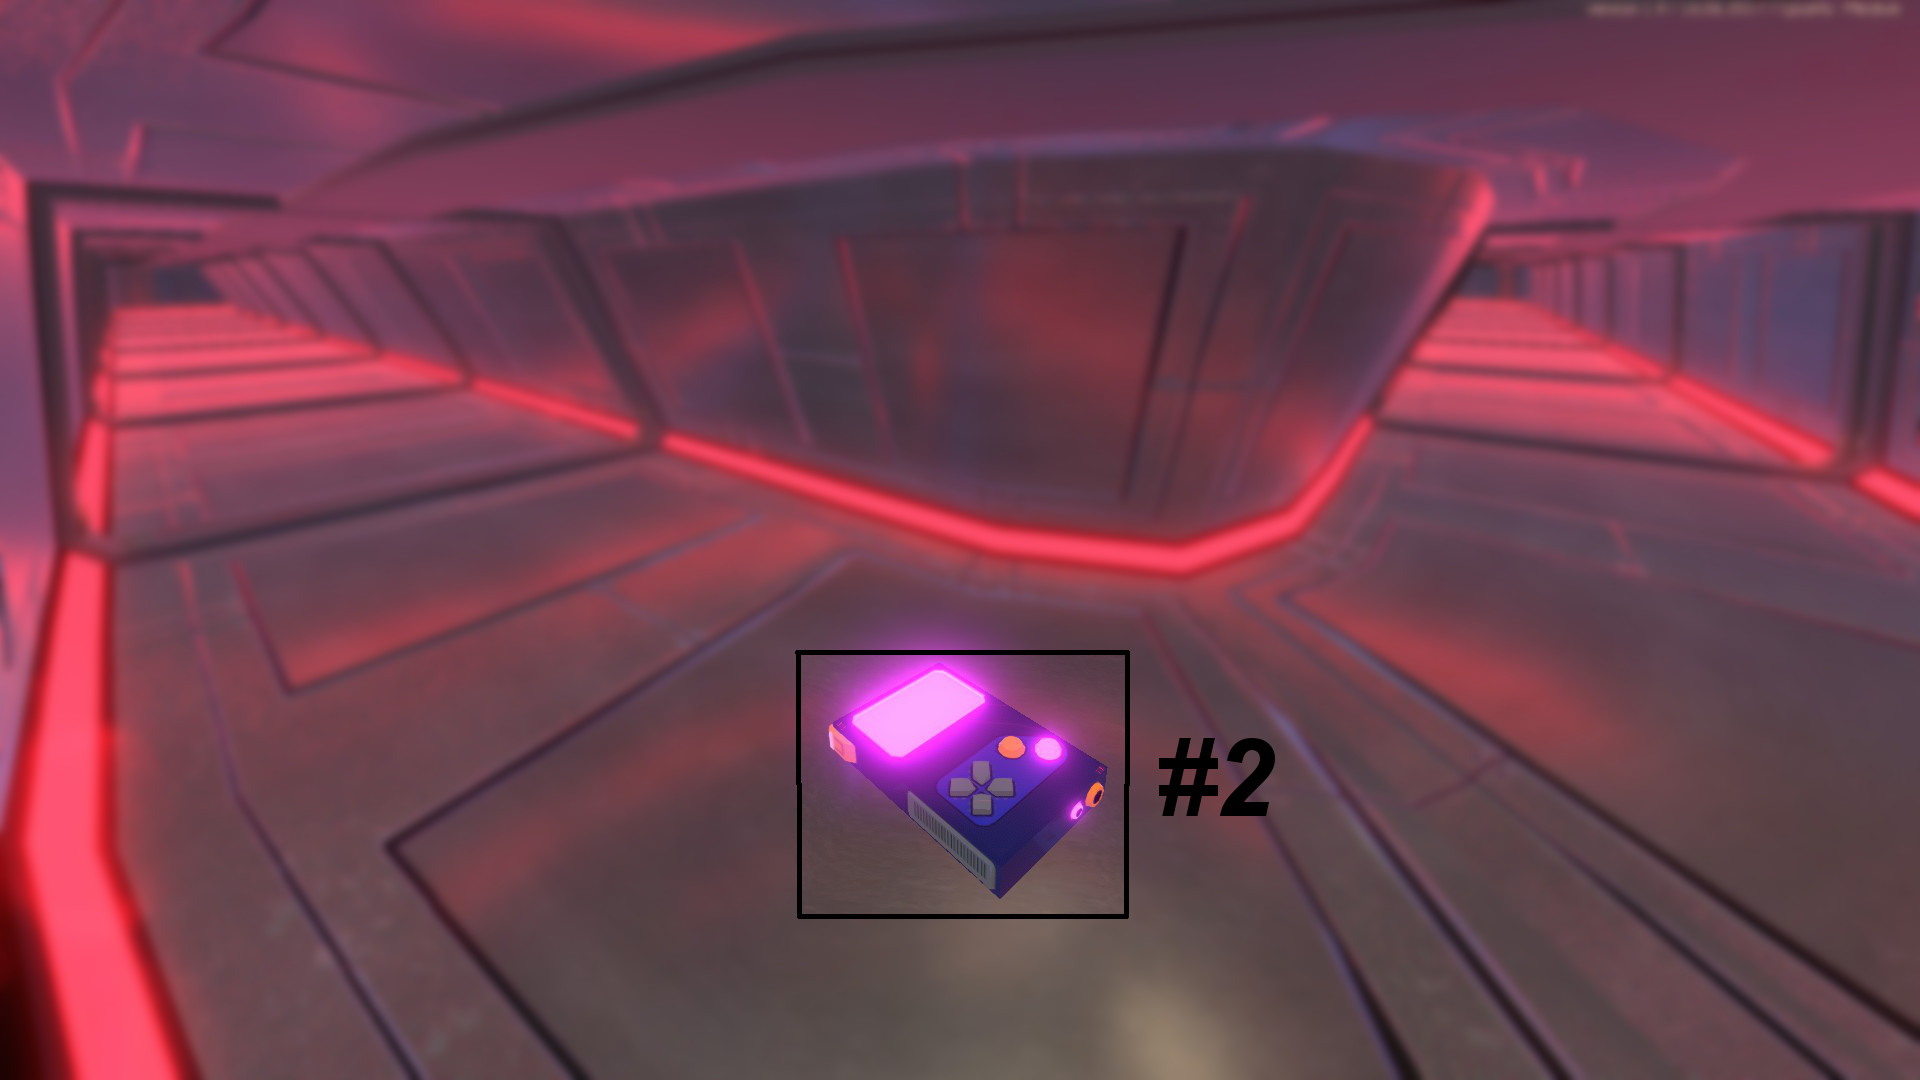
But if it's the later then I don't know, at the time I was playing there was a bug with one GG in OS not being added to the total count despite being picked up, which lead to a lot of confusion because players would mistakenly assume they didn't get it. There's even a talk about it in the previous comments here.

This bug should be fixed by now I imagine, if it isn't I'm really sorry it happened :(
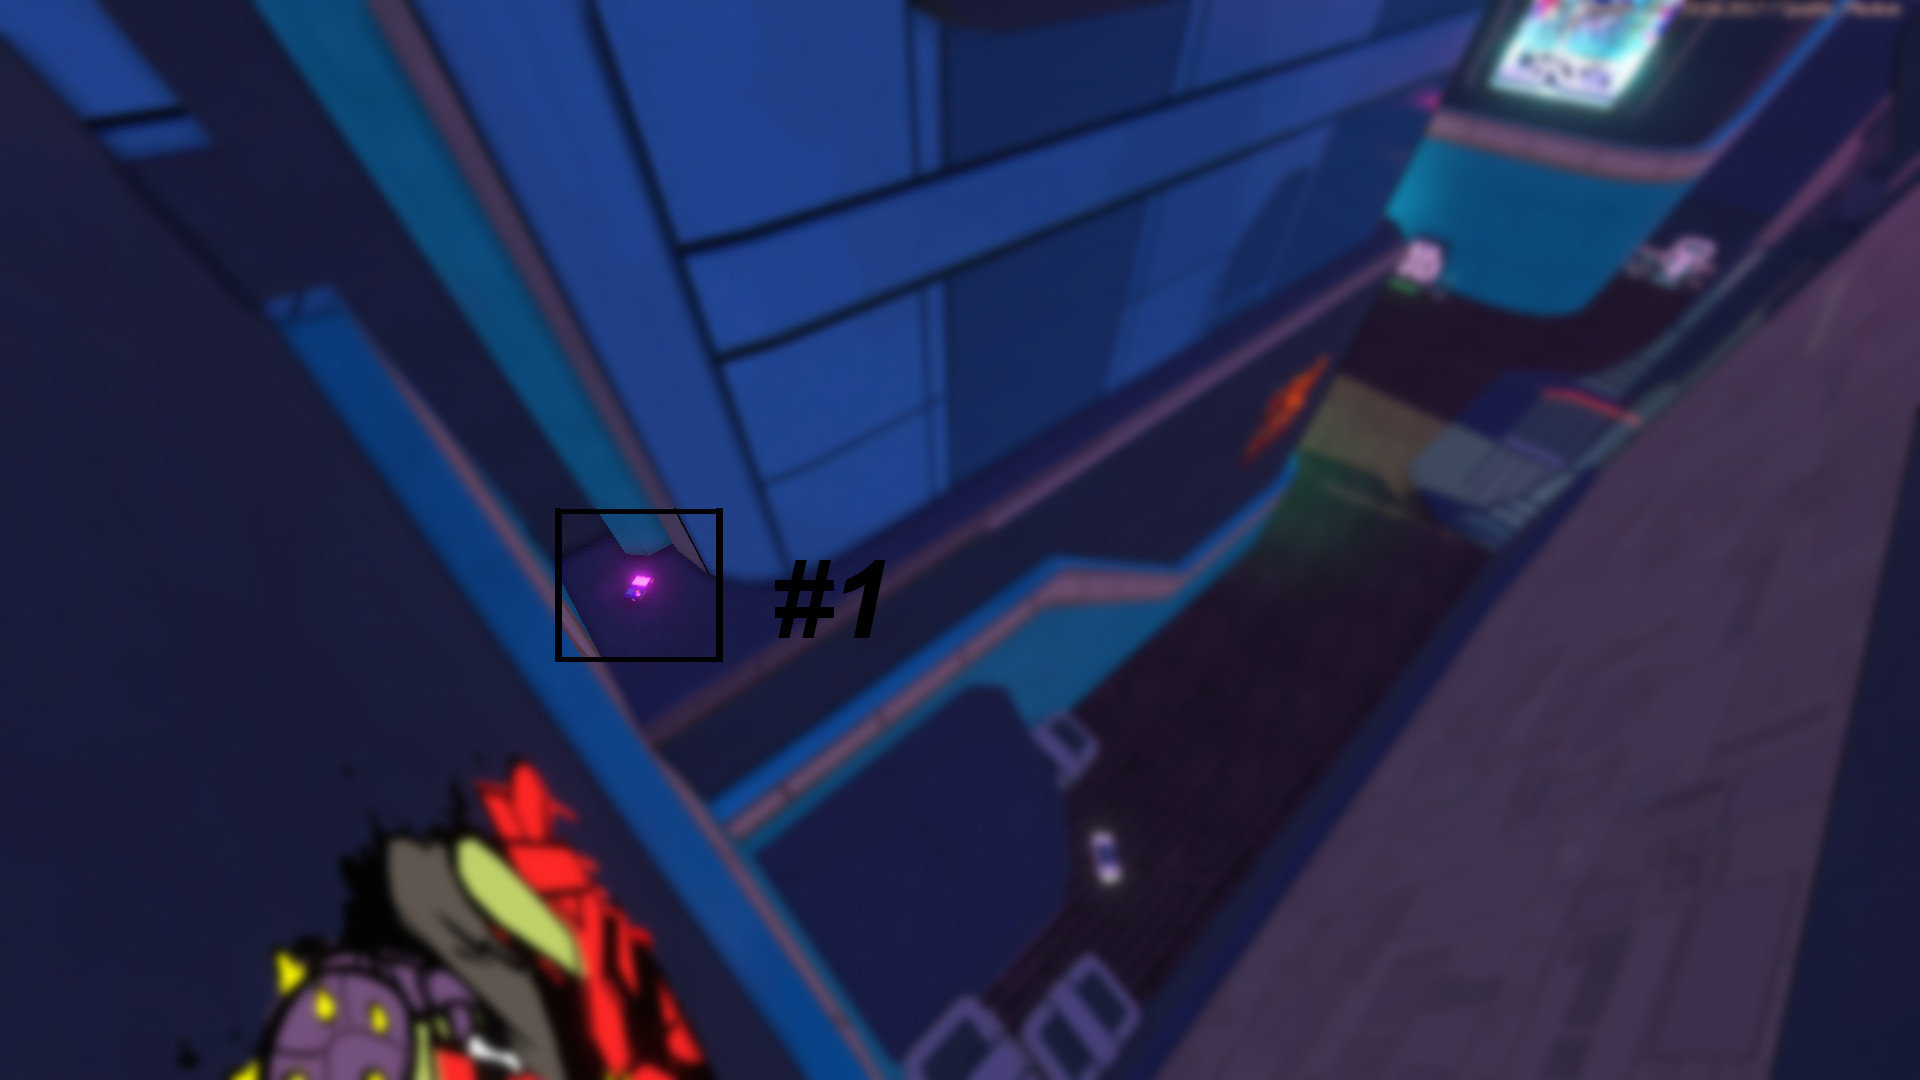
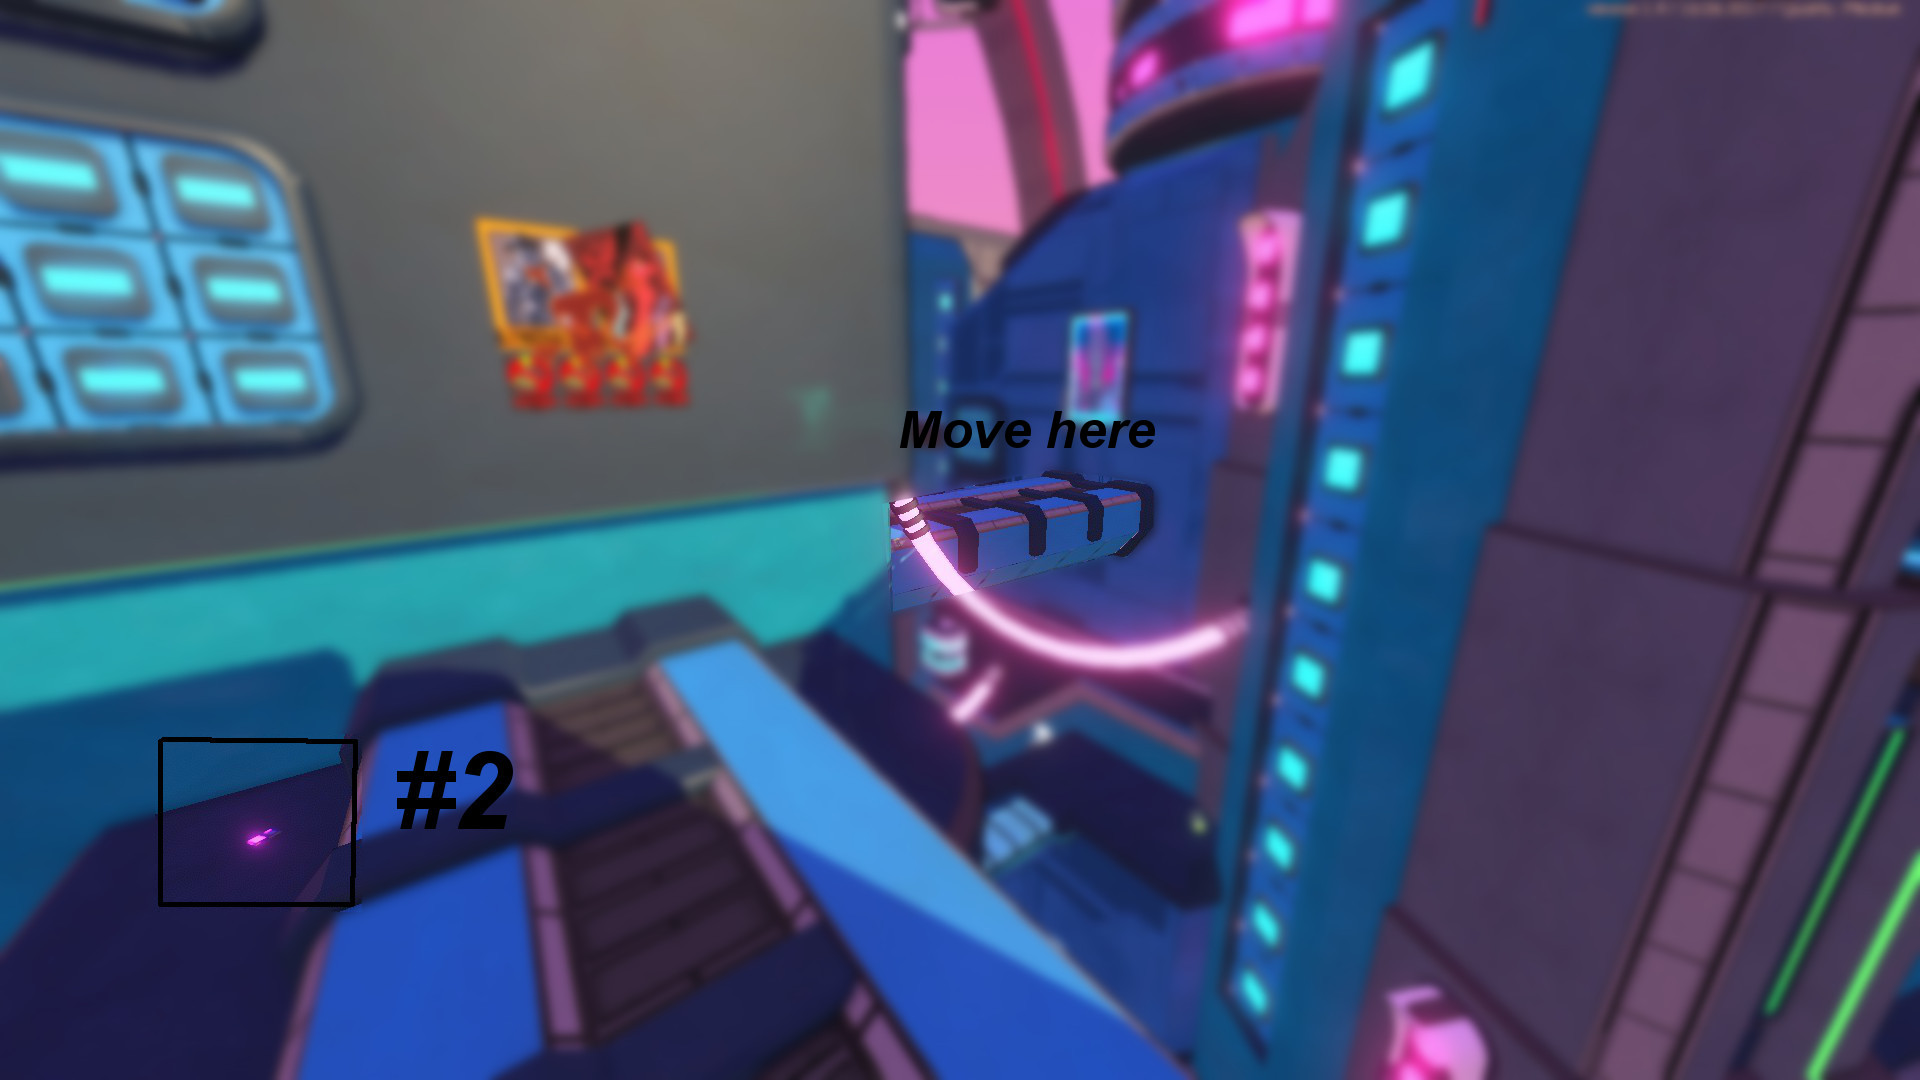
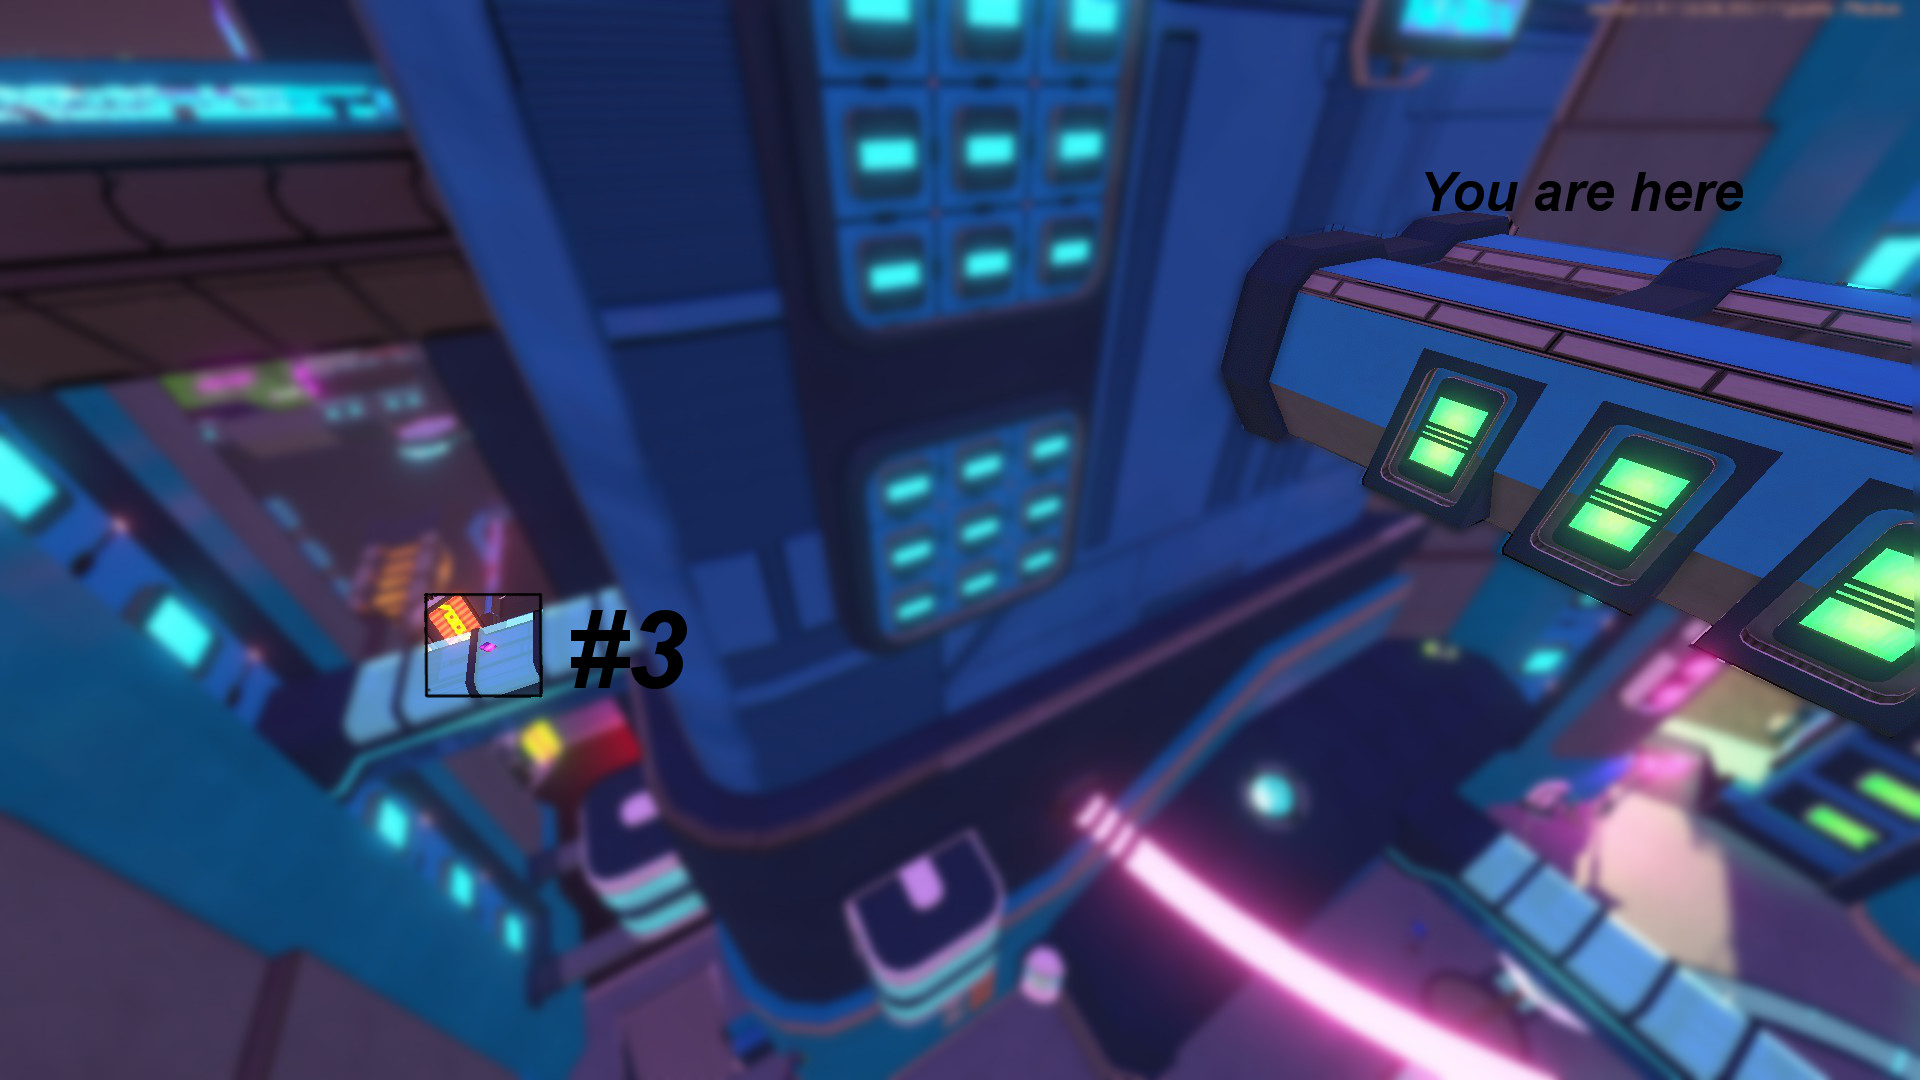
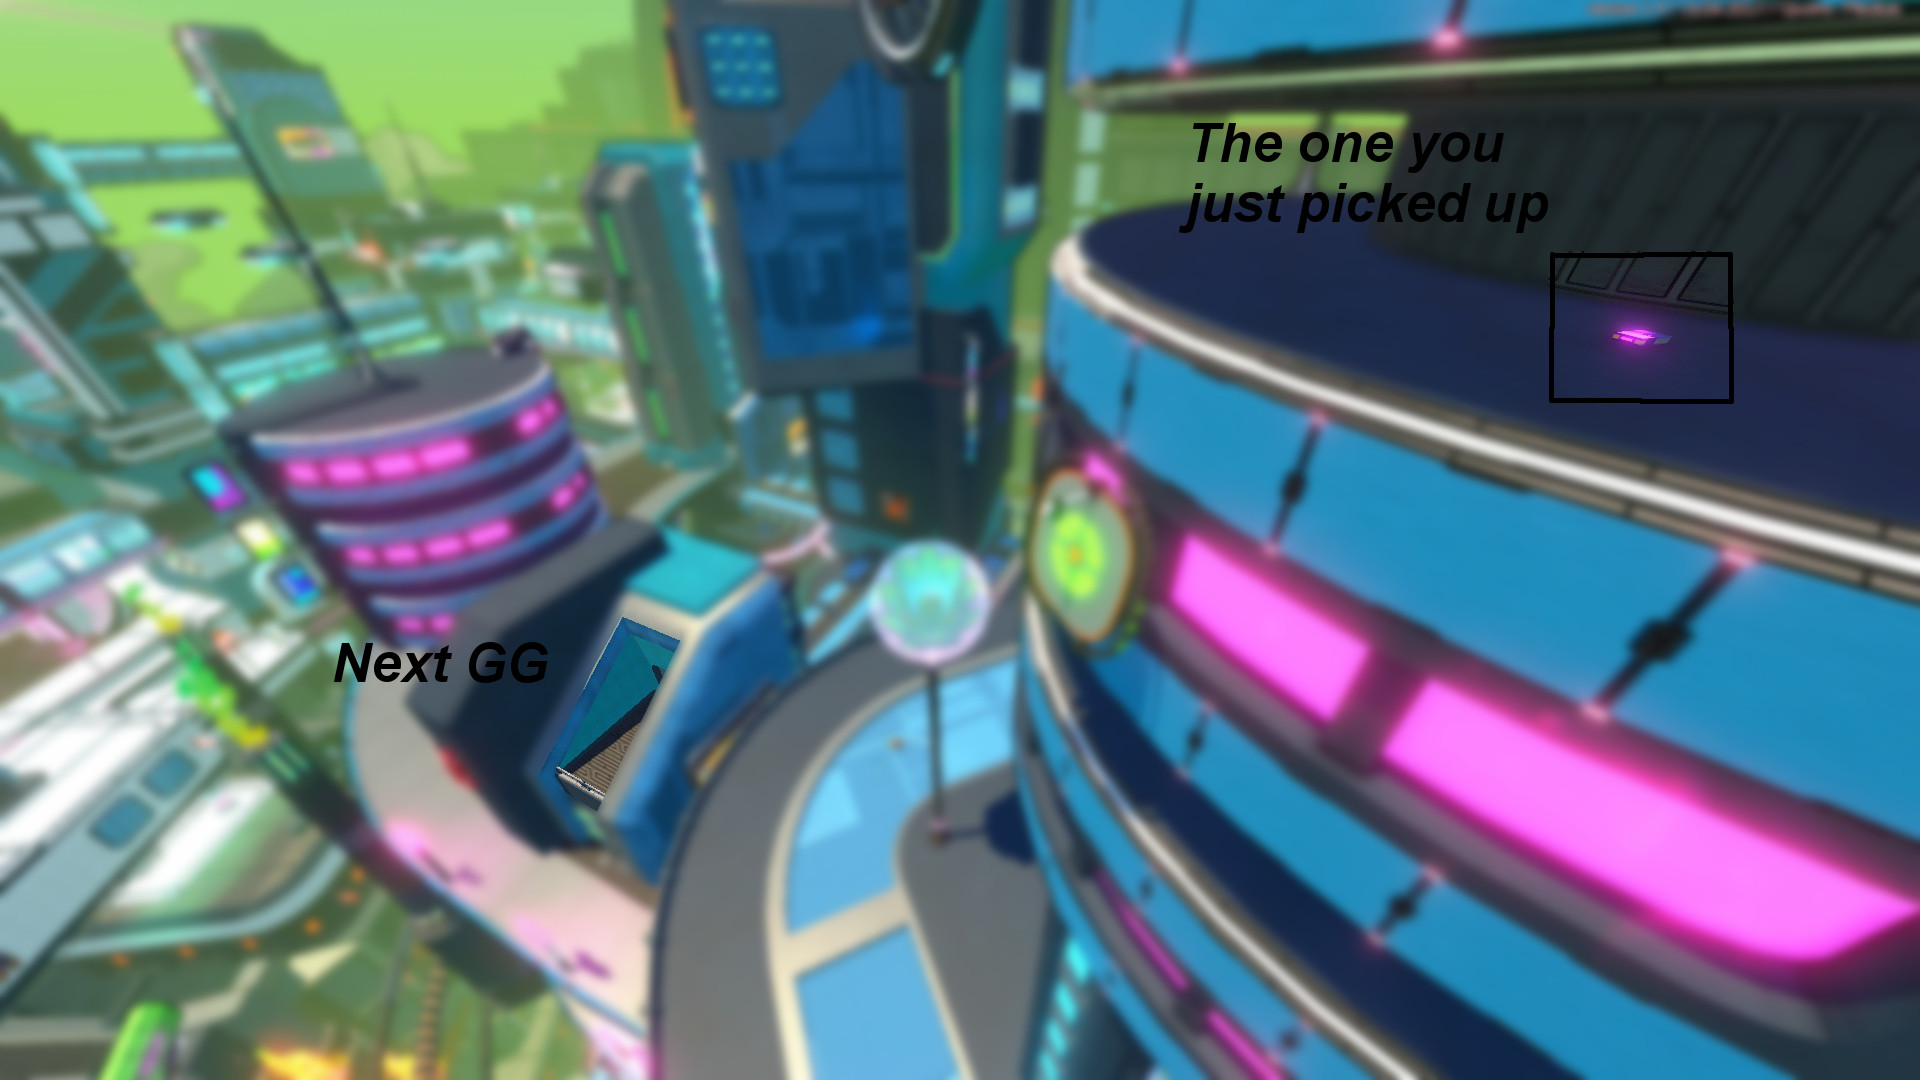
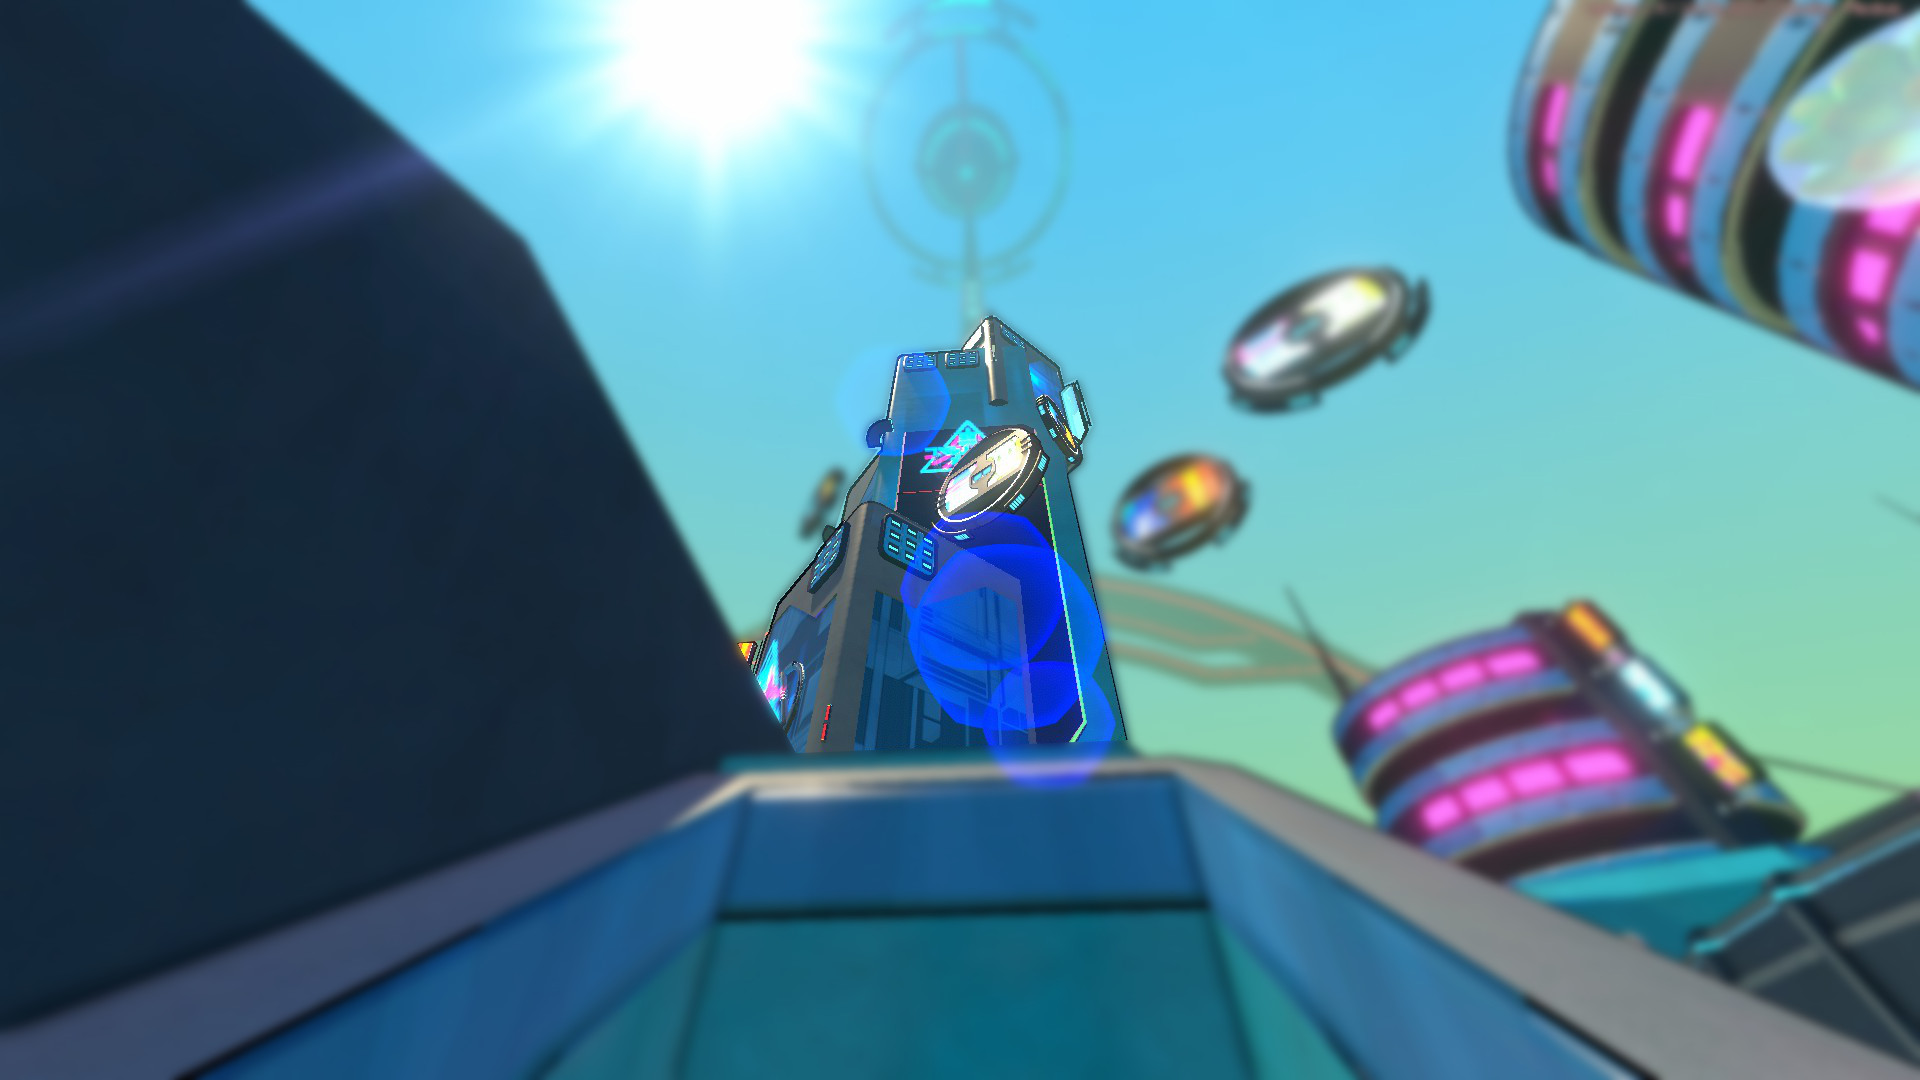
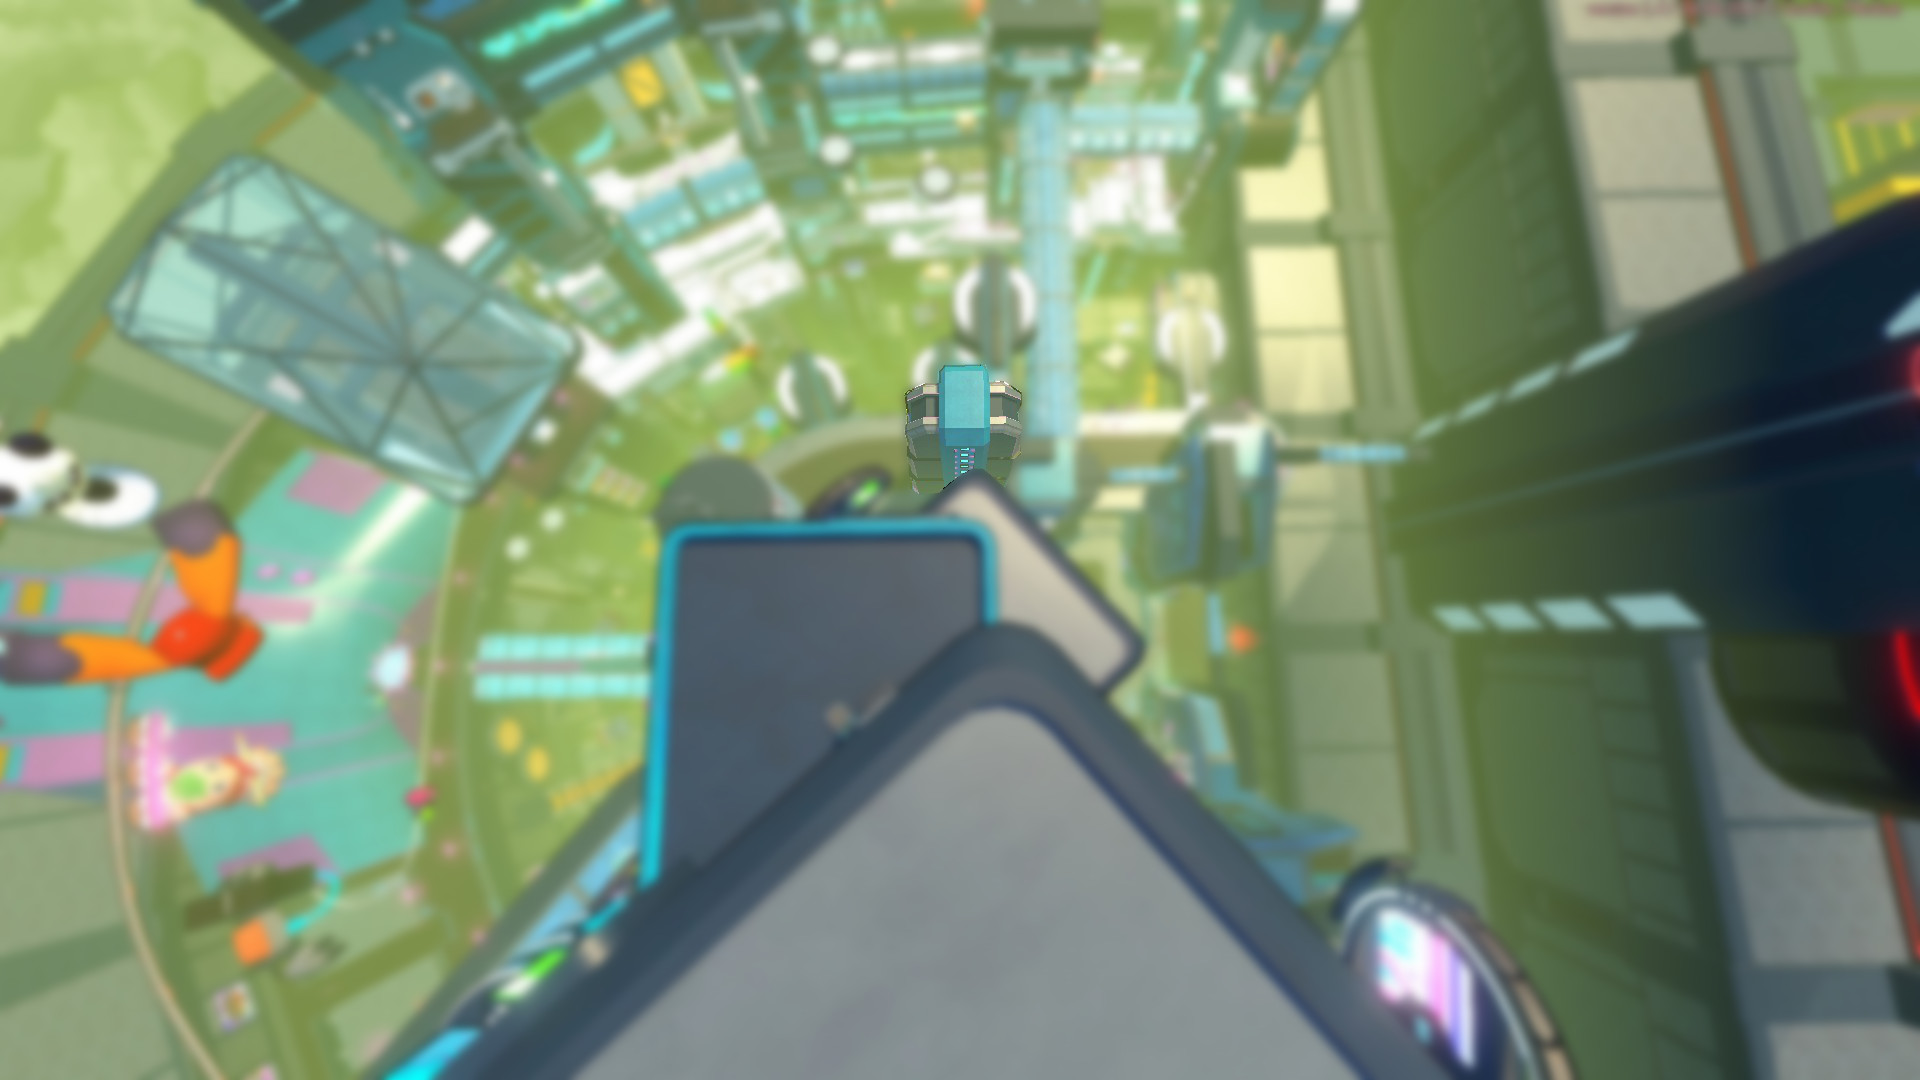
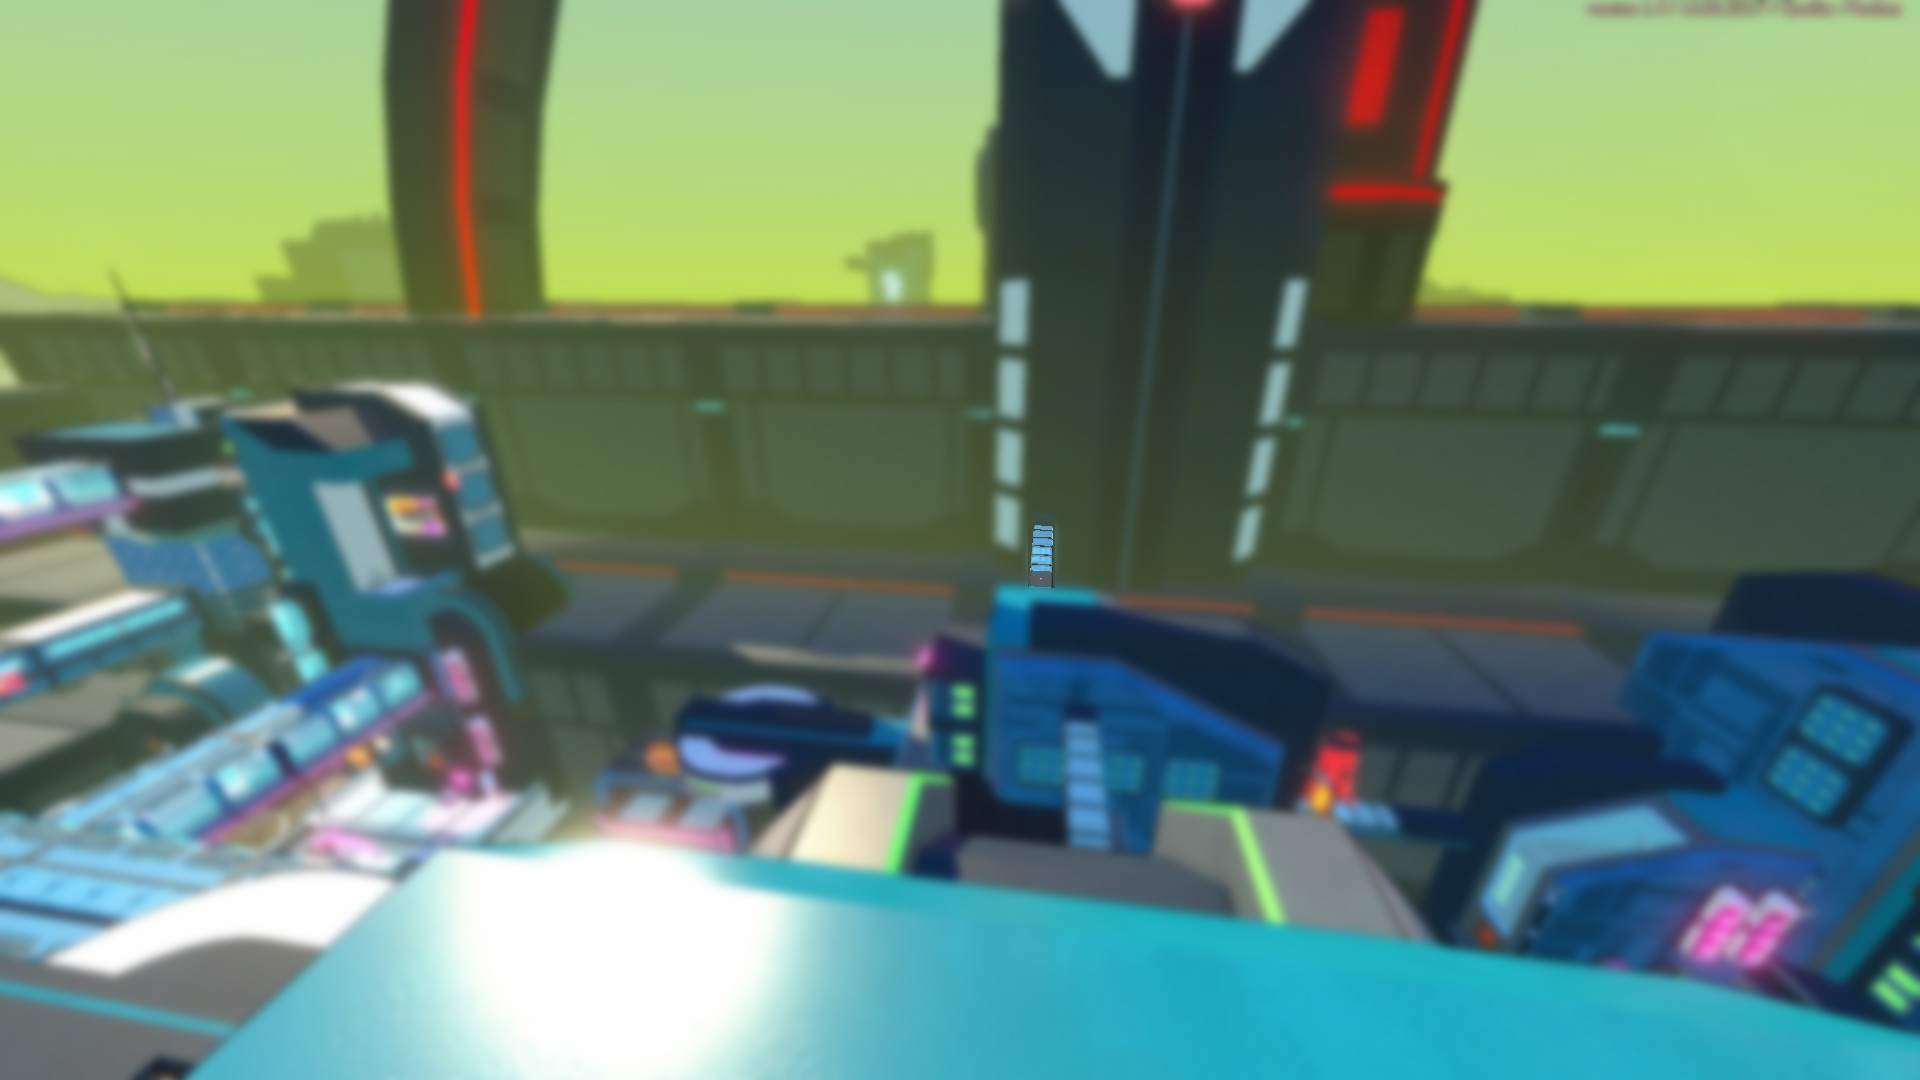
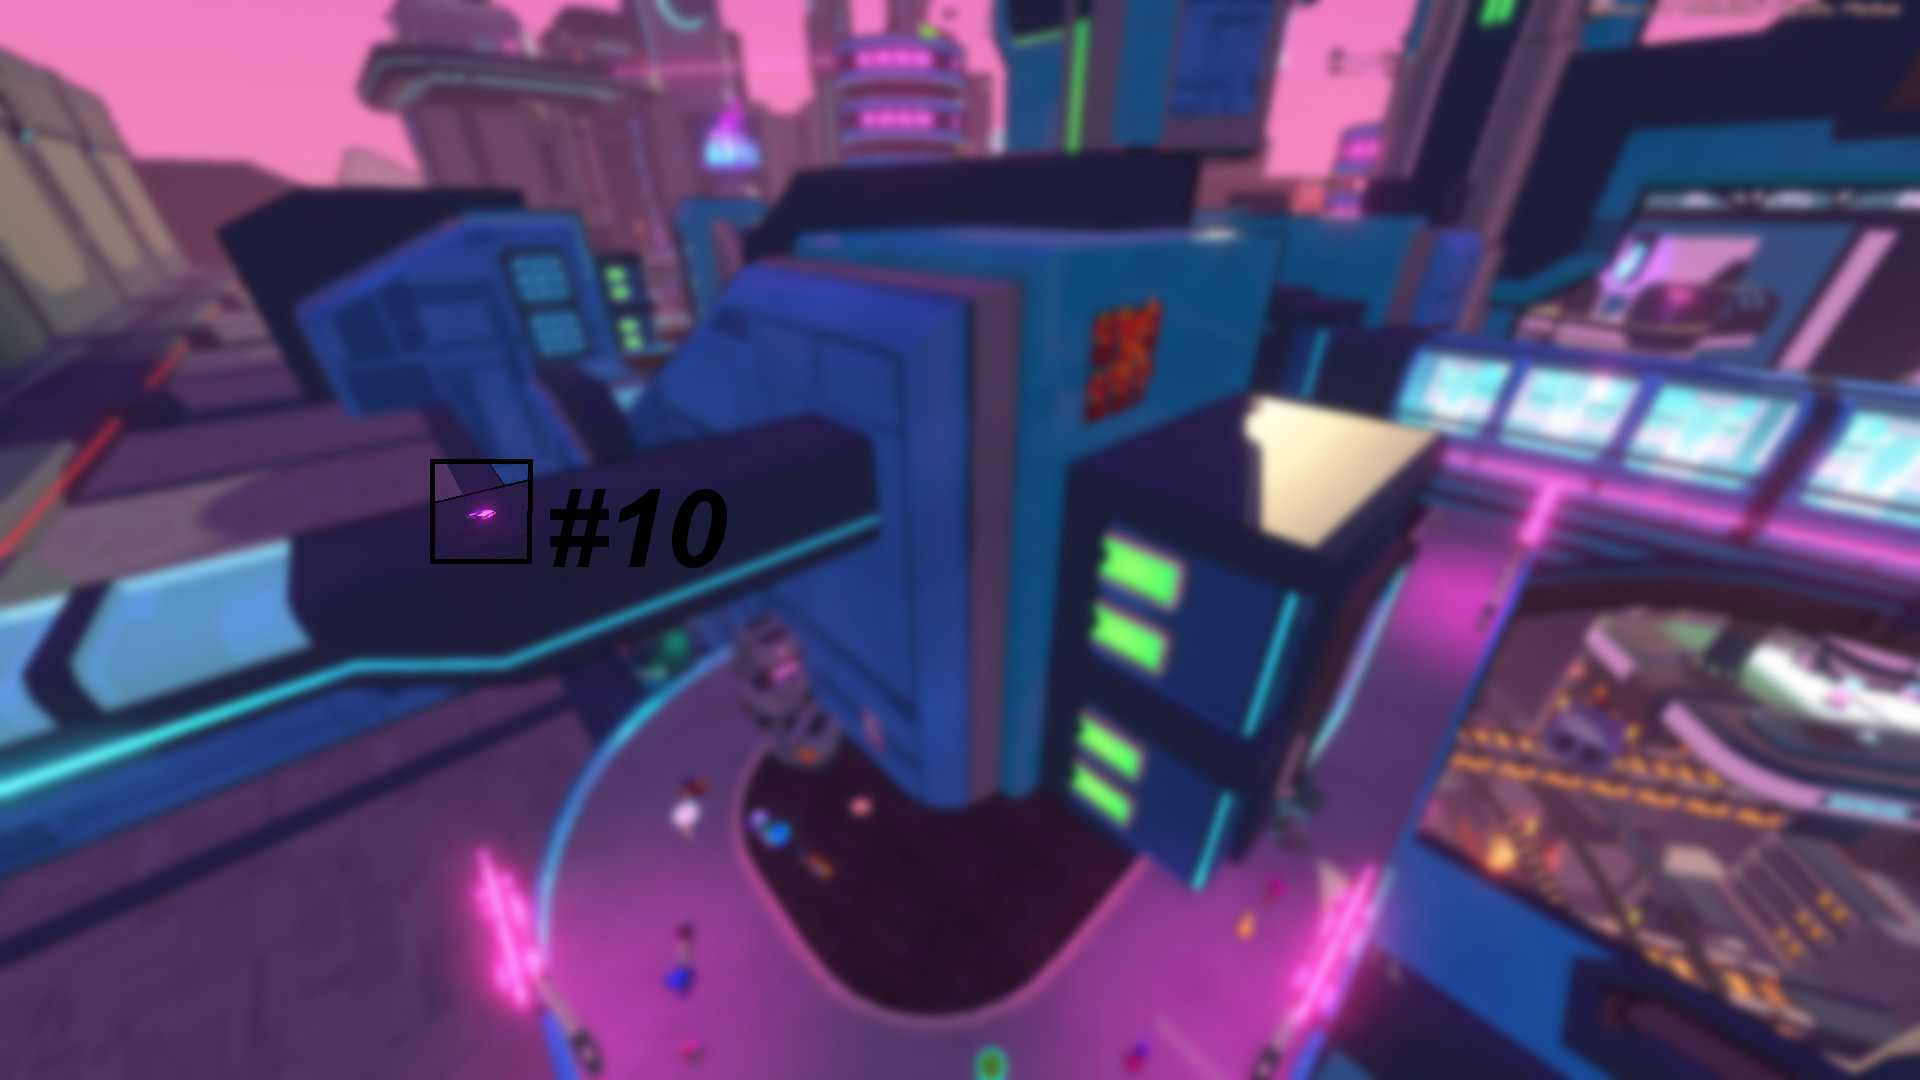
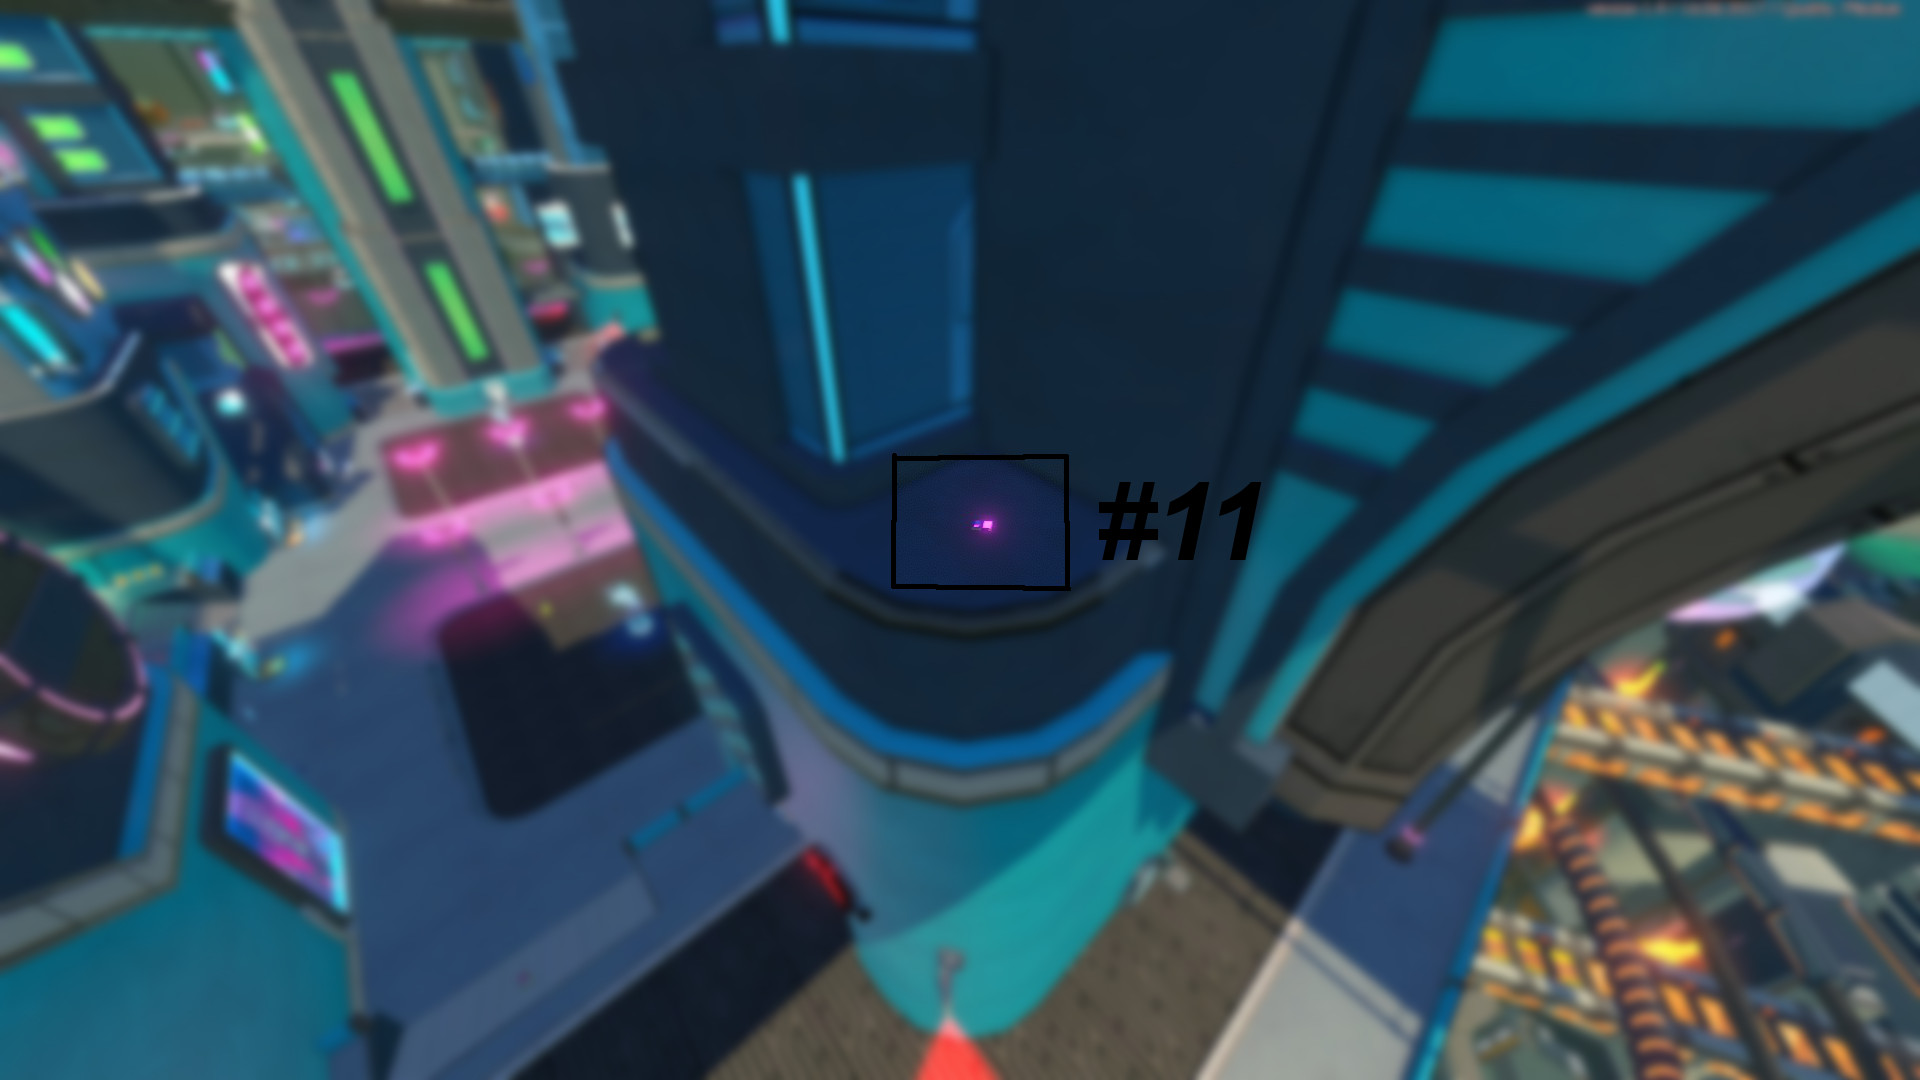
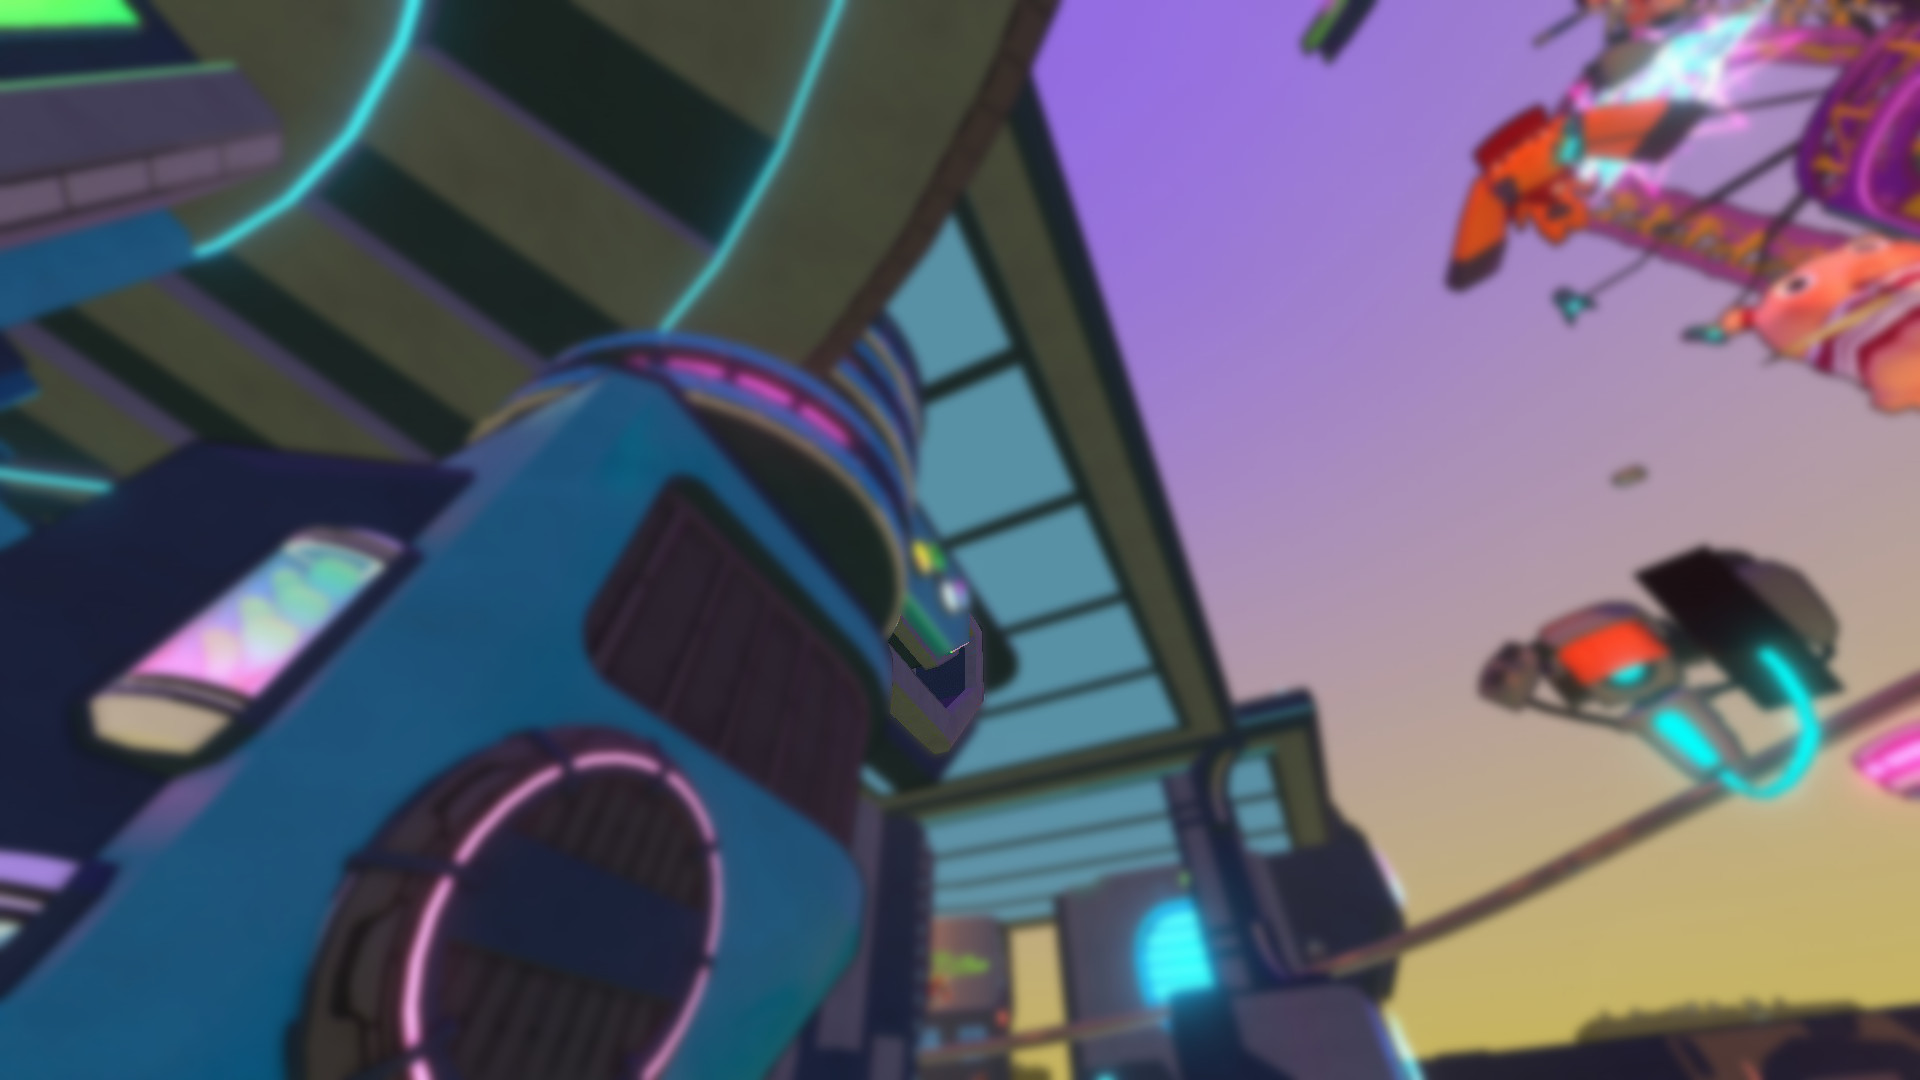
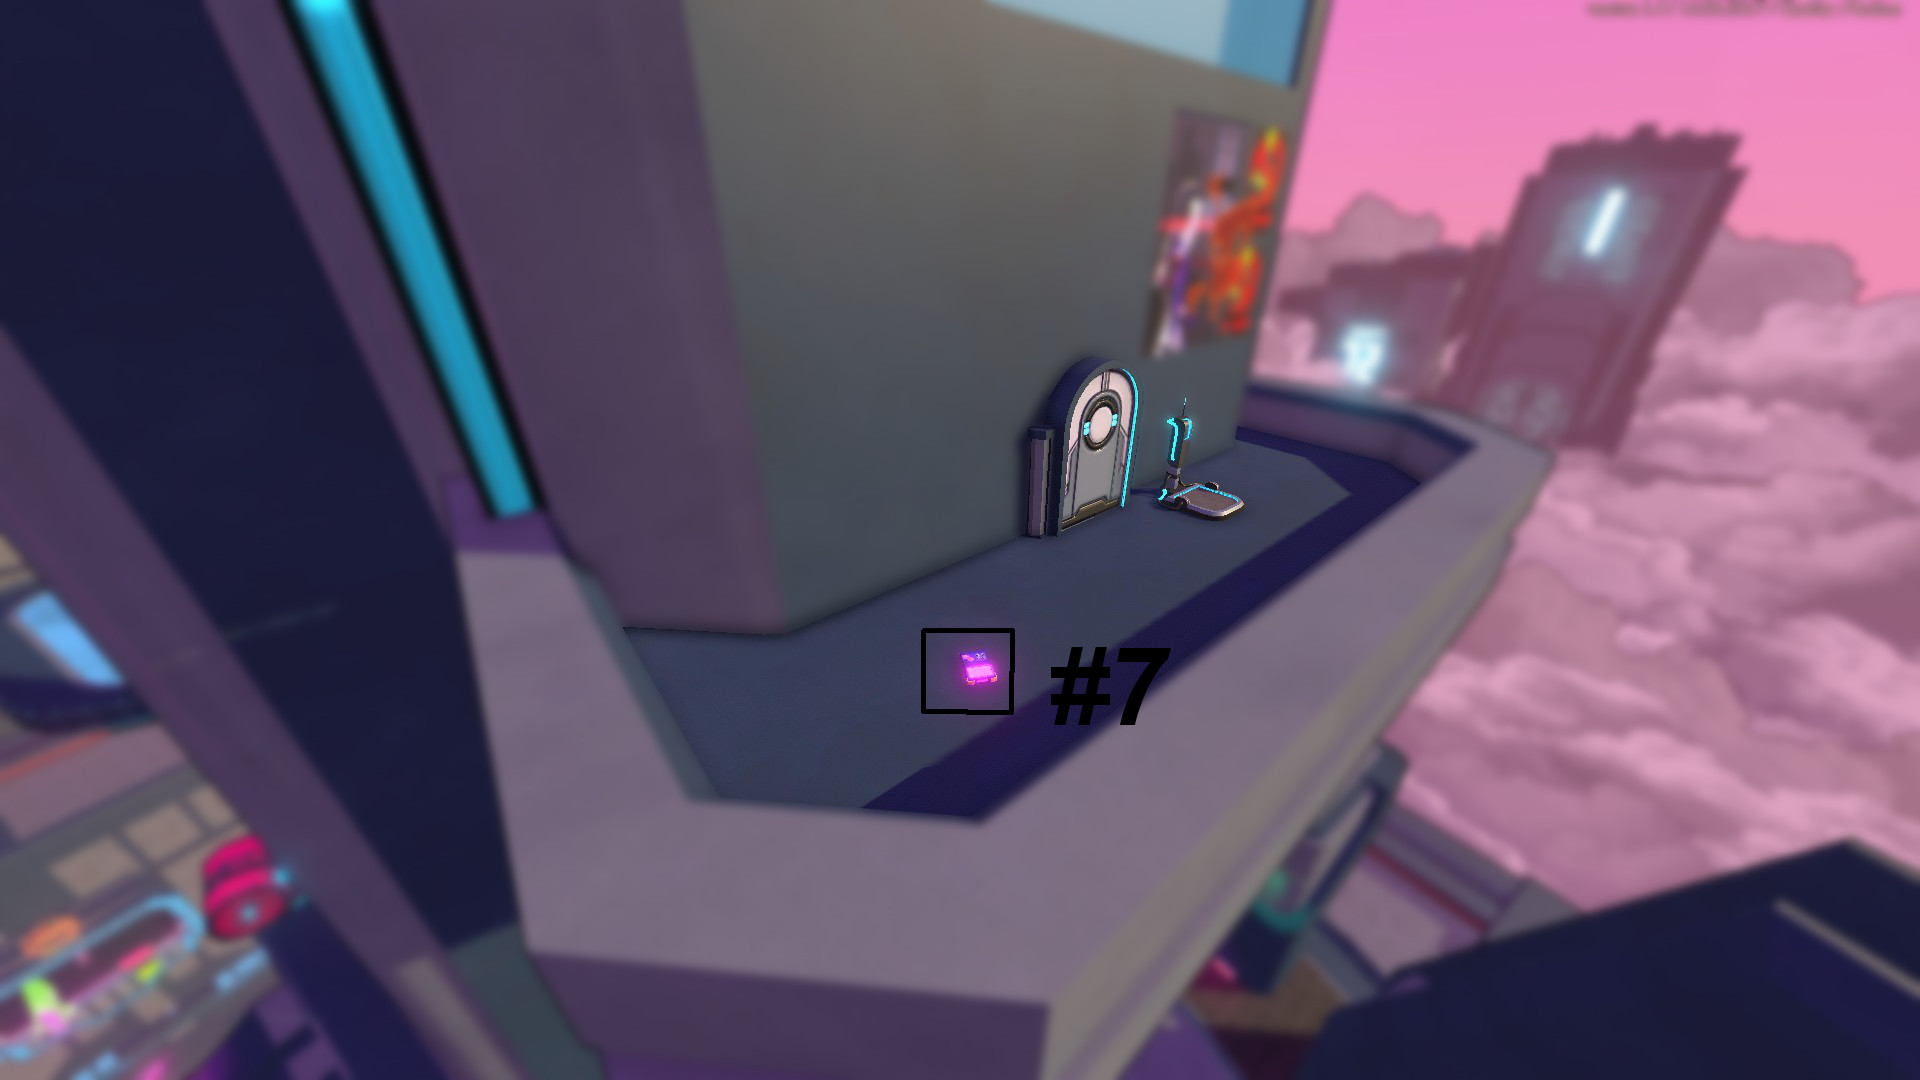
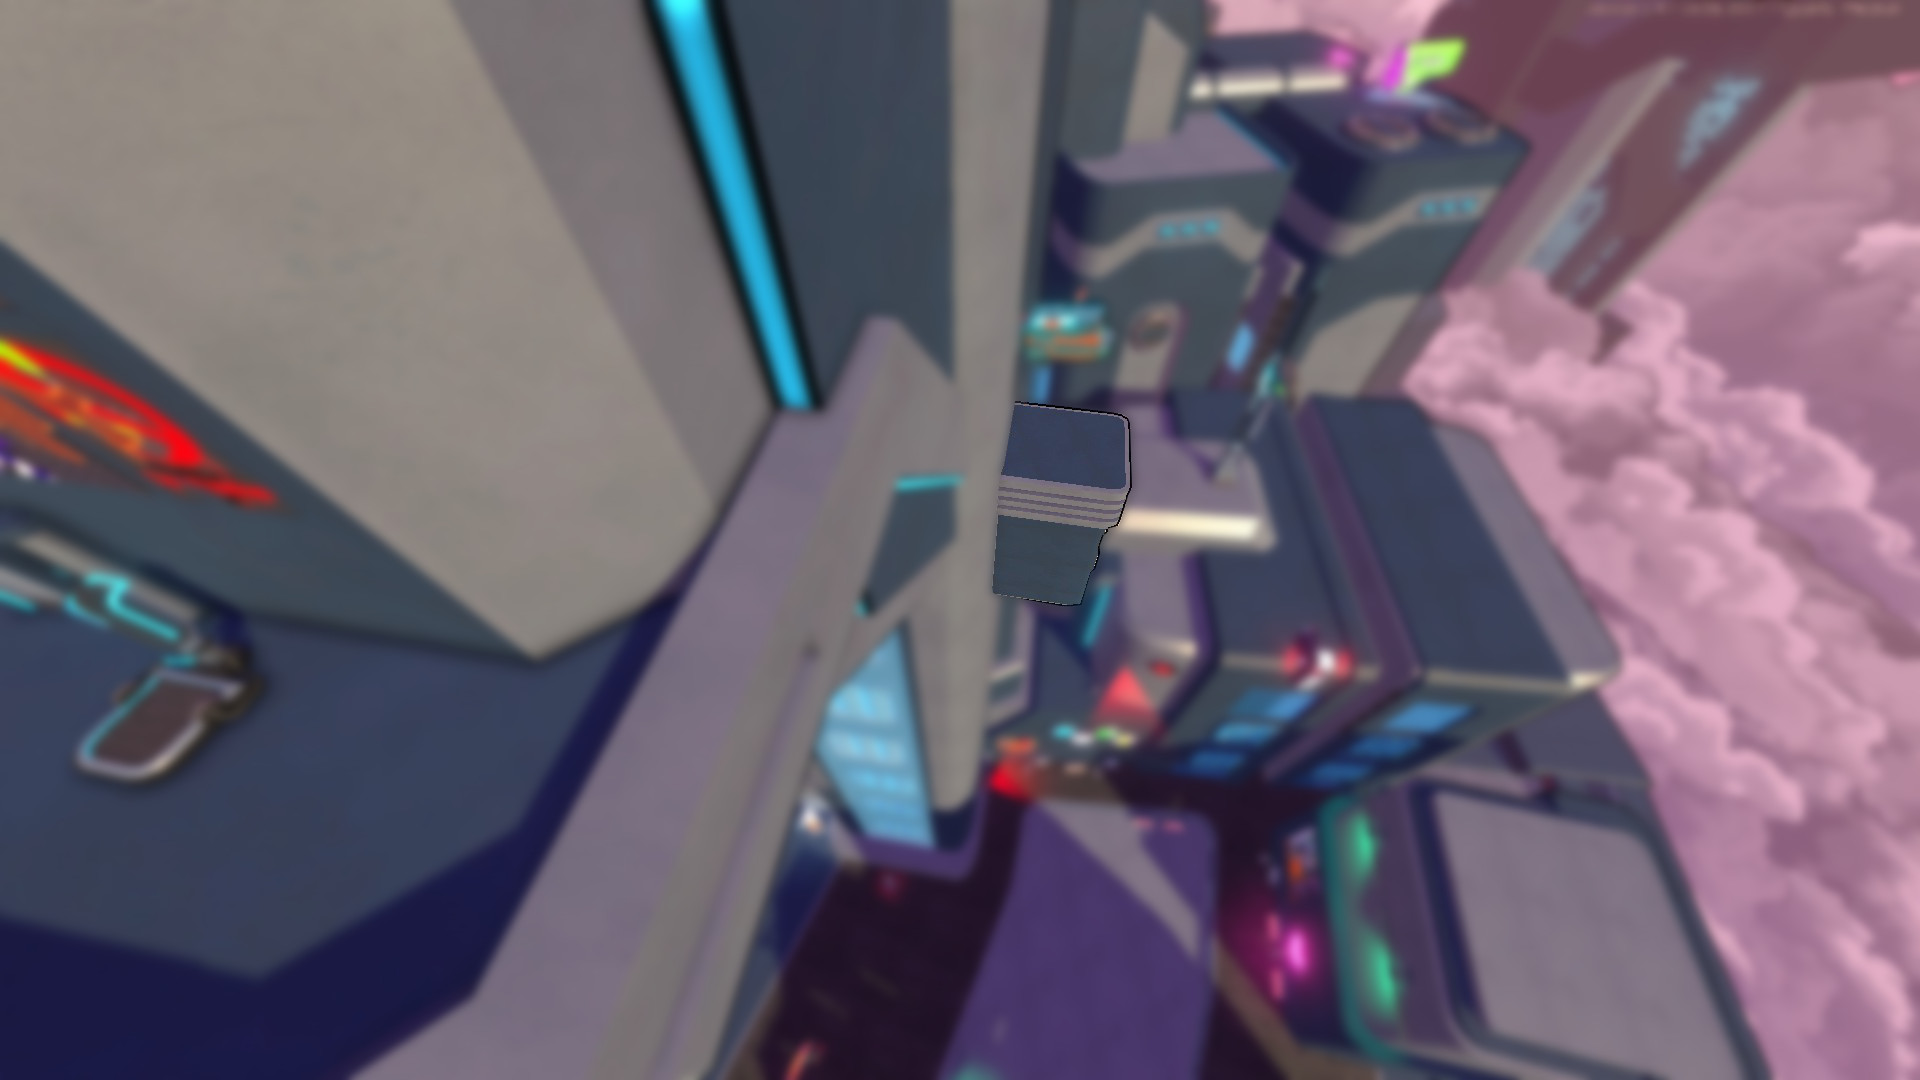
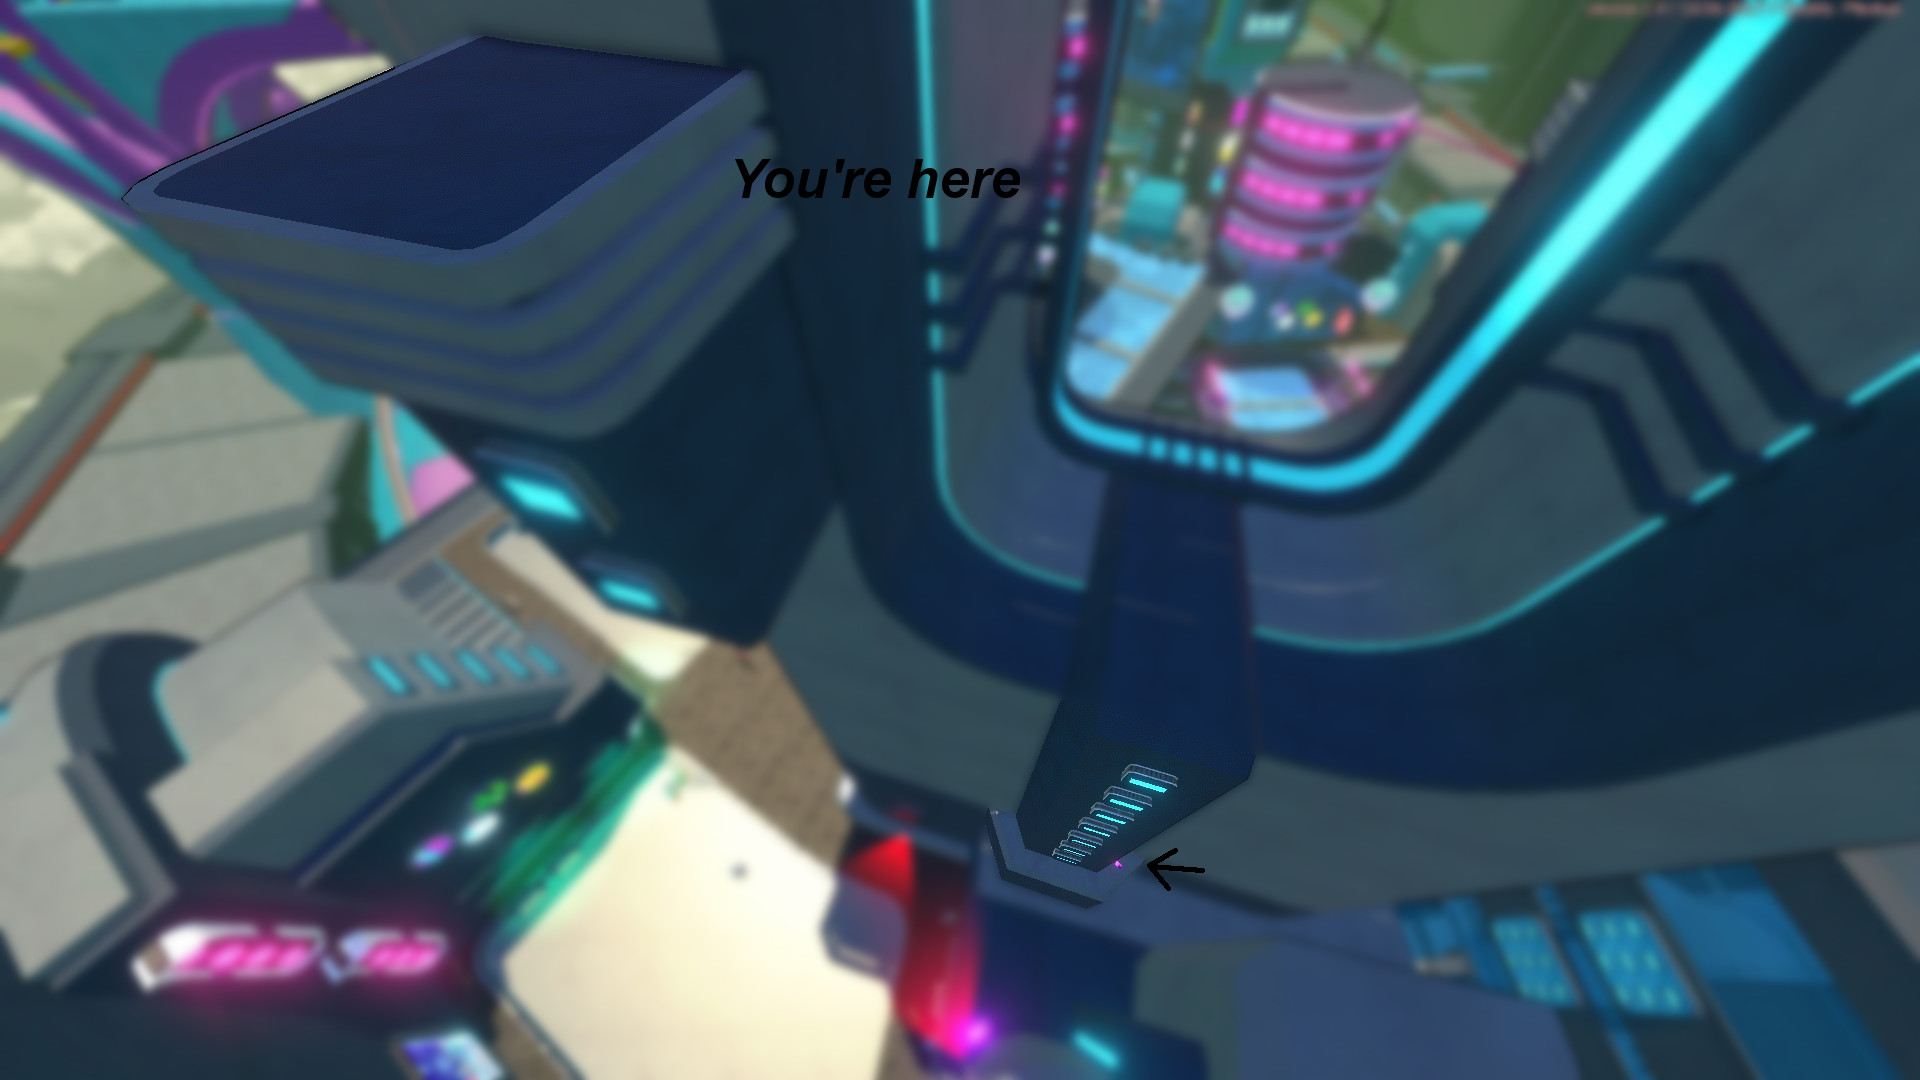
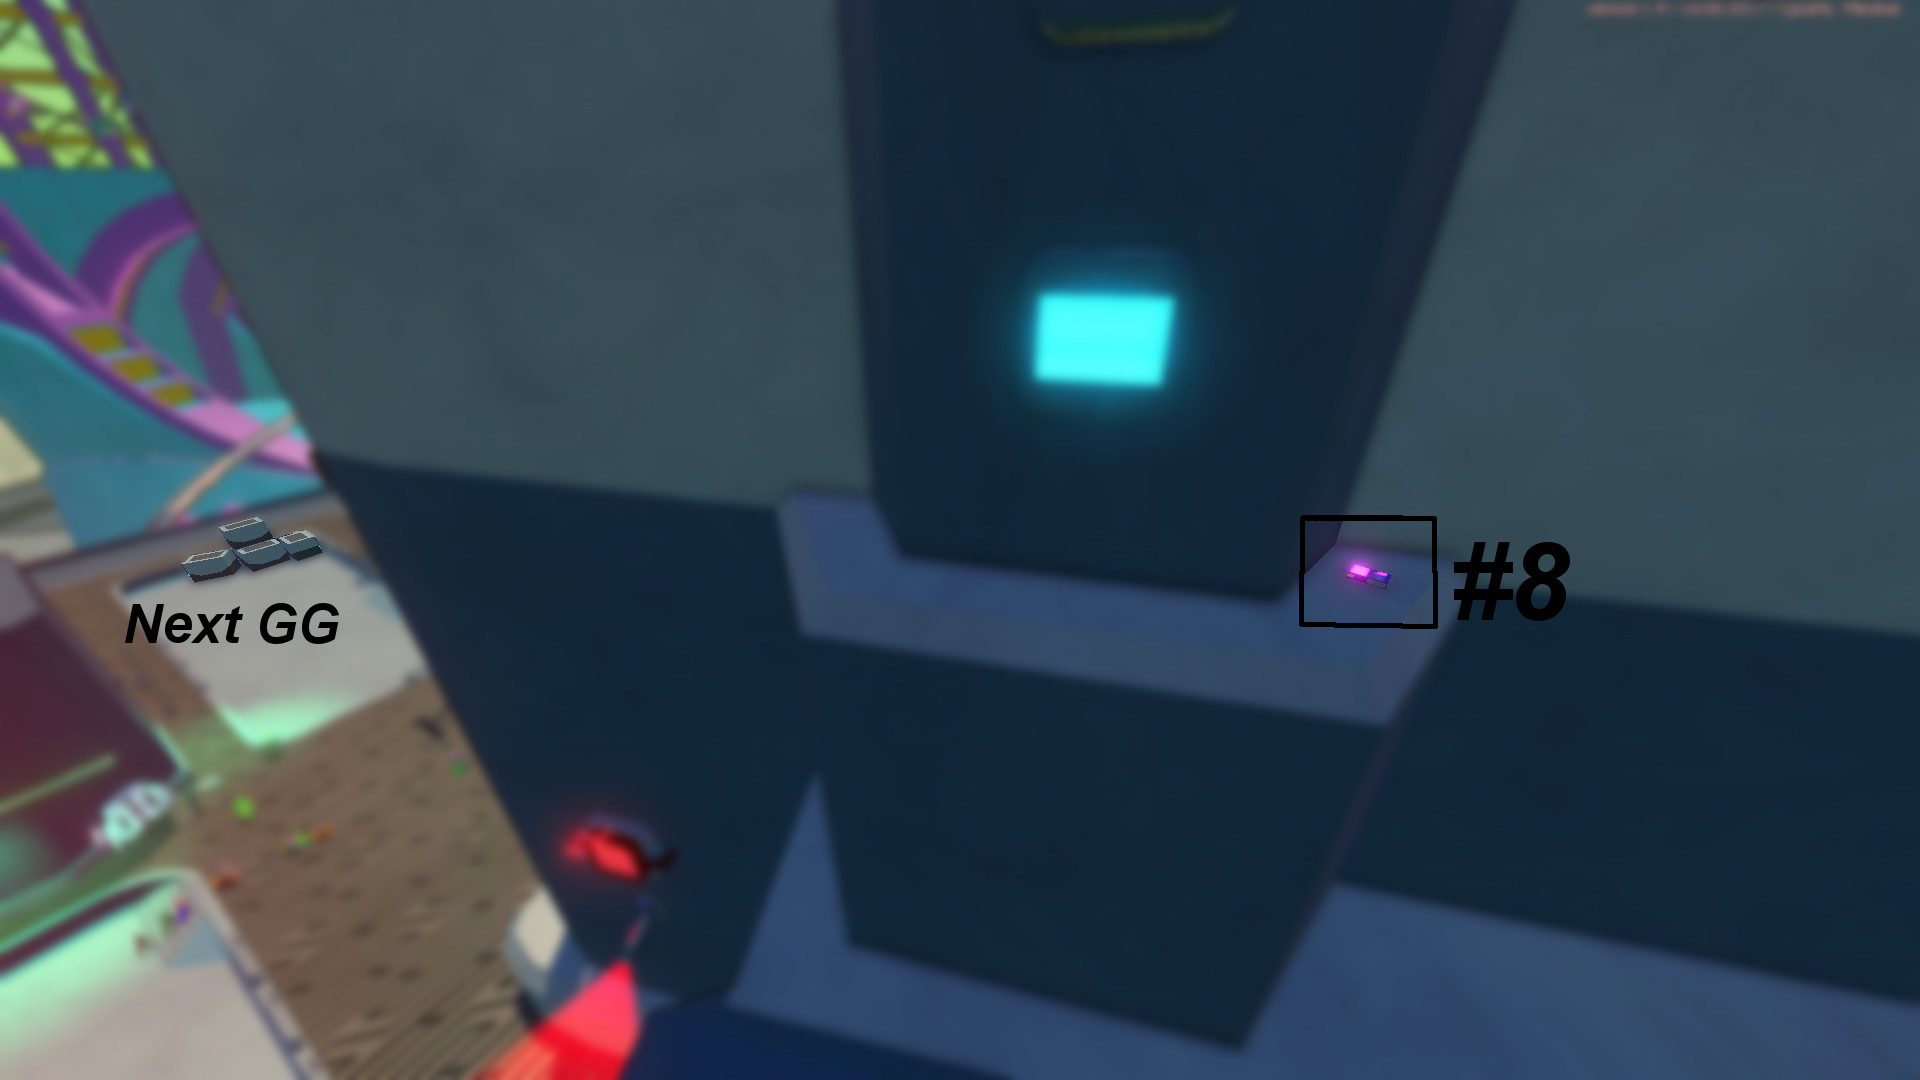
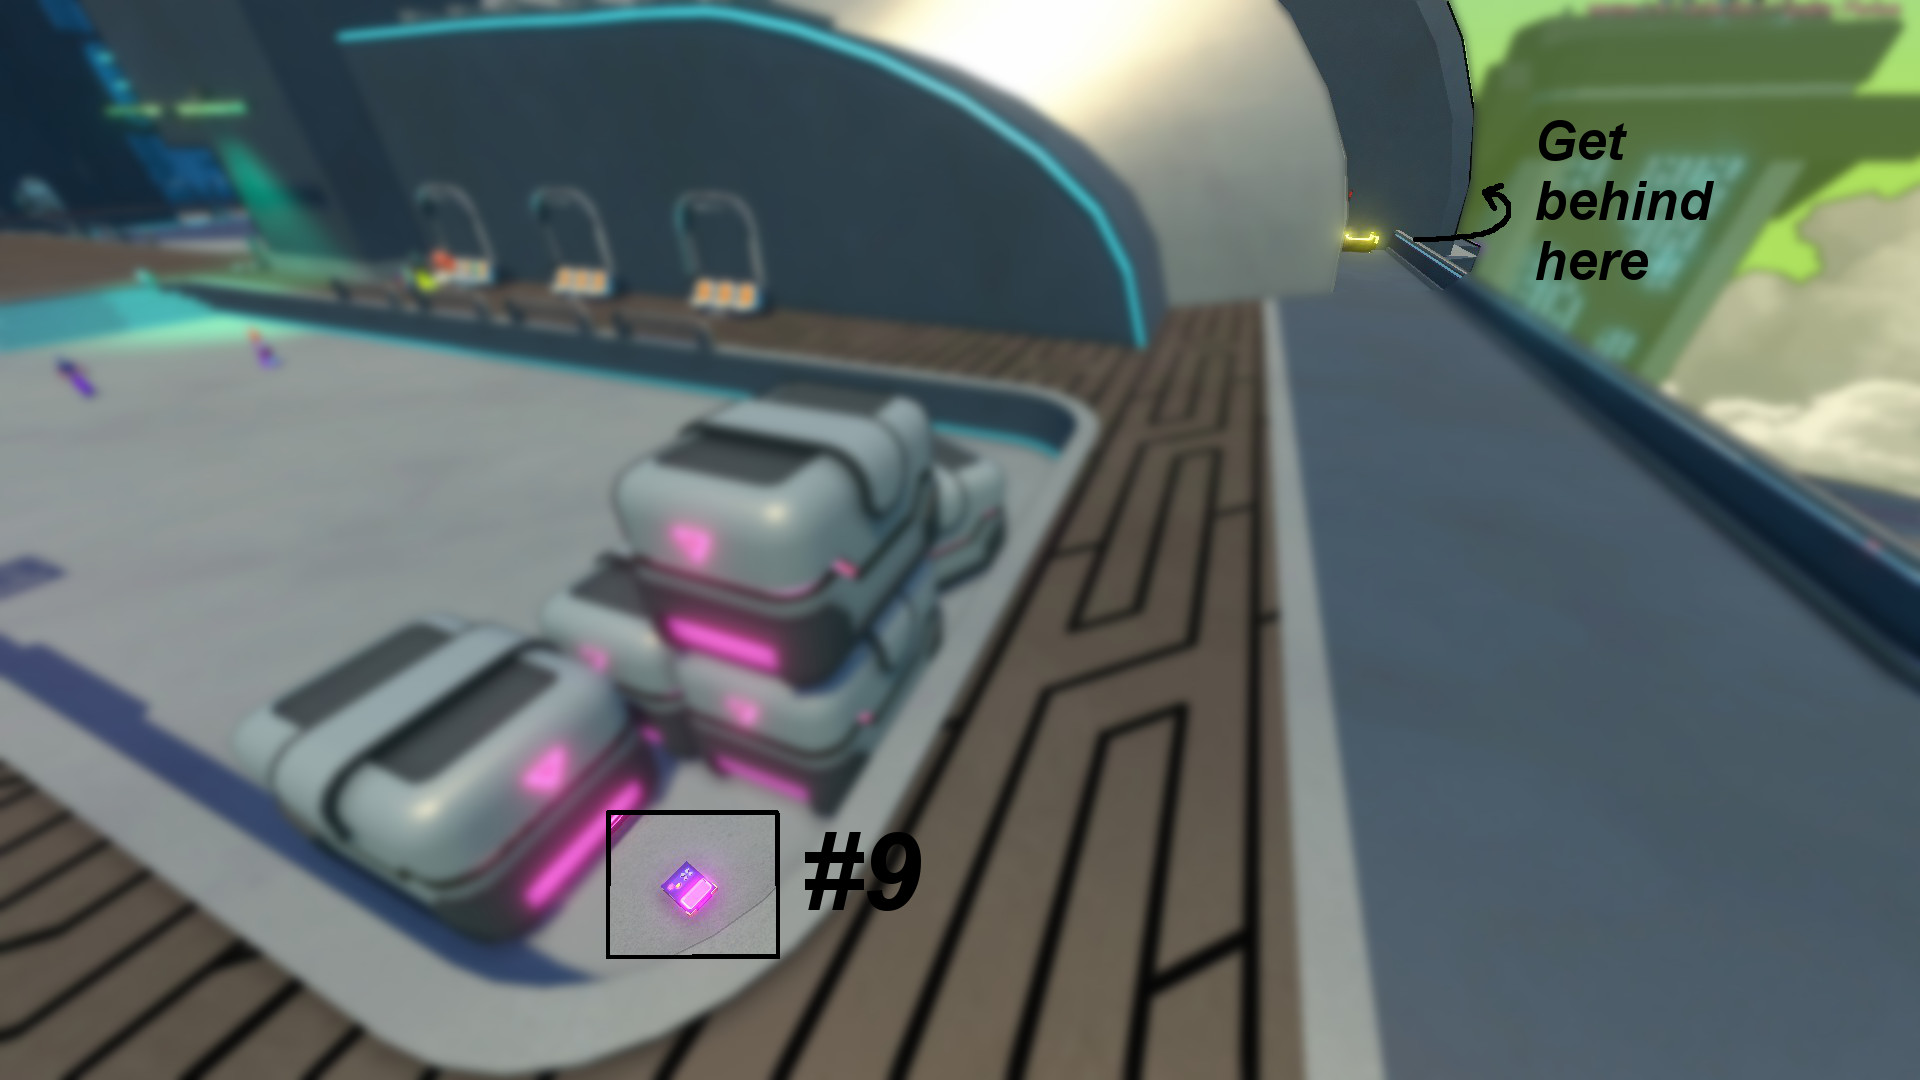
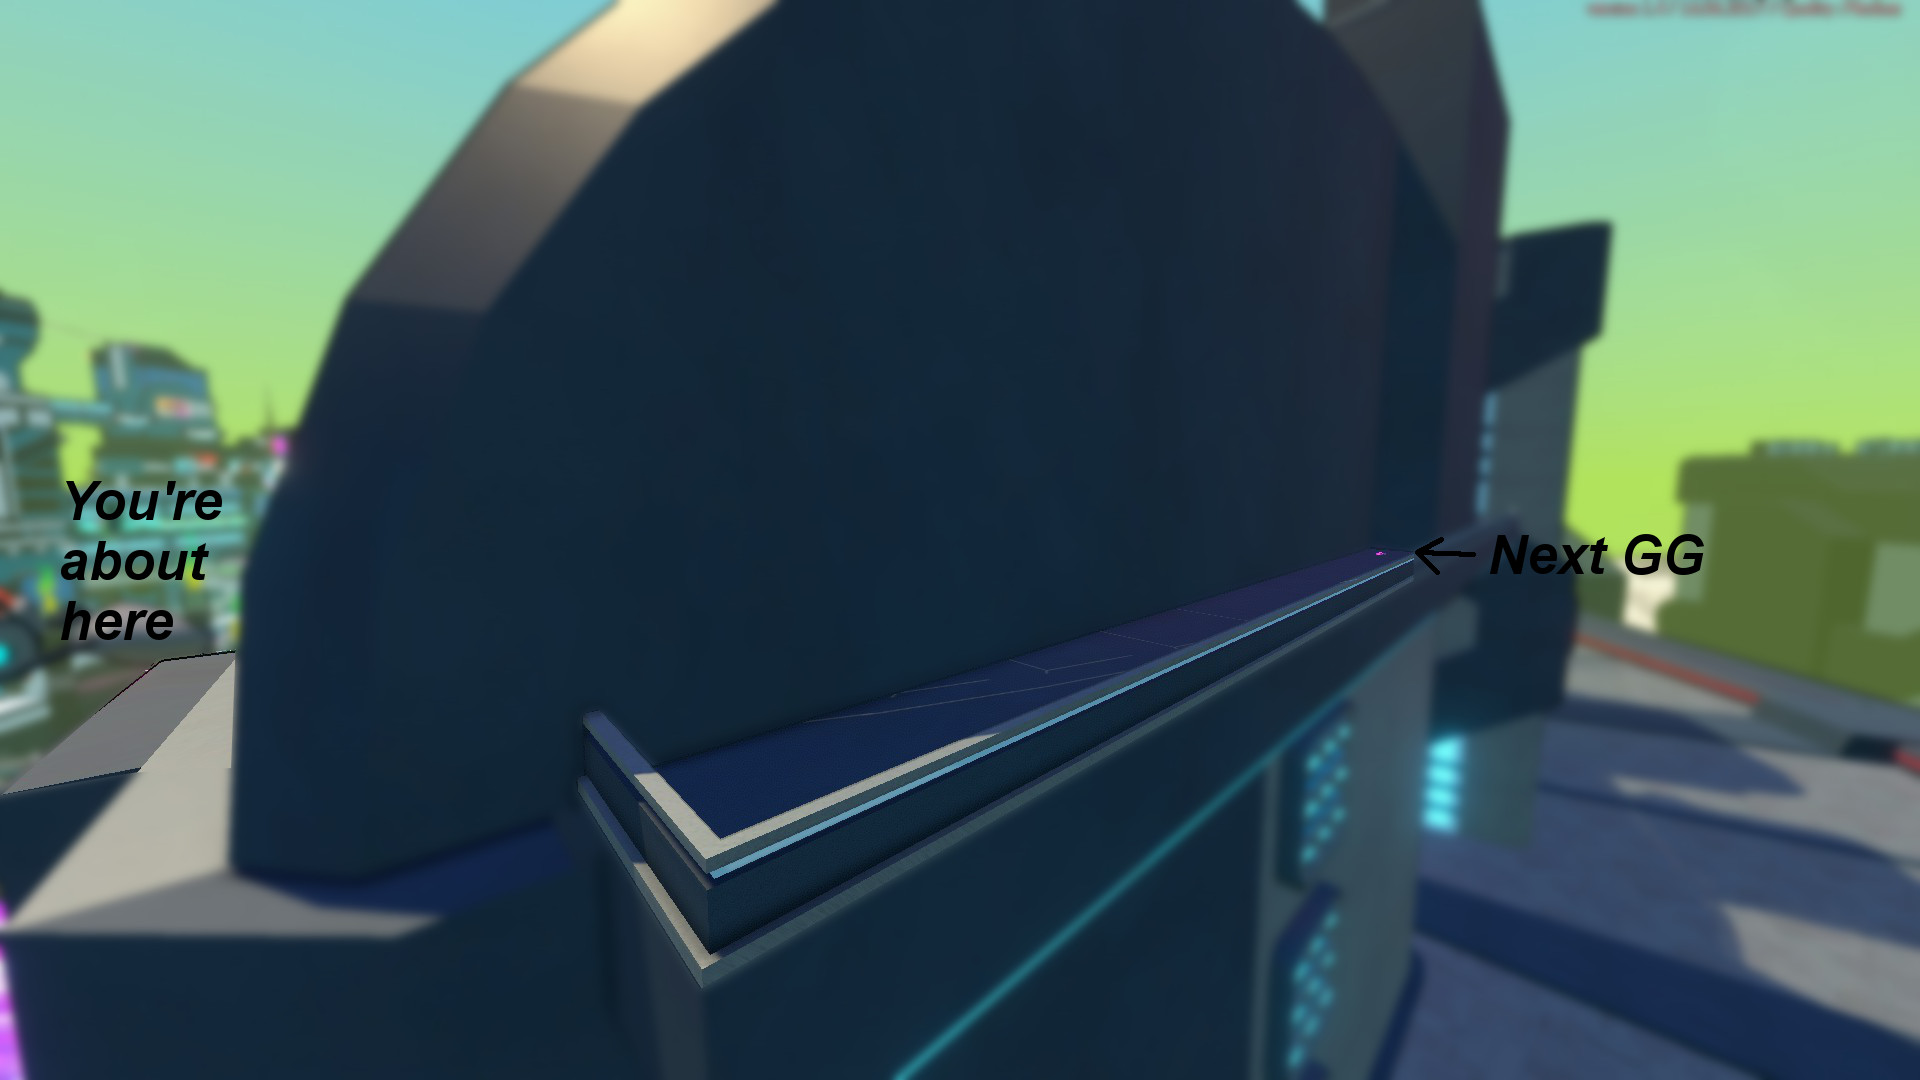
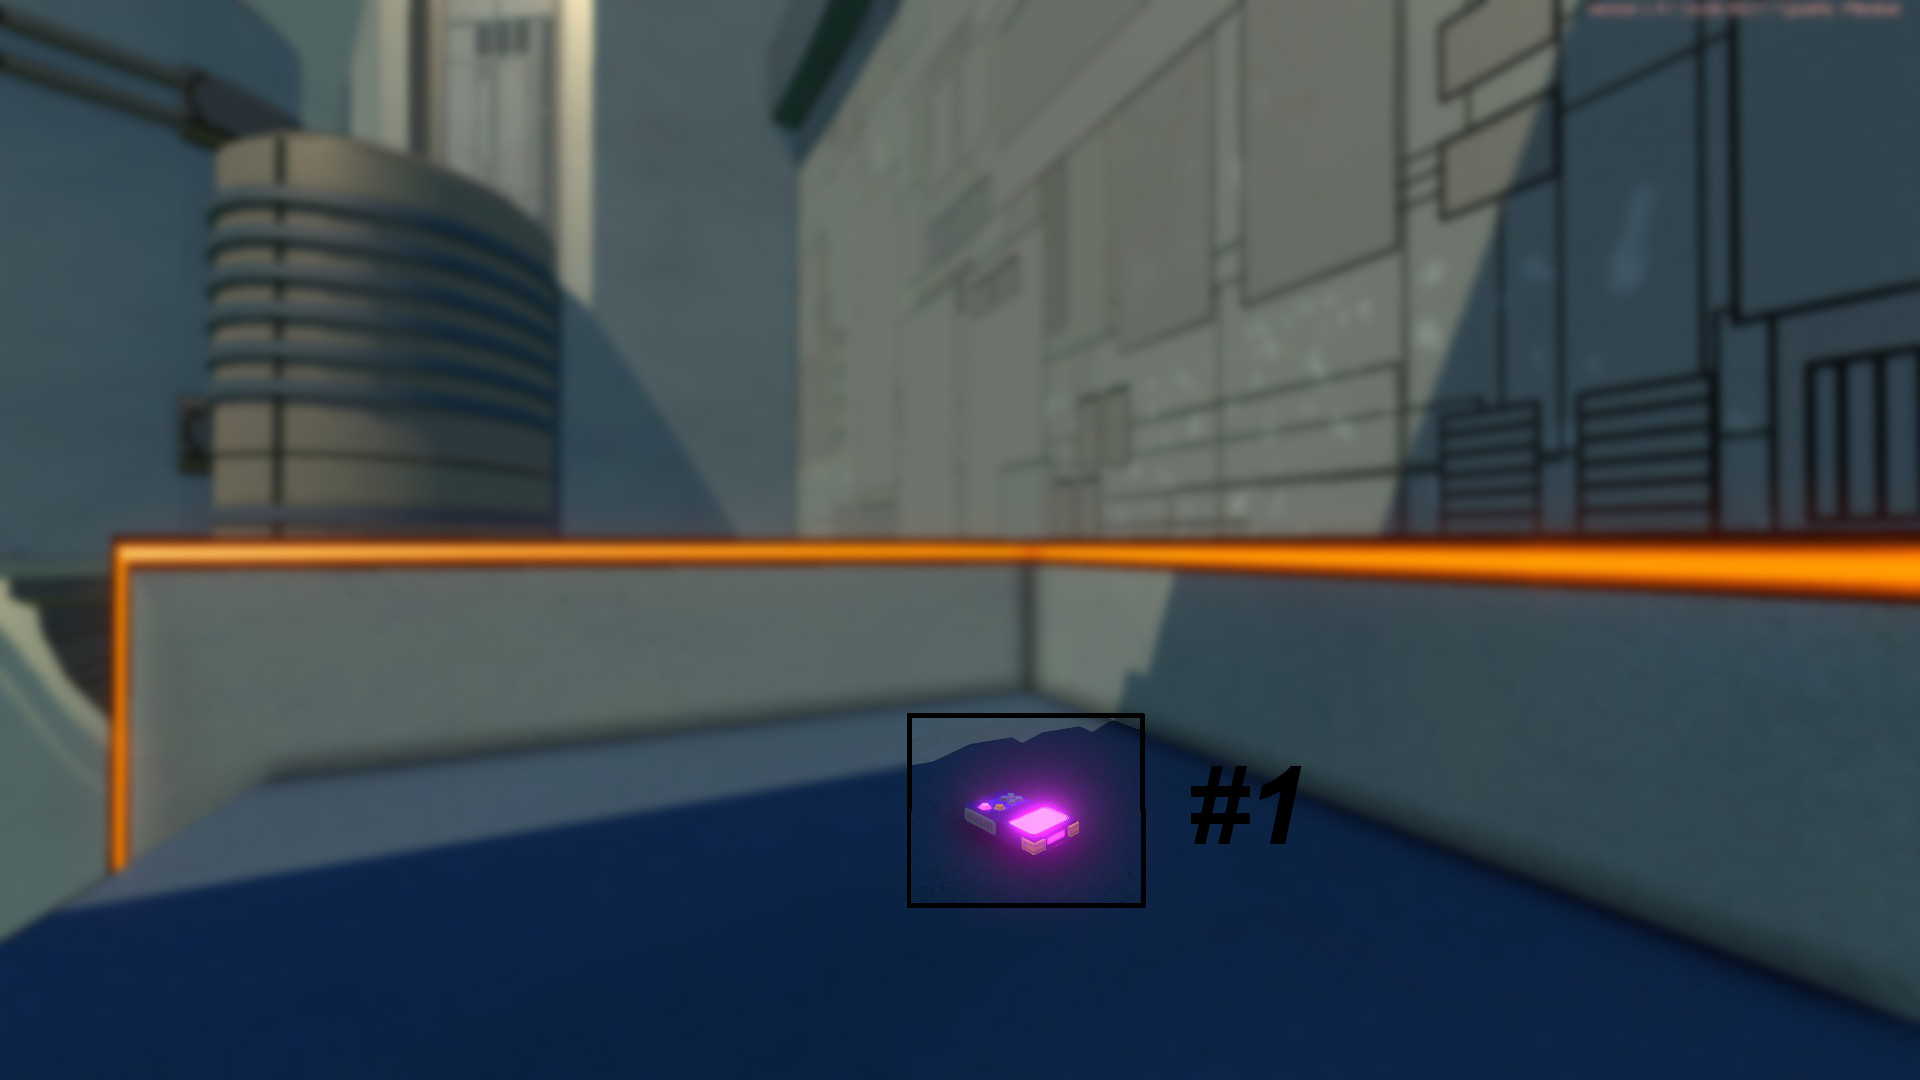
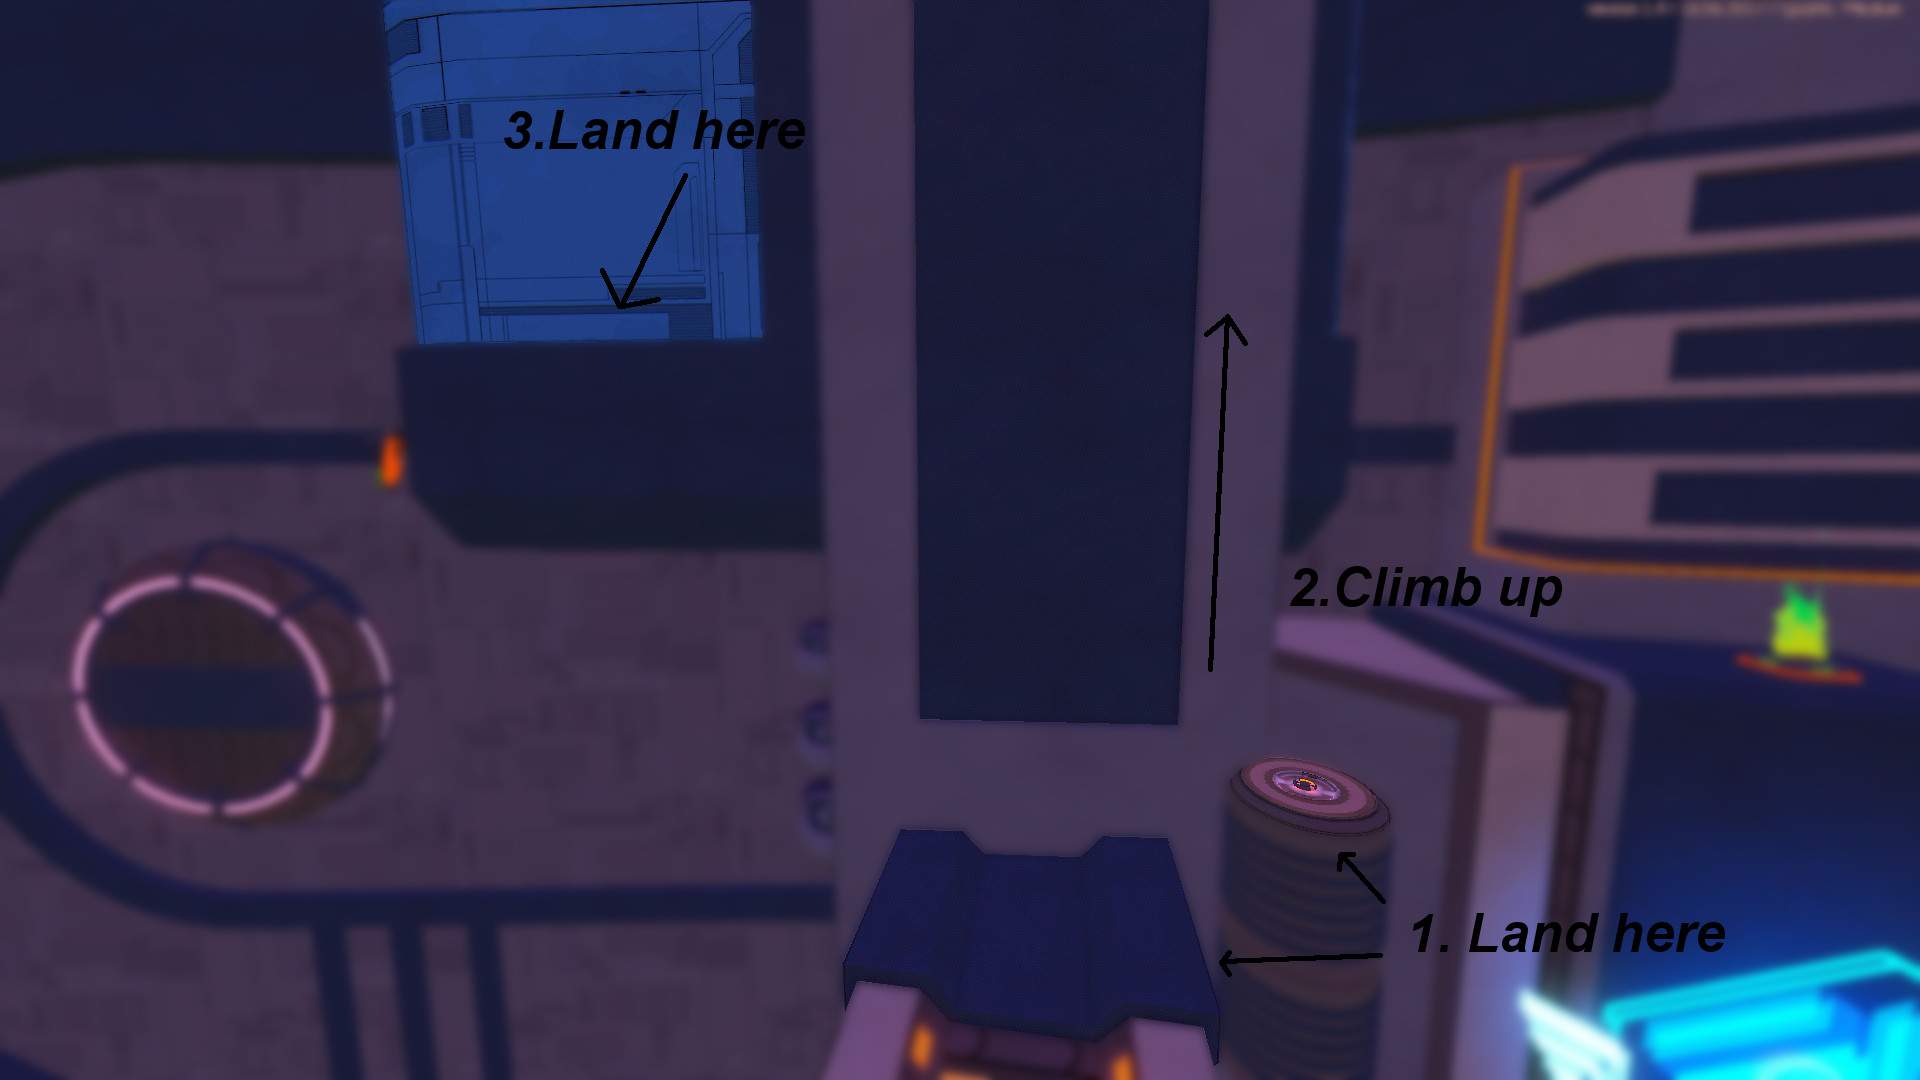
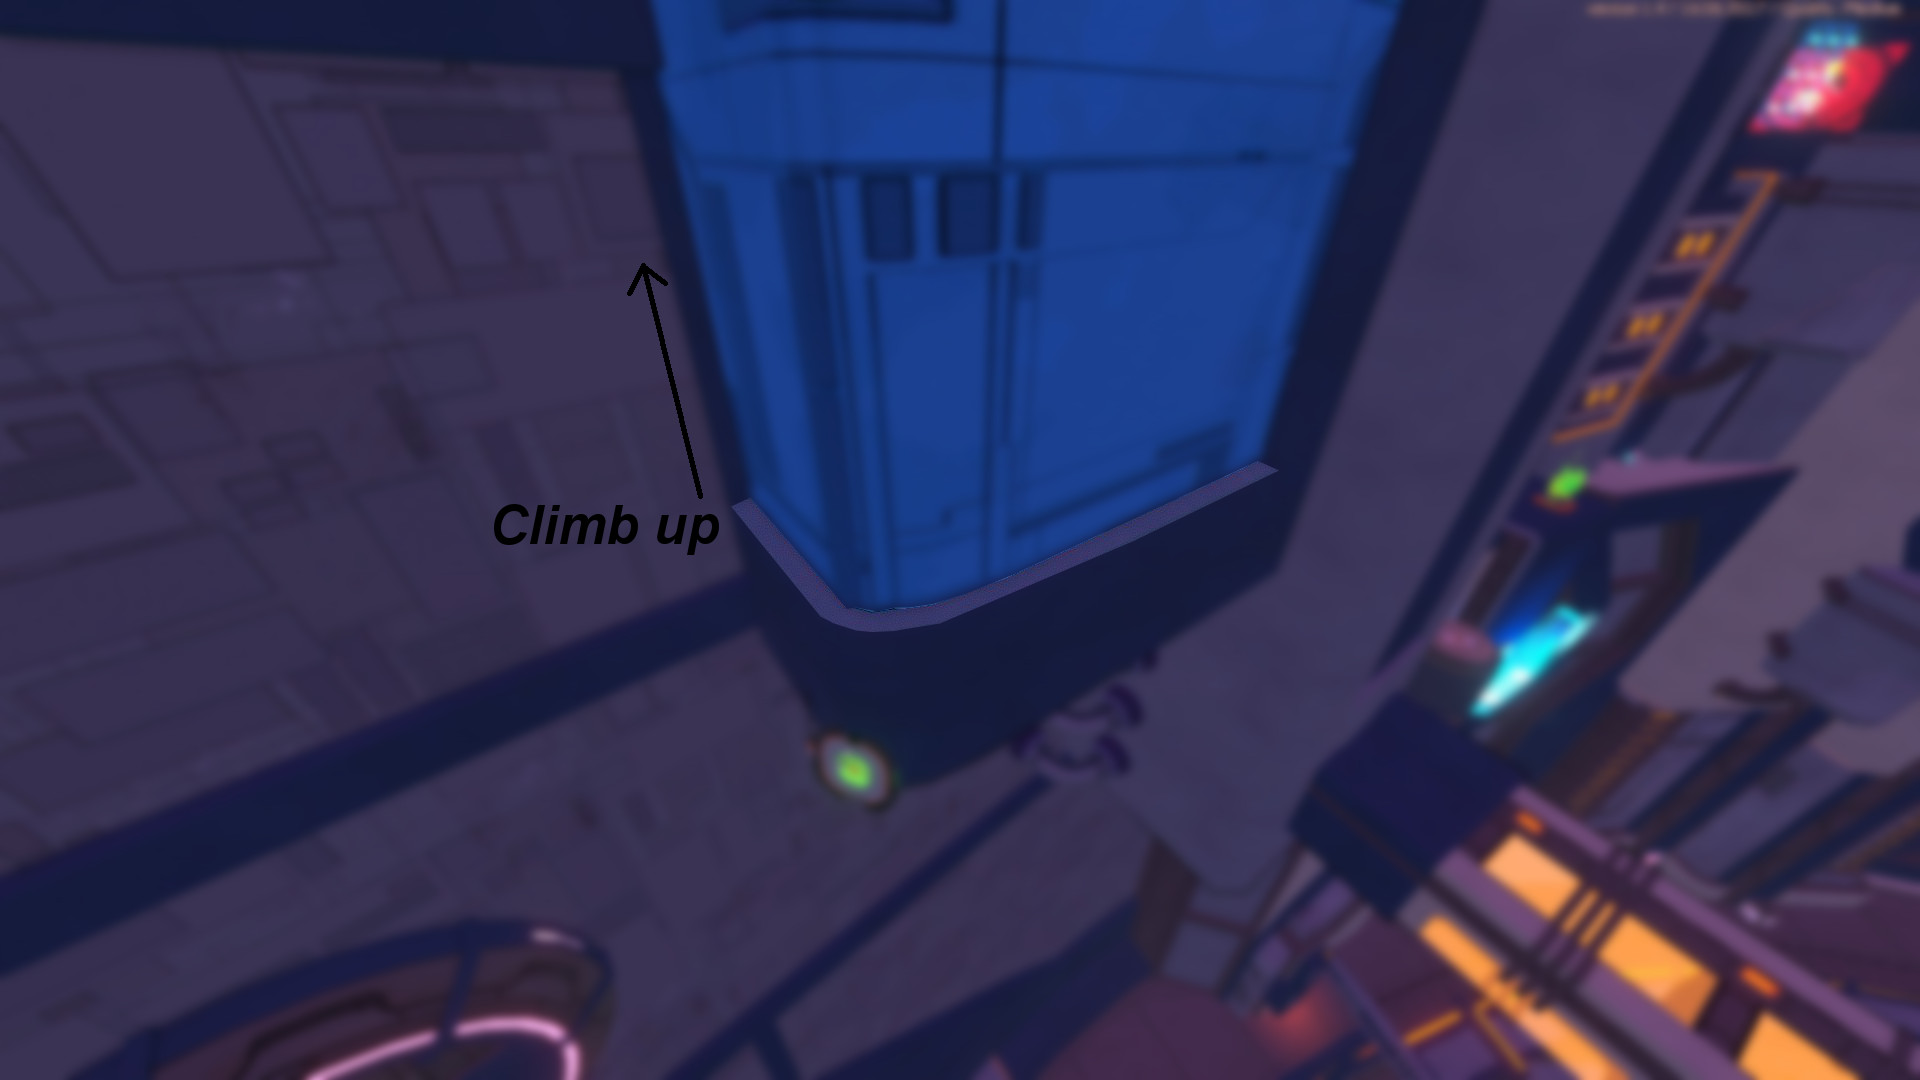
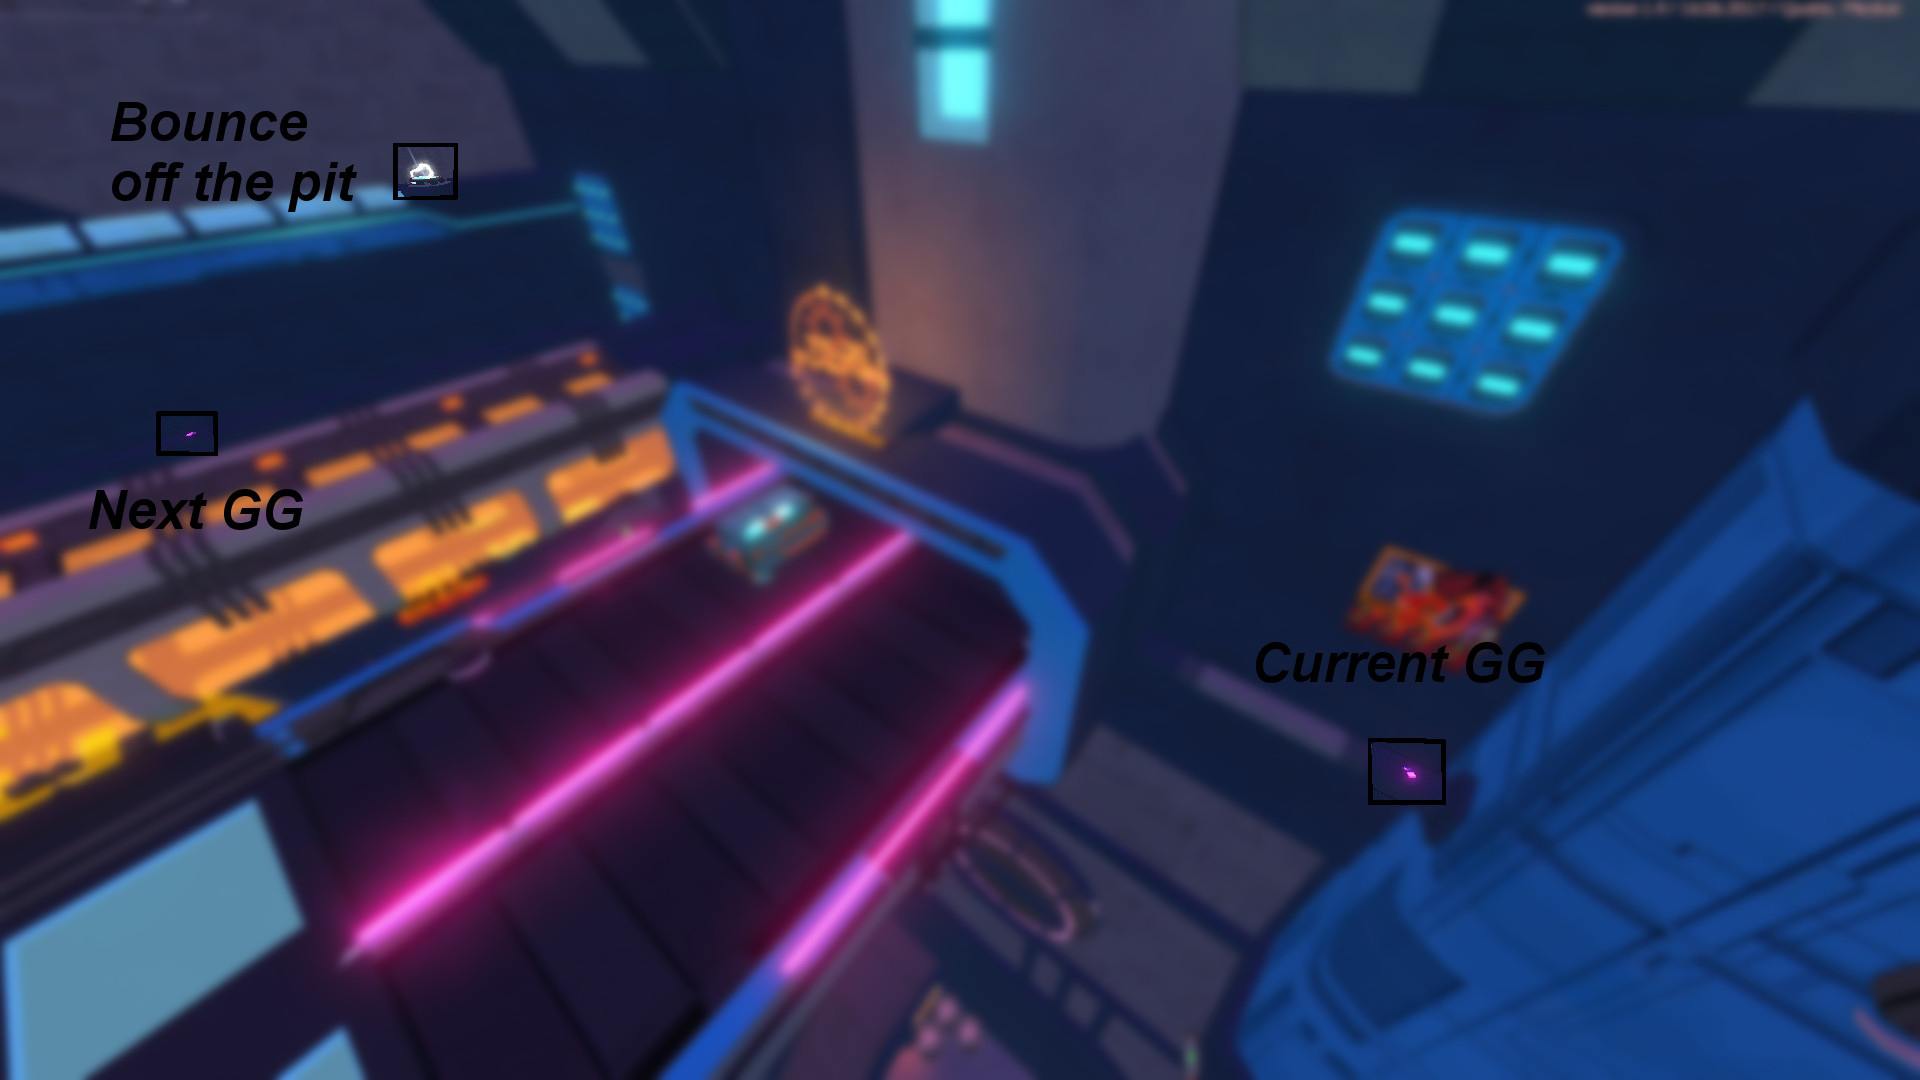
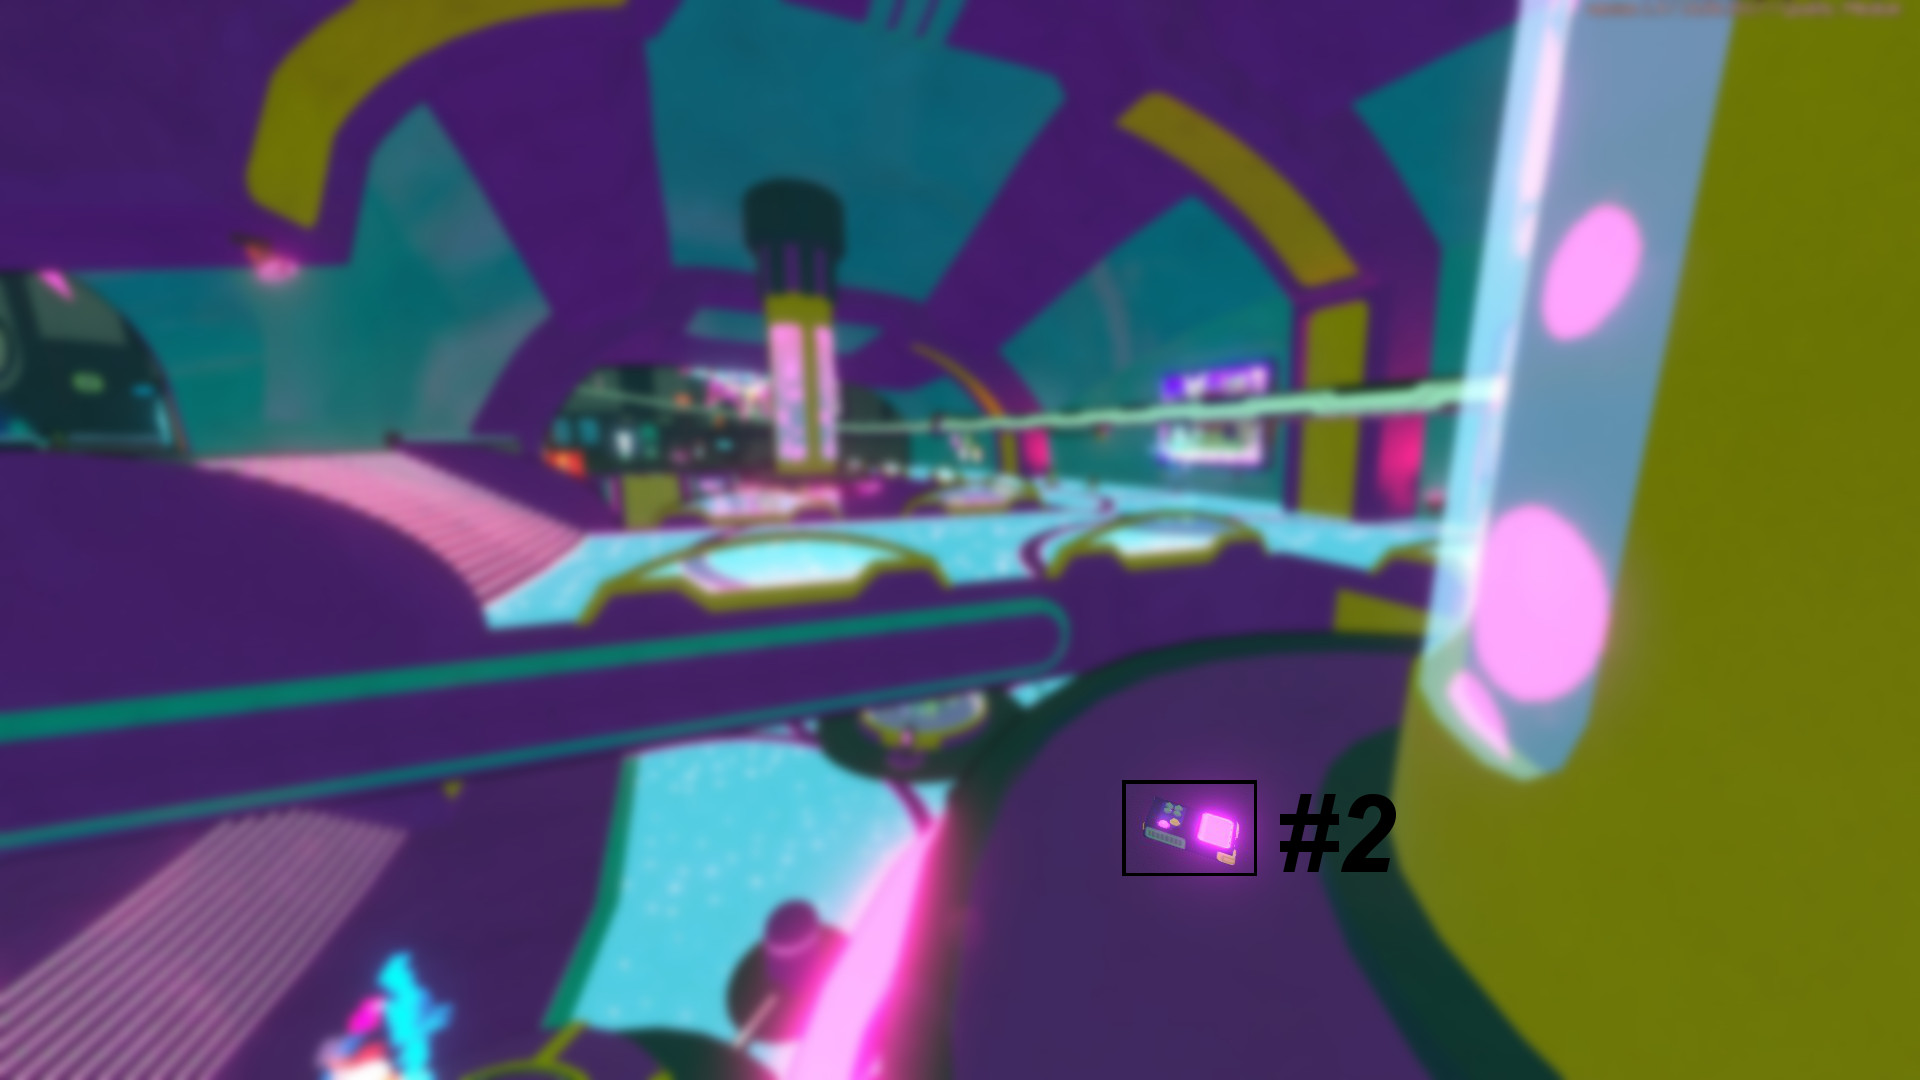
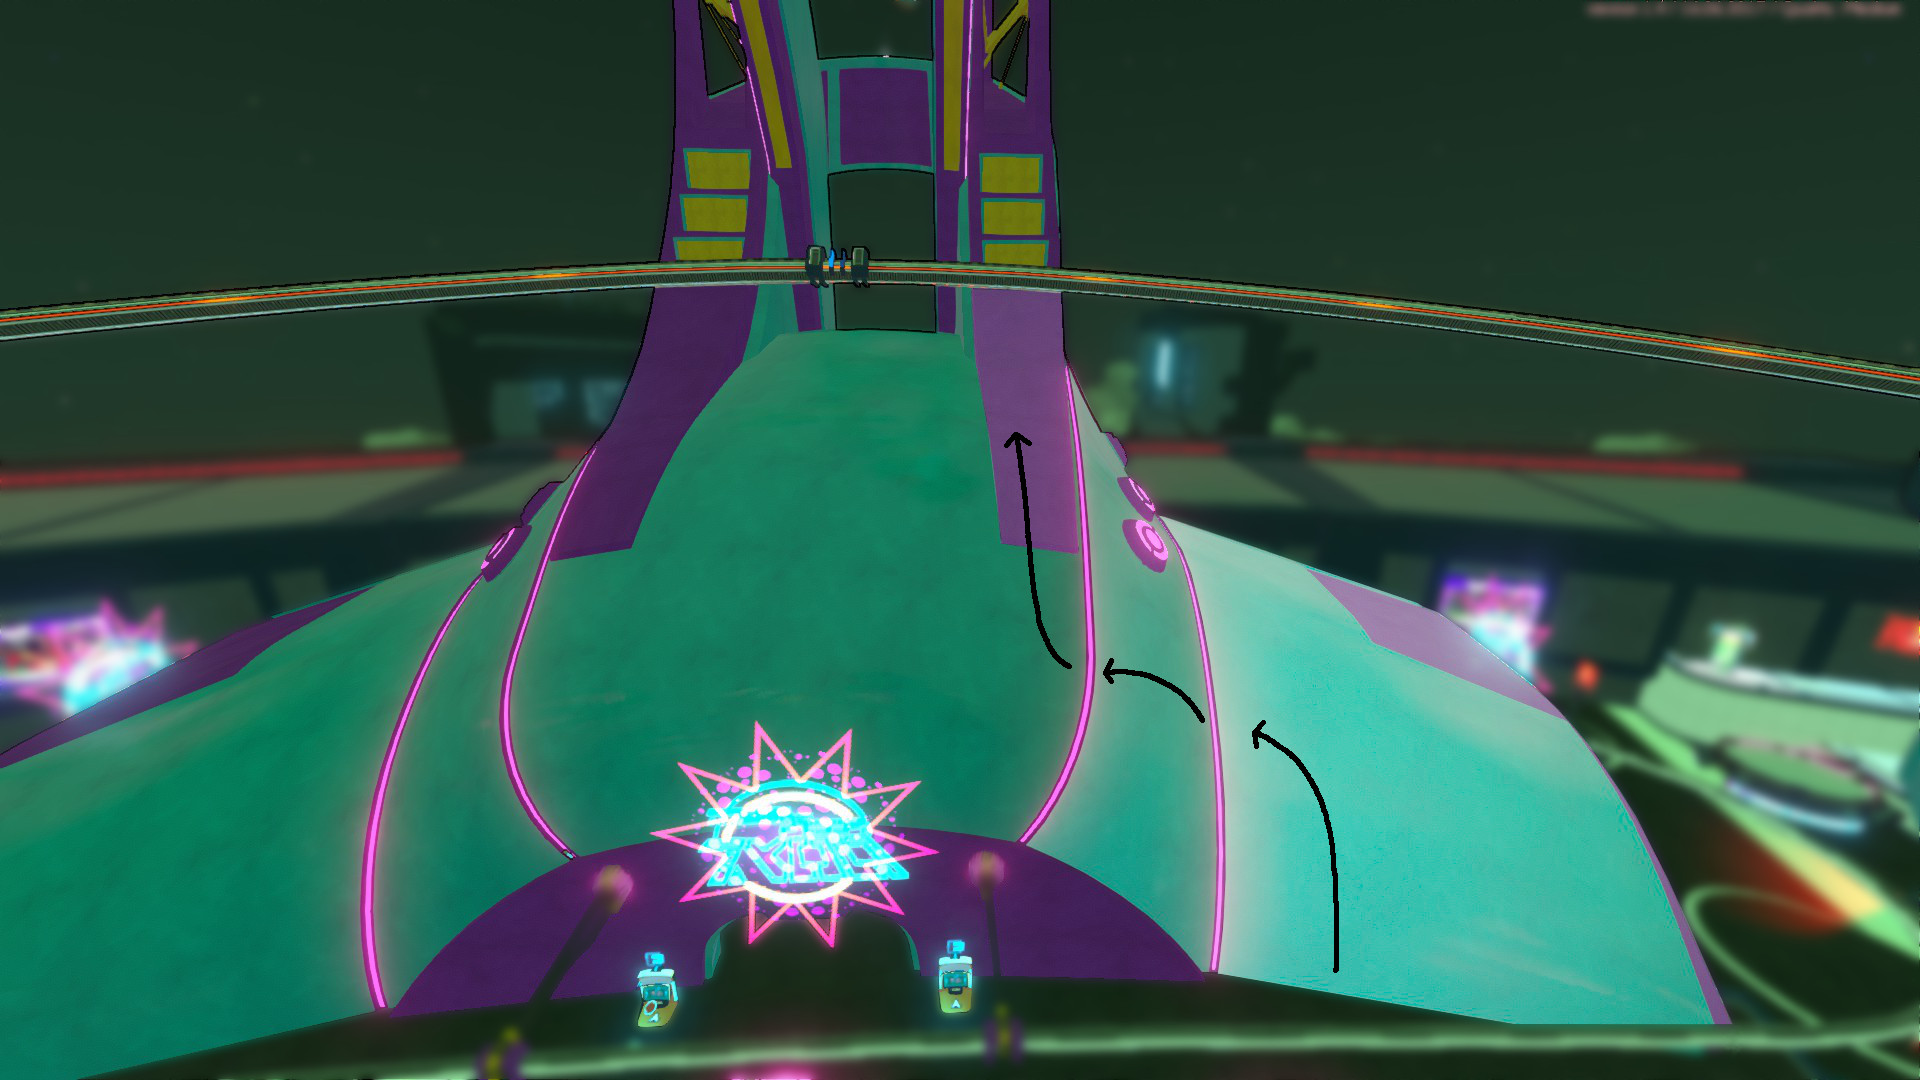
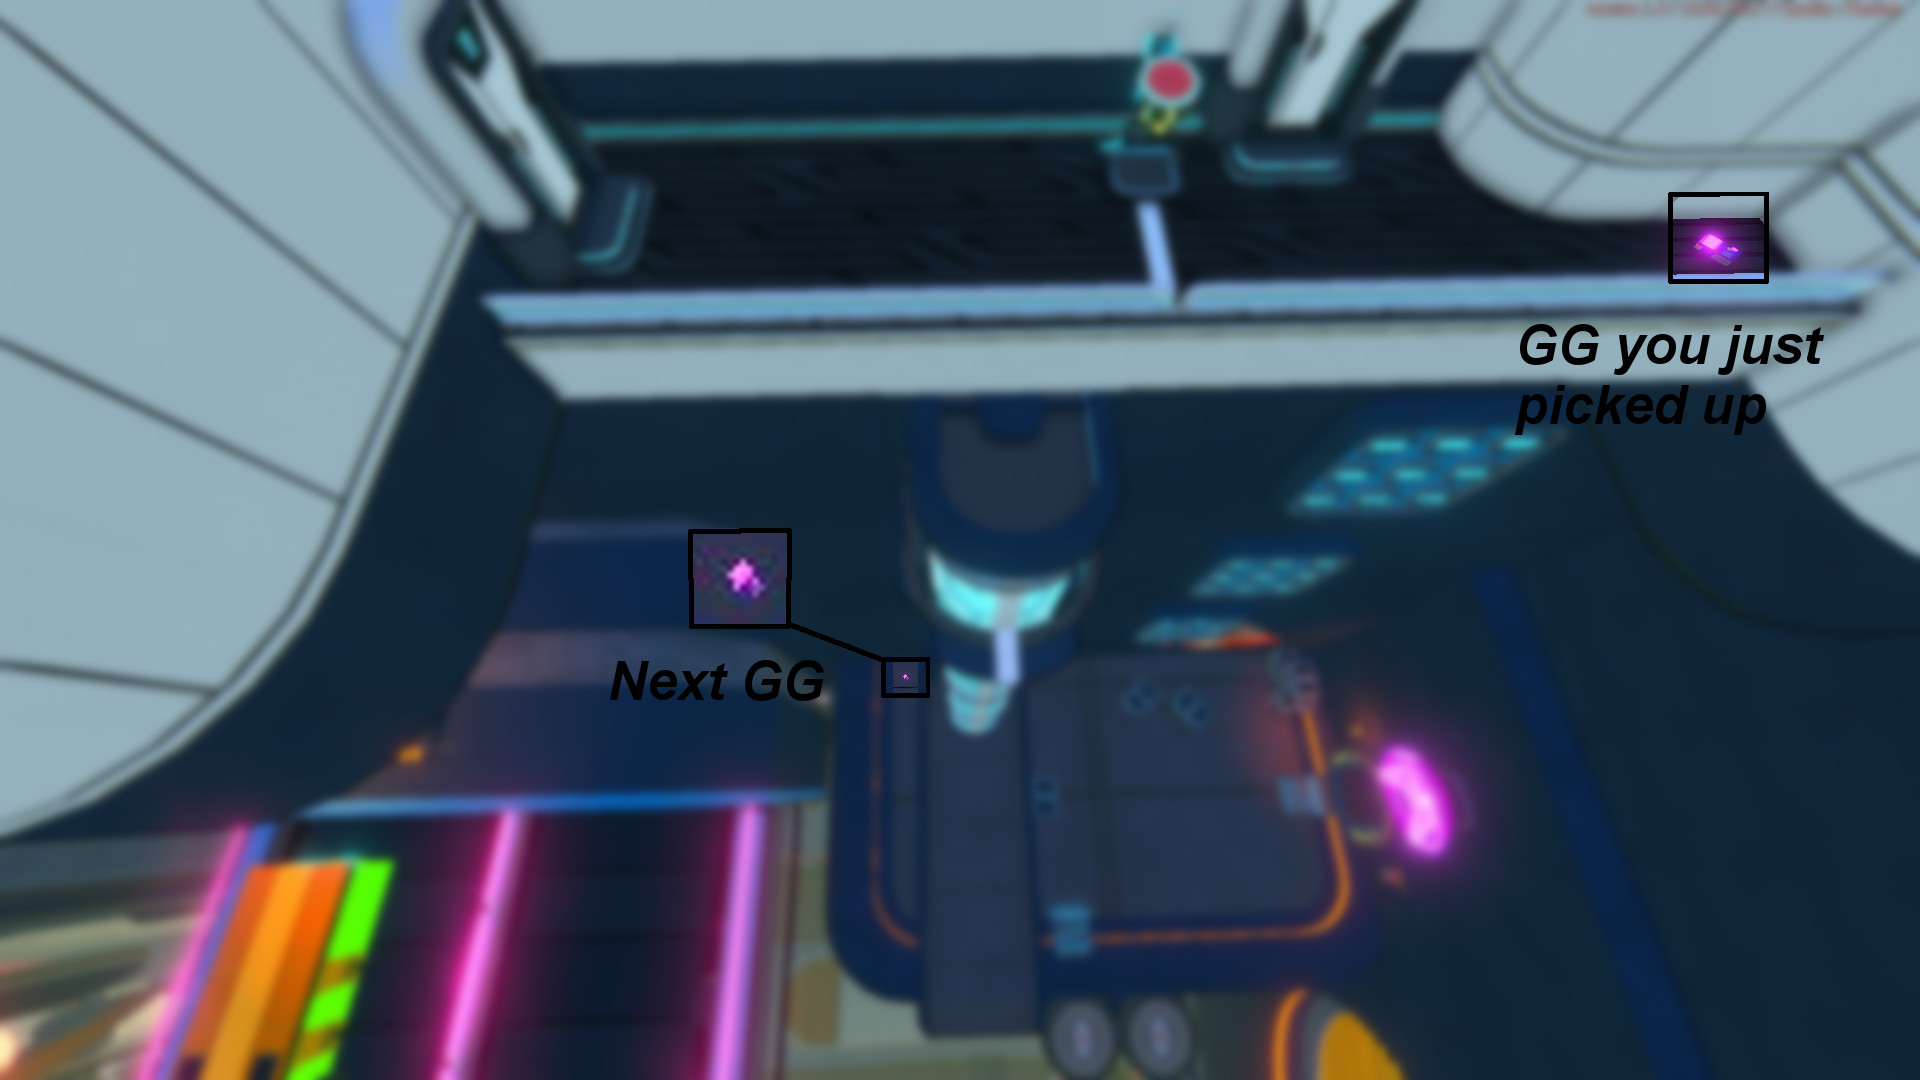
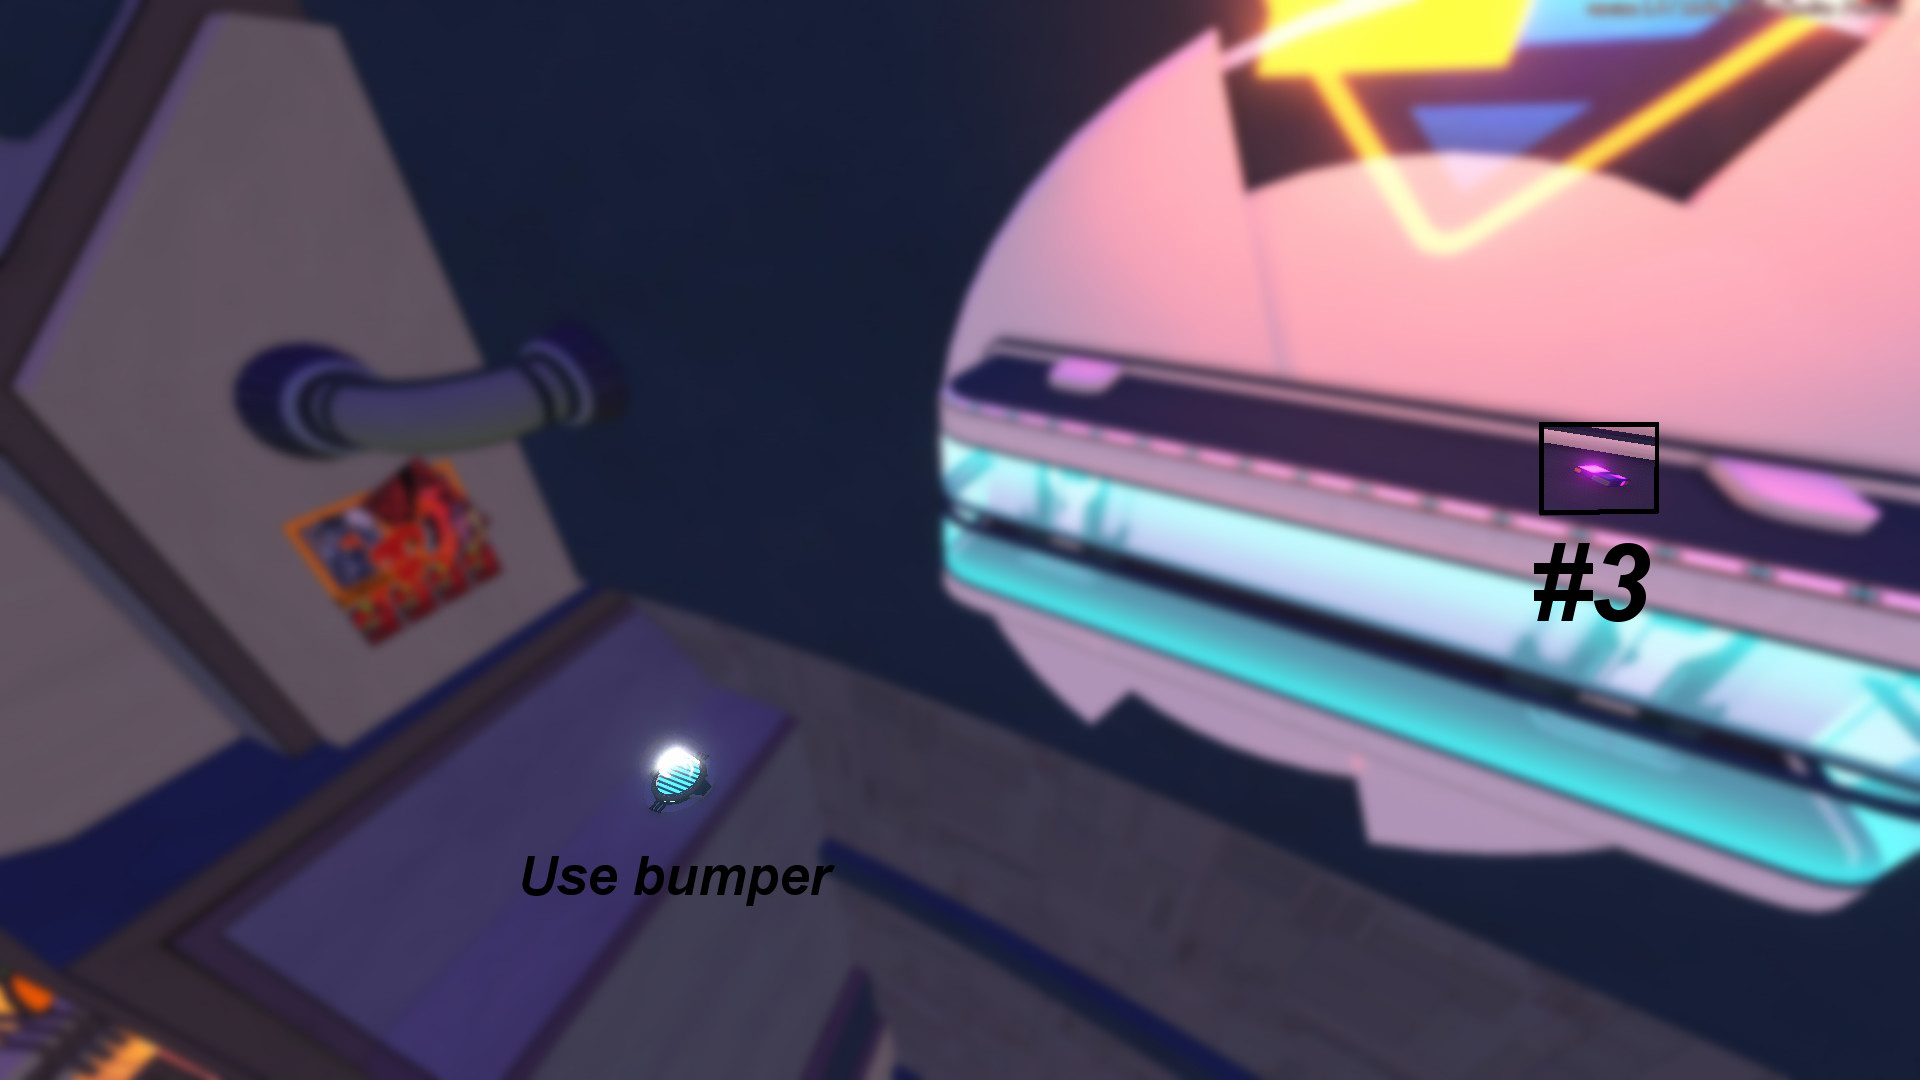
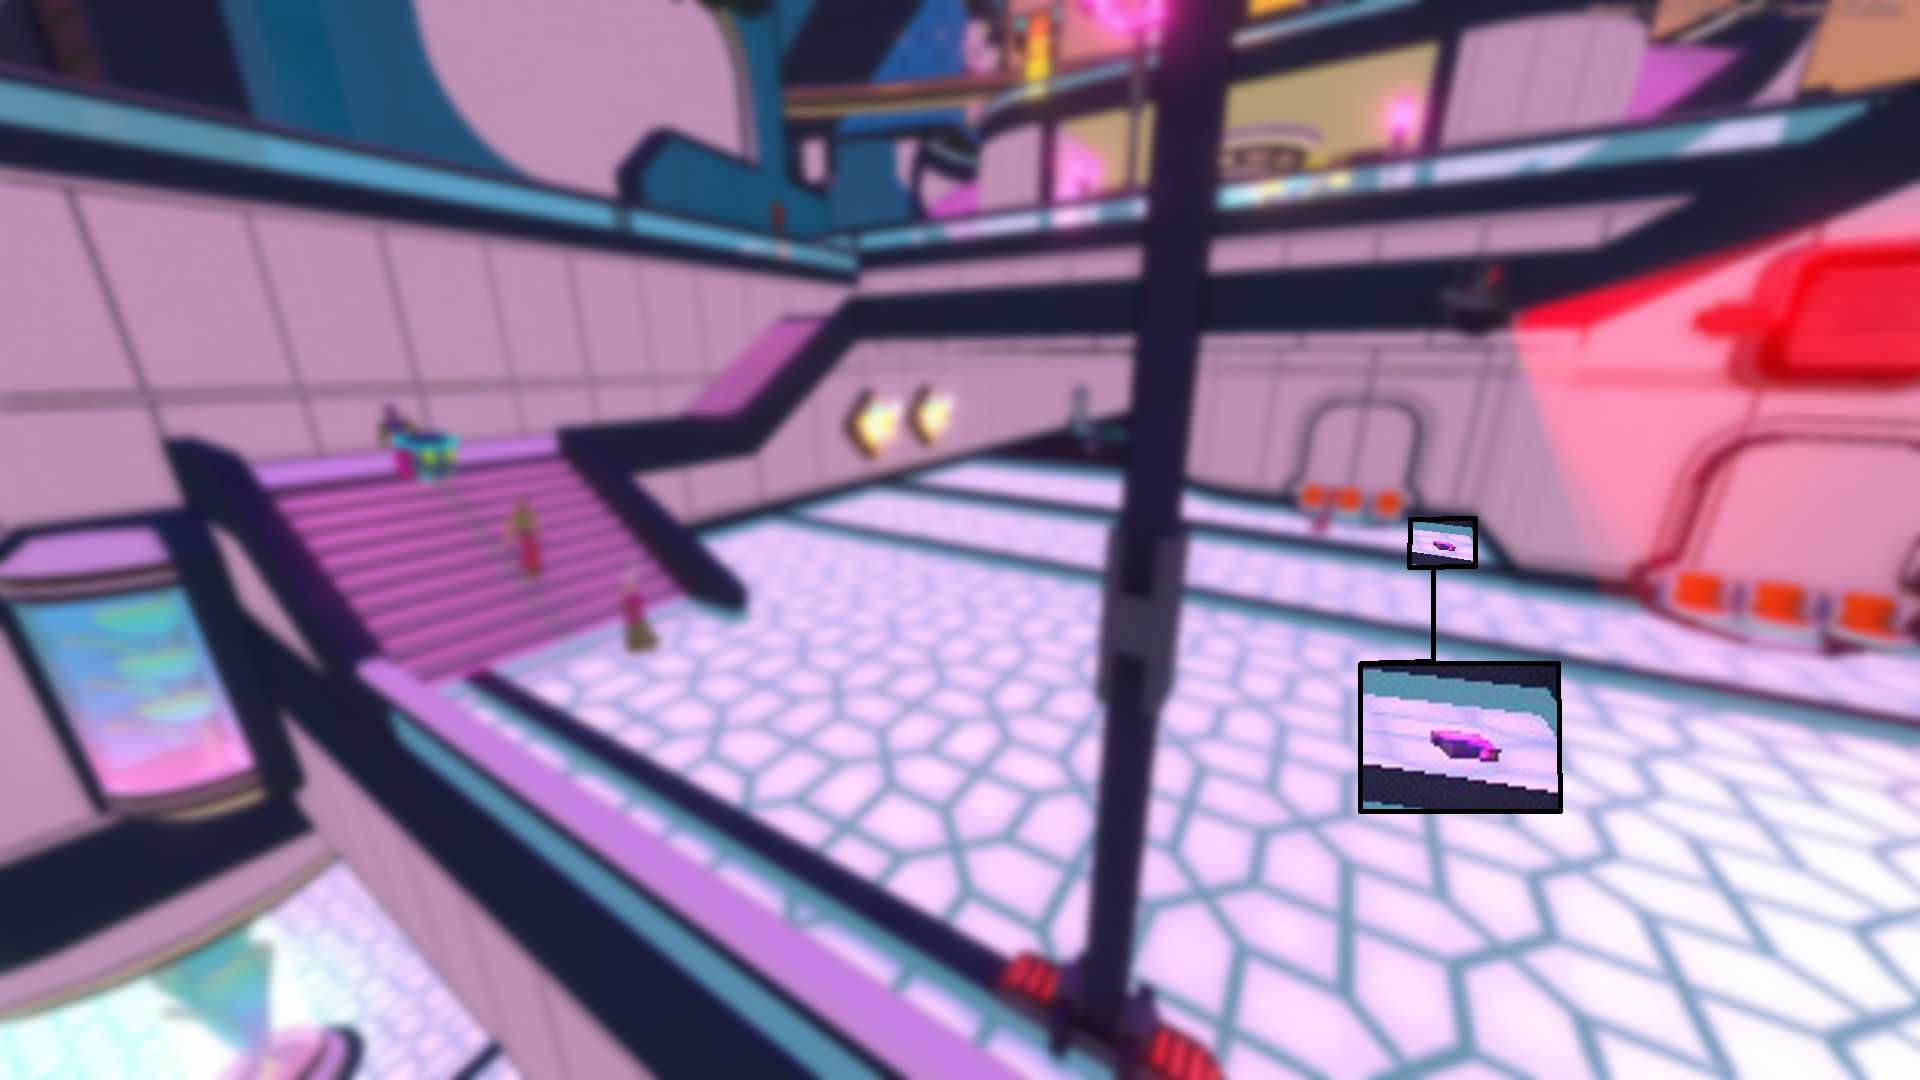
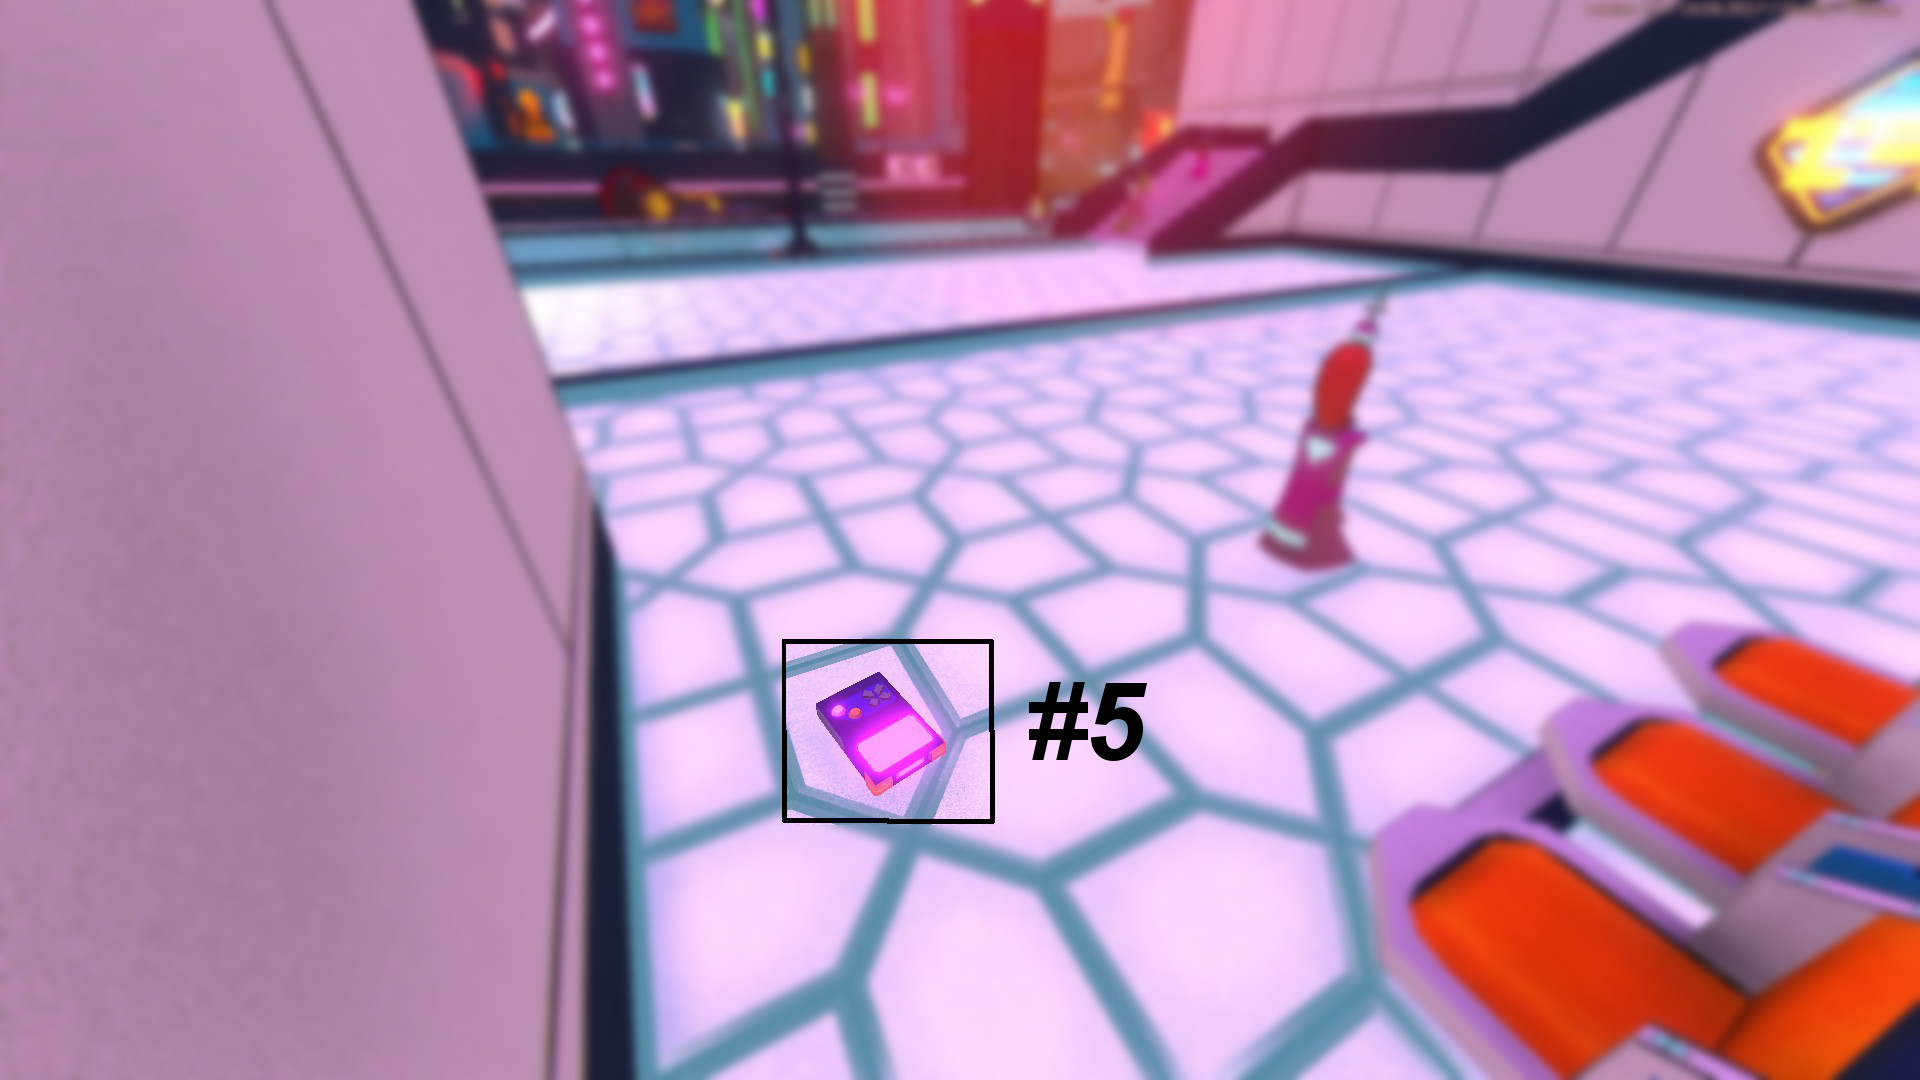
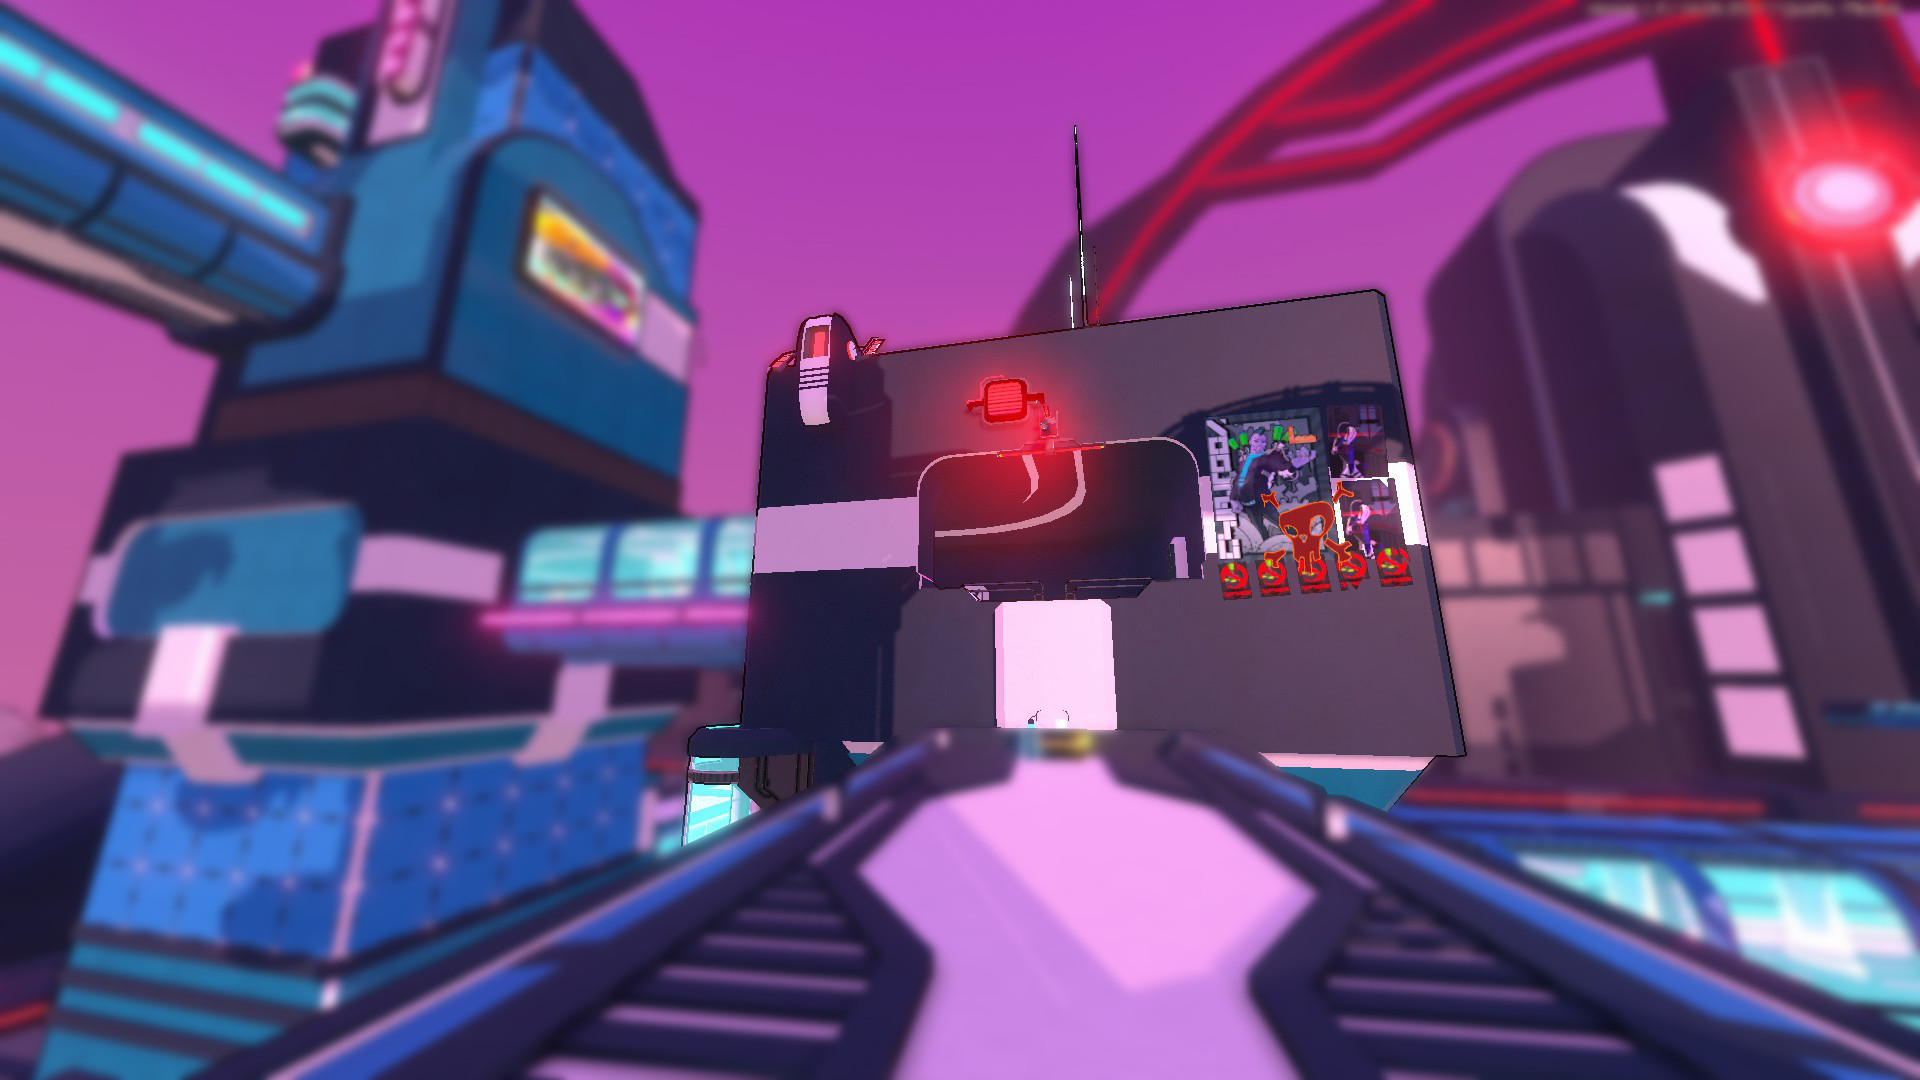
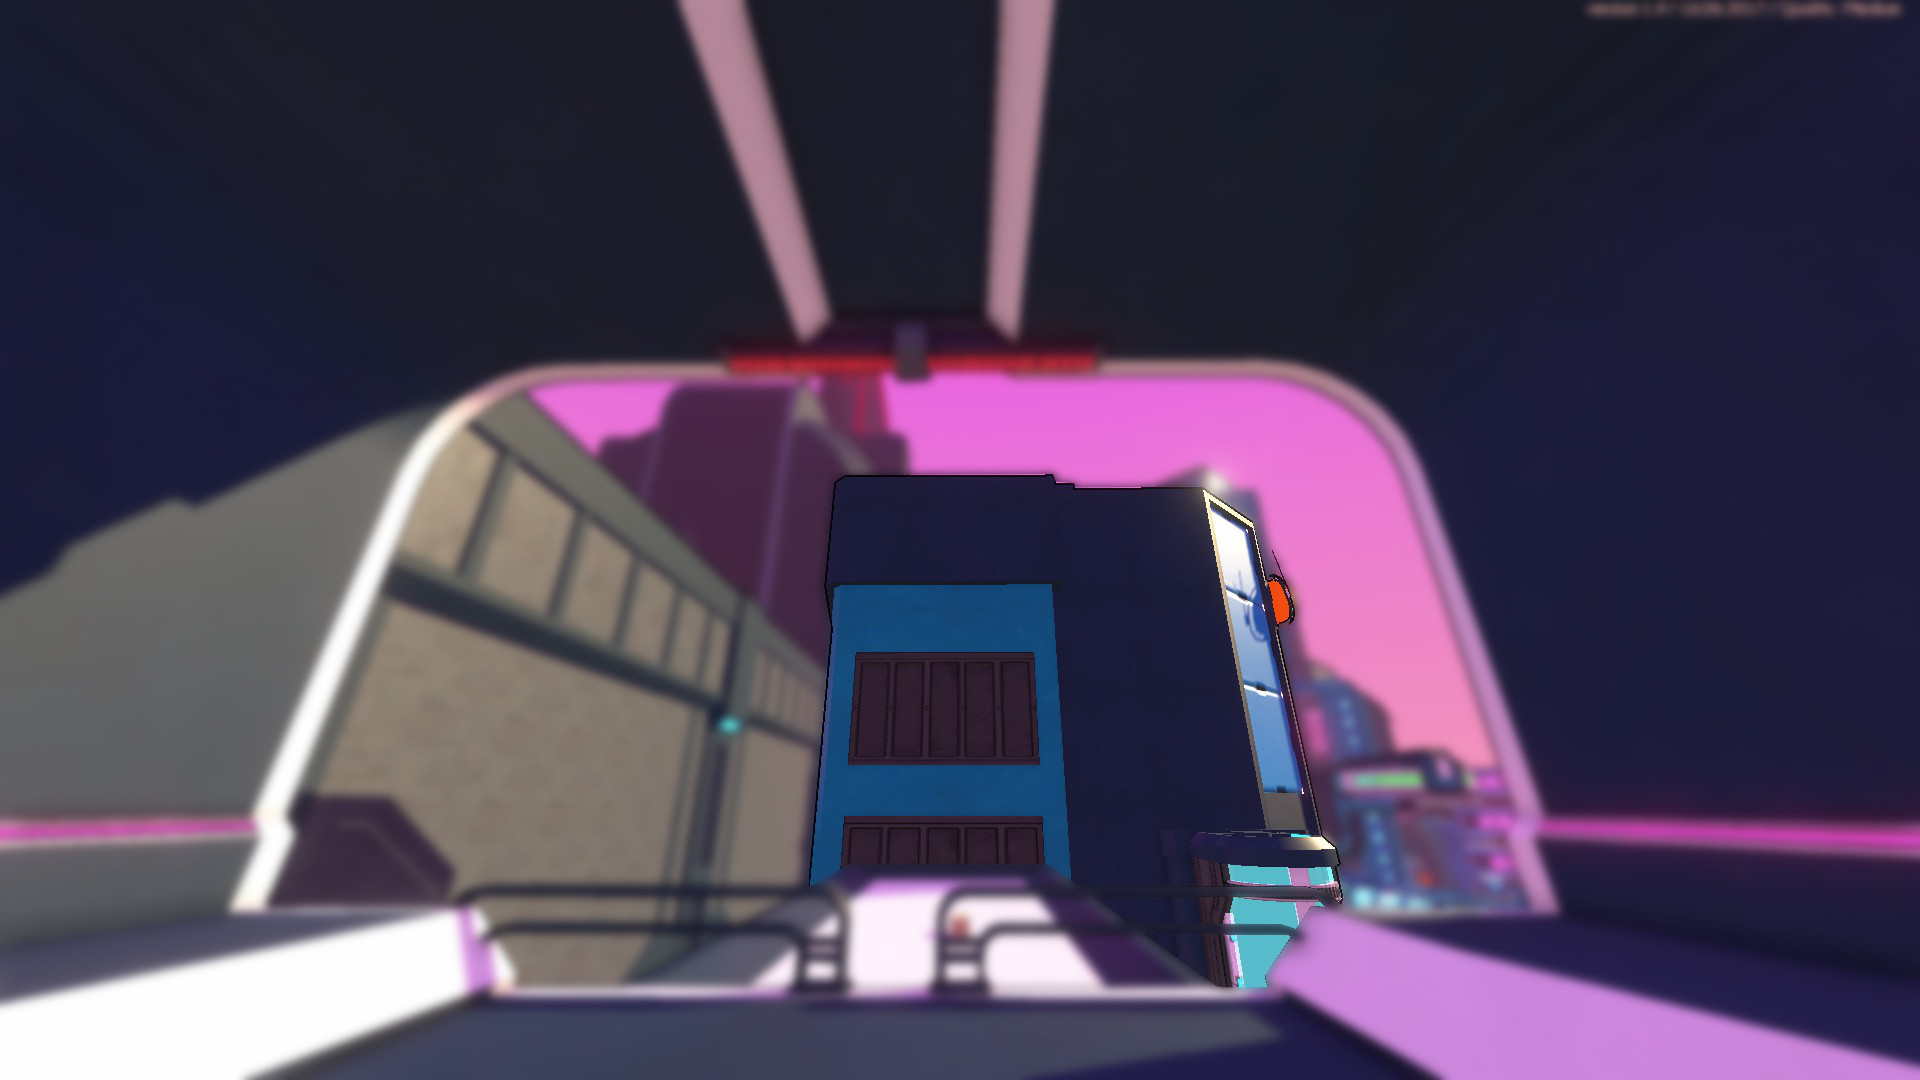
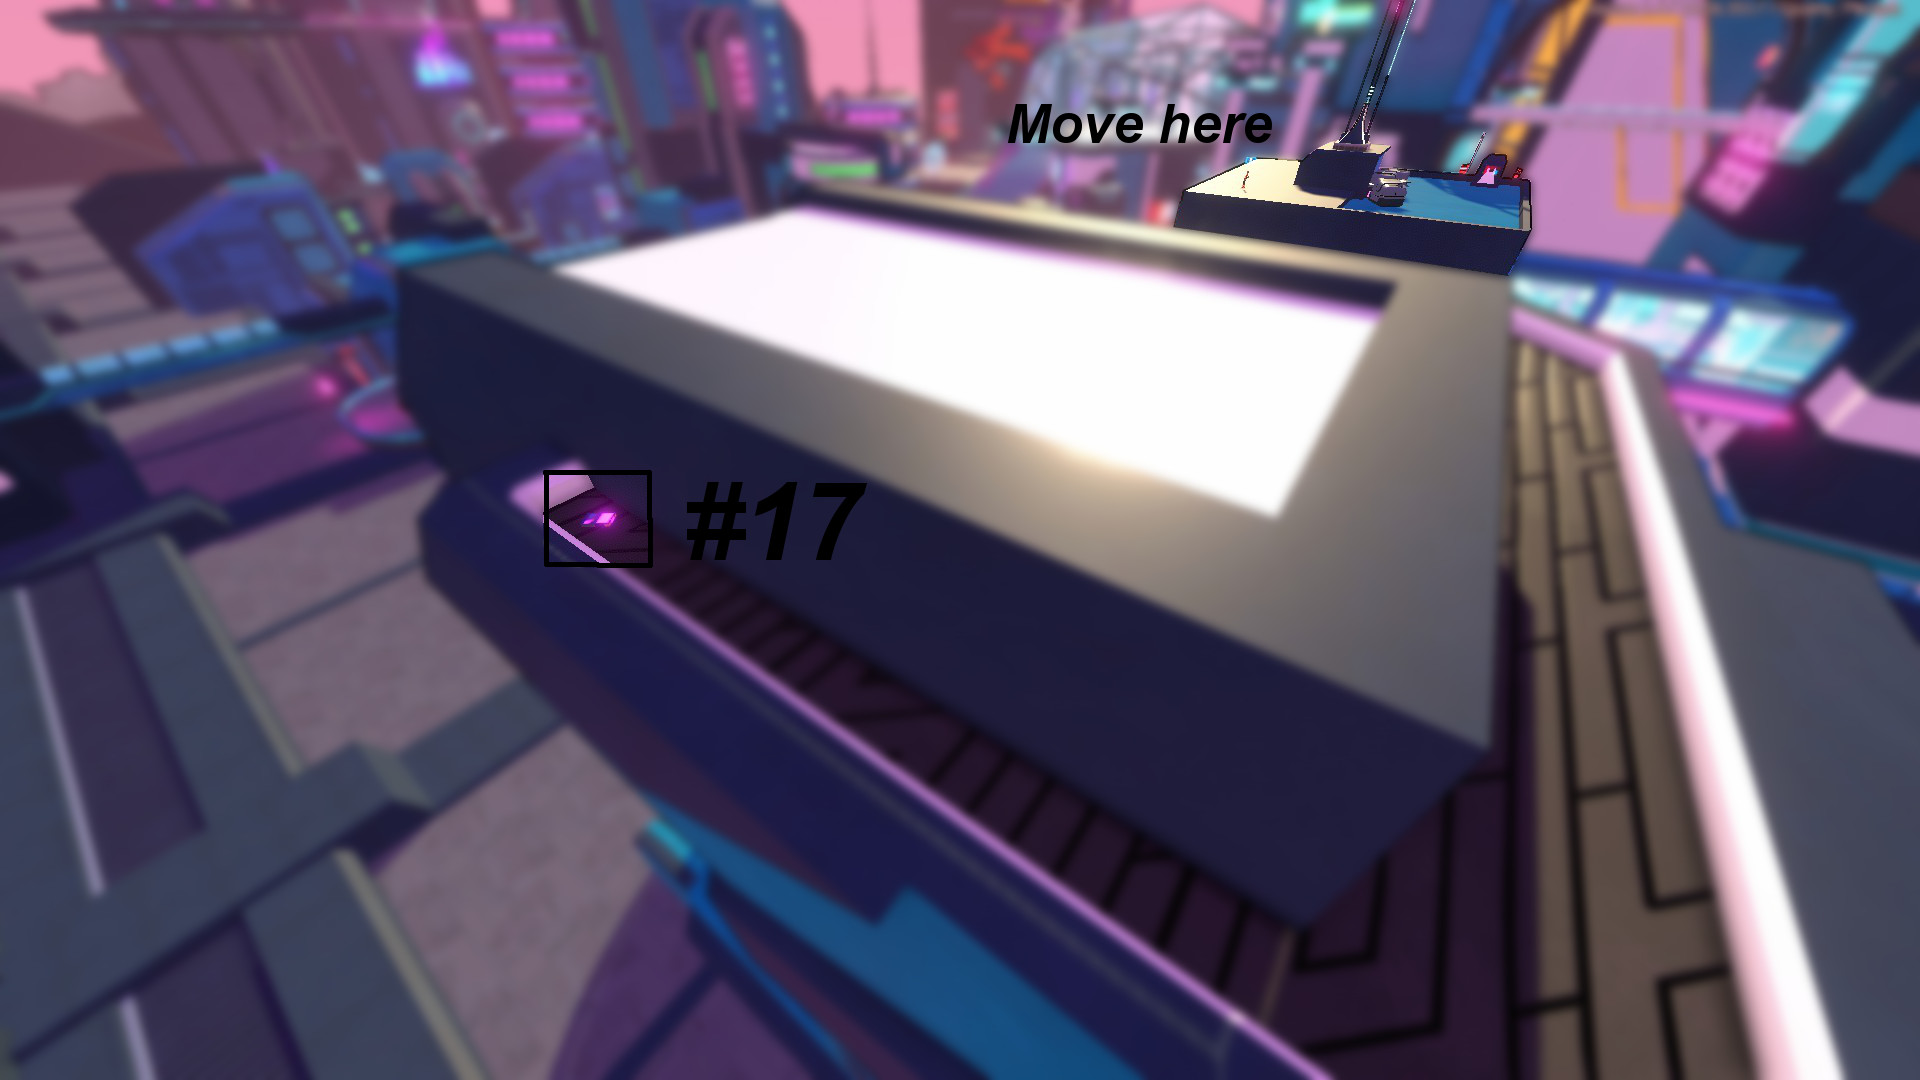
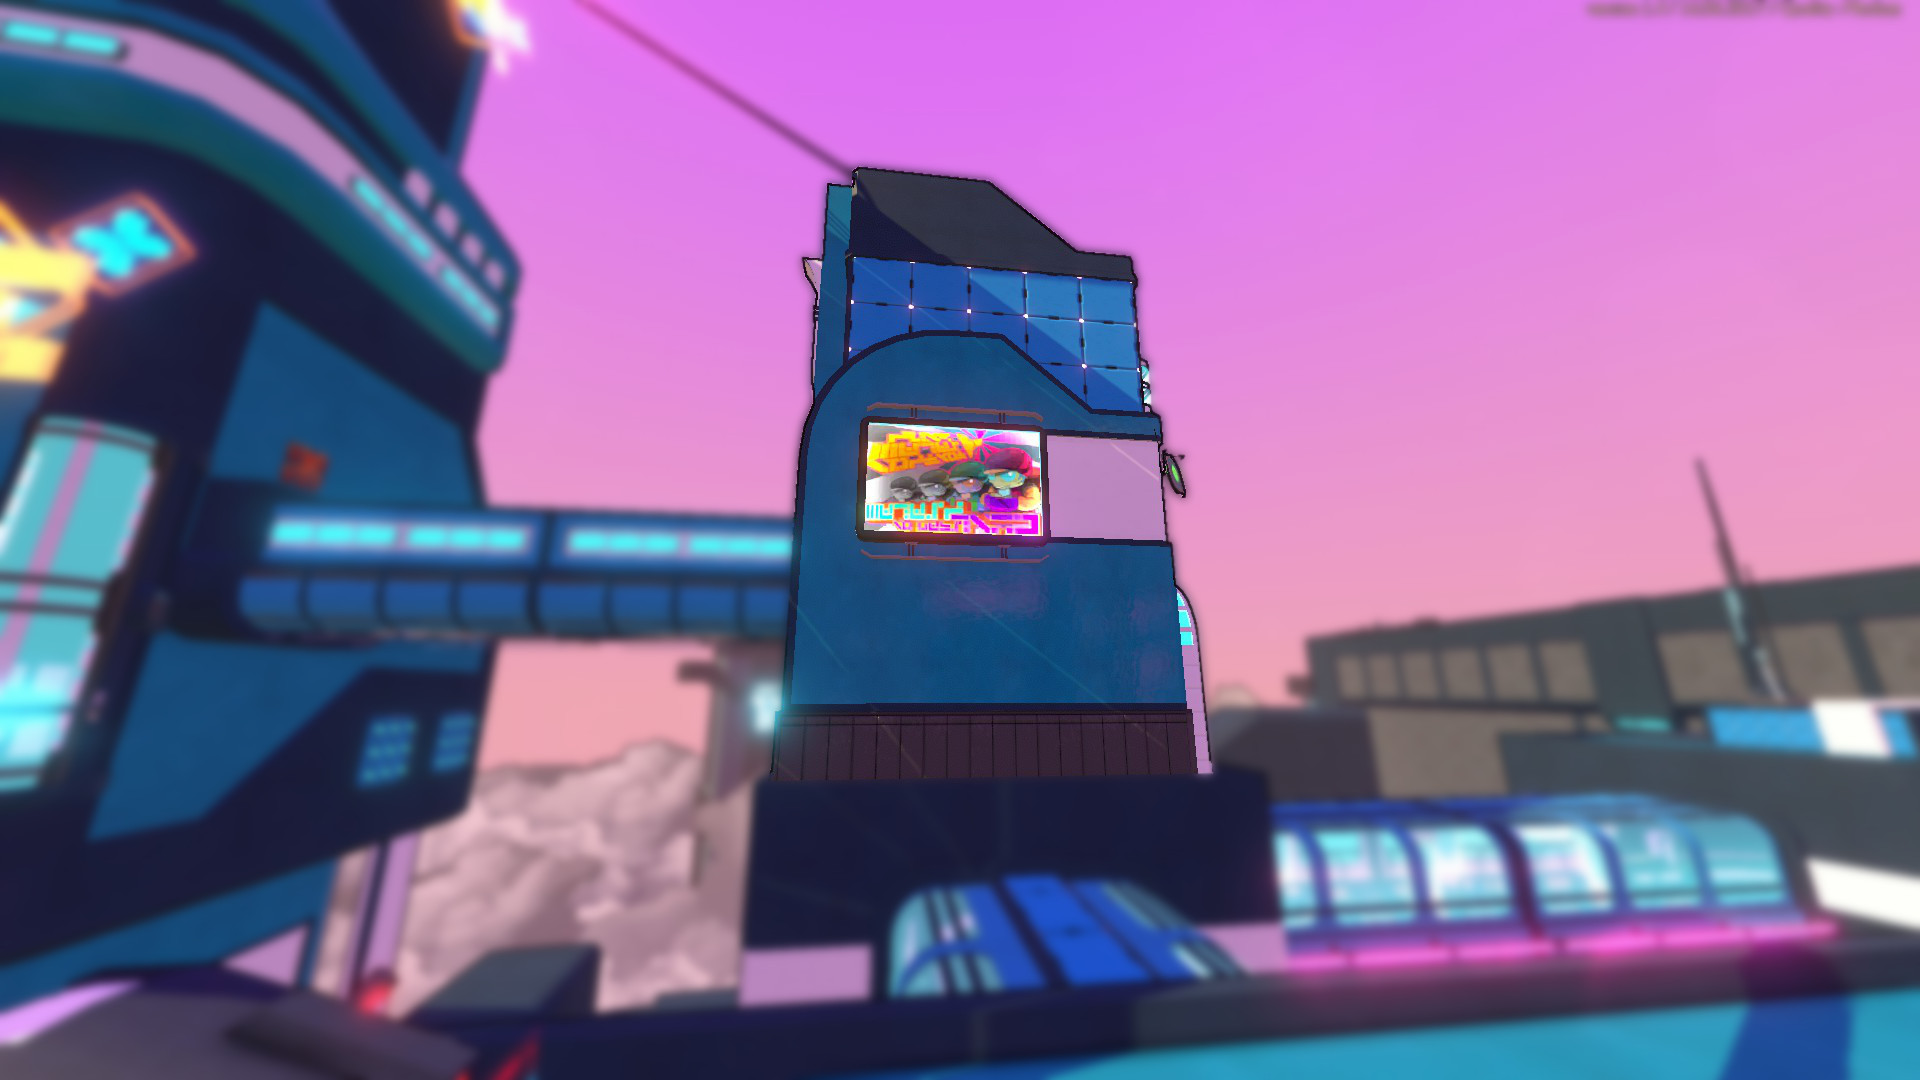
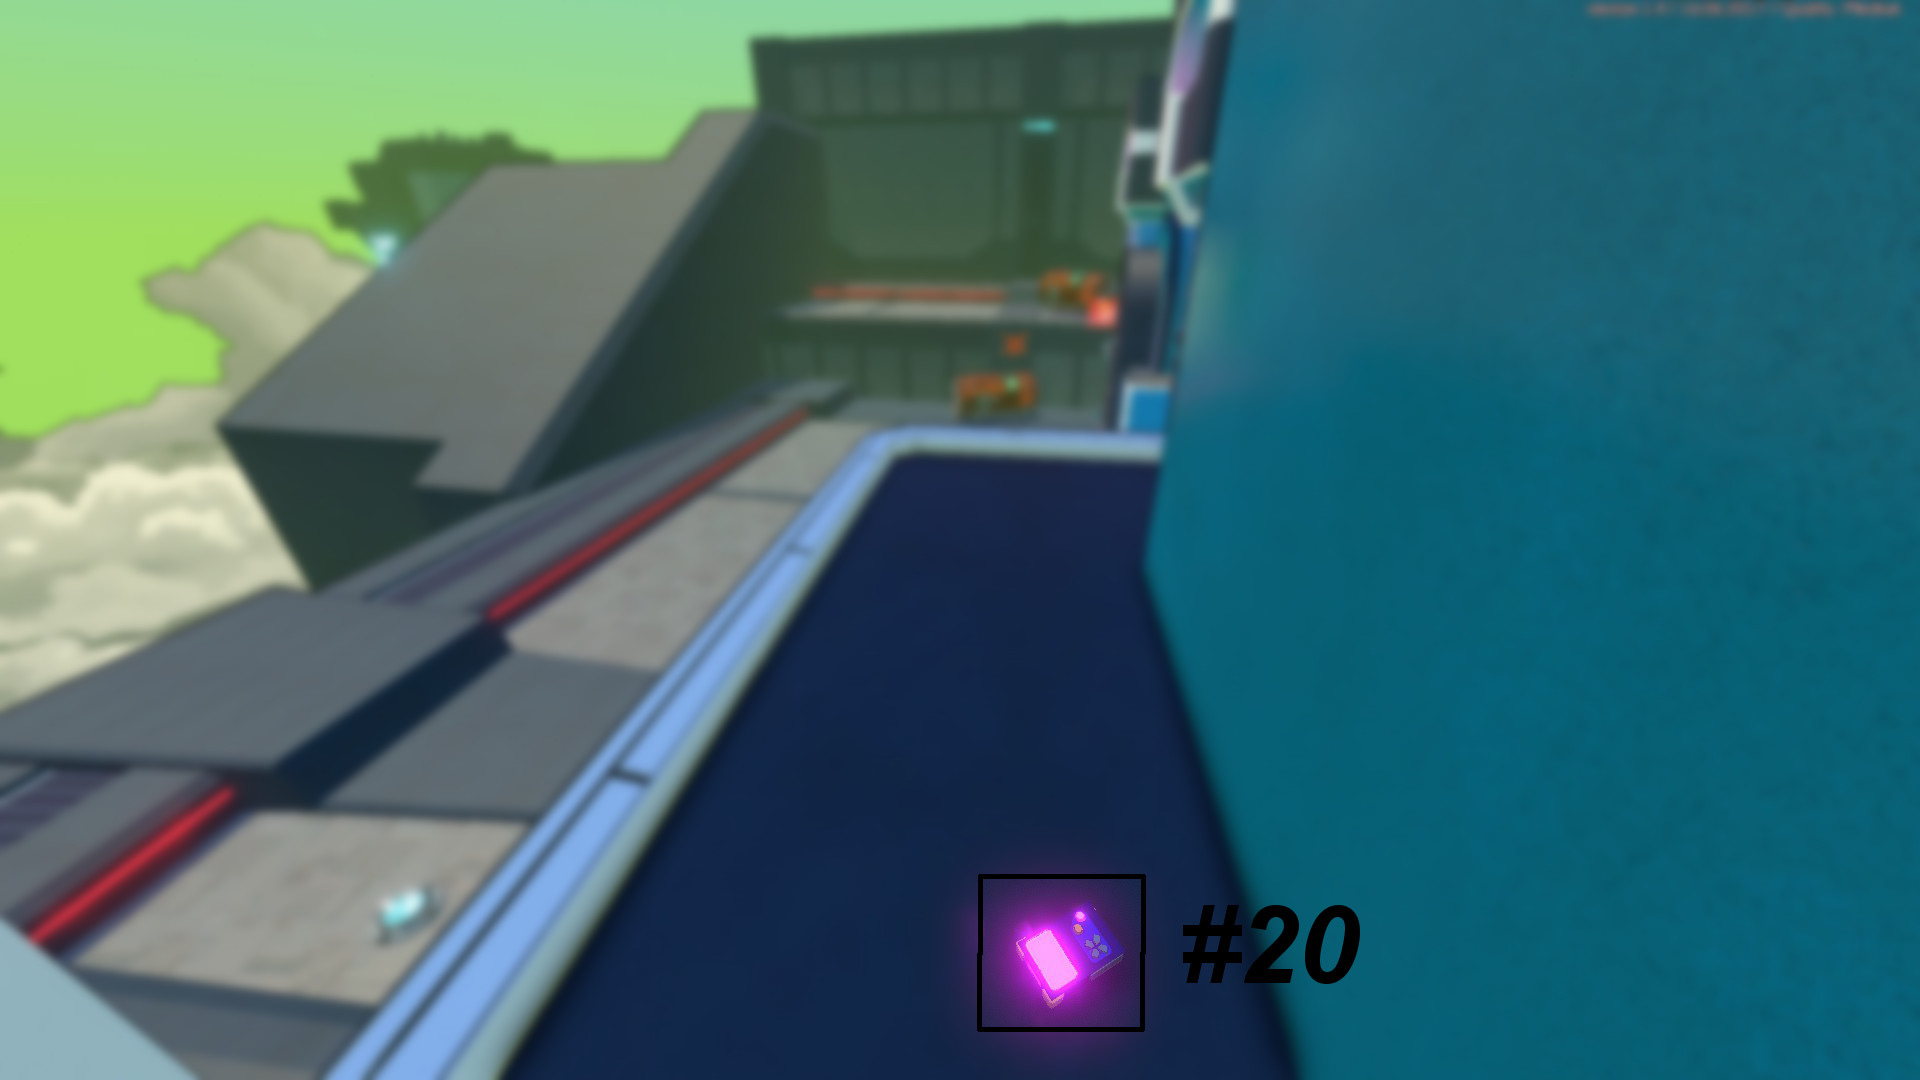
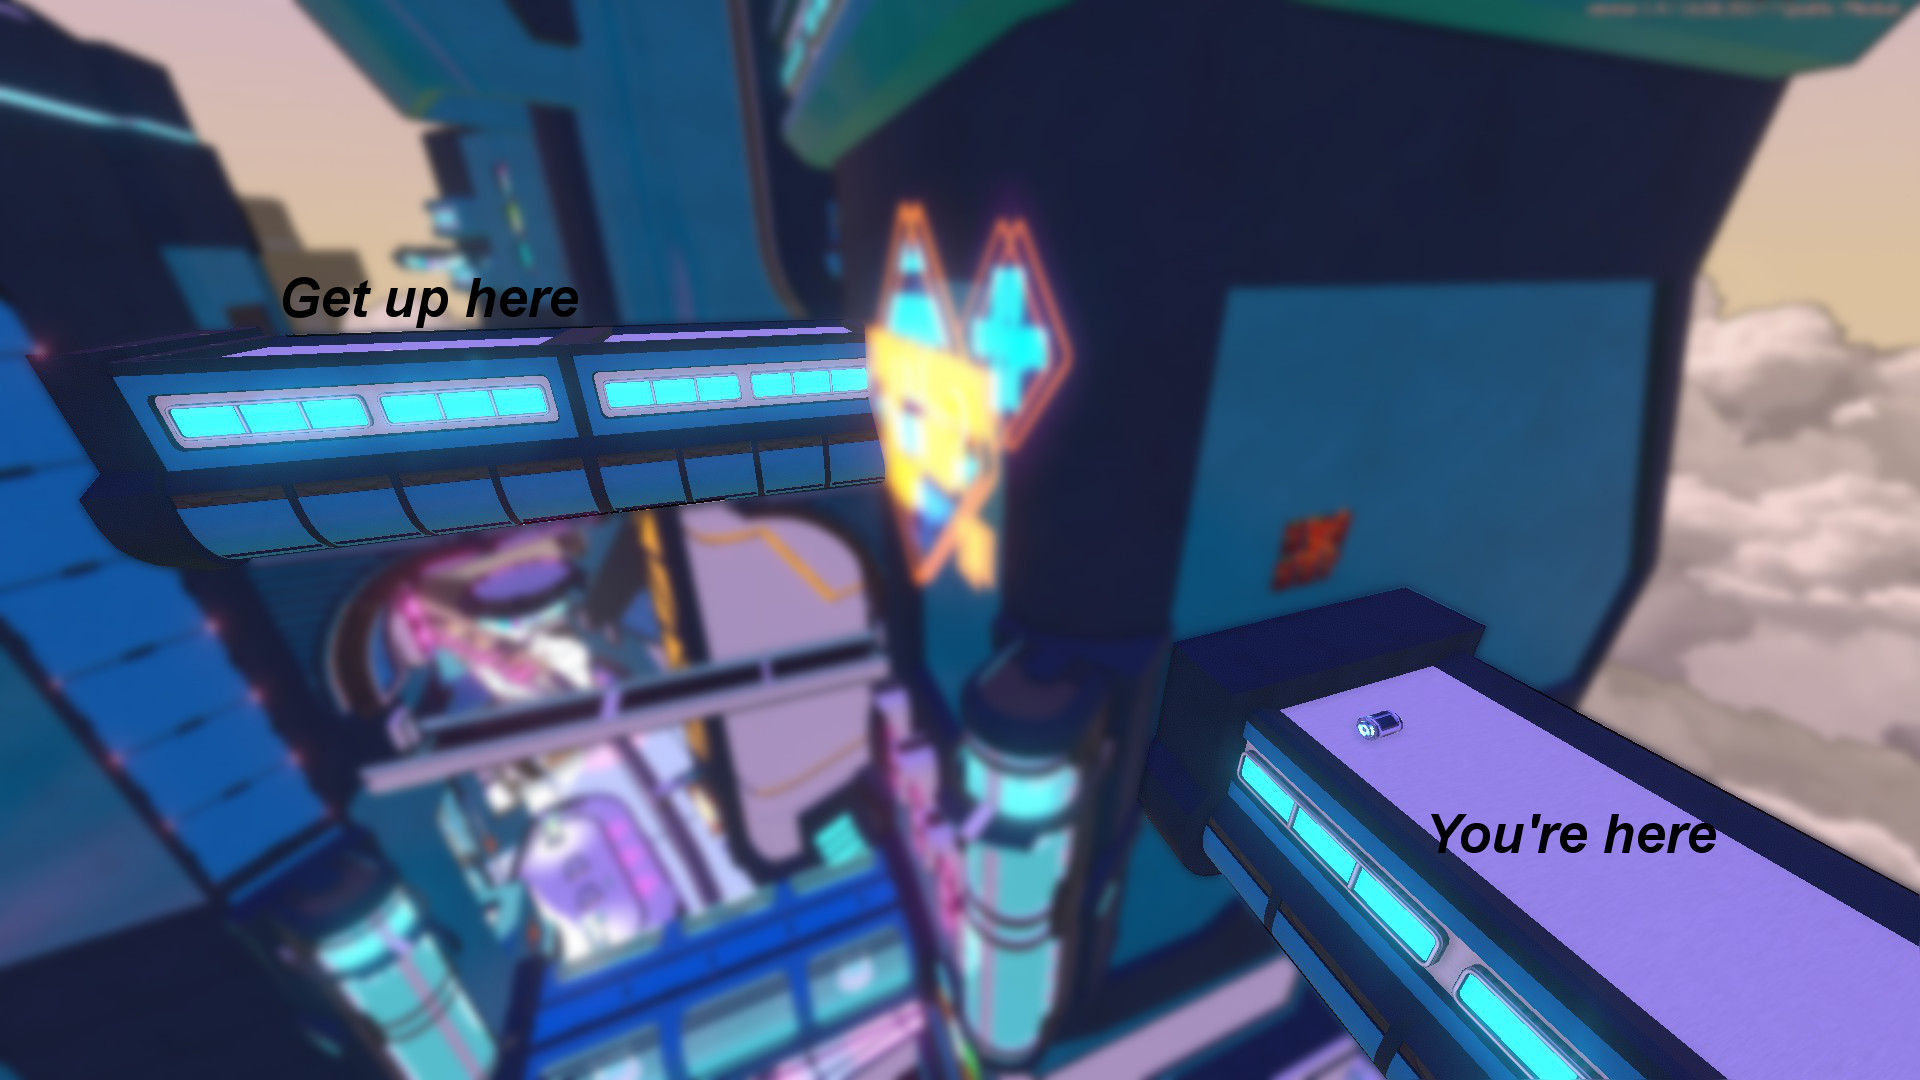
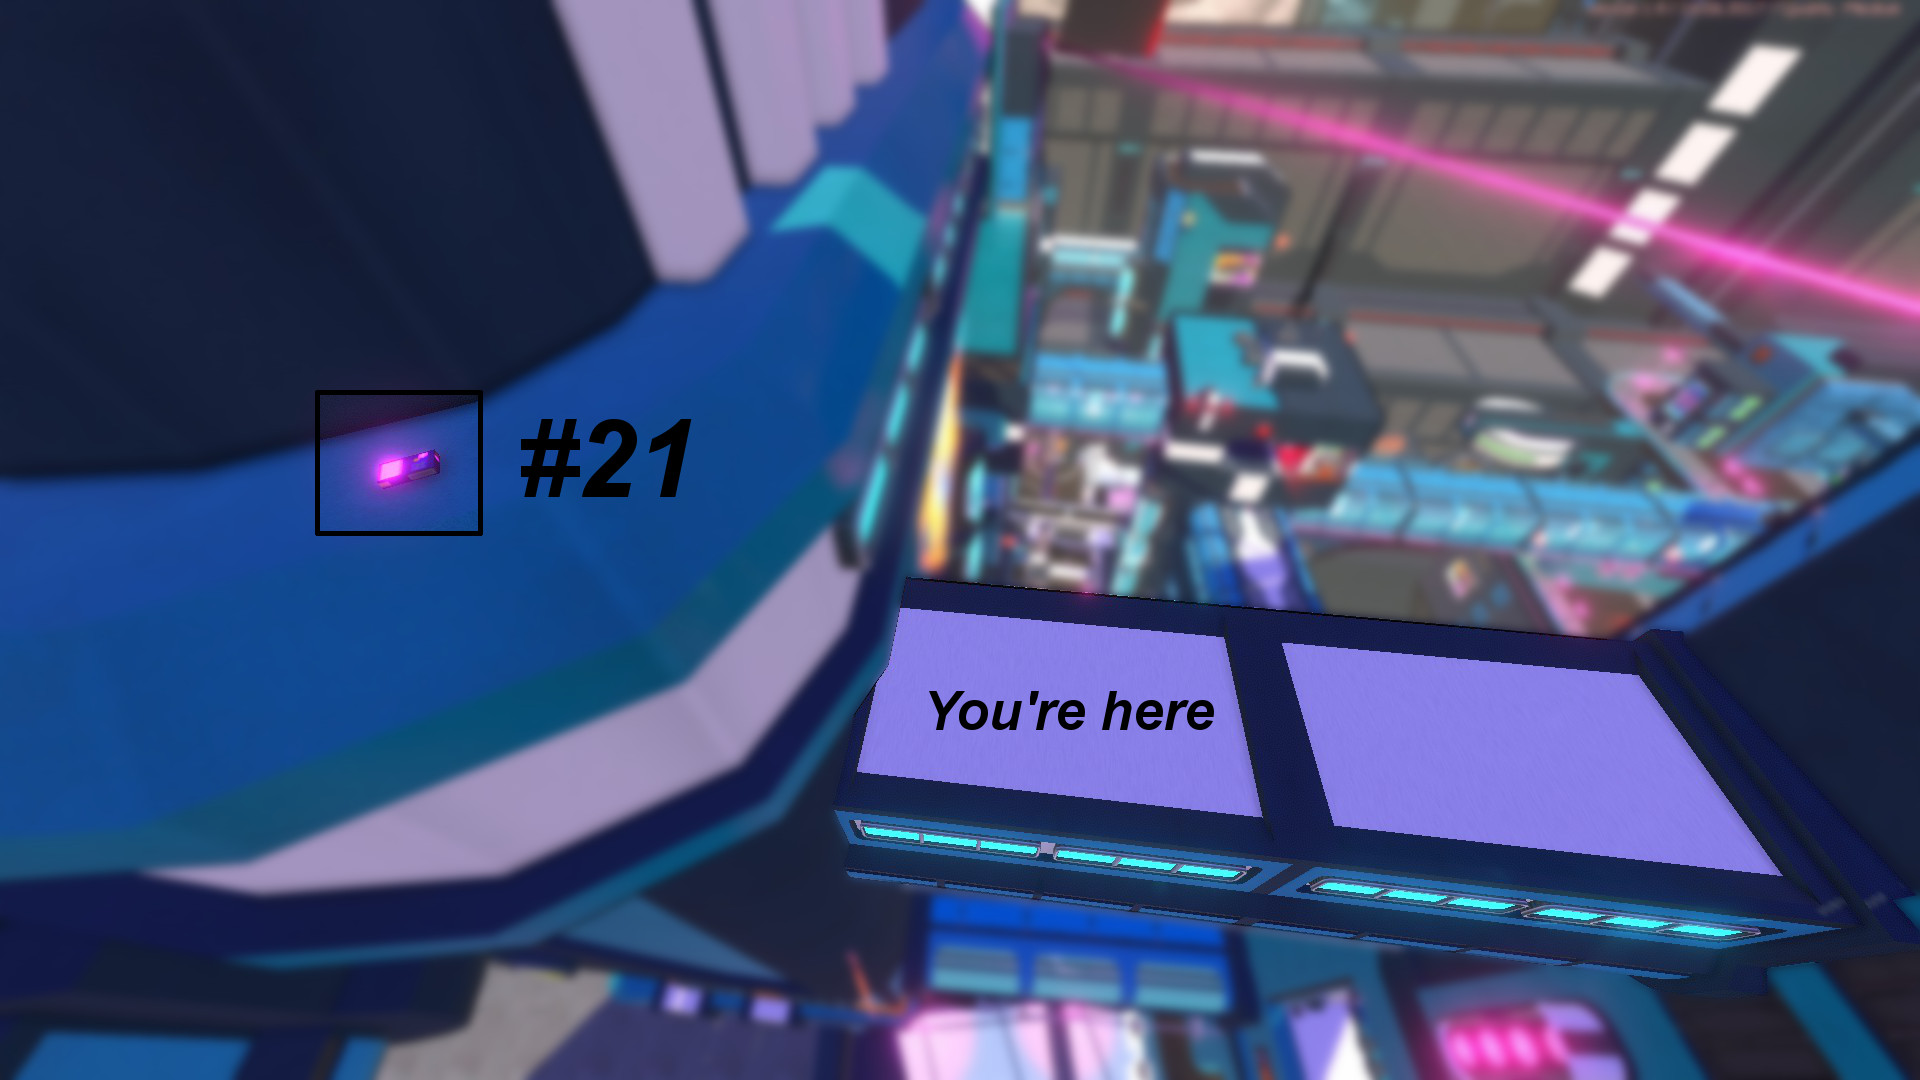
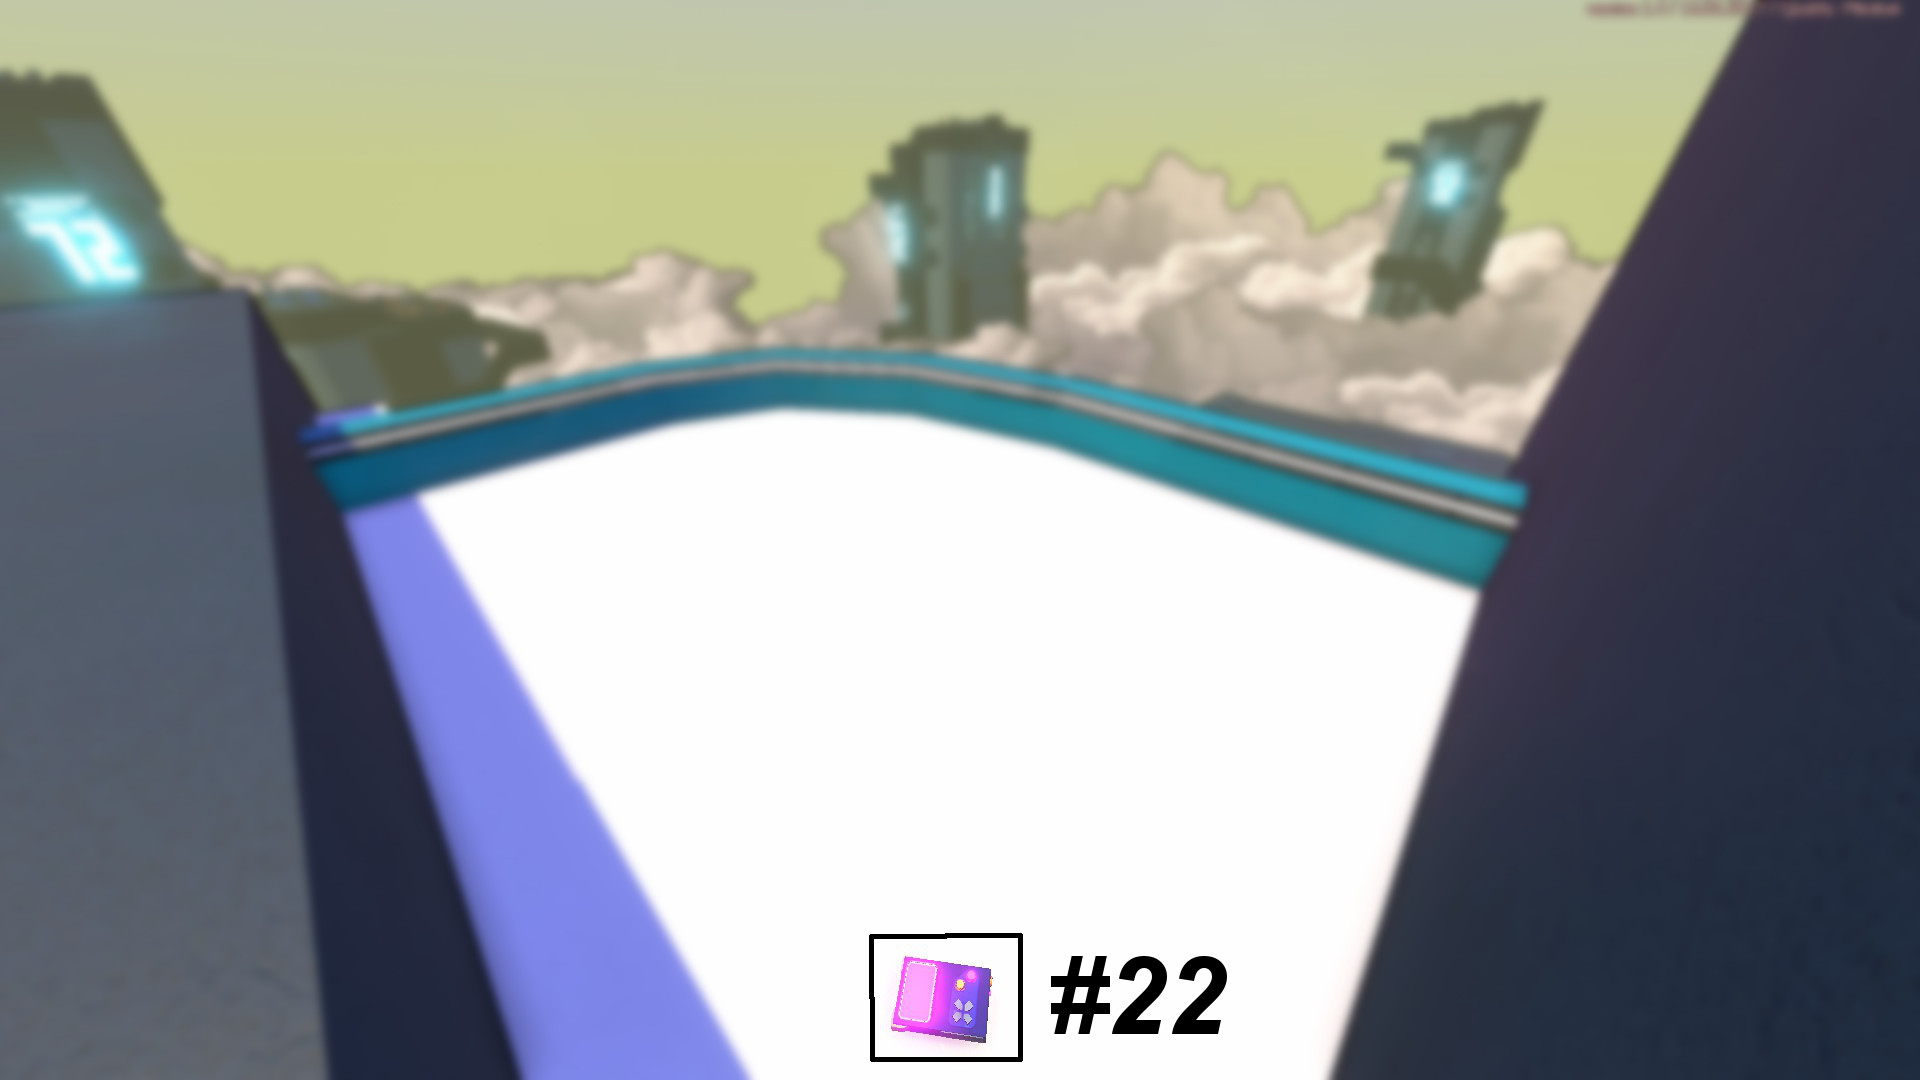
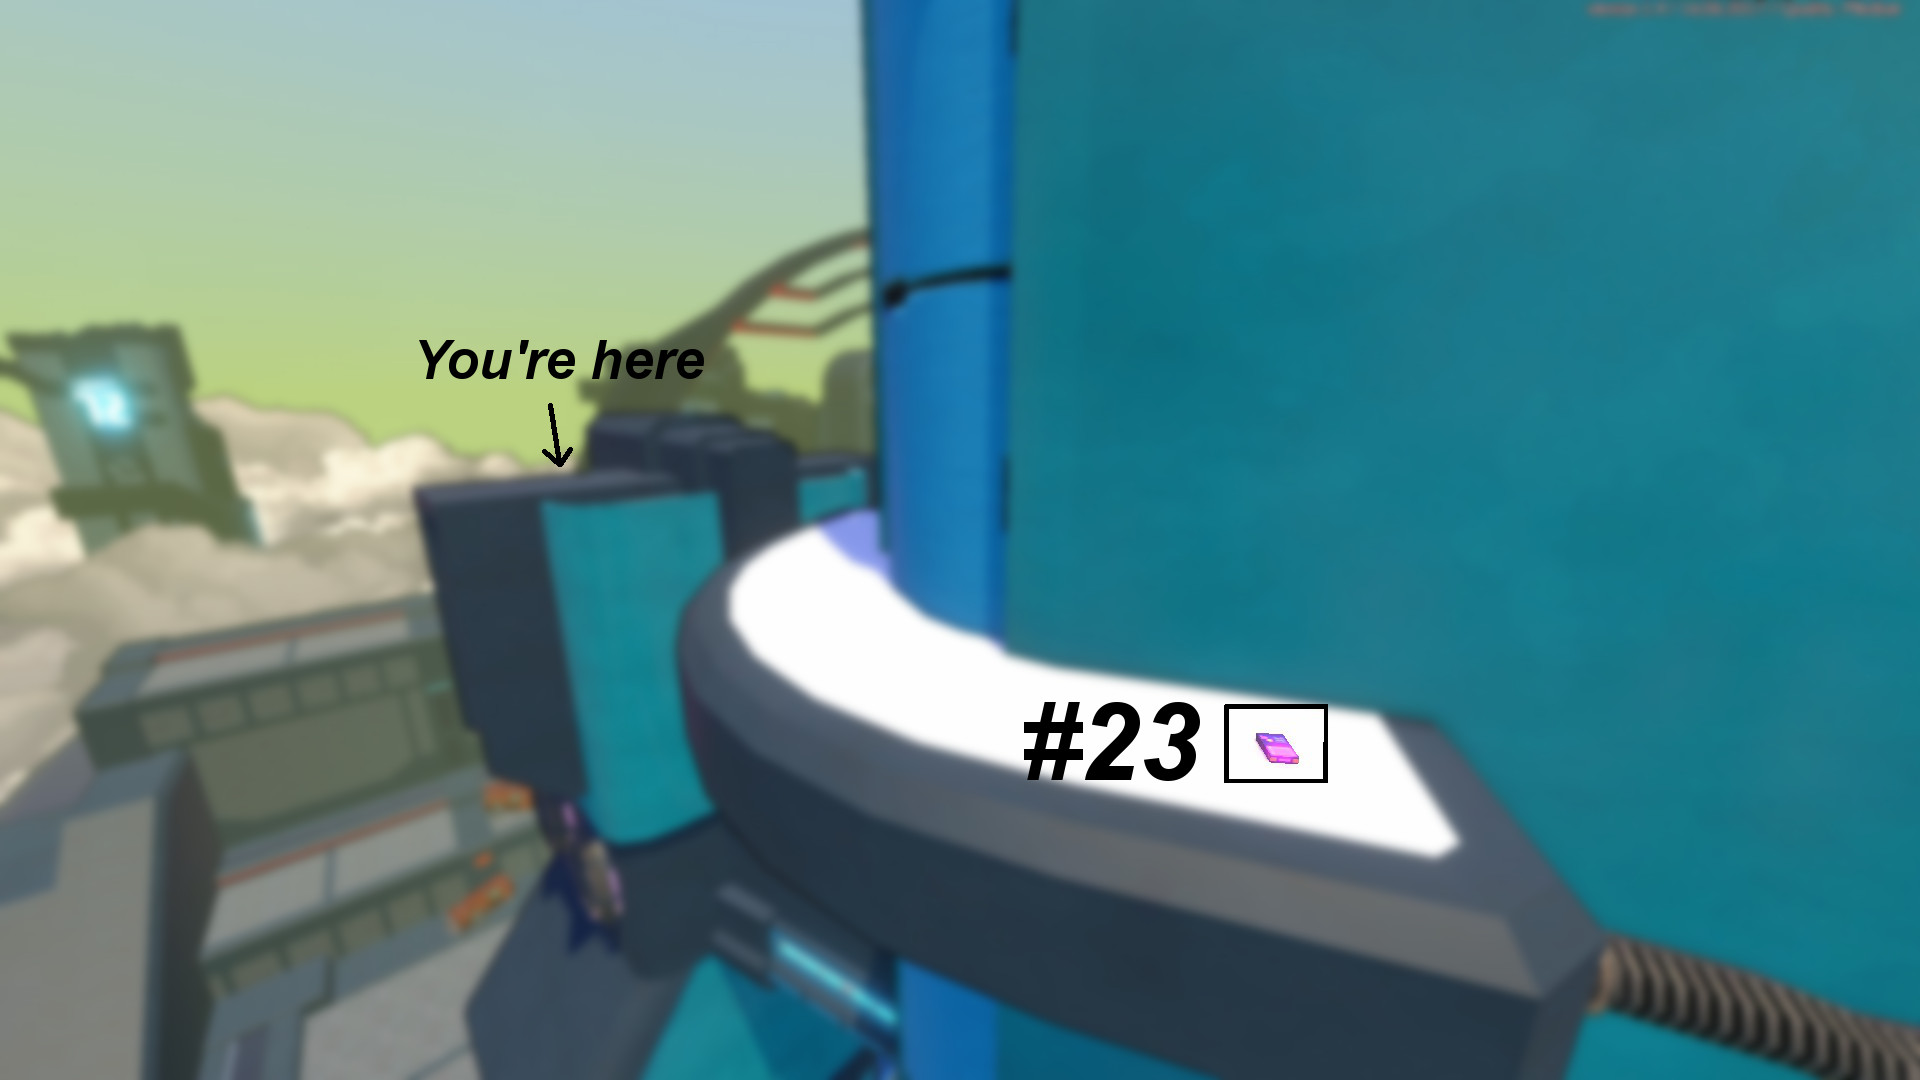
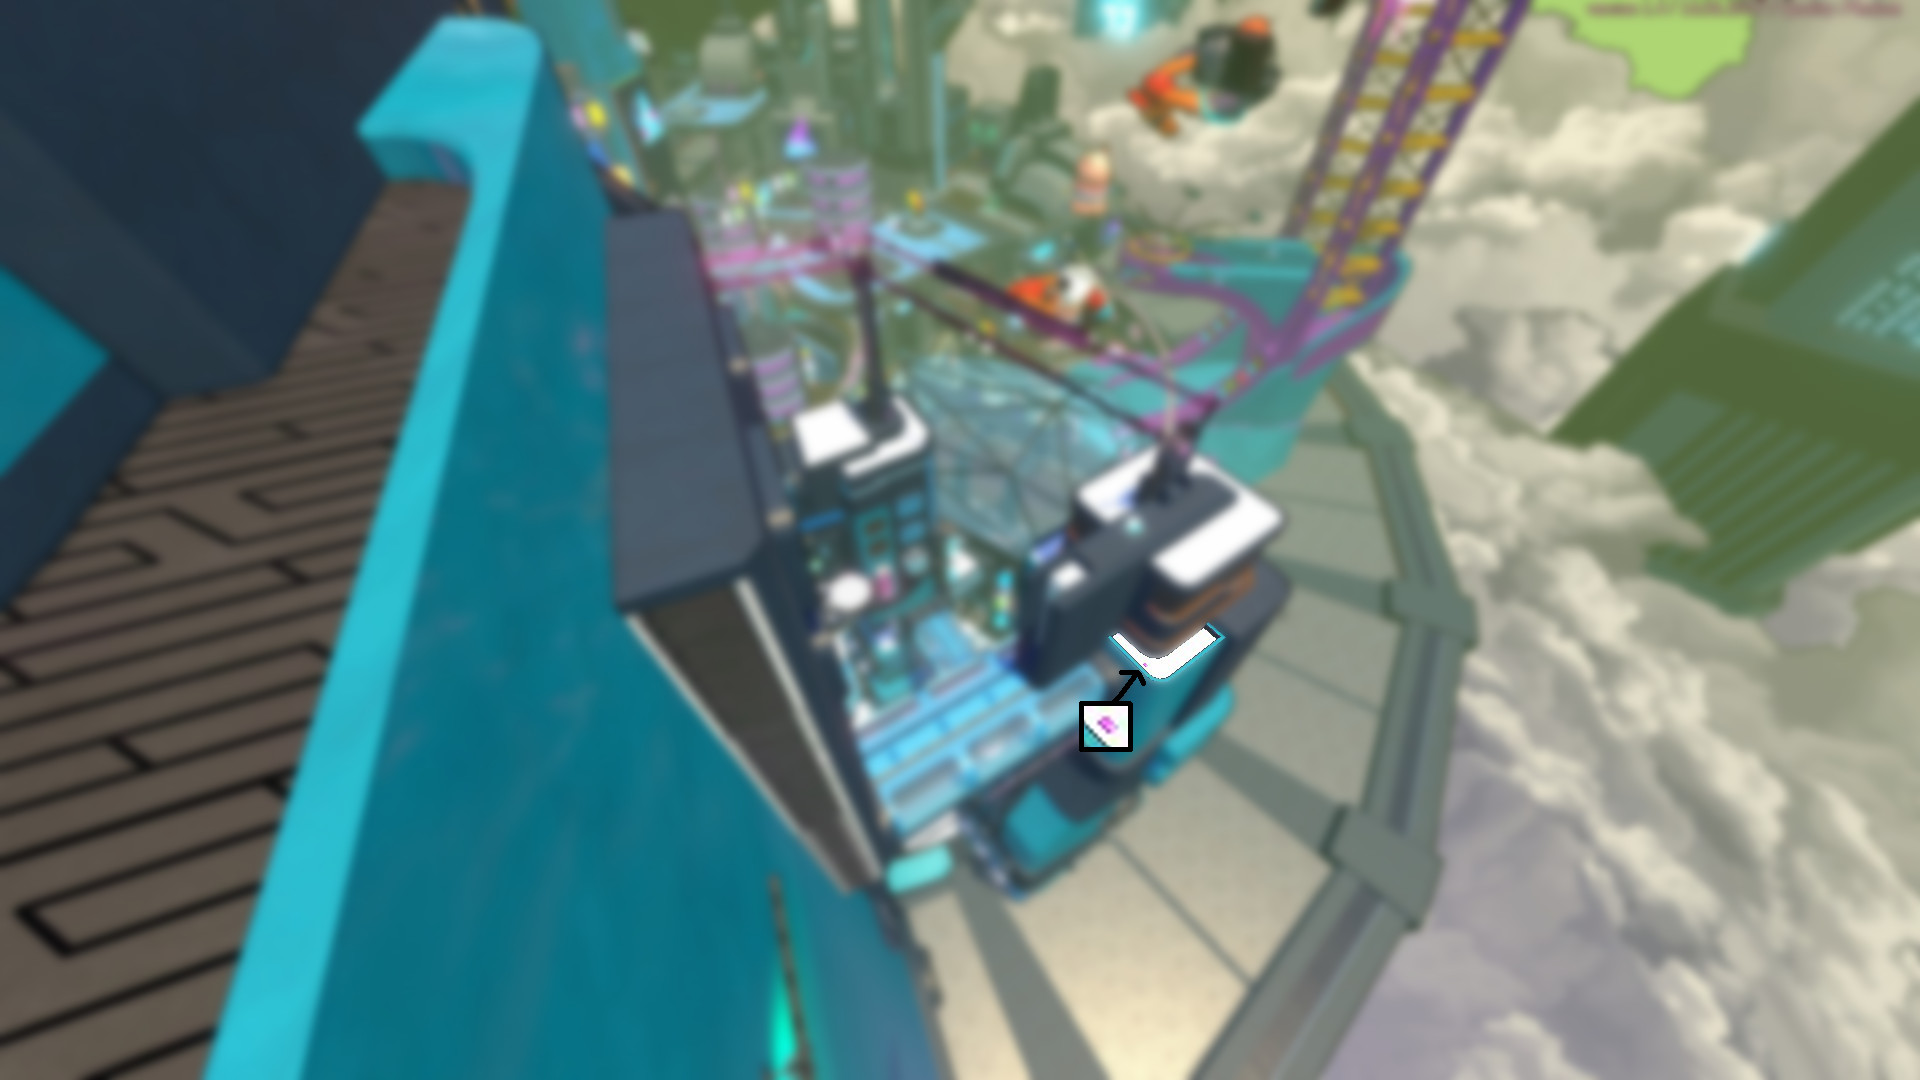
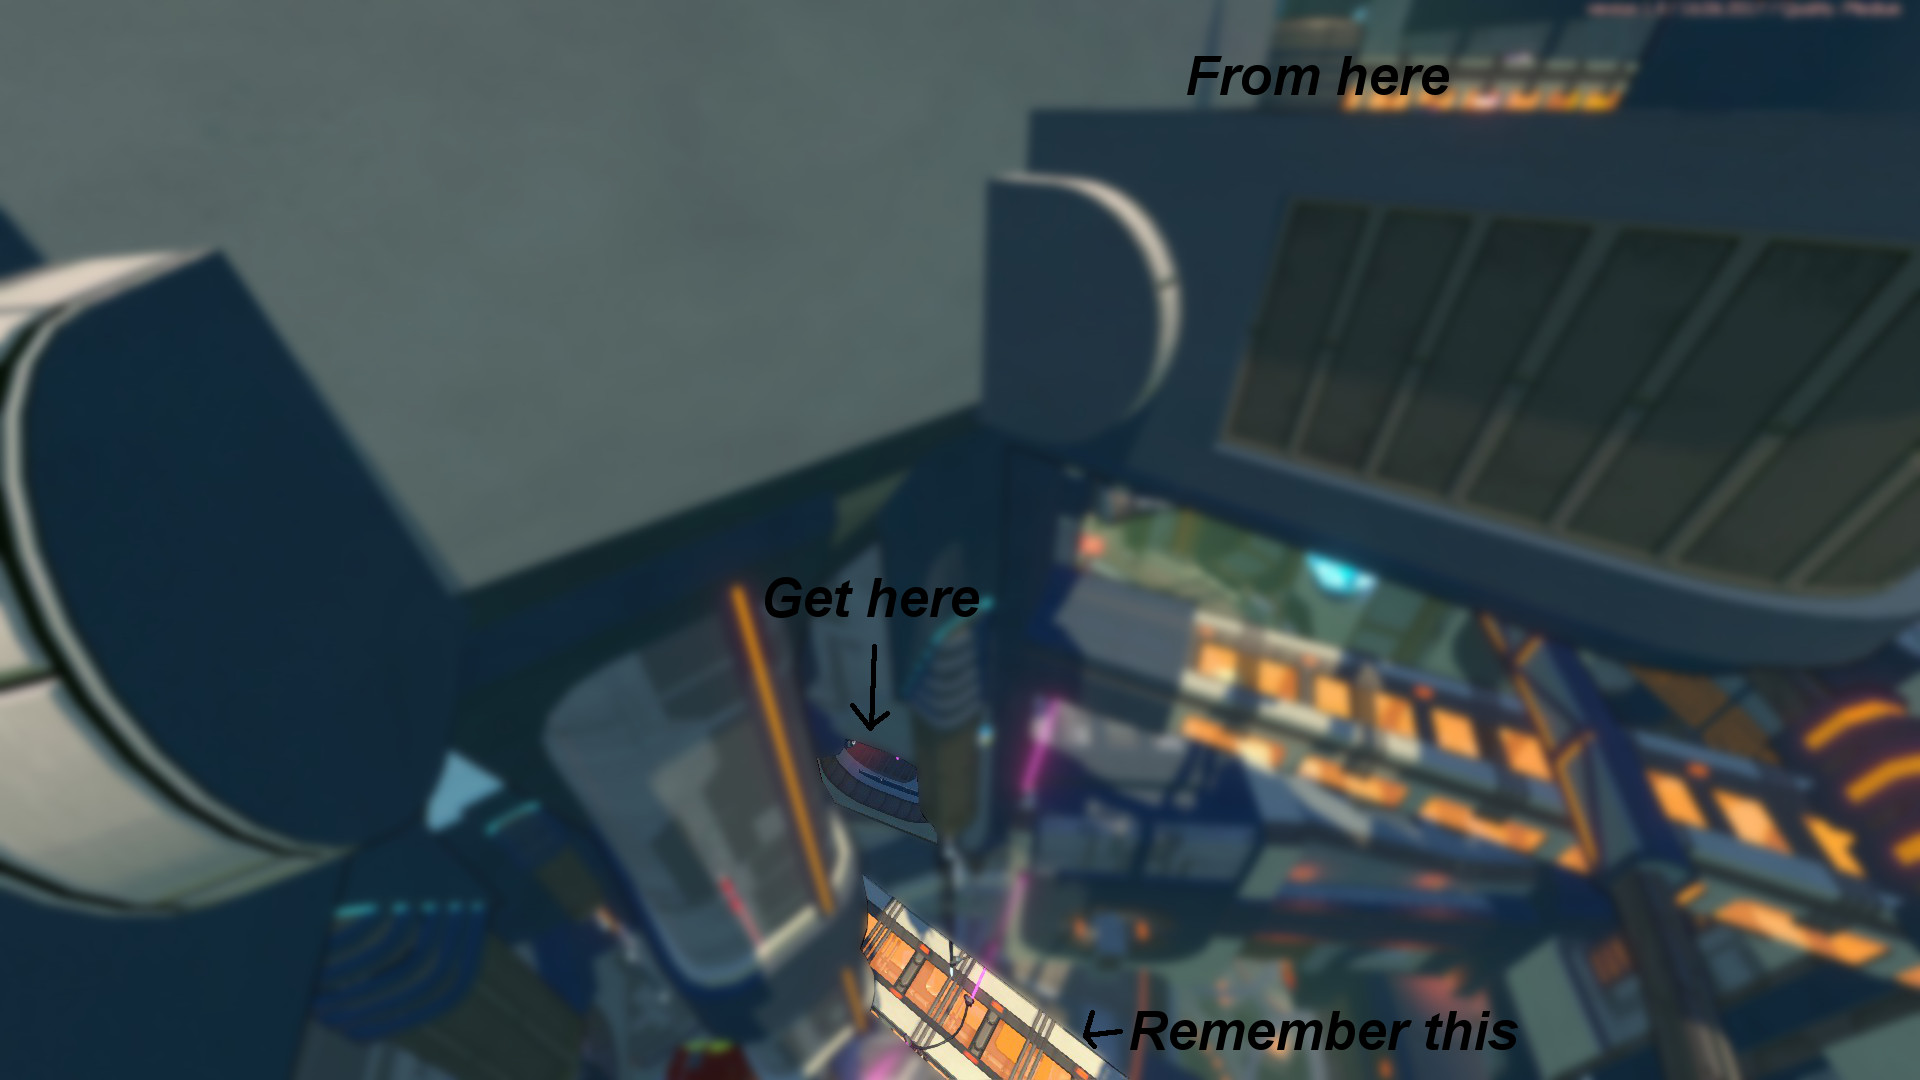
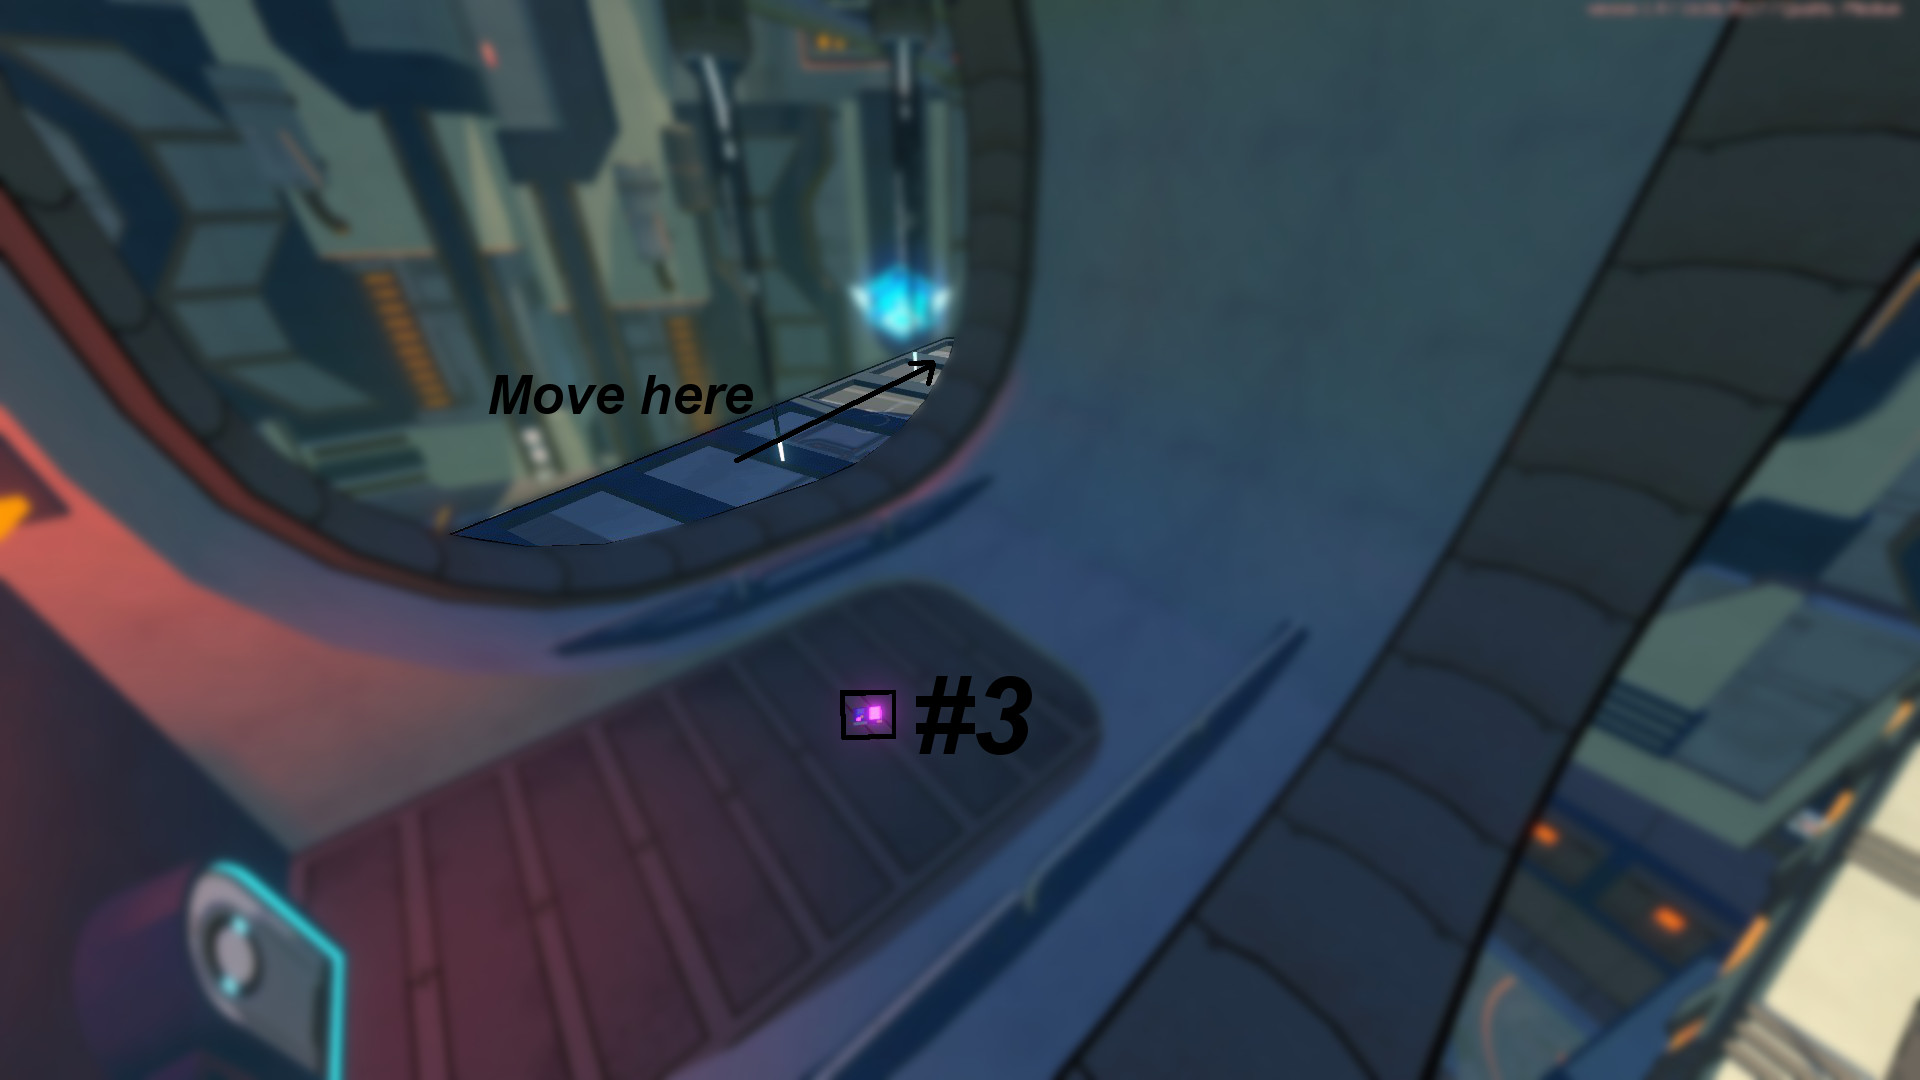
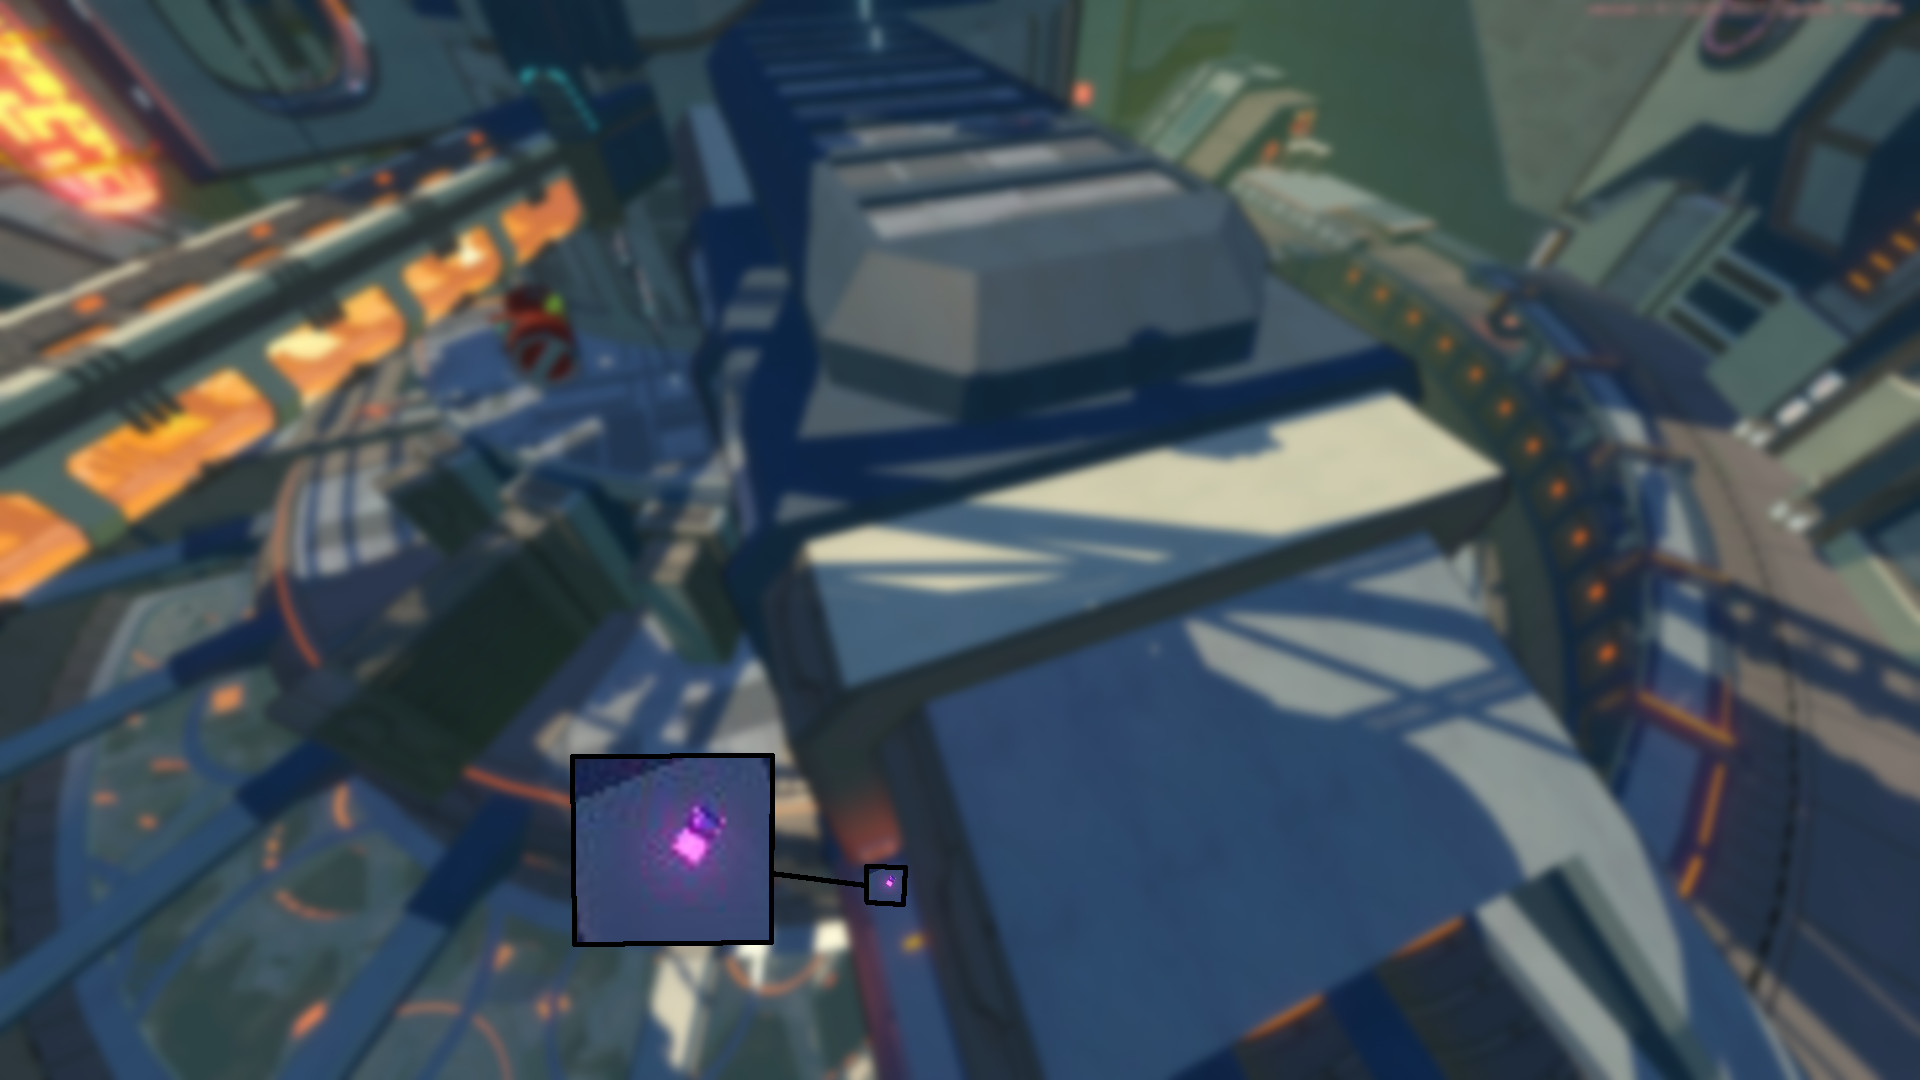
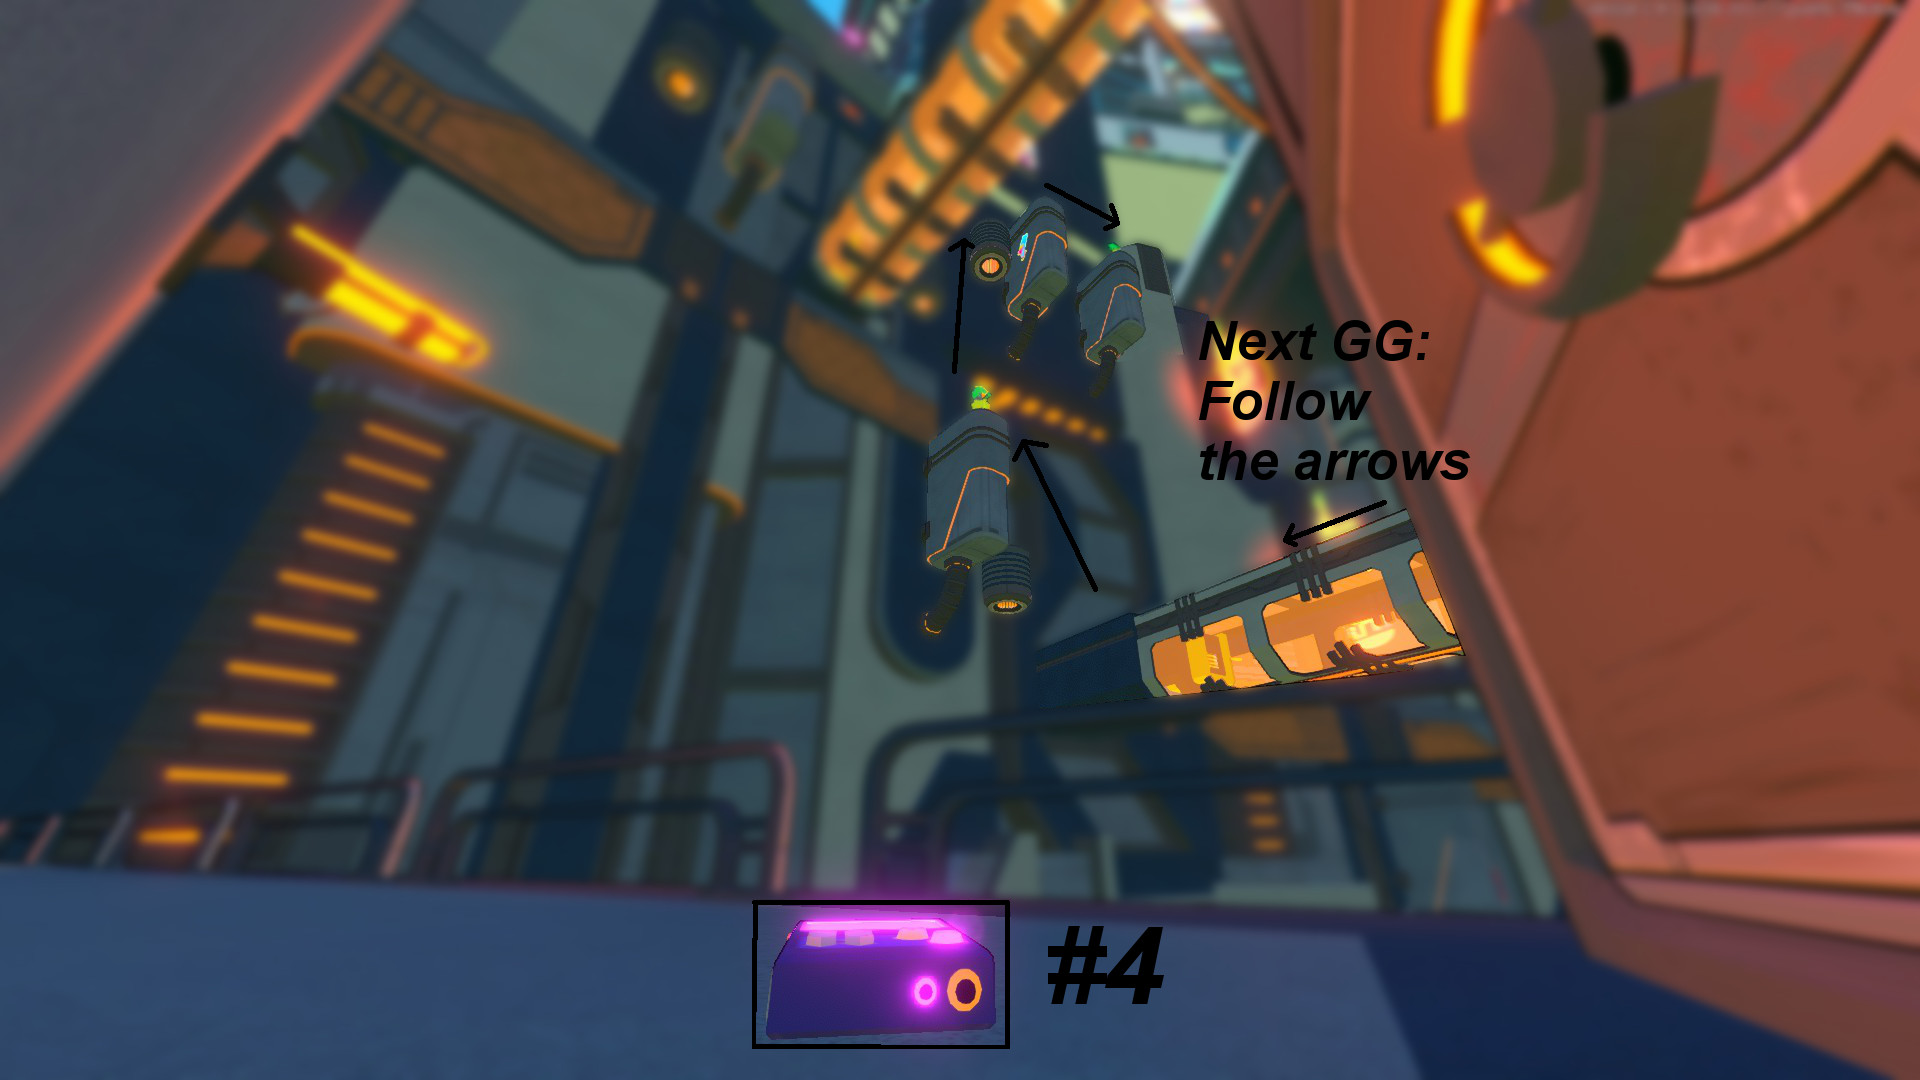
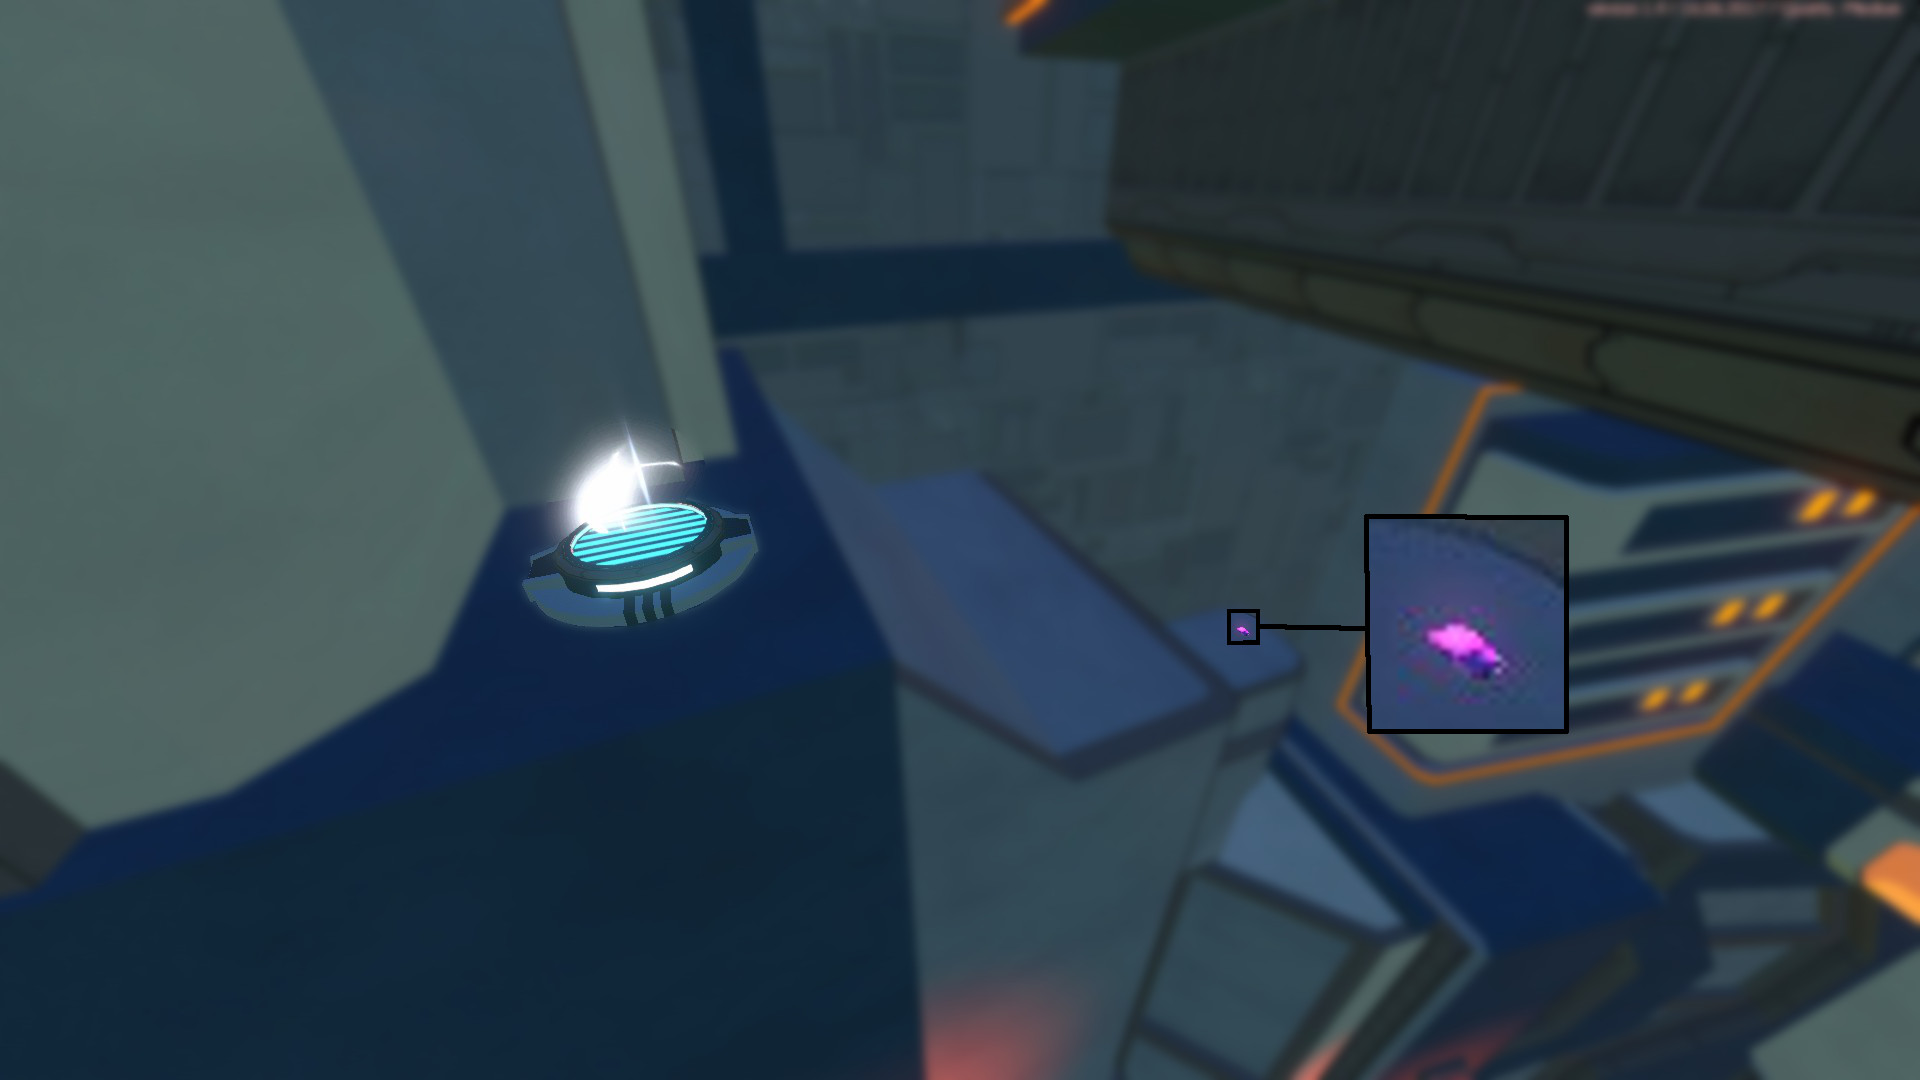
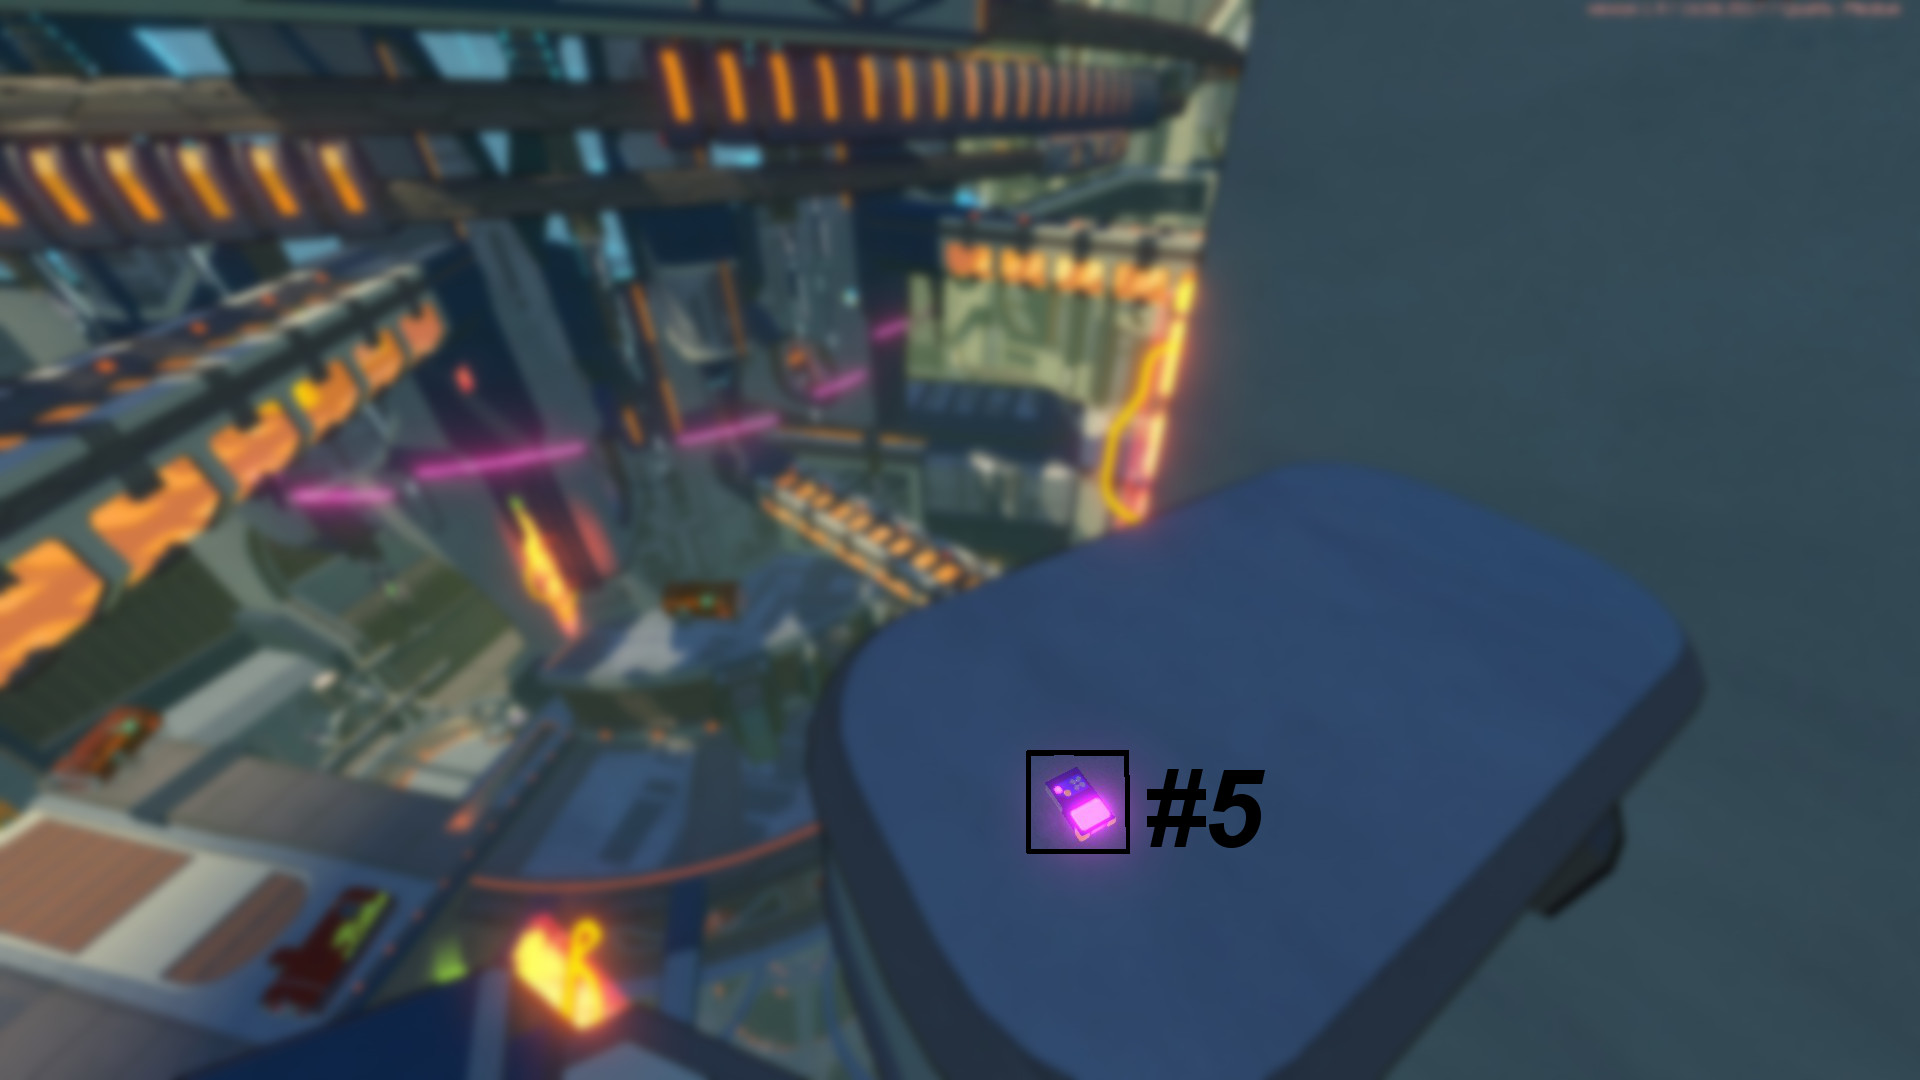
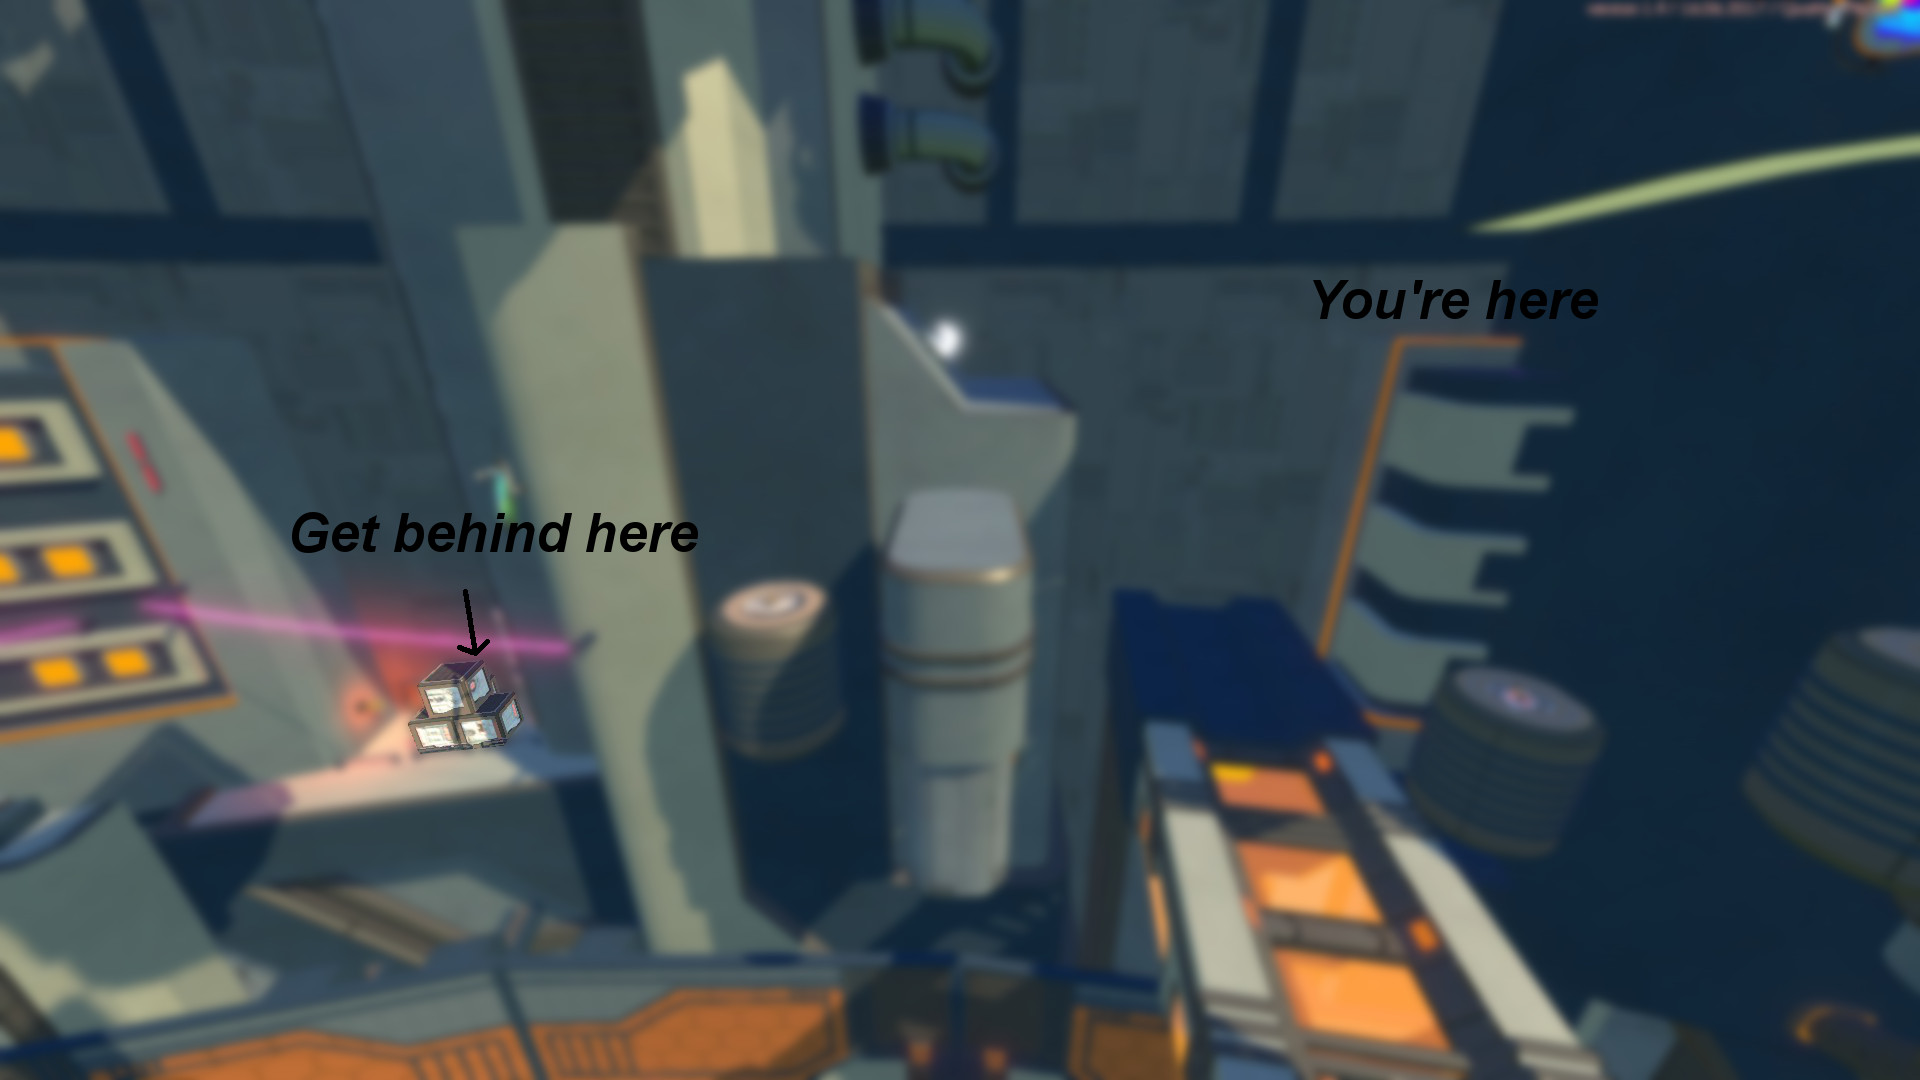
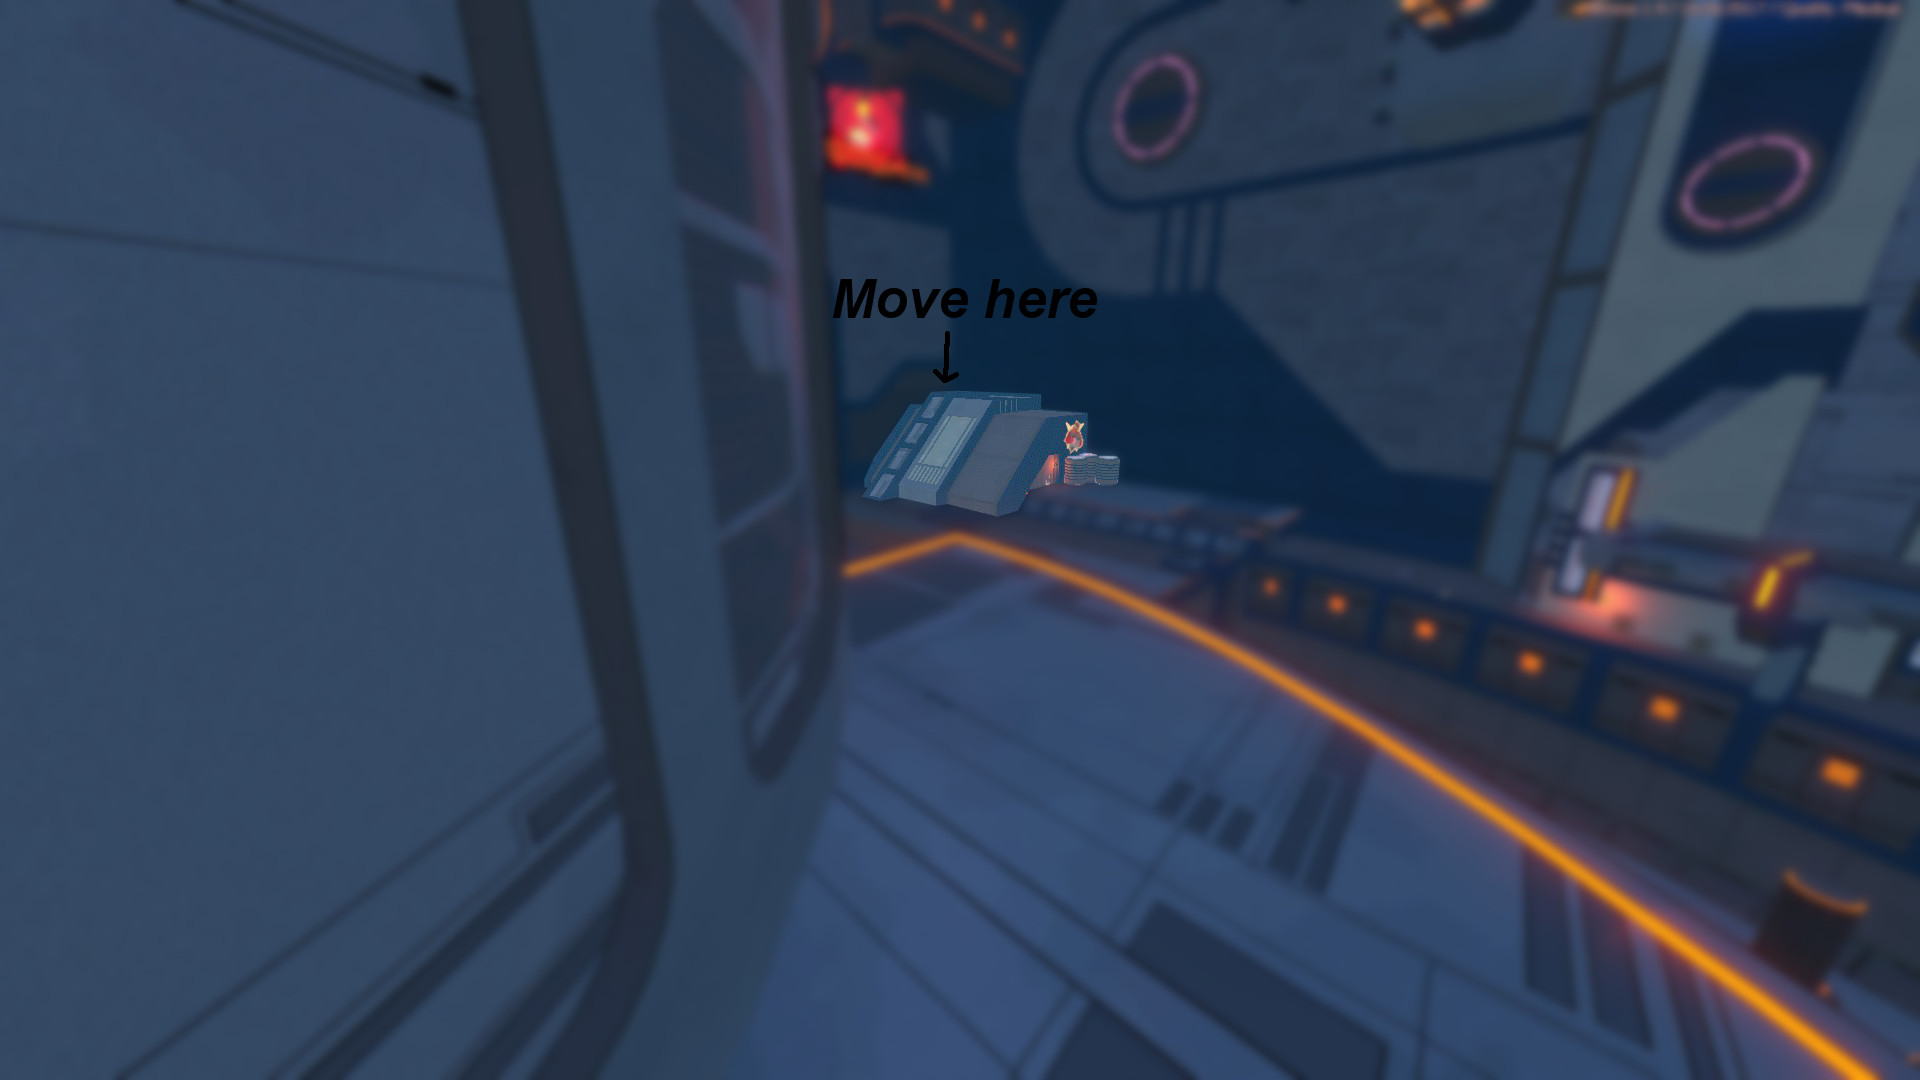
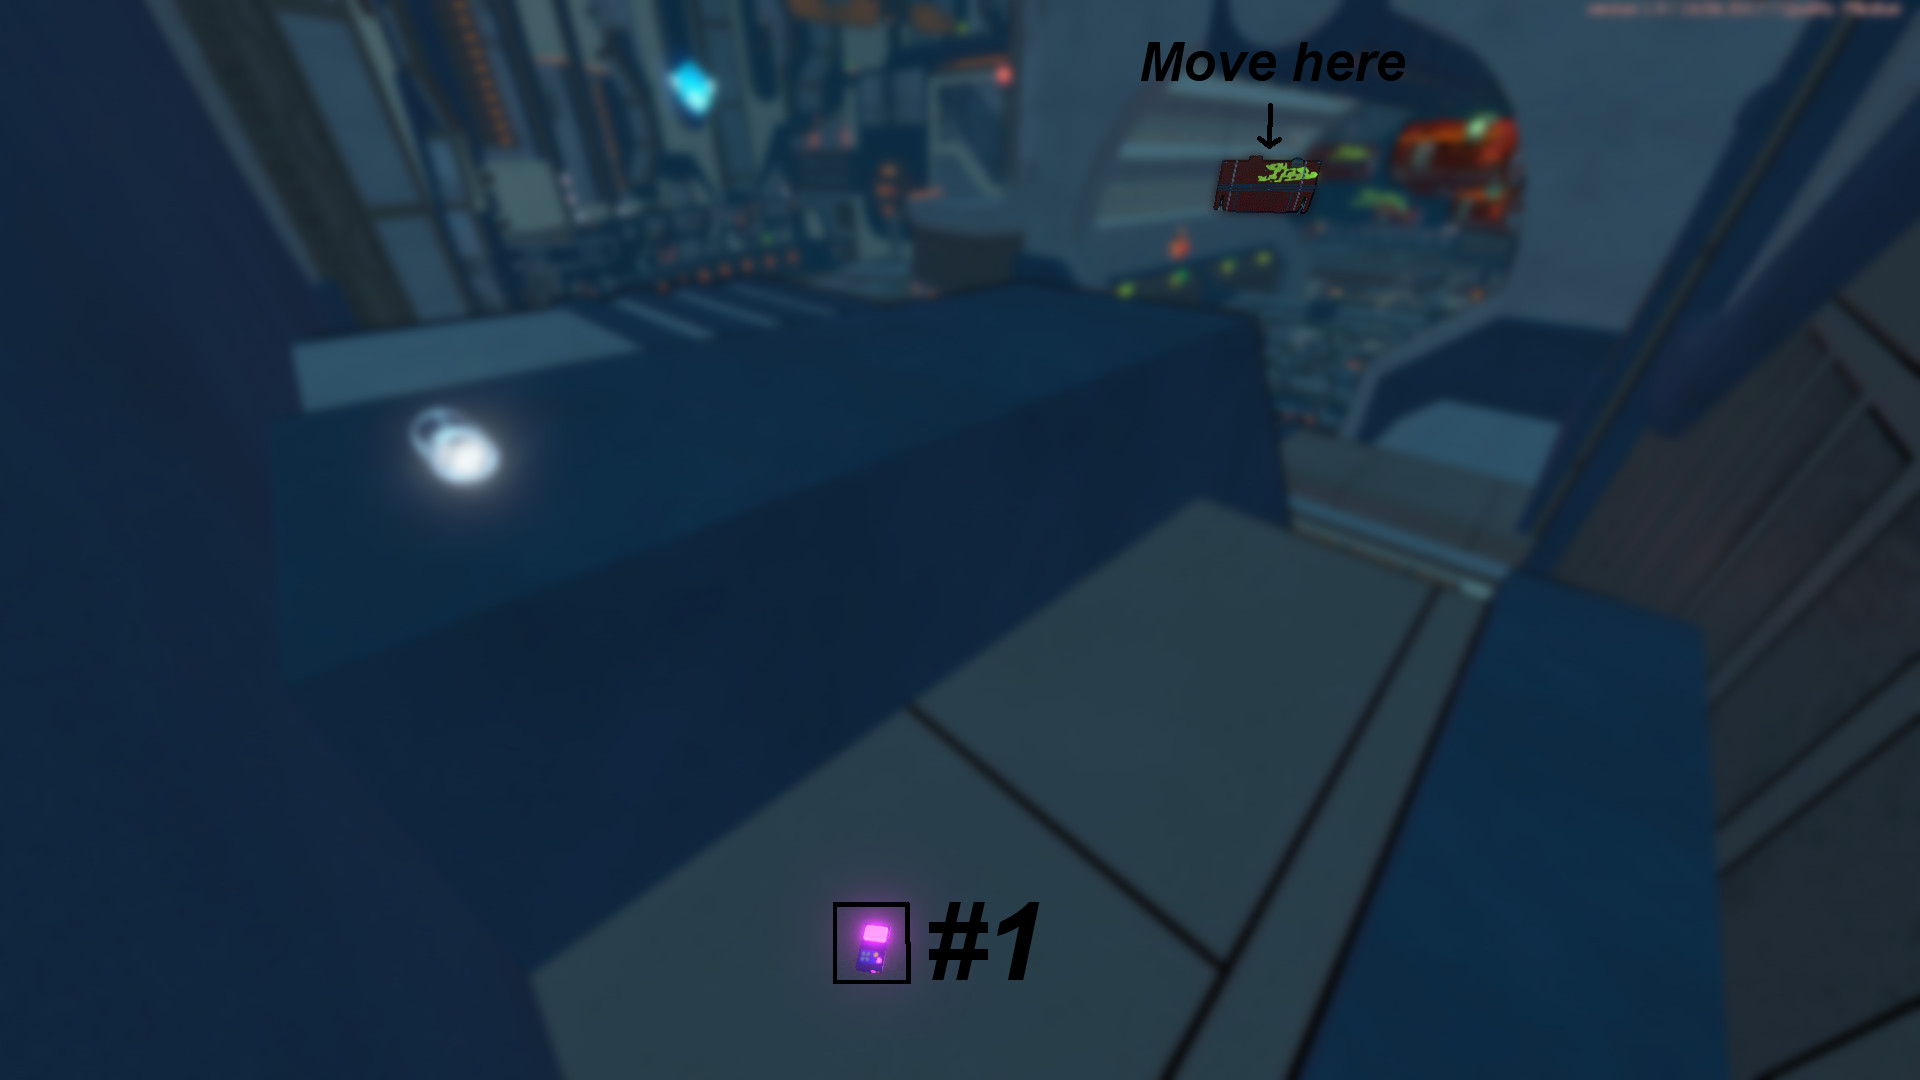
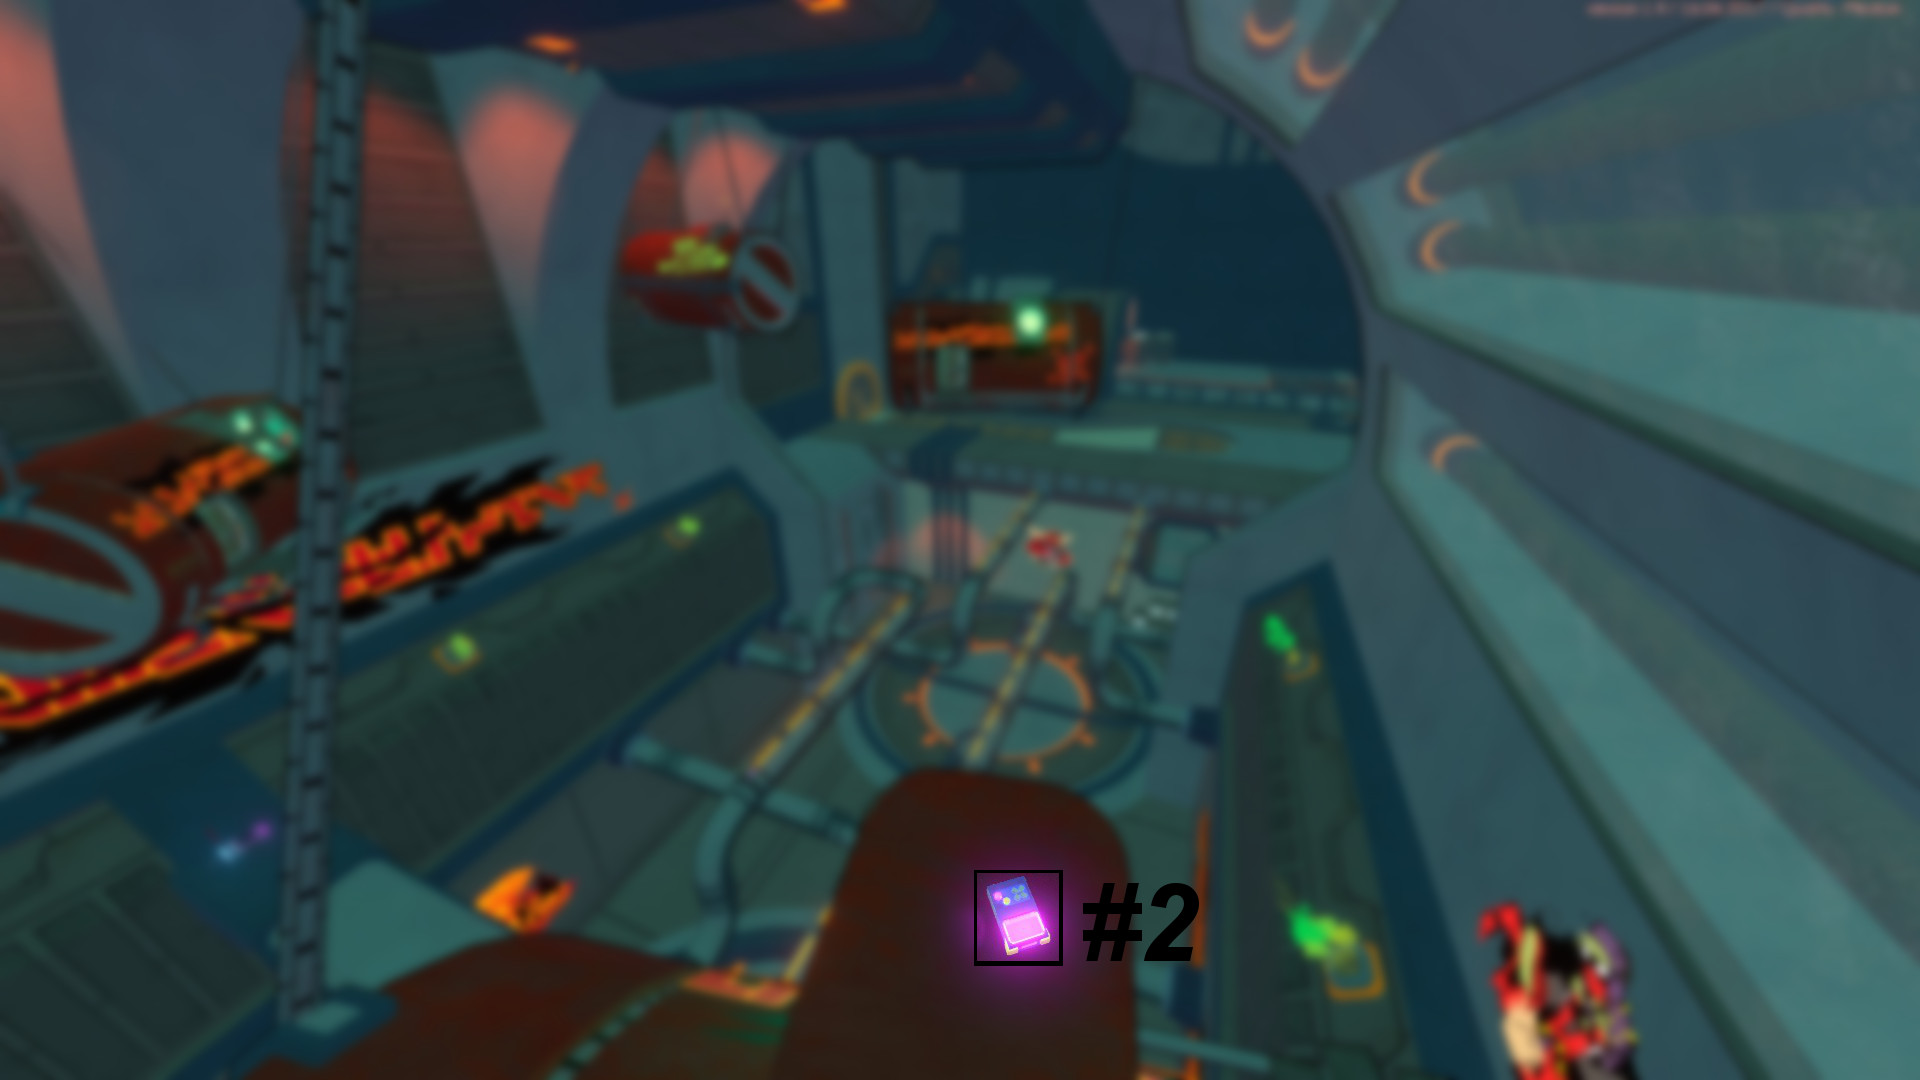
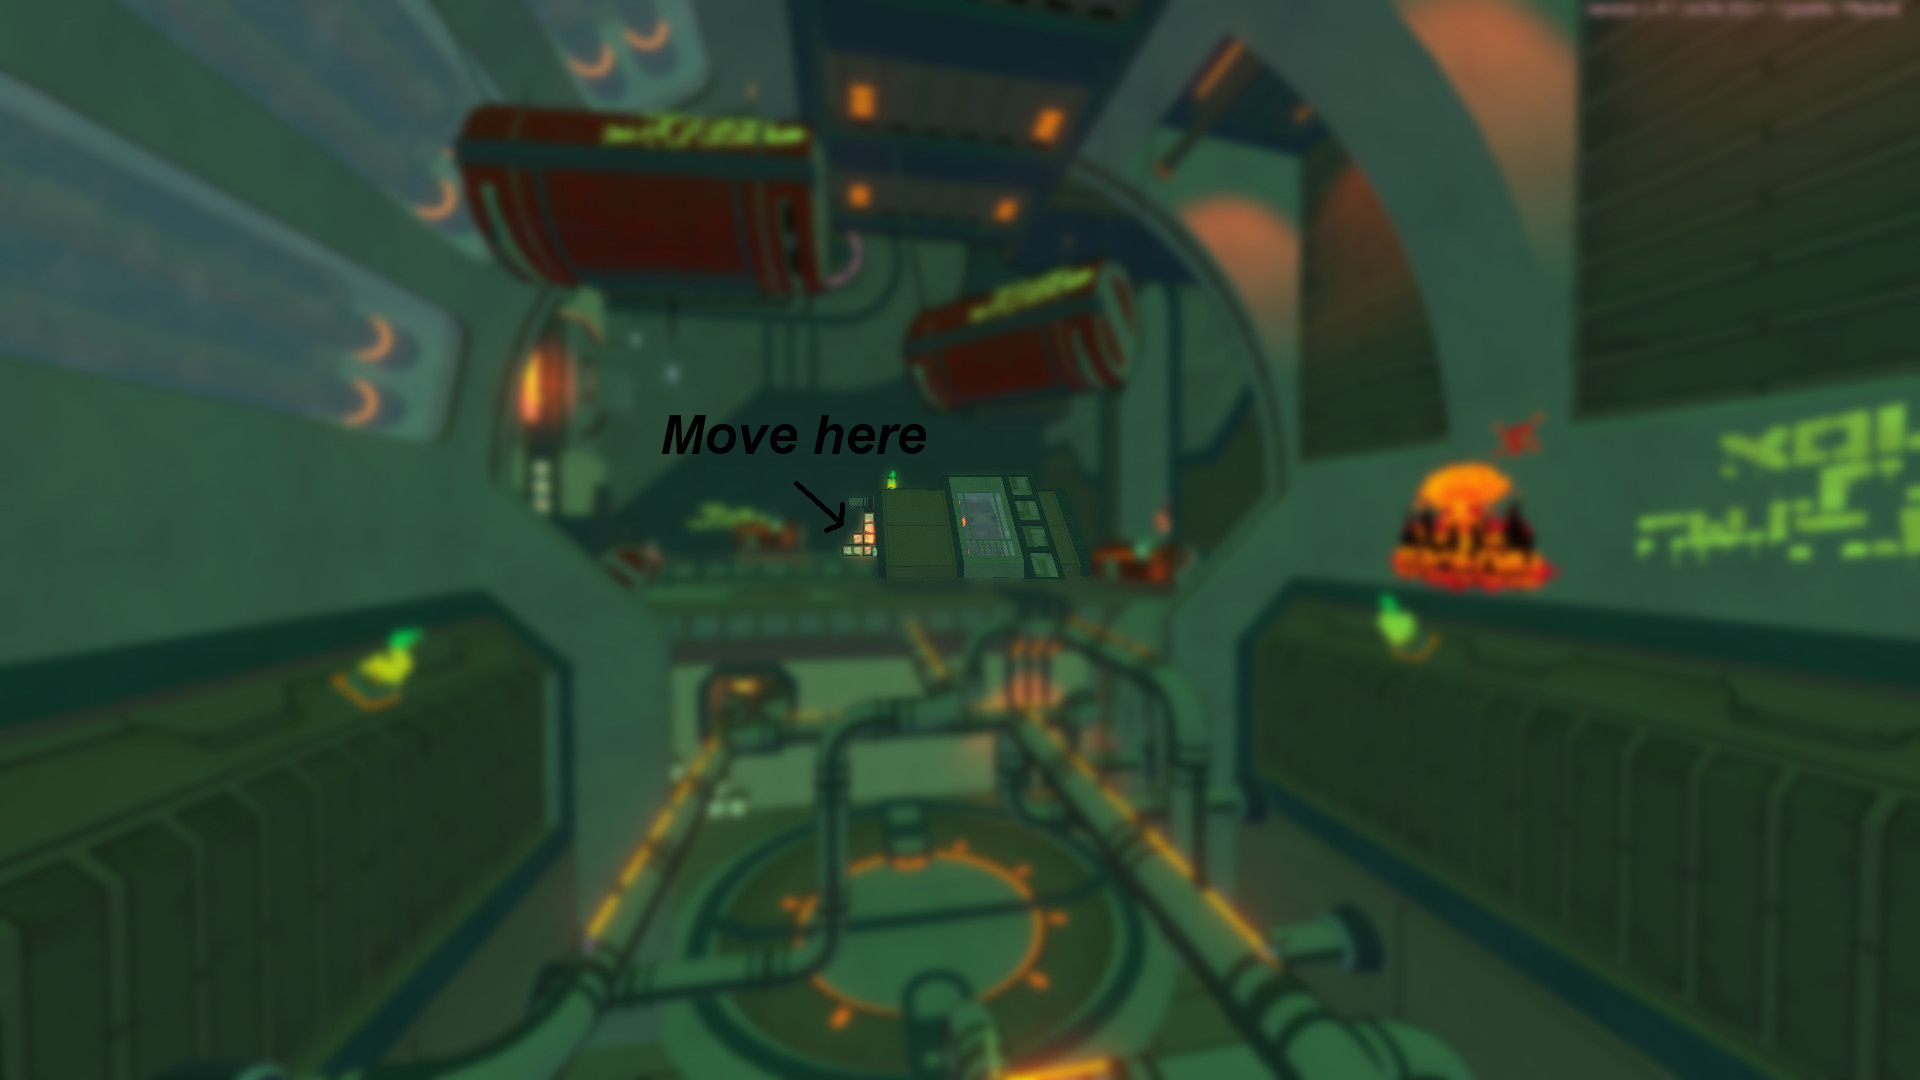
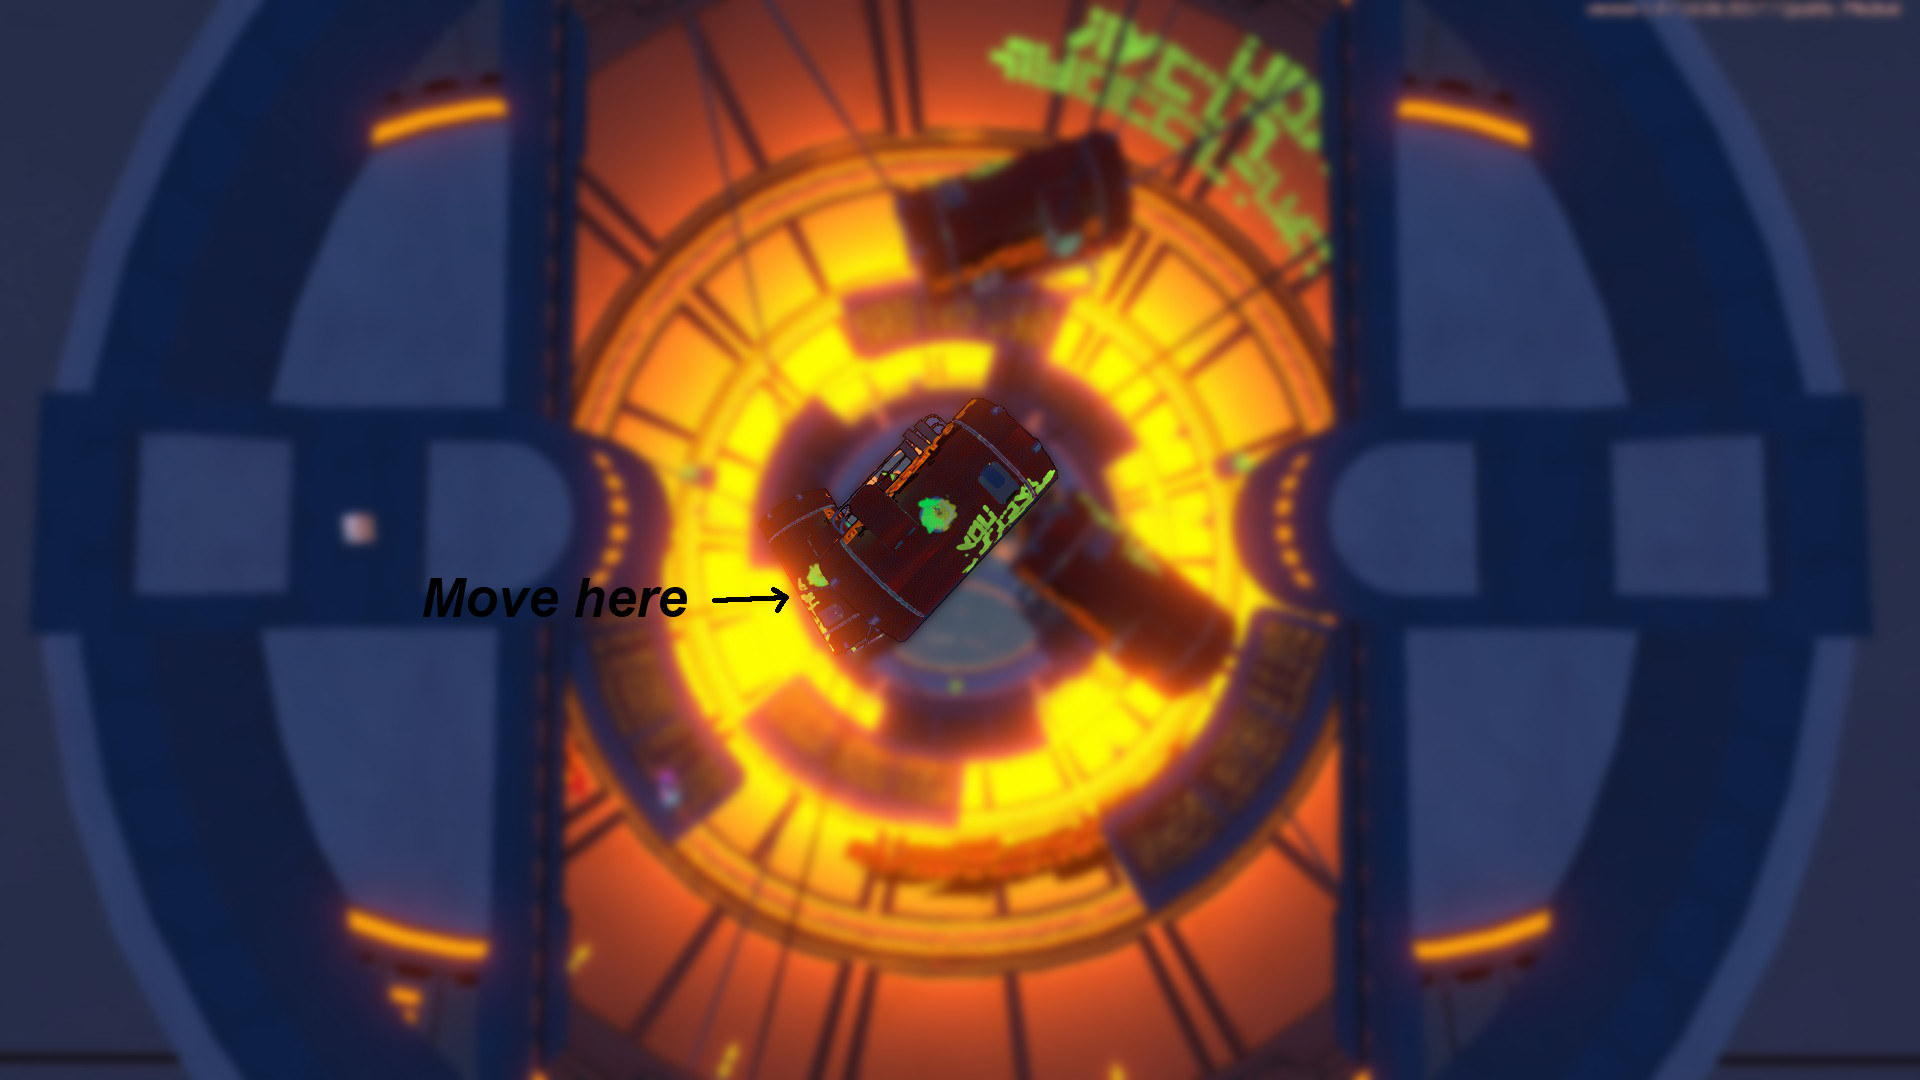
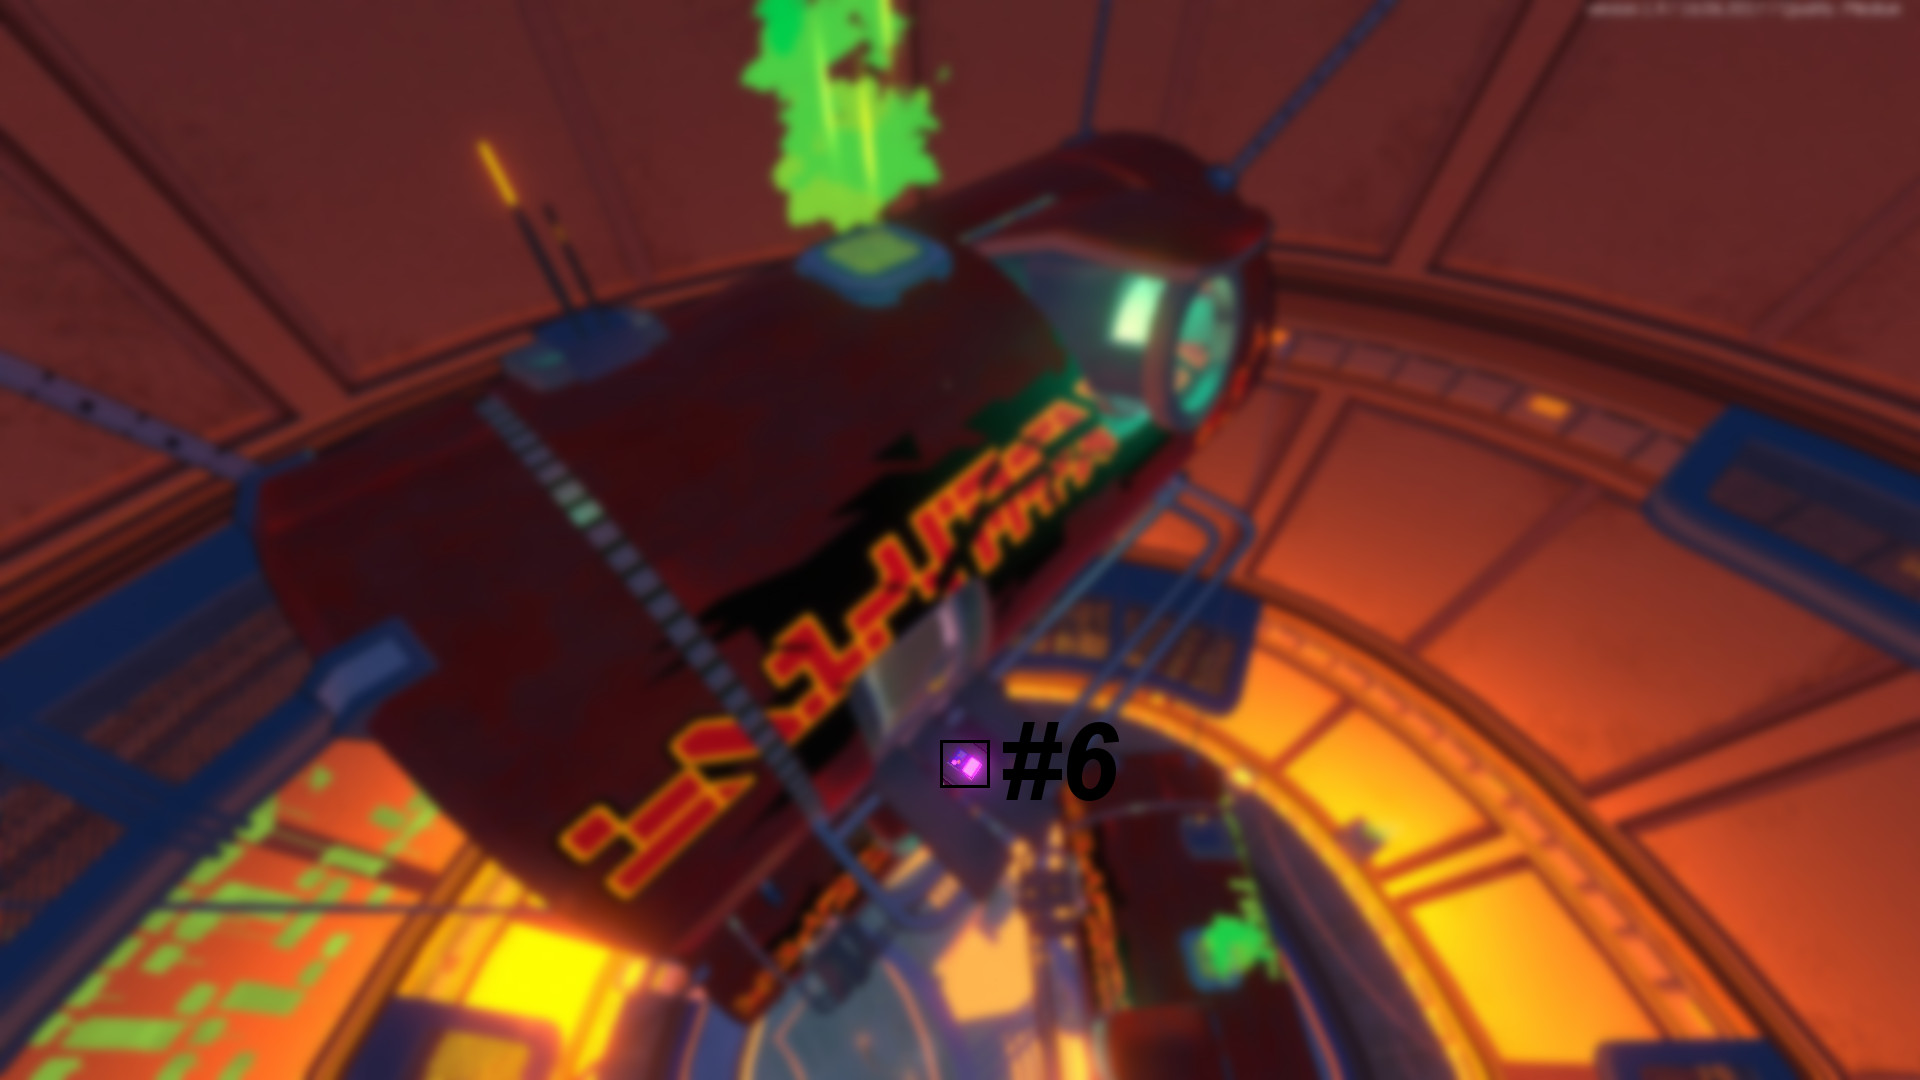
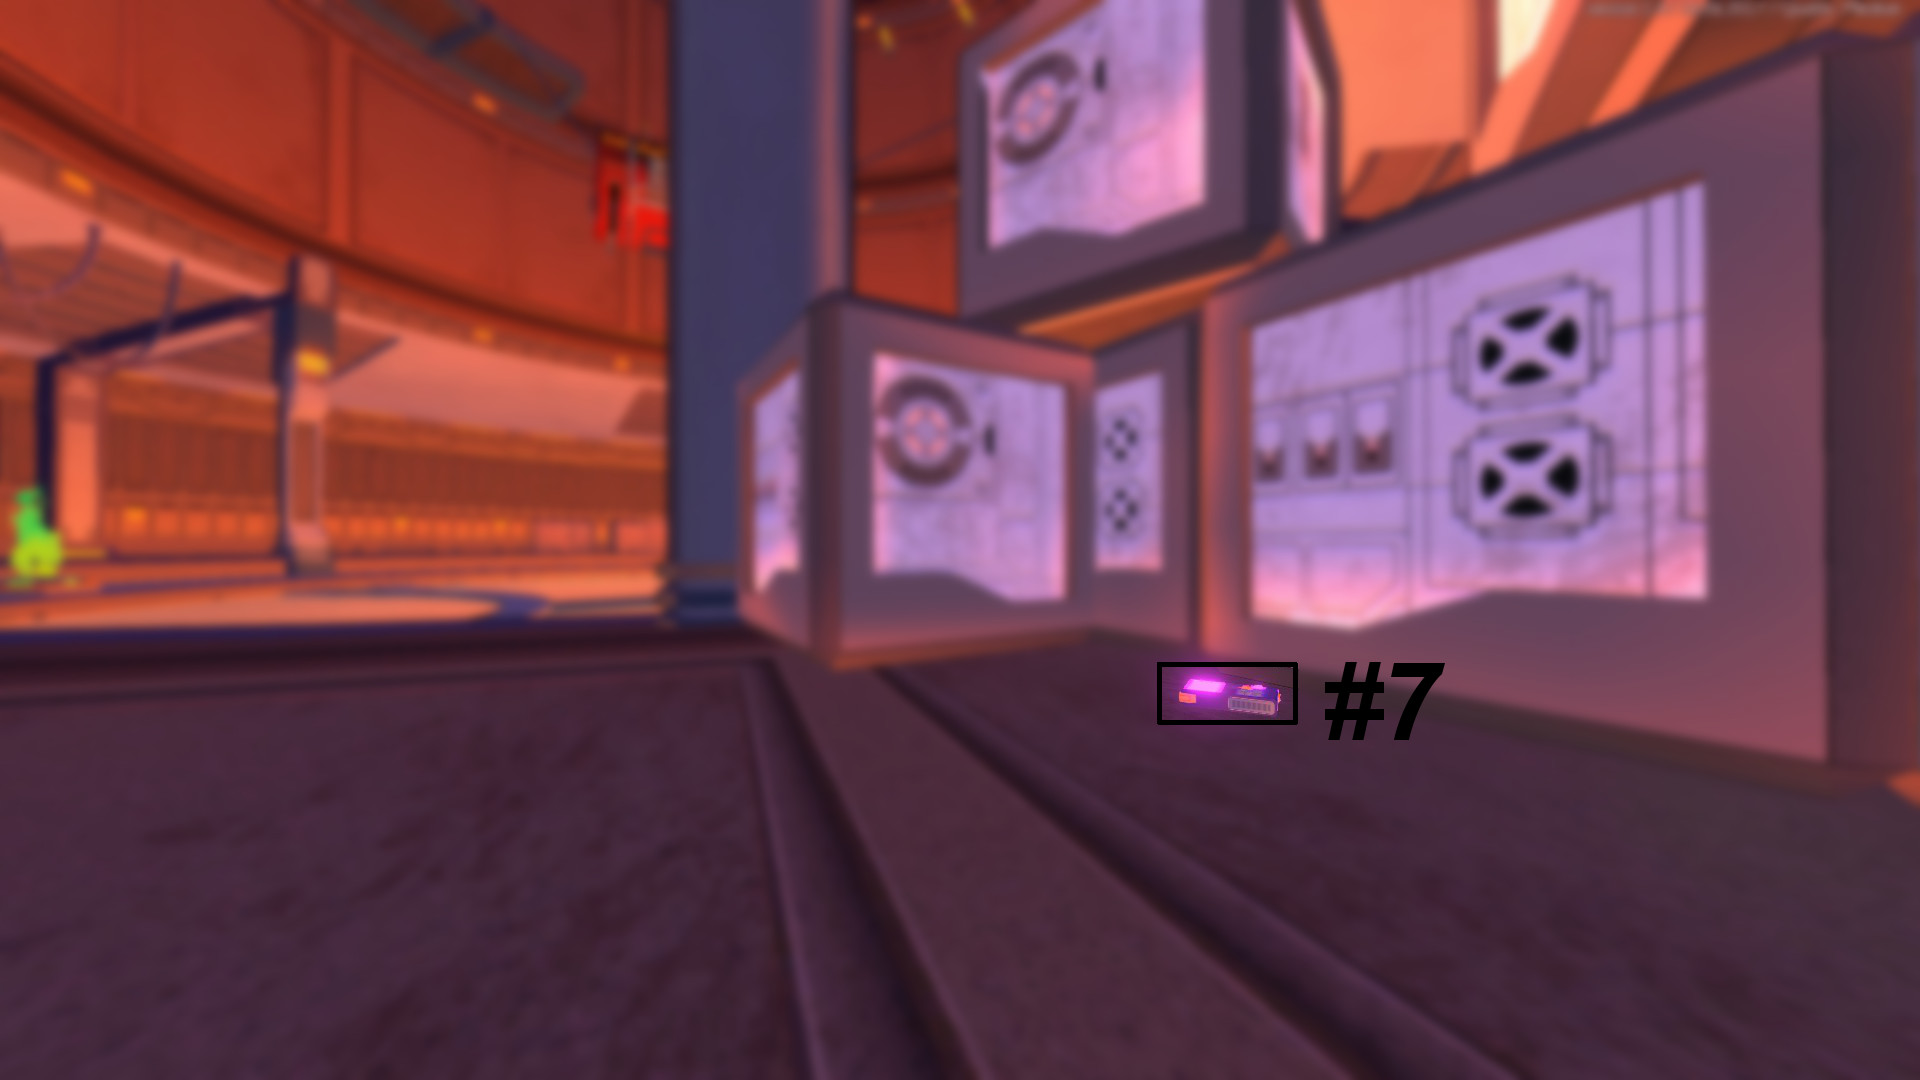
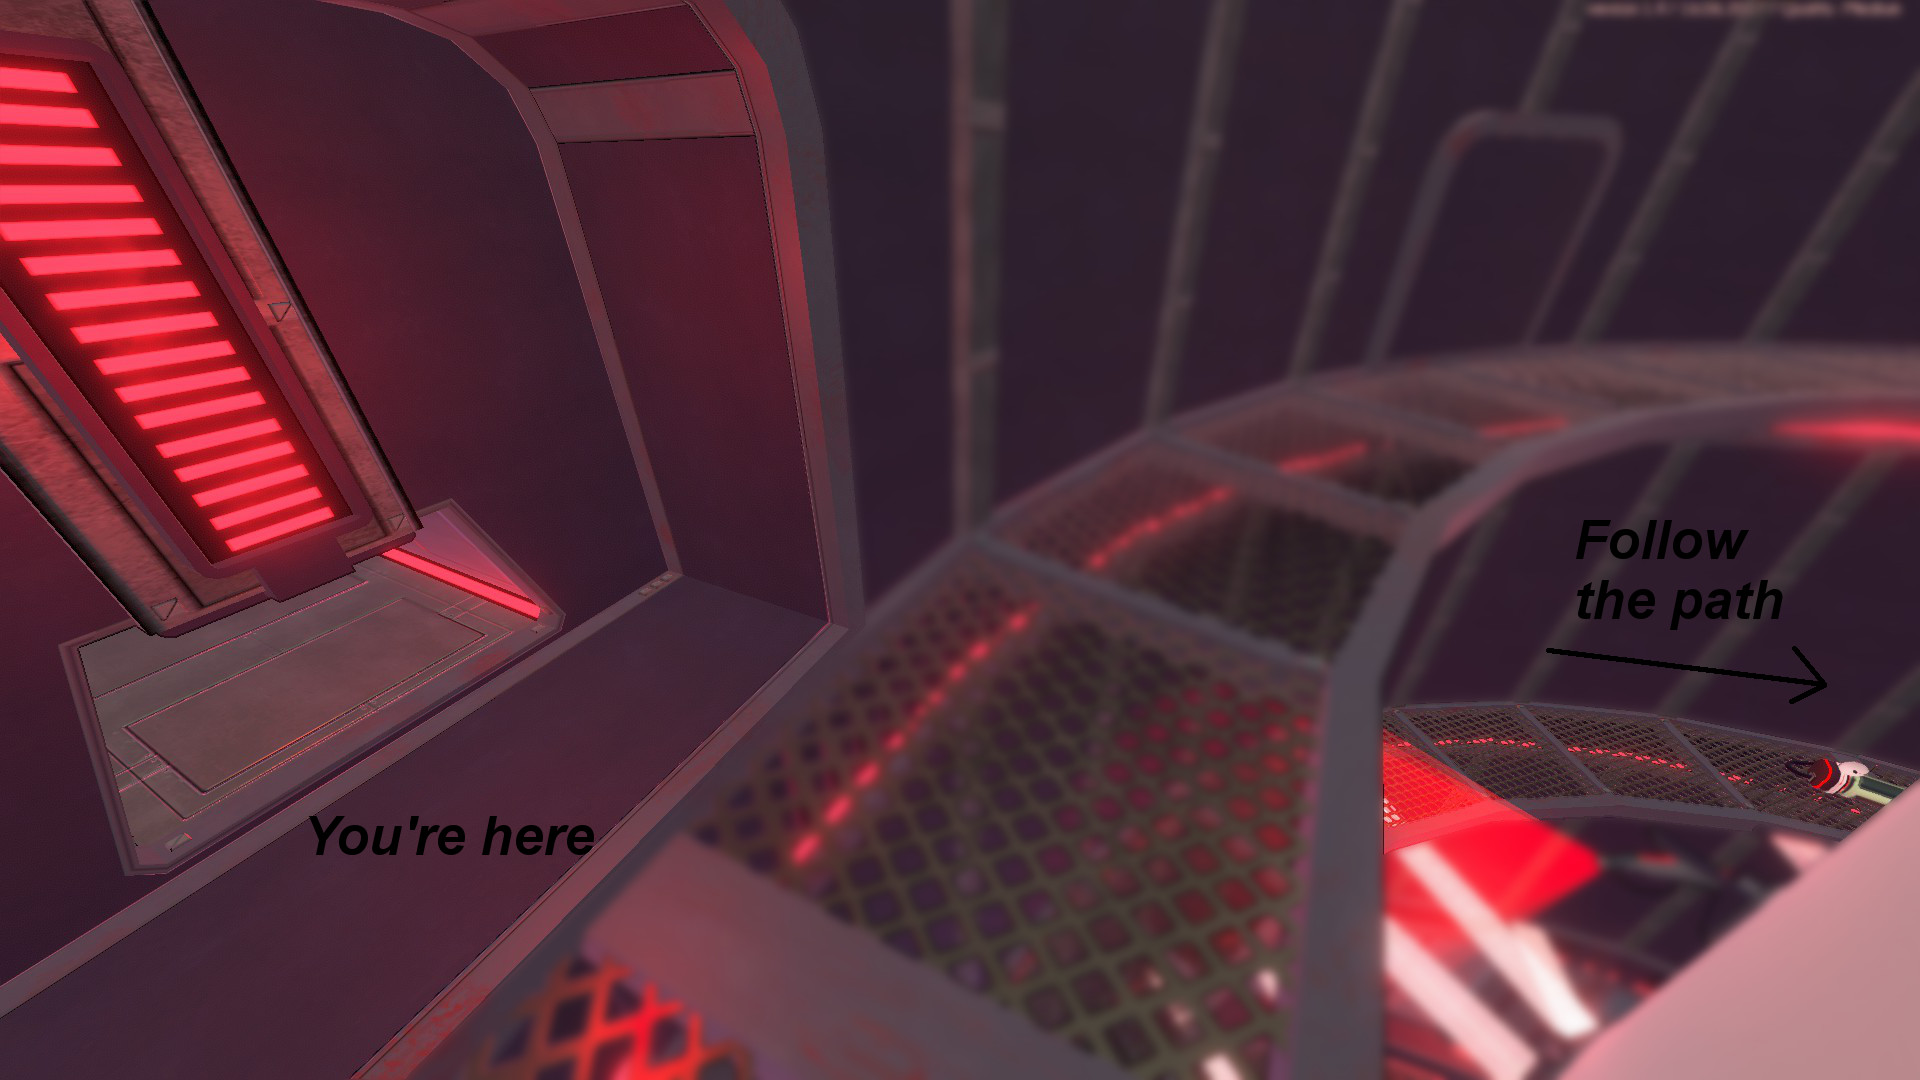
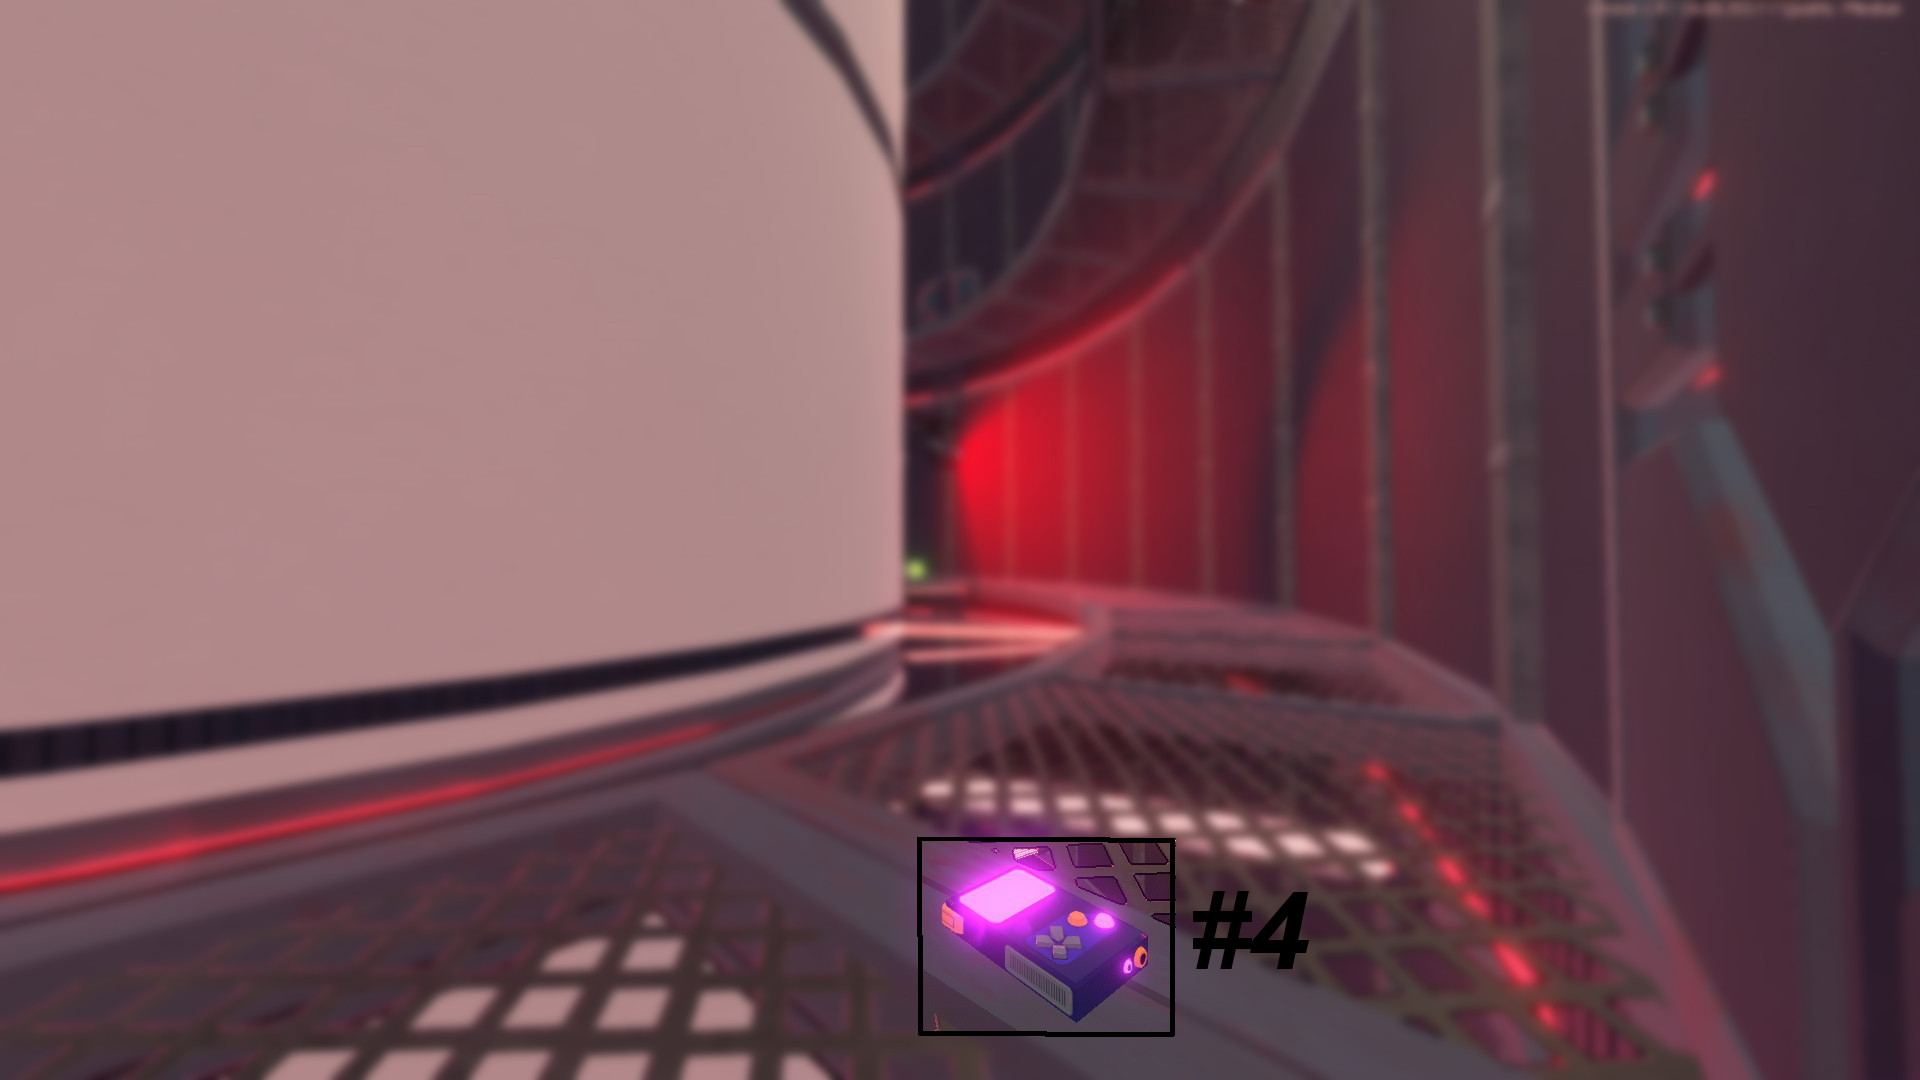
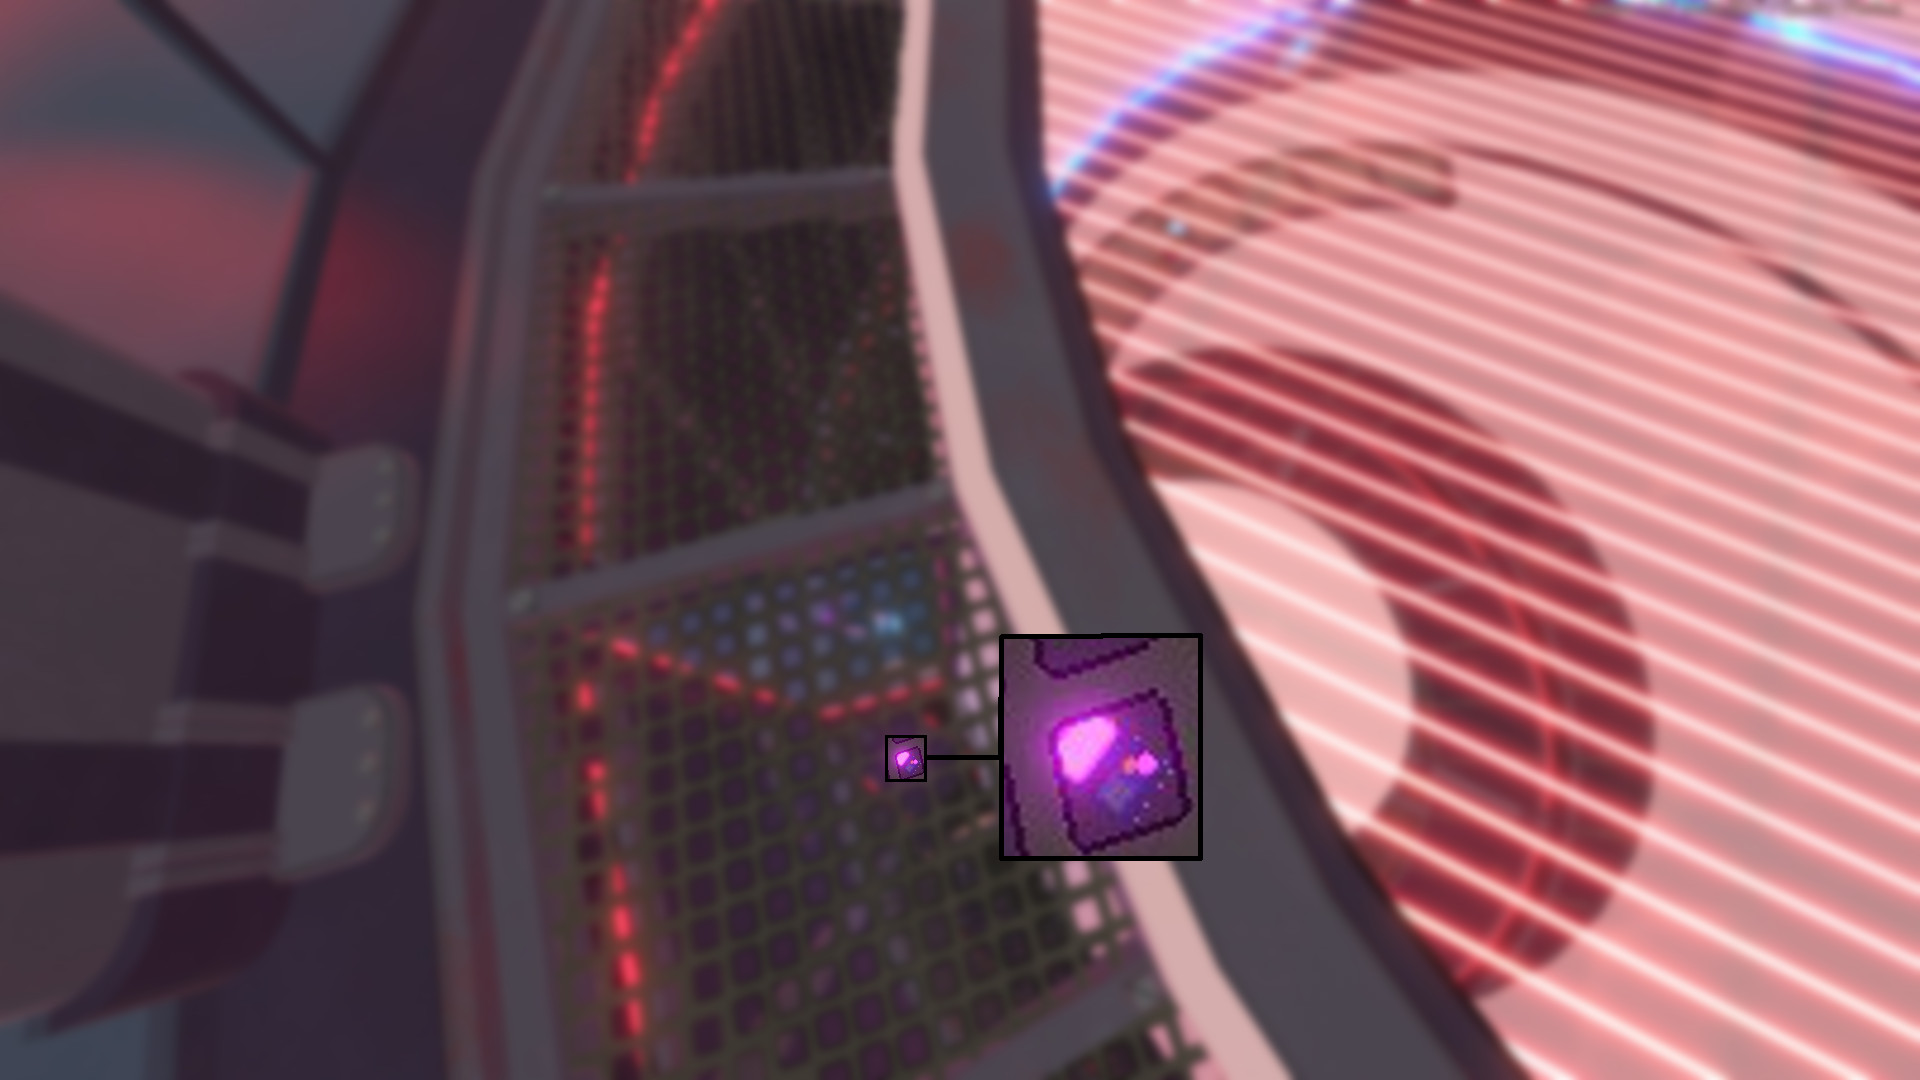
Hopefully Soleil's video guide can help you get there easier? It was rather tricky to describe OS in text since the entire race circuit looks pretty much the same.
Crowbar Jones 4 Aug, 2018 @ 4:35pm 
I've checked everywhere in Freecam, the section referred to in the end is literally nowhere to be found
Nada Afterwards  [author] 13 Aug, 2017 @ 4:09pm 
Guide's finally done! Woo! If anyone is interested in translating it read the new section right before the update log.
Laudy 11 Aug, 2017 @ 11:51am 
Well, the reason why I think the gamegirl isn't in the second vent was because I compared your screenshot to what I found when I was hunting for them. No matter where I looked in the vent, I found nothing other than an inconspicuously glowing patch.
Nada Afterwards  [author] 11 Aug, 2017 @ 11:37am 
I've also noticed Theihe's guide has recieved some new comments, although it has not been anything bad I'd like to remind you all to please respect Theihe's decision and to not flood them with questions. If this were to happen I'll be forced to remove the link to their guide. And who knows, they might decide to make theirs private too so please be considerate when commenting on their guide ^^

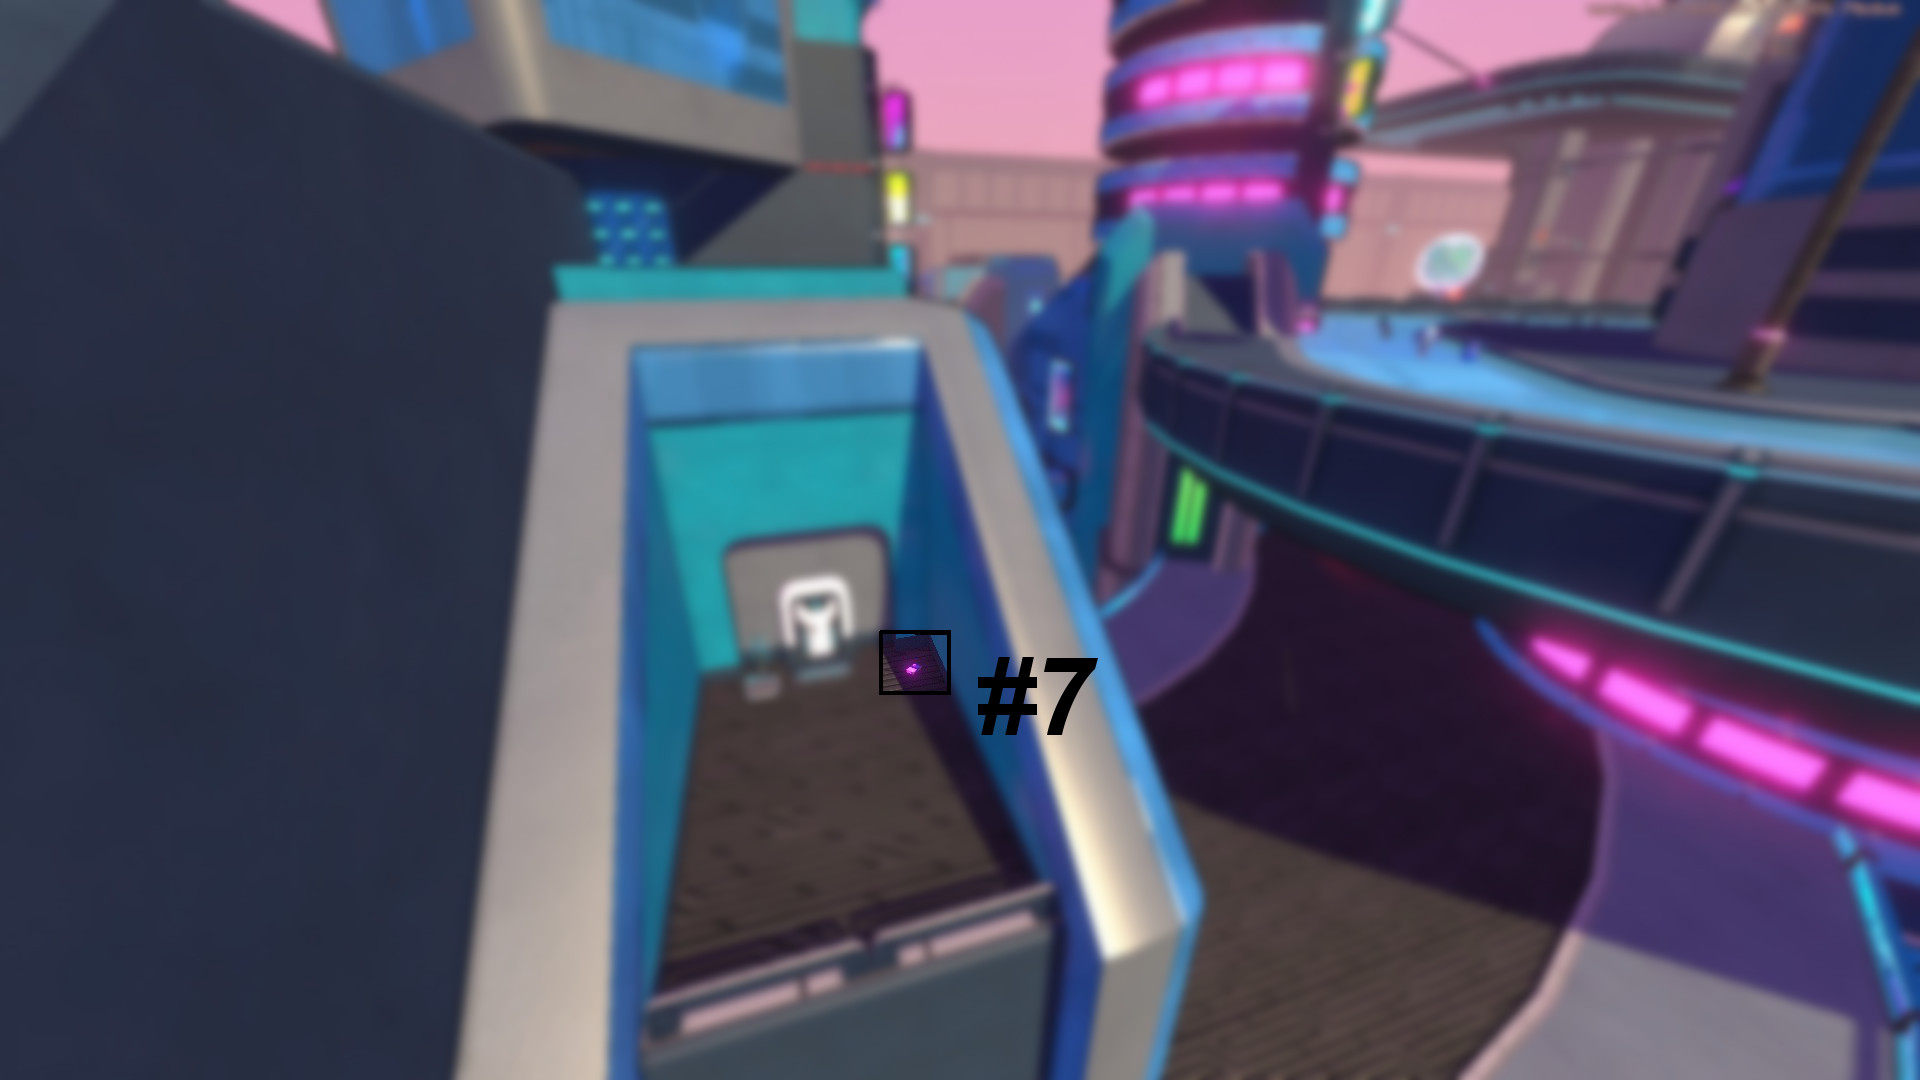
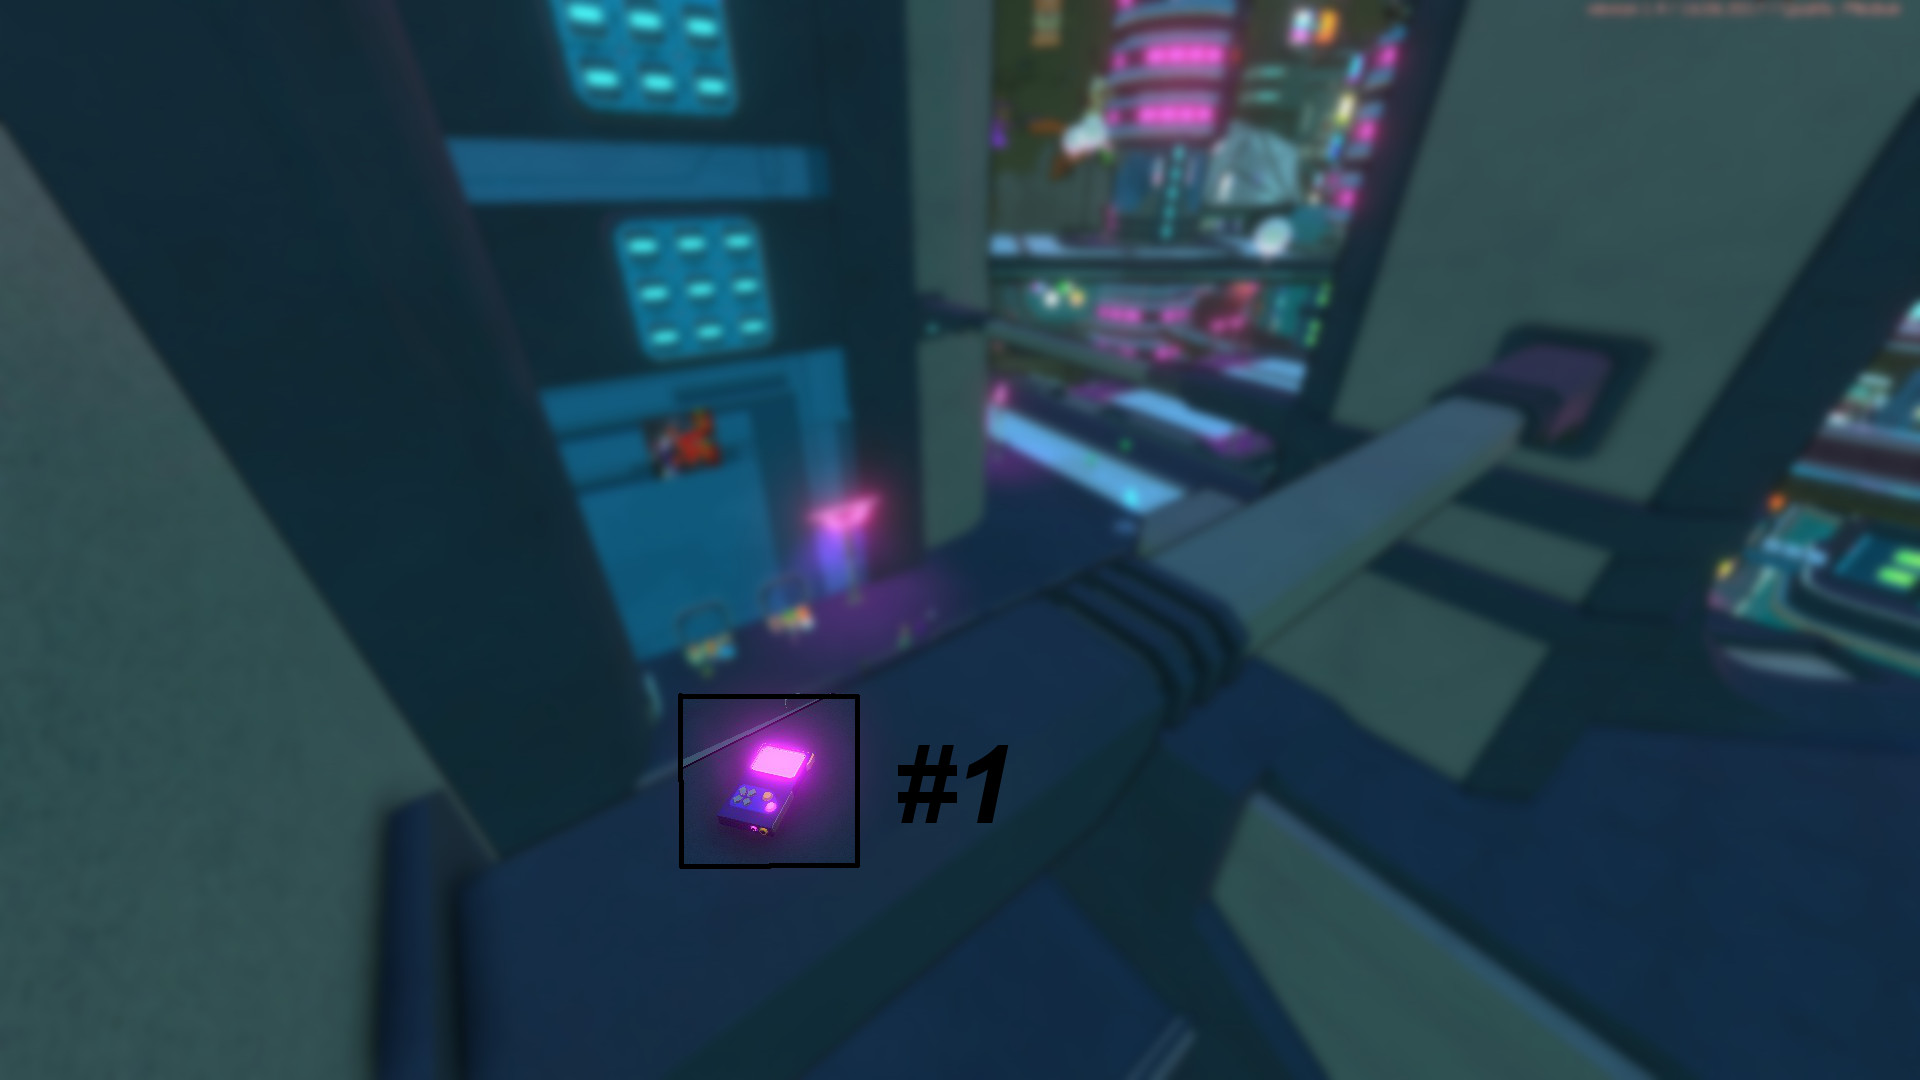
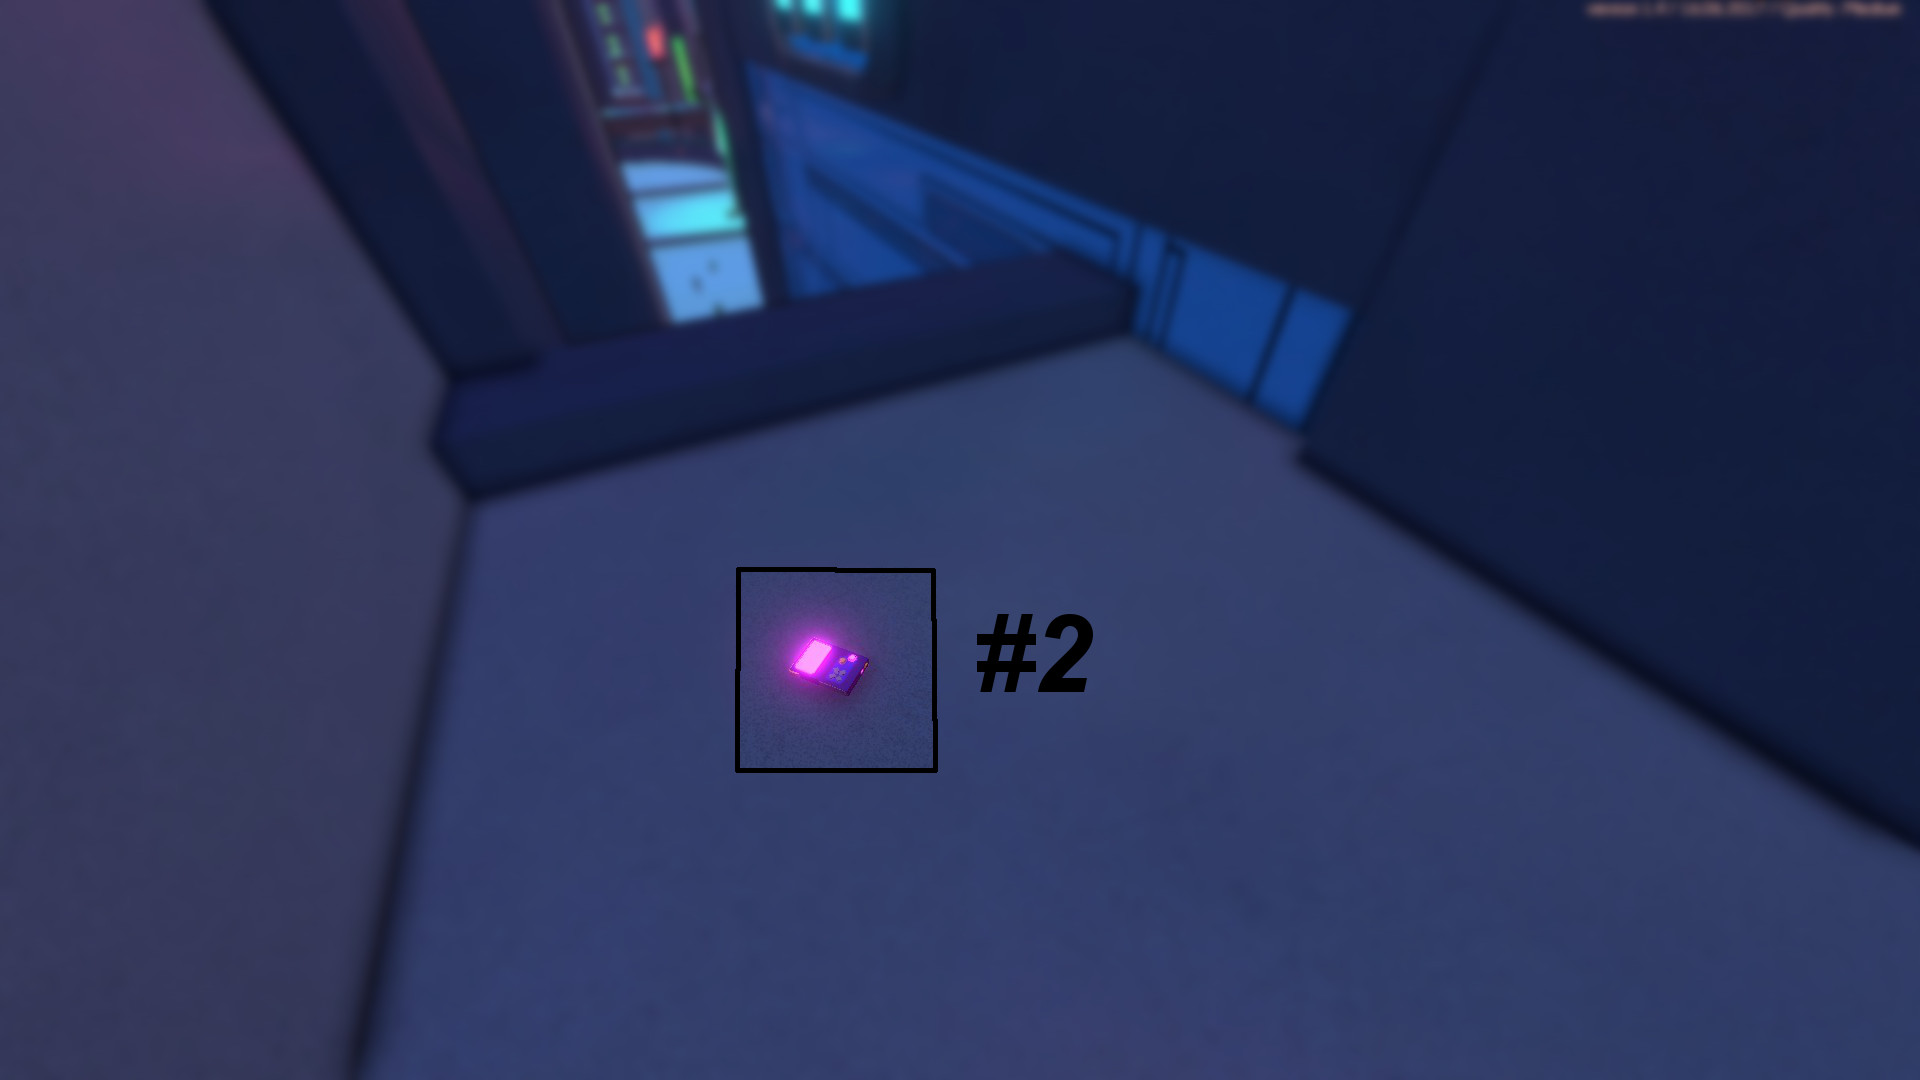
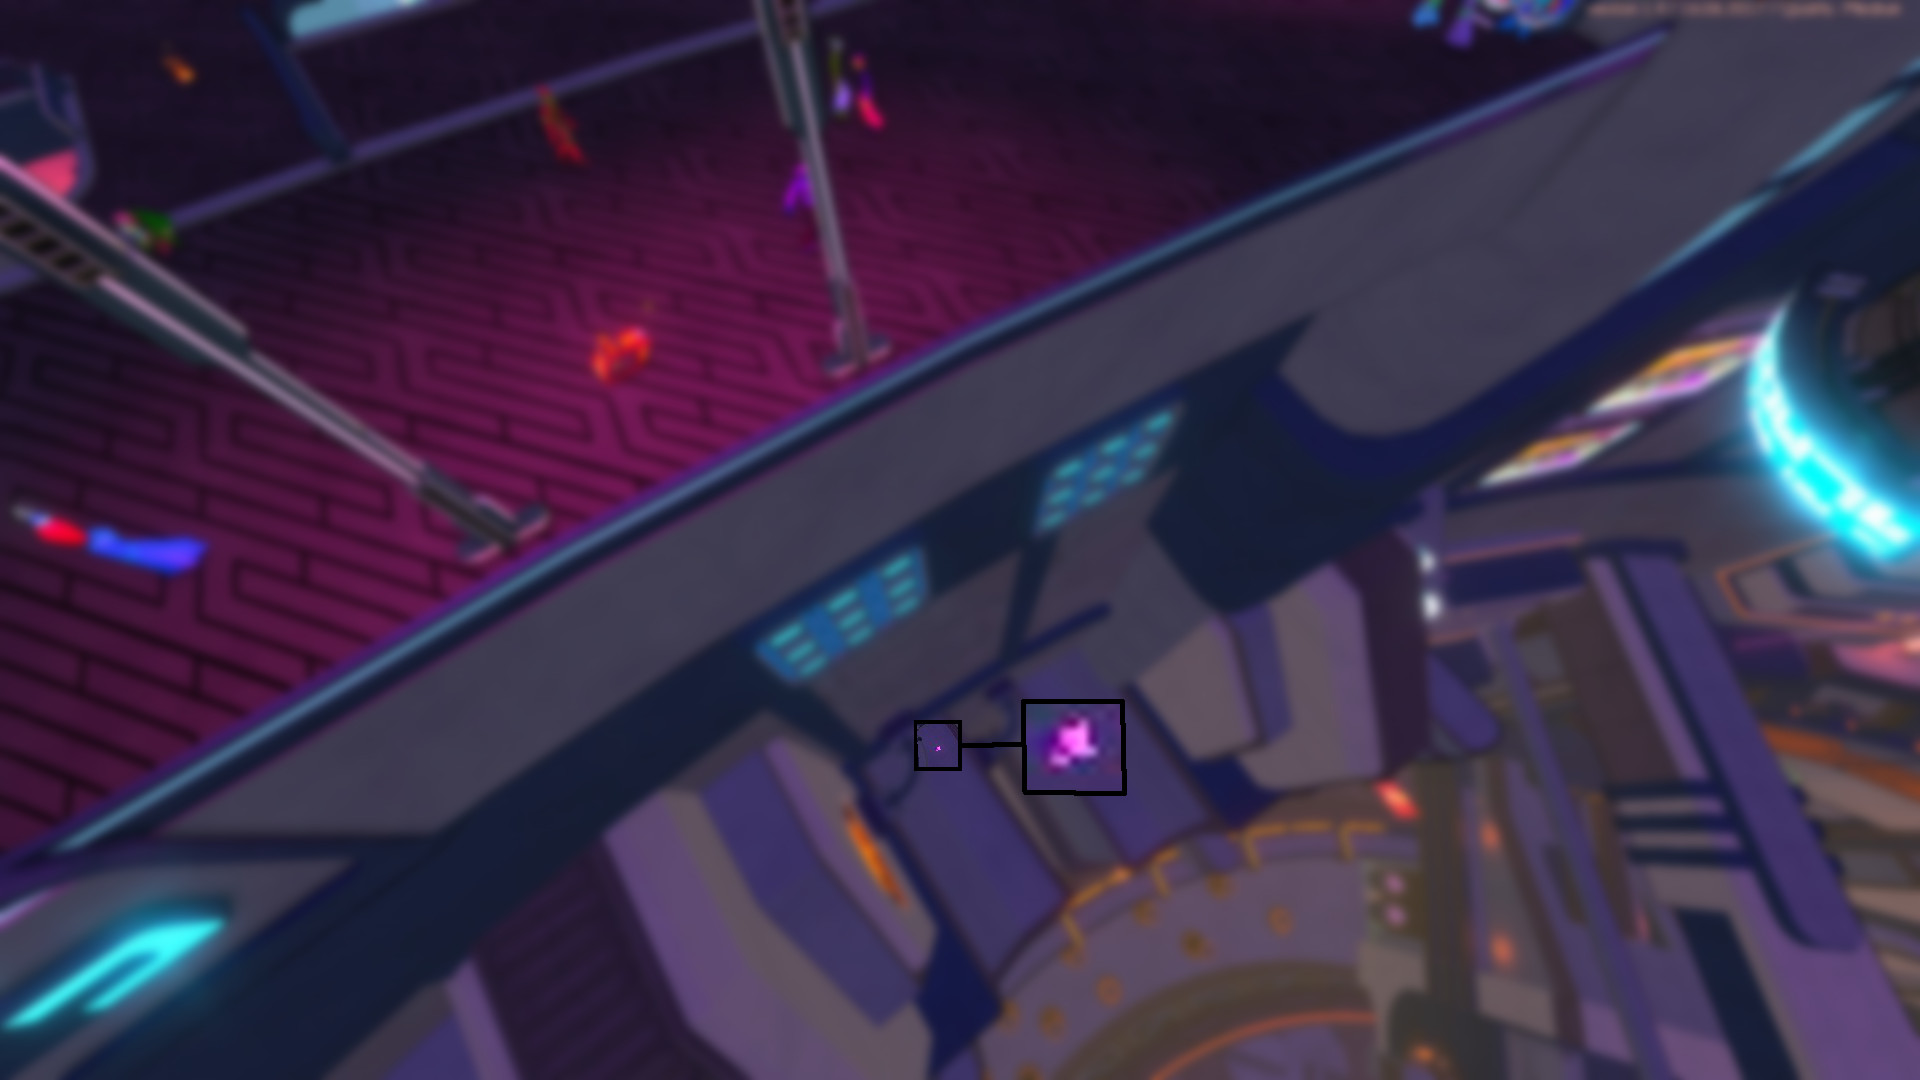
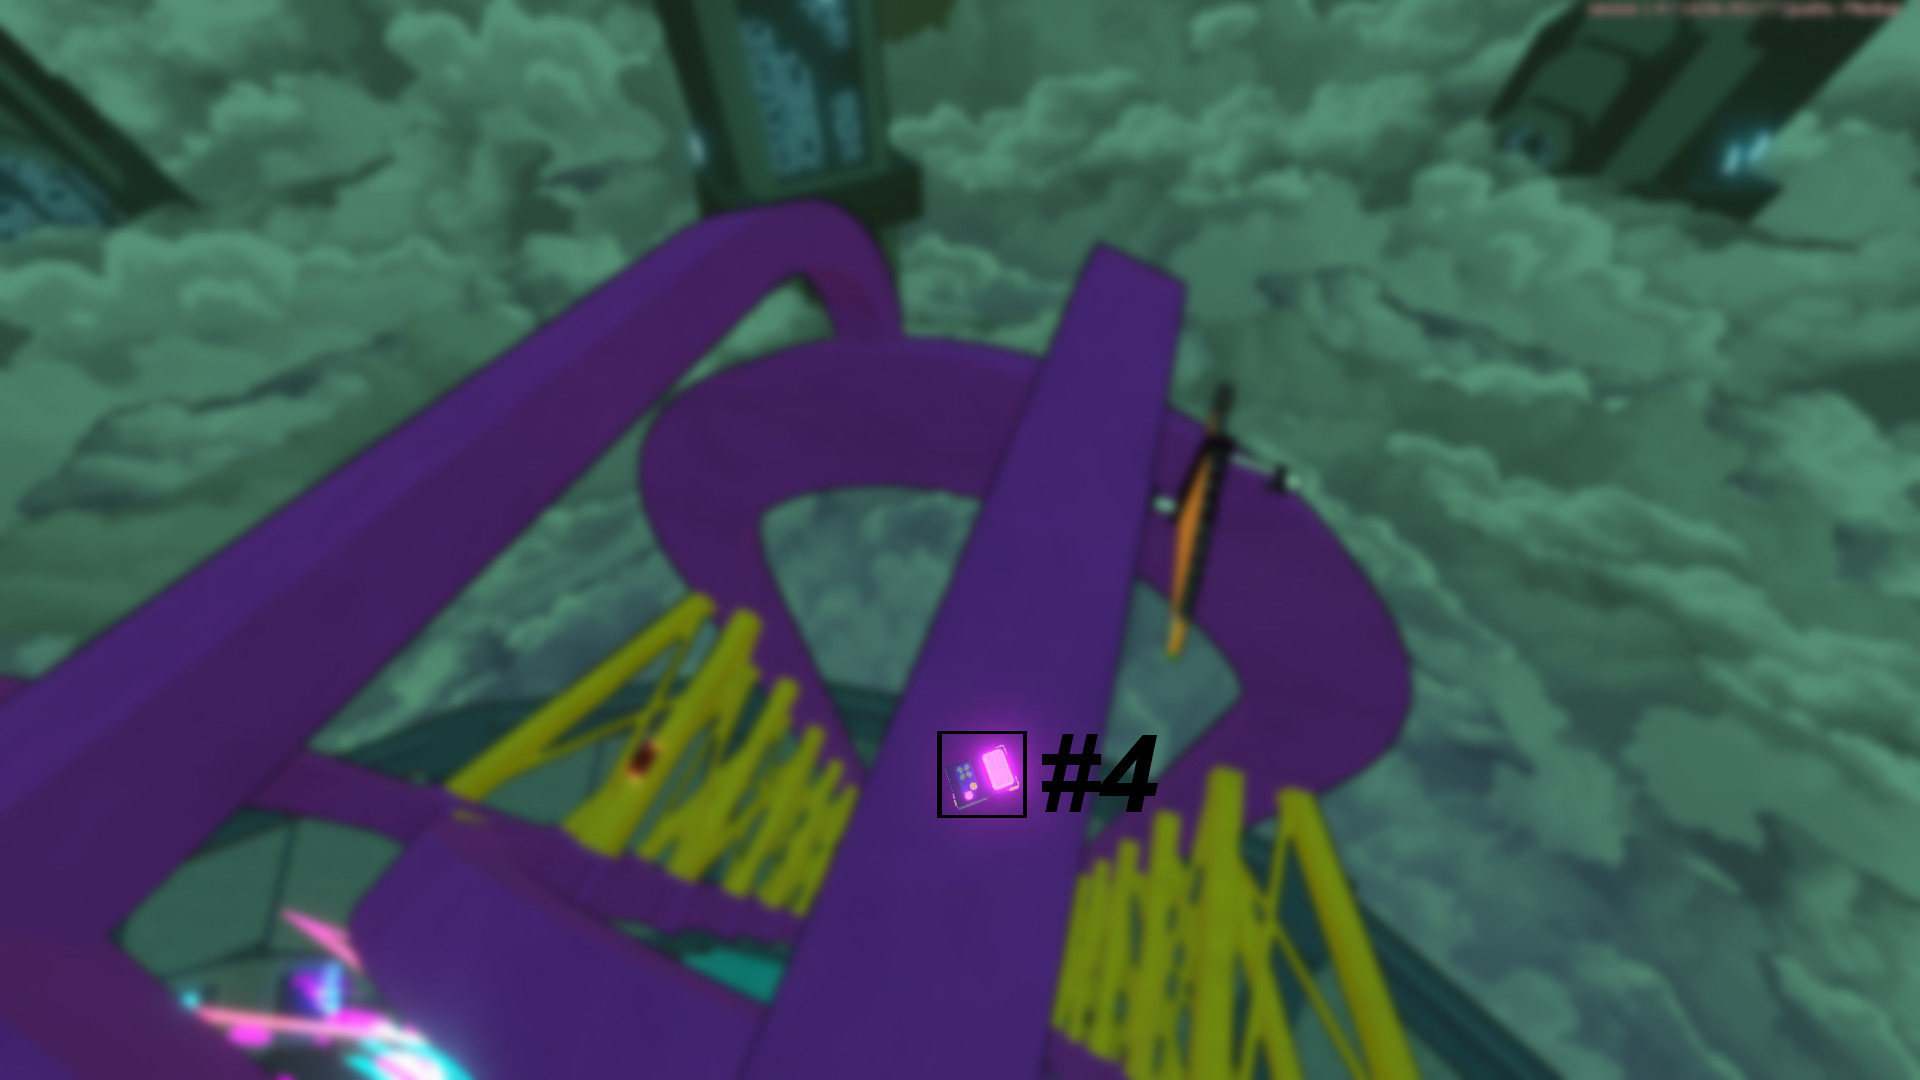
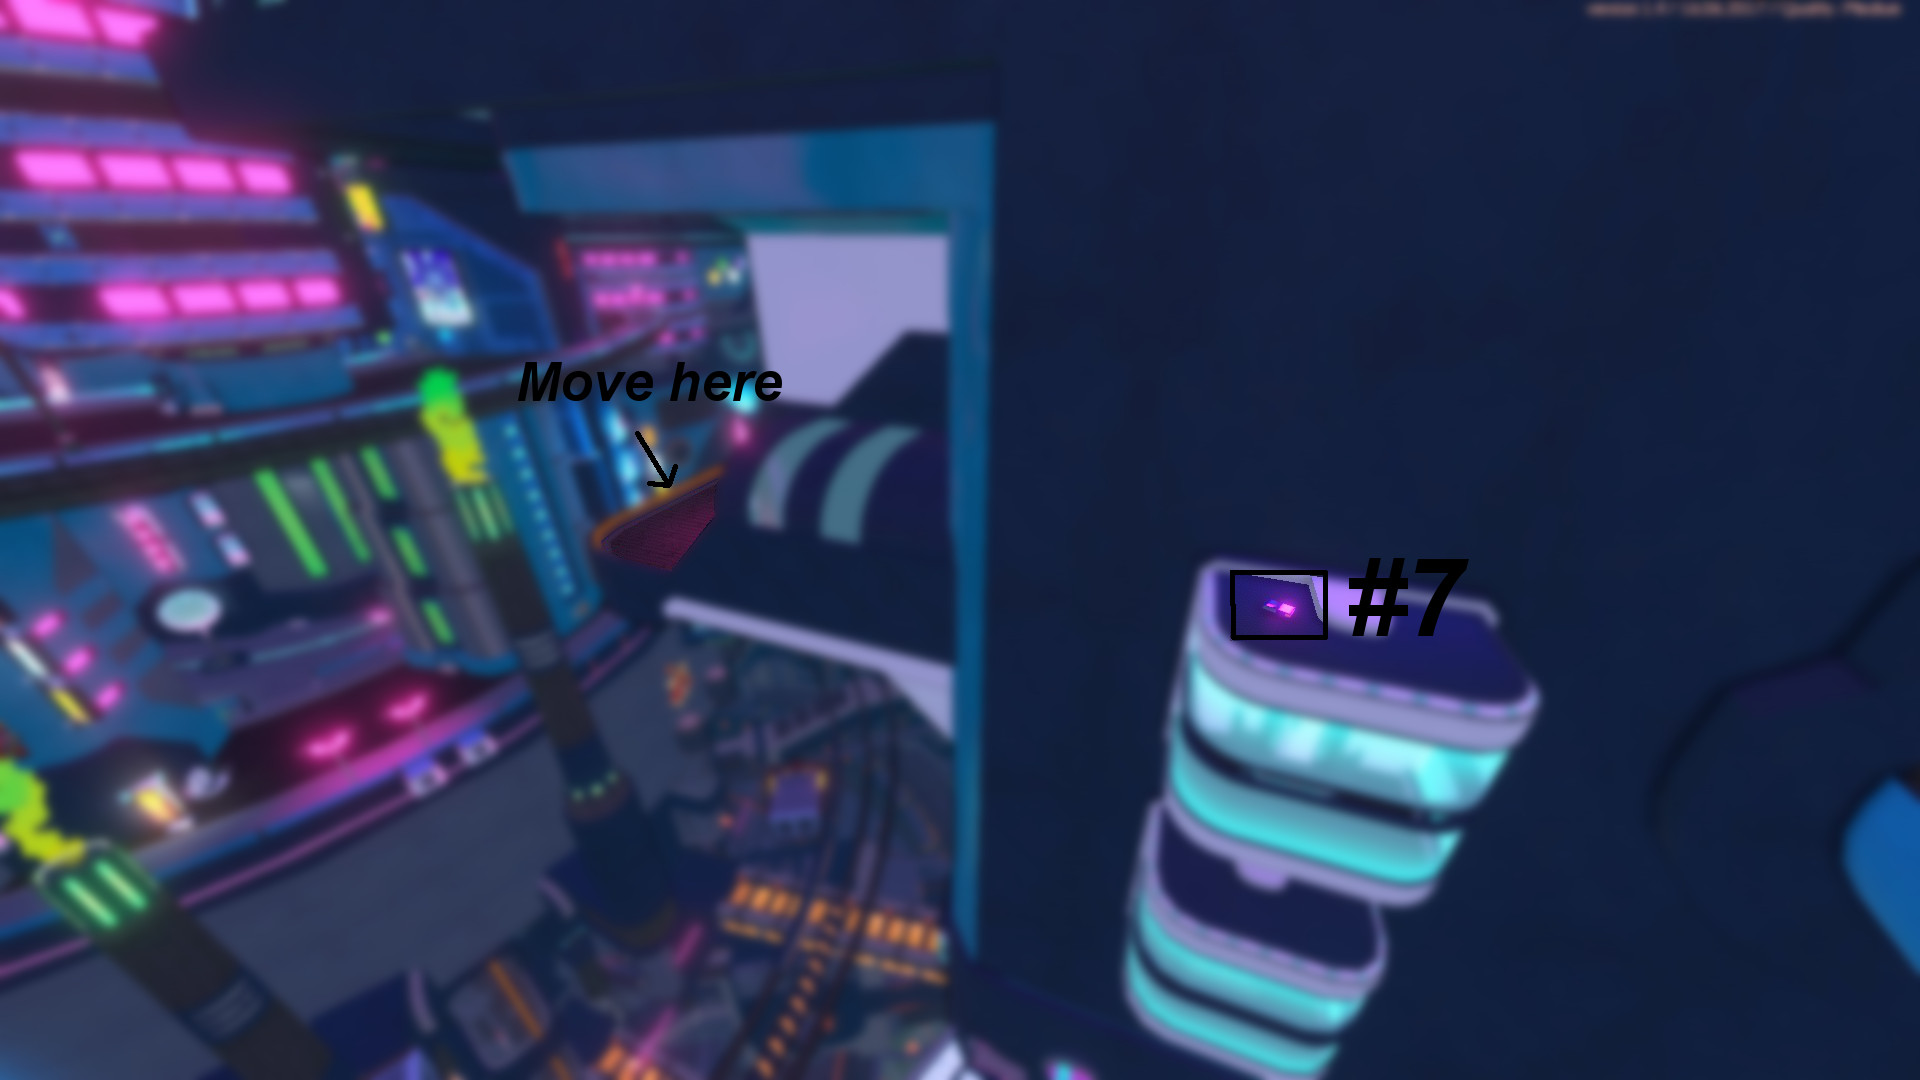
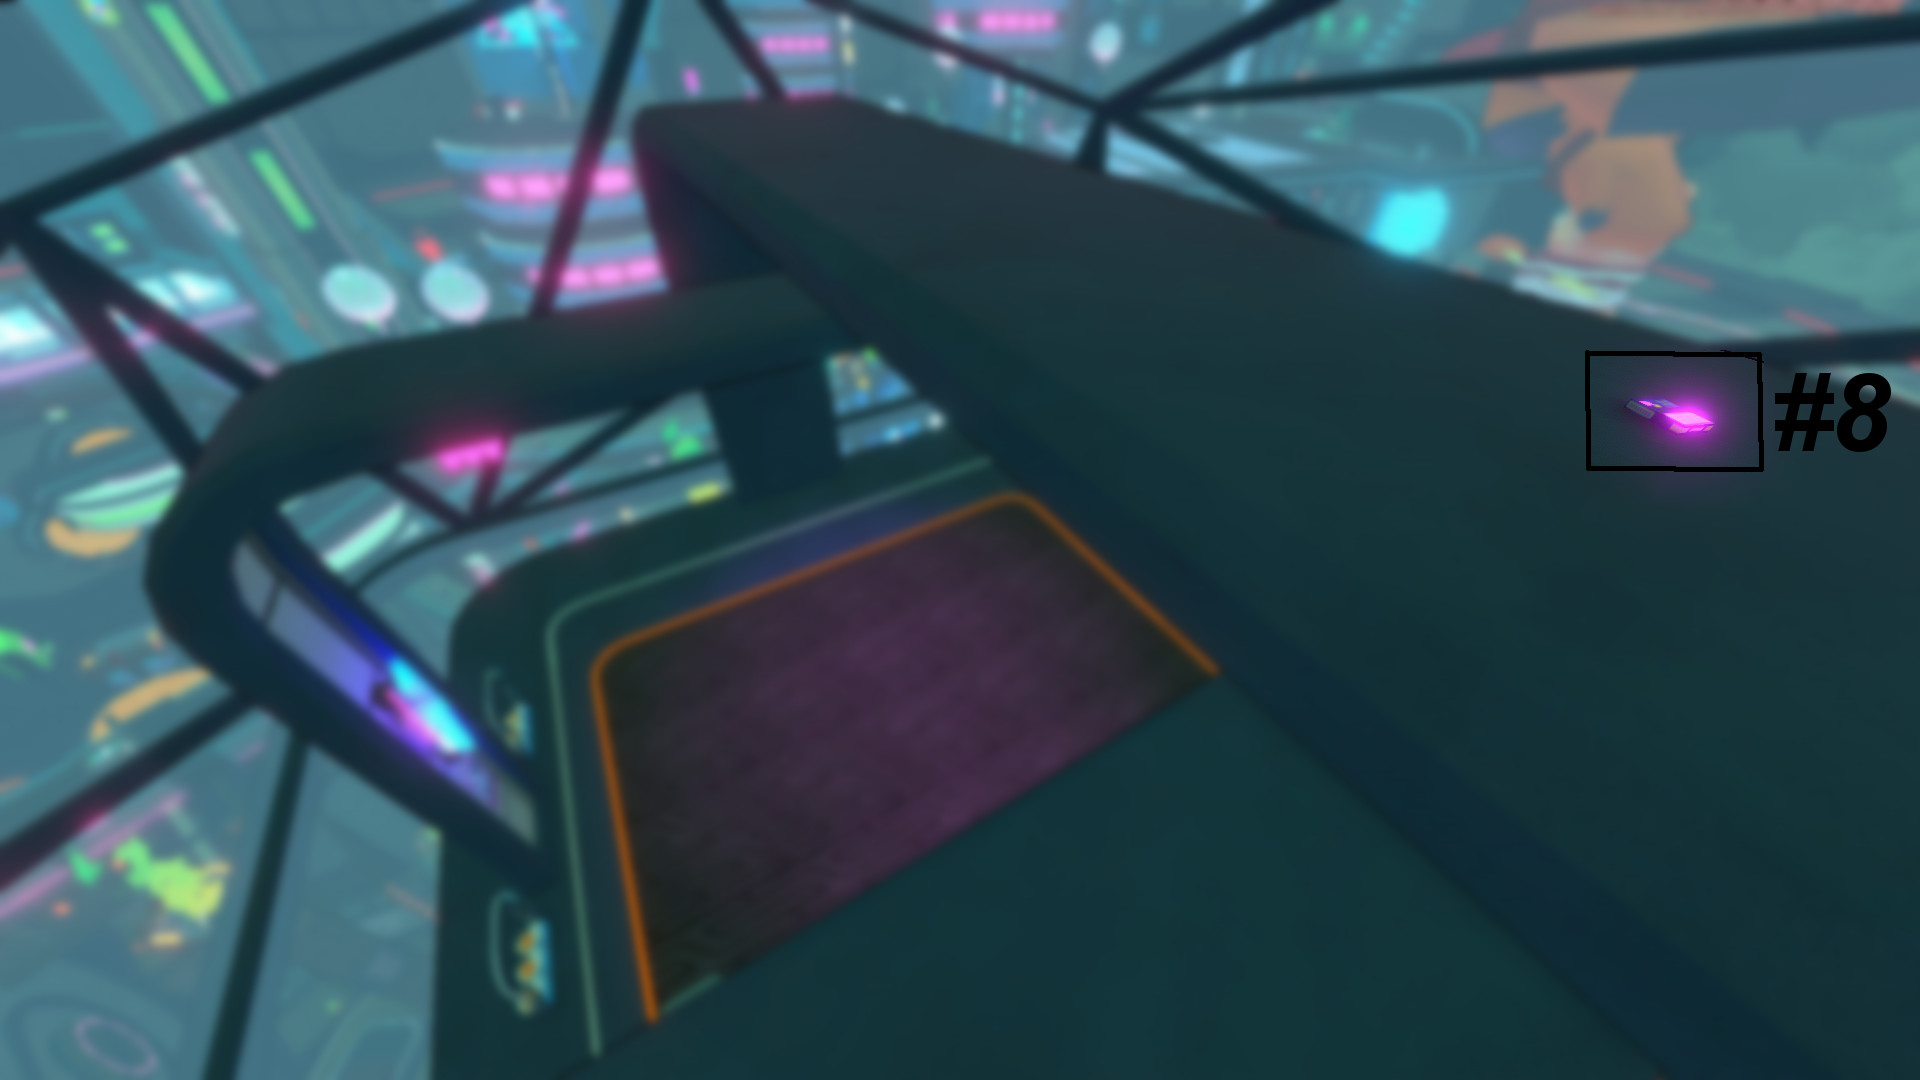
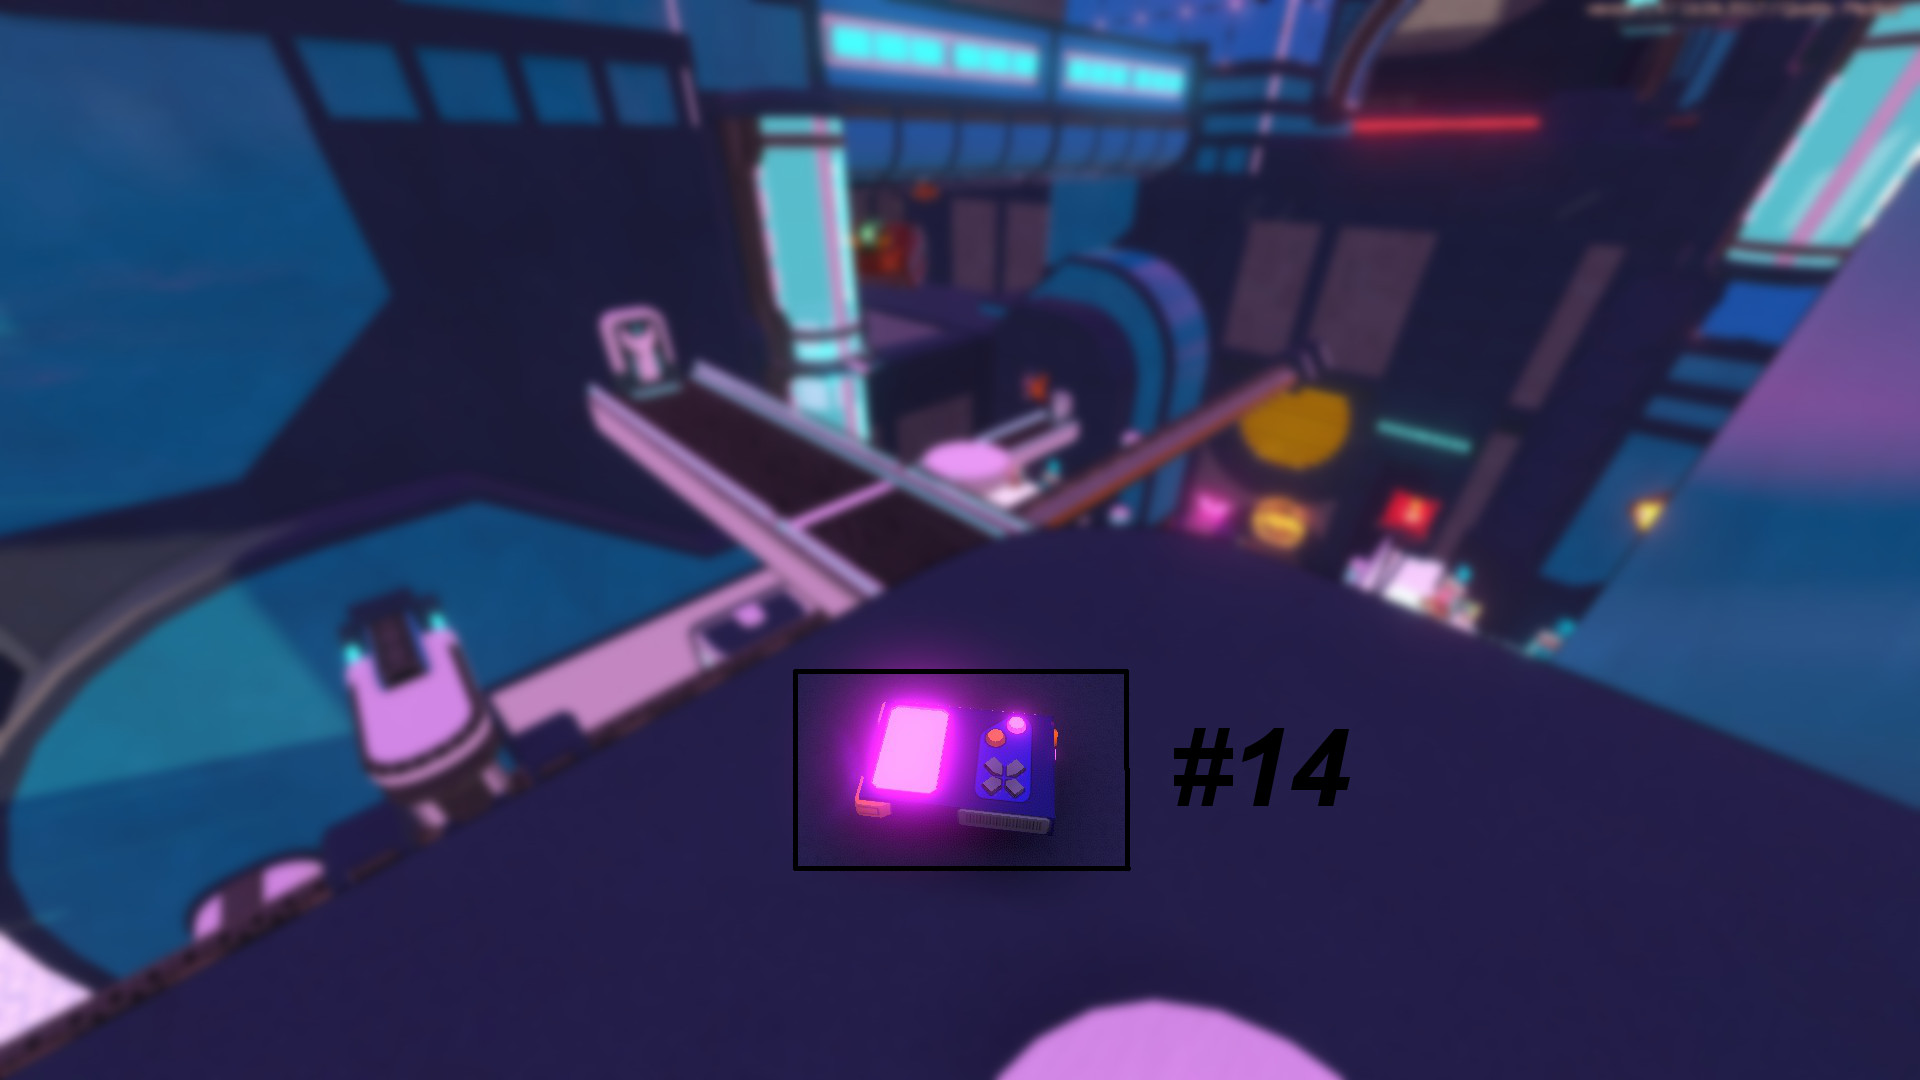
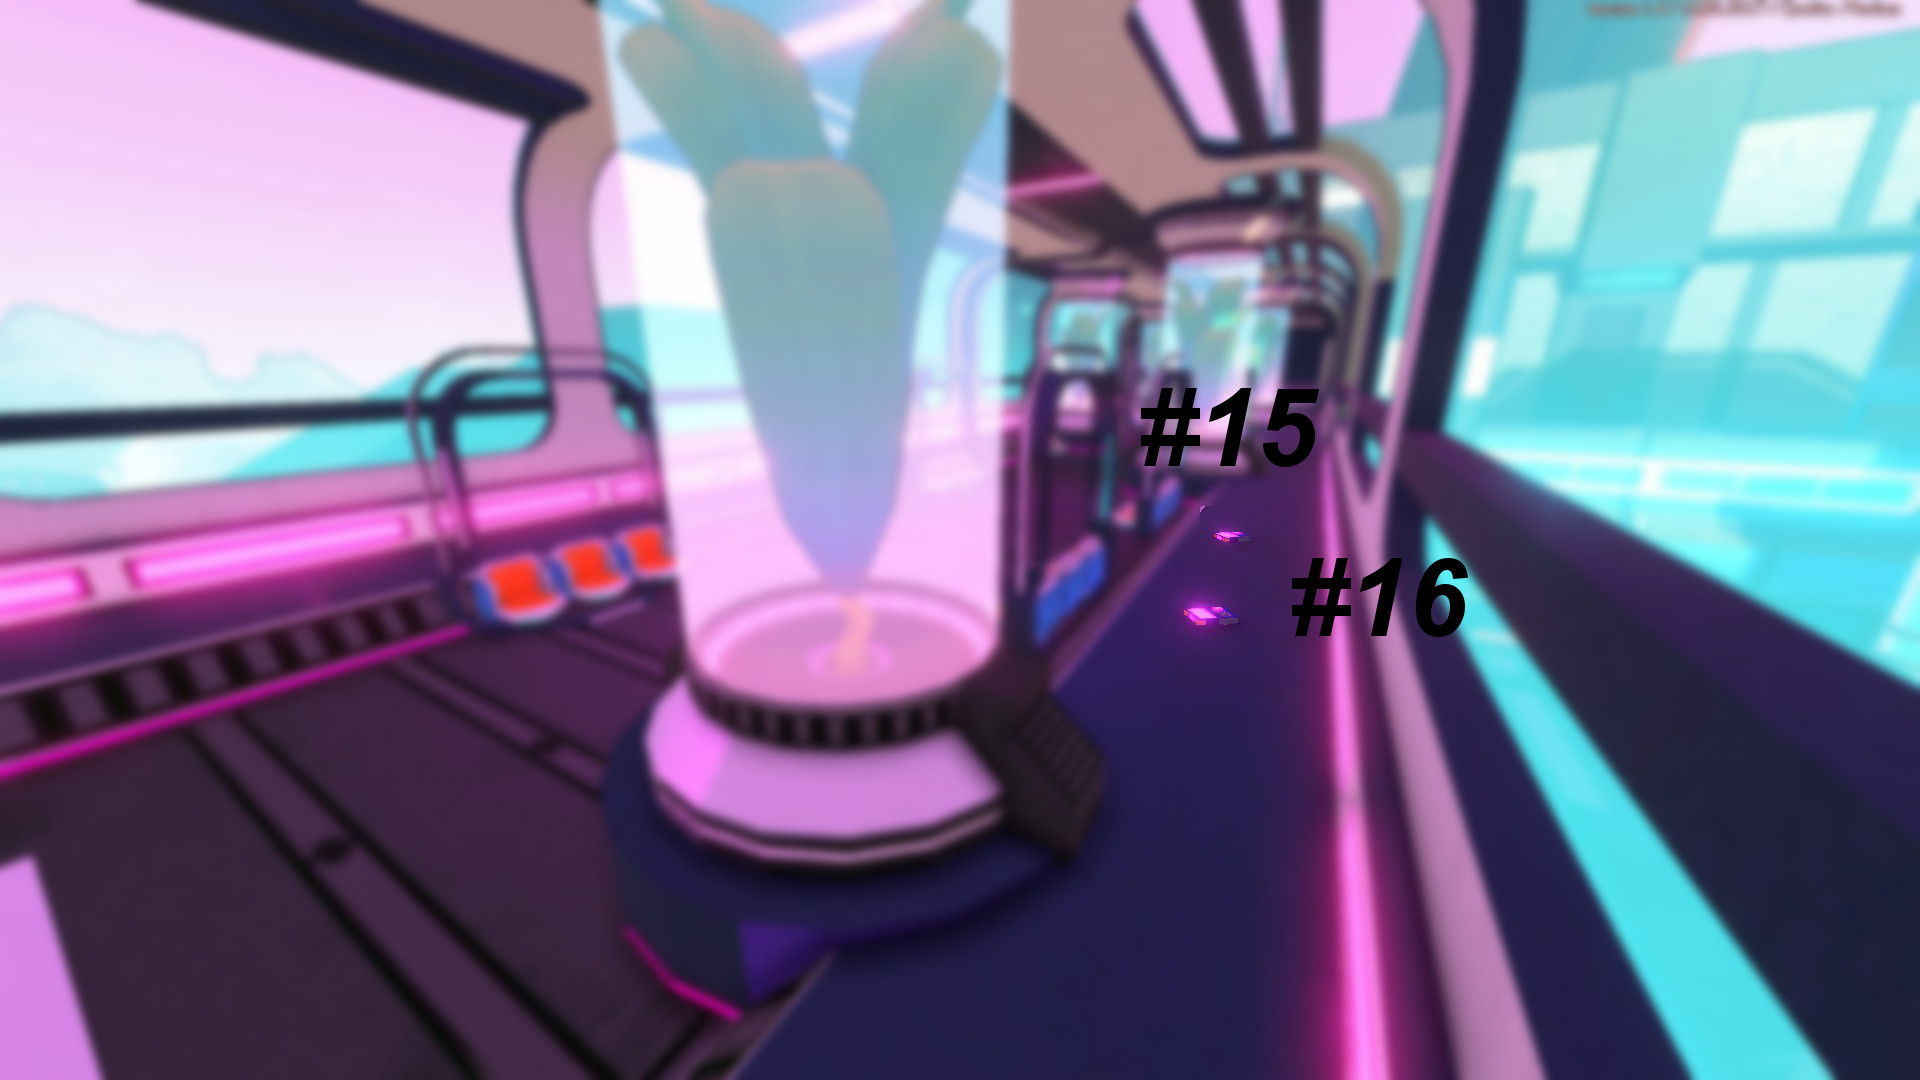
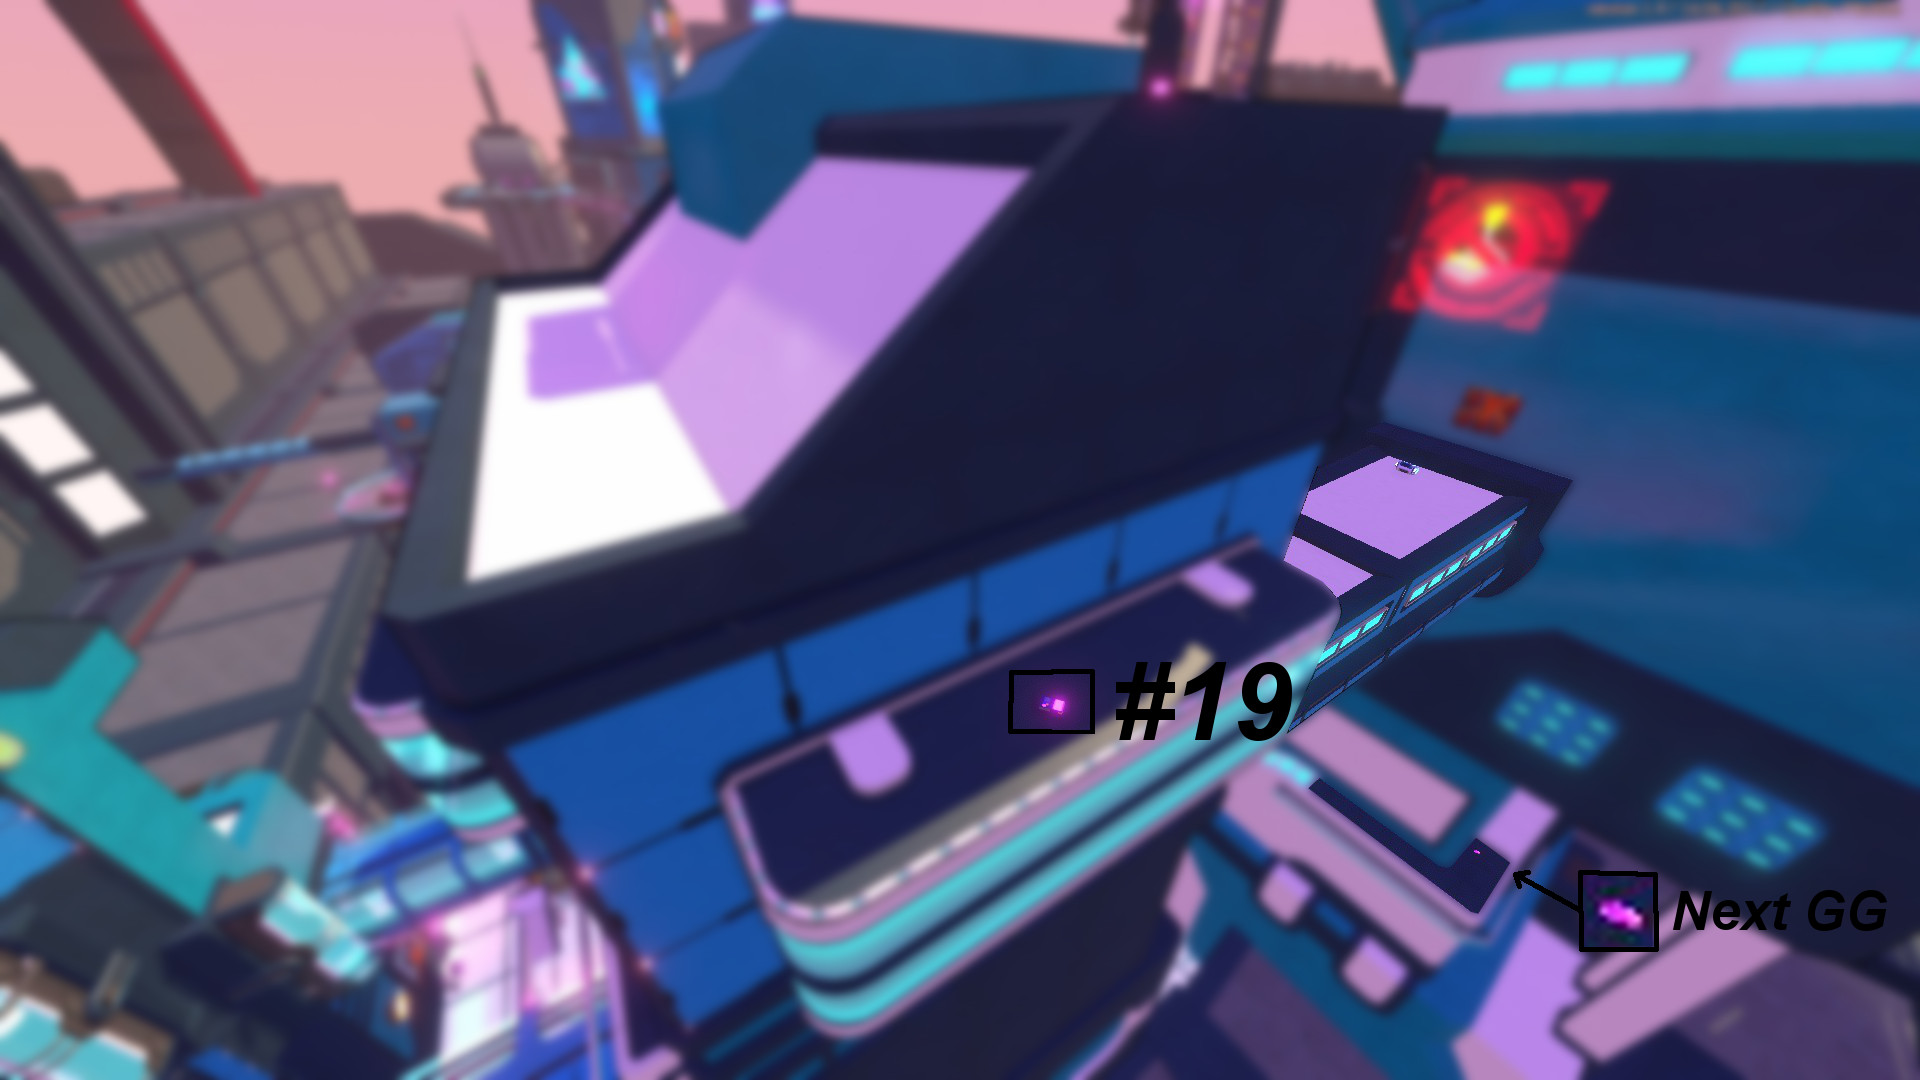
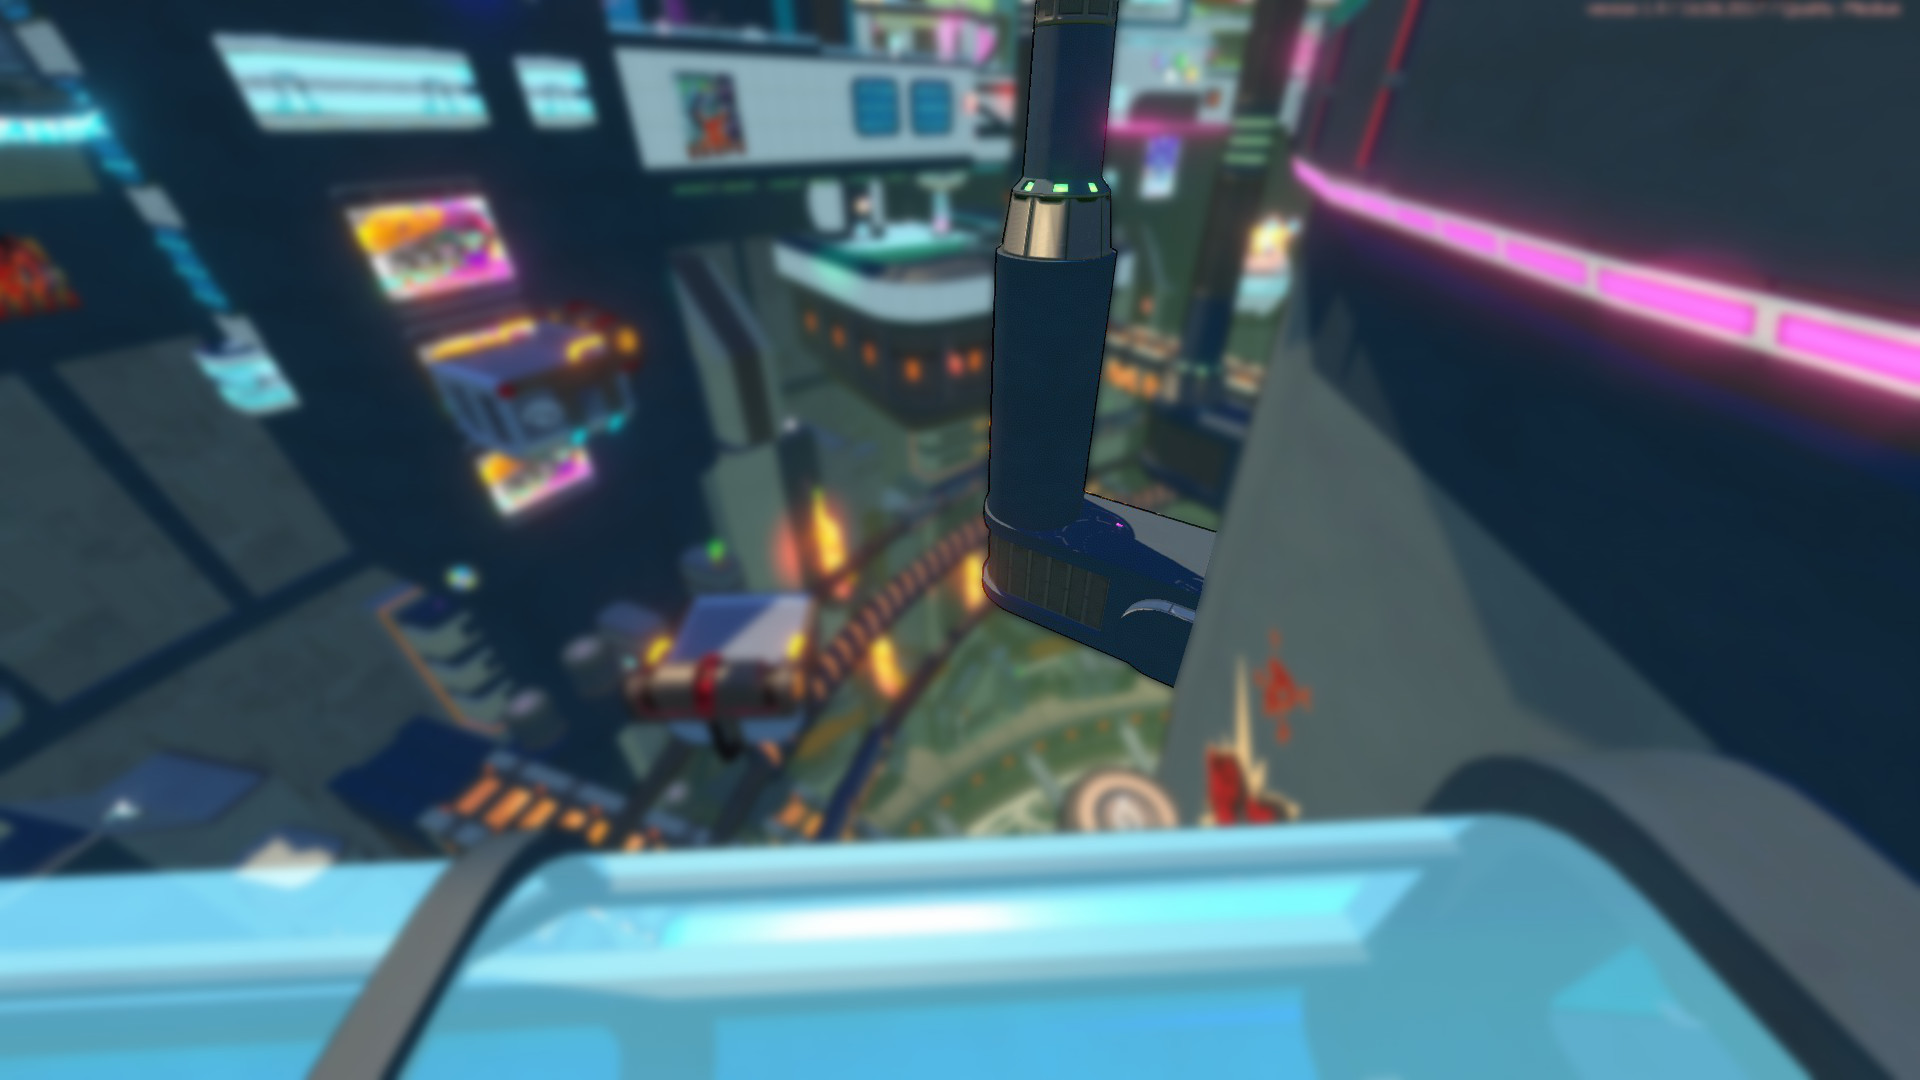
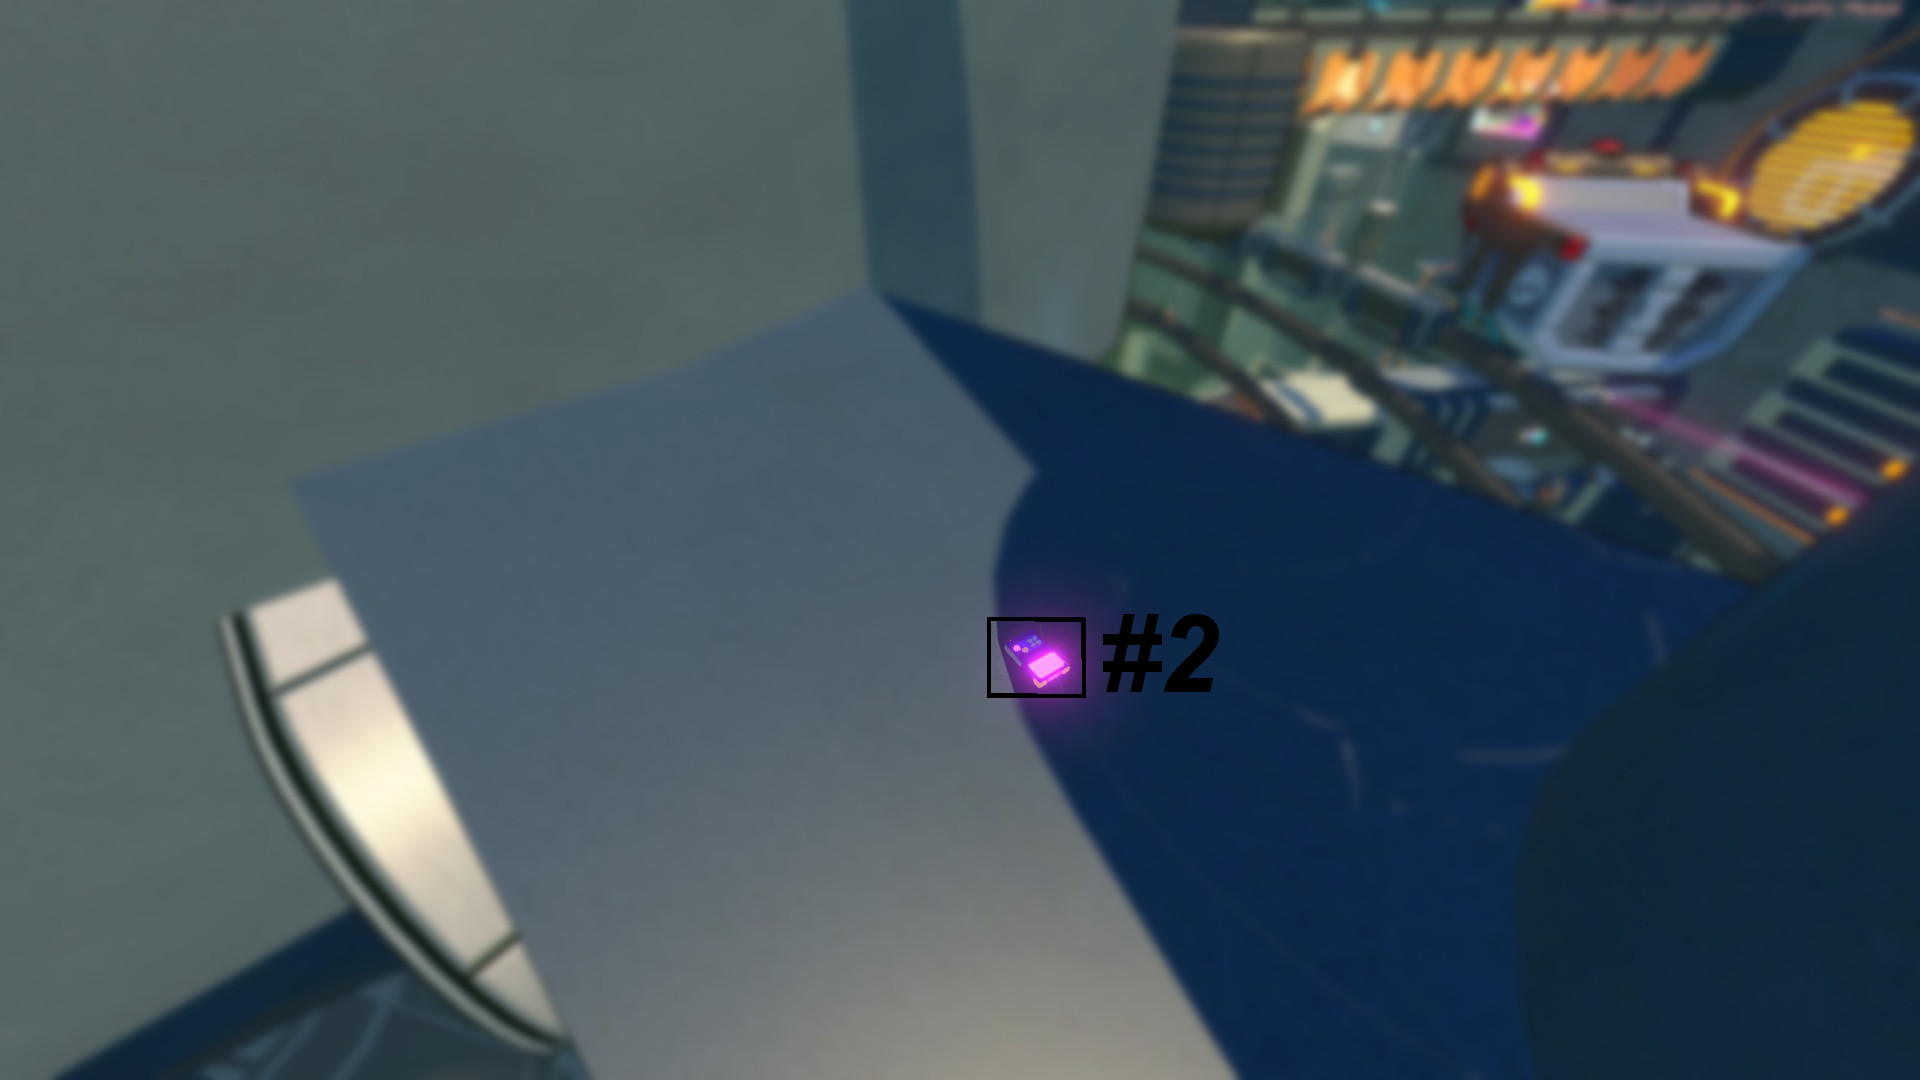
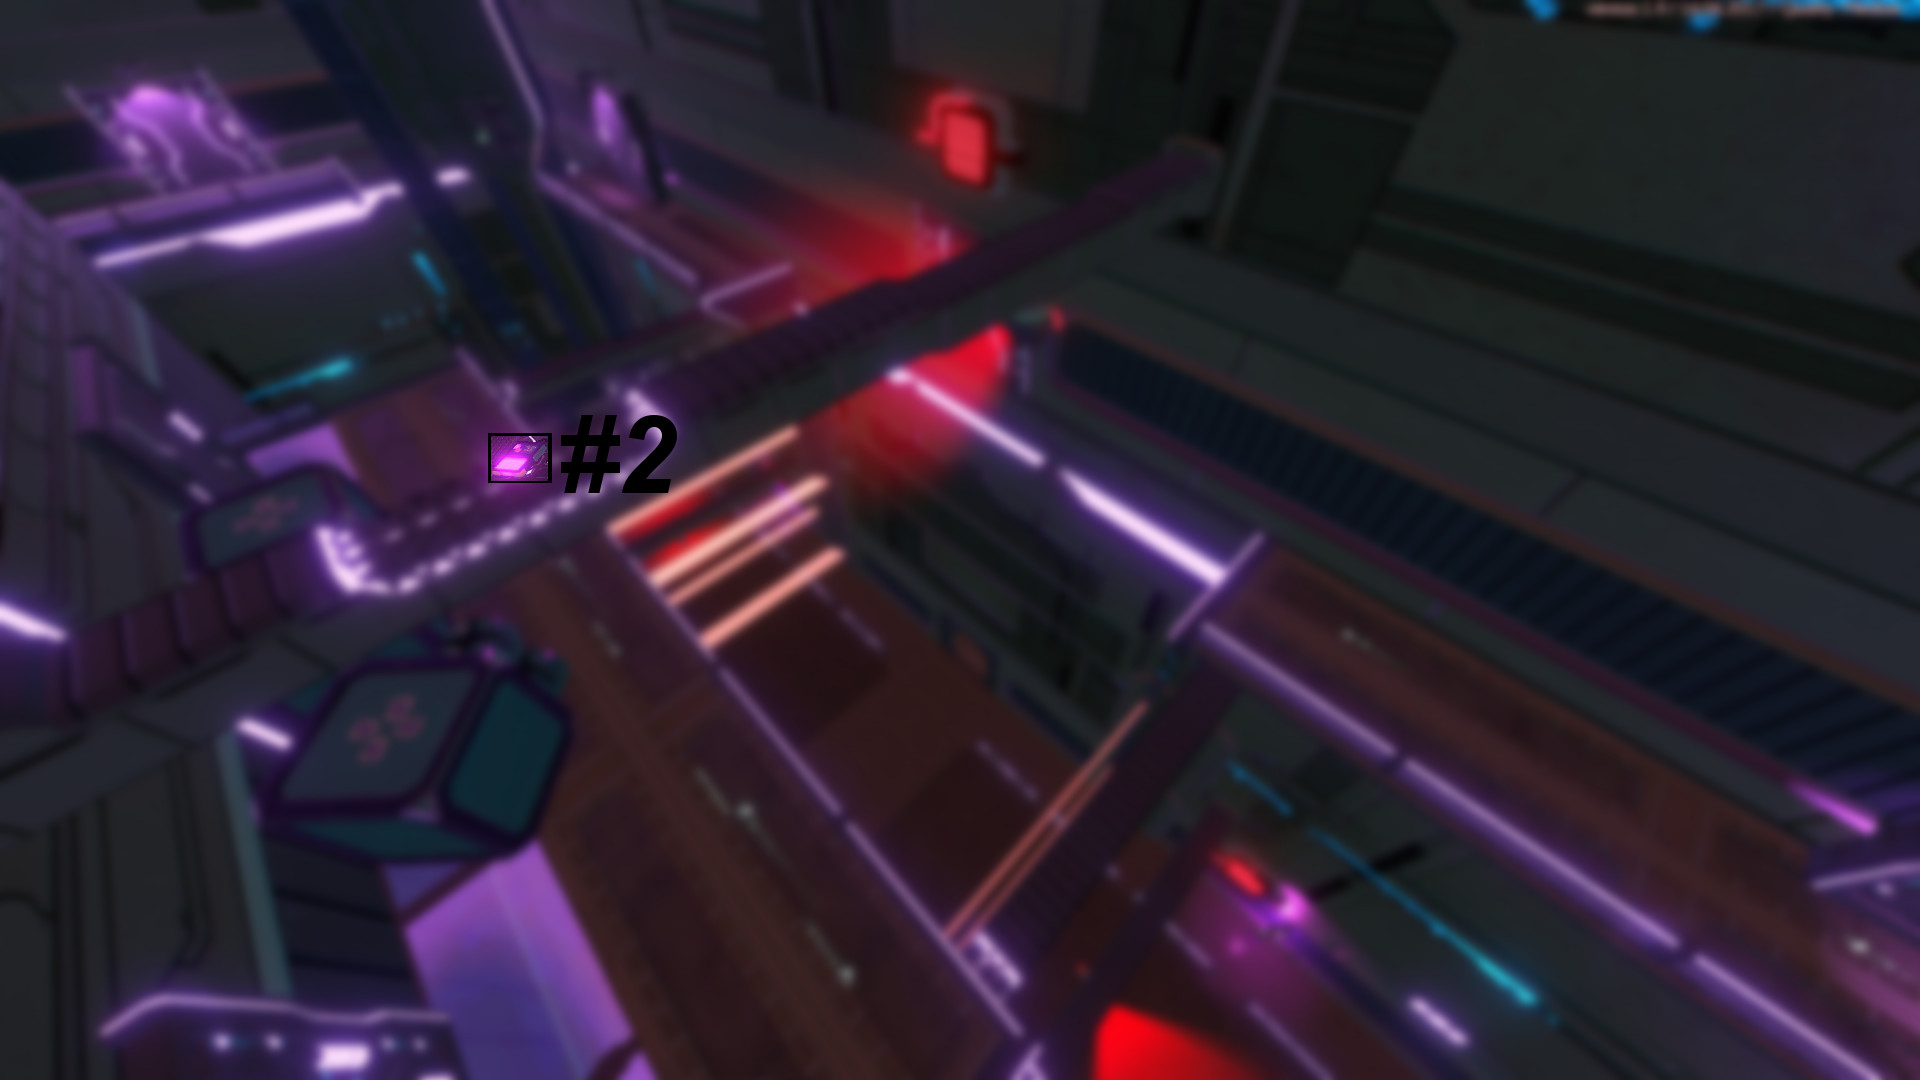
As for the 205/206 bug, I have not yet brought this to the devs on the Discord server (but it has been informed to other players). I'd like to wait for more confirmation on Laudy's assumption before doing this, so if you also think the bug happened on the second vent GG from OS report it here.