Easy Red 2

Easy Red 2

48 ratings
Dog Tags (100%)
By Galahad and 1 collaborators
Ultimate Dog Tag guide for Easy Red 2!
The most current informations!
5
2
   
Award
Favorite
Favorited
Unfavorite
How do dog tags work?
Sometimes AI soldiers spawn with special loadouts in certain (always the same) places. They aren't a part of any other squad so they are often easily distinguishable by fighting alone!

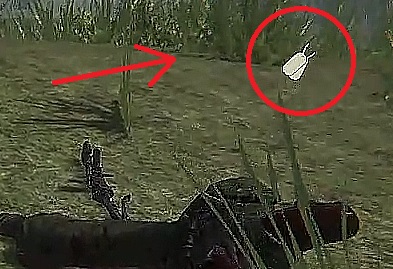
When they die a special gold dog tag icon will appear on your screen. When you press F on a body of such a soldier you will automatically collect a unique dog tag (dogtag). Even if you exit the battle the dog tag will be saved now. If you struggle with collecting the dog tag try changing the difficulty settings to "Easy", and Max AI units to "Low". There is also a working exploit. It's possible to start a private server without any bots. Dog tag characters will still spawn and can be easily found alone that way (thank you Ostrich!).

You can later play as the soldier with a dog tag you collected. It often represents a real person fighting in a certain battle. It also has a special loadout that sometimes lets you use weapons you wouldn't have a chance to use (for example Obrez Pistol).

Anzio
Battle for Anzio
  1. Shores of Nettuno:
    • Heinrich Flugelman (1918)
      Location - Phase 2, an AT gun in a town.
      Loadout - FG 42 w/ a scope and bayonet, Fallchirmjager uniform w/ a Feldmutze.
    • Alphonse Juin (1888)
      Location - Phase 5, when entering Anzio.
      Loadout - S&W Revolver, British uniform w/ a beret.

  2. Near Tor San Lorenzo
    • Lorne Maclaine Campbell (1902)
      Location - Phase 2, near a tent, an AT gun and 2 houses.
      Loadout - Sten Mk II, S&W Revolver.

  3. Near Acciarella
    • Thomas George Prince (1915)
      Location - Phase 3, near 3 ruined buildings and a trench.
      Loadout - Springfield 1903 w/ a scope, radio, Colt M1911A1, US uniform w/ a British helmet.

  4. Toward the Appennines
    • Chester Cruikshank (1913)
      Location - Phase 3, near the mountain castle.
      Loadout - M1A1 Thompson, S&W Revolver.
    • Ludwig Heilmann (1903)
      Location - Phase 5, bushes near the church, ruined building and an MG position.
      Loadout - FG 42, Luger, Wehrmacht uniform w/ an officer cap.

  5. Pushing back

  6. Anzio Express
    • Alan Whicker (1921)
      Location - Phase 3, near the trench behind a hill with a single house.
      Loadout - Lee Enfield No. 4 Mk I, bayonet, Colt M1911A1, British uniform w/ a helmet.
    • William Sidney (1909)
      Location - Phase 4, near the field behind the trench with an AT and AA guns.
      Loadout - Thompson M1928, S&W Revolver, British uniform w/ a beret.

  7. Near Frosinone
    • Maximillian Becker (1912)
      Location - Phase 3, near the long road after the trench line with a single house.
      Loadout - MP 40, Luger, syringe, an officer cap.

  8. Battle of Cisterna
    • Audie Murphy (1925)
      Location - Phase 1, near the end of a road. Close to 3 houses, a ruined building and an AT gun.
      Loadout - M1A1 Thompson, Colt M1911A1.

  9. Cassino City
    • Emil Czech (1908)
      Location - Phase 1, near a church and a lone house in the middle of a field.
      Loadout - Lee Enfield No. 1 Mk III, bayonet, S&W Revolver, British uniform w/ a helmet.
    • George Allan Mitchell (1911)
      Location - Phase 2, near 2 ruined buildings, tank fixing depot and a small trench.
      Loadout - Lee Enfield No. 1 Mk III, bayonet, S&W Revolver, dynamite, British uniform w/ a helmet.
    • Kamal Ram (1924)
      Location - Phase 5, near the city entrance.
      Loadout - Lee Enfield No. 4 Mk I, bayonet, S&W Revolver, British uniform w/ a helmet.
    • Hermann Barnbeck (1894)
      Location - Phase 6, near the river inside the city.
      Loadout - MP 44, Luger, Wehrmacht uniform.

  10. Liri River
    • Pietro Manelli (1896)
      Location - Phase 2, near tents and a trench line.
      Loadout - MAB 38, Beretta M1934, Italian SS uniform.

  11. Point 445, Montecassino
    • Sven Hassel (1917)
      Location - Phase 4, near the entrance to the Monte Cassino Abbey.
      Loadout - MG 42, German tank uniform w/ a Wehrmacht helmet.
    • Julius Schlegel (1895)
      Location - Phase 3, near a house, an AA gun and a small trench.
      Loadout - MP 40, Luger, officer cap.
Kwajalein
Battle for Roi-Namur
  1. Roi - Red Sector
    • Andrew Loy (1920)
      Location - One of the last phases.
      Loadout - M1 Garand, bayonet, American uniform w/ a helmet.

  2. Namur - Green Sector

  3. Namur Fall

  4. Roi - Securing the airport

Battle for Kwajalein
  1. Kwajalein Beachhead
    • Monzo Akiyama (1891)
      Location - Phase 2, near a tower, 2 huts and a camo net.
      Loadout - Type 100, Nambu Type 14, Japanese tank uniform w/ a helmet.
    • Arnold J Gresser (1927)
      Location - Phase 4, near a tower, an AA gun, and a T-shaped trench before the airfield.
      Loadout - M1 Garand, radio.

  2. Kwajalein Airport
    • Richard Sorenson (1924)
      Location - Phase 3, near some huts.
      Loadout - M3A1 Grease Gun.
    • Yamagata Masaji (1910)
      Location - Phase 4, near AA guns, trenches and huts behind the tank repair depot.
      Loadout - Type 97 AT rifle, Nambu Type 14, Japanese tank uniform w/ a pith helmet.

  3. North of Kwajalein
    • Tarokichi Aso (1915)
      Location - Phase 3, near 2 concrete AA gun positions.
      Loadout - Type 100, Luger, a pith helmet.

  4. Counter attack
    • Kenzo Tsuyuki (1917)
      Location - Phase 1 (Initial phase needs to be won by Americans), near 2 huts, AT gun and a tank repair depot.
      Loadout - Type 99, Nambu Type 14, Japanese uniform w/ a pith helmet.
    • Robert McCard (1918)
      Location - Phase 2 (First phases need to be won by Americans), near a desk with an MG, surrounded by barbed wire.
      Loadout - Browning M1919.
Makin
Battle of Makin
  1. Red Beach

  2. Yellow Beach

  3. The South Coast

  4. Southern Village

  5. Piercing the Jungle
Kos
Battle for Kos
  1. Mount Dikeos

    • Invasion of Marmari
      • Felice Leggio (1899)
        Location - Phase 6
        Loadout - MAB 38, Beretta M1934, 3xsmoke, Italian uniform w/ a Bustina cap, a lot of aspirin tablets and bandages.

    • Kardamaina
      • Francesco De Giovanni (1918)
        Location - Final phase, one of the two capture points.
        Loadout - Breda 30, Italian uniform w/ a helmet.

    • Towards Kos Capital

      • Road to Mastihari

        • Kos Harbour
          • Dante Zucchelli (1918)
            Location - Phase 4, defending the harbour.
            Loadout - Carcano M91 Cavalry, Beretta M1934, 4 Nebeltopf smoke grenades, Italian uniform w/ a helmet.

        • Kos Airport
          • James G. Gray (1921)
            Location - Phase 4, town attacked before the airport.
            Loadout - Playable for Italians! Sten Mk II, S&W Revolver, British uniform w/ a helmet, a lot of tuna cans and bandages.
          • William Patrick Reilly (1919)
            Location - Phase 5, the entrance to the airport.
            Loadout - Playable for Italians! Lee Enfield No. 4 Mk I, bayonet, S&W Revolver, British uniform w/ a Brodie helmet, a lot of aspirin tablets and bandages.
          • Sylvester von Saldern (1908)
            Location - Phase 6, the entrance to the airport.
            Loadout - MP 40, Luger, German uniform w/ an officer cap.

        • Kefalos Last Stand

          Tunisia
          Battle of Tunisia
          1. Medjez-el-Bab Resistance
            • Ahmed El Abed (1915)
              Location - Phase 2, behind western cap point
              Loadout - Lebel Mle 1886 w/ a bayonet, Ruby M1914, 2xsmoke, 2xgrenade, aspirin, 2xbandages, French uniform w/ a helmet.
            • Charles de Lambilly (1902)
              Location - Phase 4, behind western cap point
              Loadout - MAS 38 w/ a bayonet, ammo box, tool box, smoke, grenade, aspirin, 2xbandages, French uniform w/ a helmet.

          2. Tebourba Raid

            • Tebourba Gap

              • Hill 286
                • Johannes Scheid (1910)
                  Location - Phase 3, Hill 286.
                  Loadout - MG 42 w/ box mags, Luger, AT grenade, smoke, 4xgrenades, 2xbandages, German Fallschirmjager uniform w/ a helmet.

              • Taking Sedjenane
                • Francesco La Fata (1917)
                  Location - Phase 1, behind the cap point with German reinforcements.
                  Loadout - Carcano M91 Cavalry w/ a bayonet, 4xgrenades, 4xaspirin, 2xbandages, Italian uniform w/ a Sunhelm.
                • Albert Alfred Picot (1899)
                  Location - Phase 2, behind the cap near Sedjenane.
                  Loadout - FM 24/29, 2xsmoke, 2xgrenades, 4xaspirin, 2xbandages, French uniform w/ Africa Corps helmet.
                • William L. Nelson (1918)
                  Location - Phase 2, first cap point.
                  Loadout - M1917 Enfield w/ a Mk 3 scope and a bayonet, Thompson M1928A1 w/ drum and box mags, grenade, 4xaspirin, 2xbandages, American uniform w/ a helmet.

              • Enfidaville Line

                • Longstop Hill
                  • John Anderson (1918)
                    Location - Phase 1, western flank.
                    Loadout - Thompson M1928 w/ drum mags, Enfield No. 2 Mk I, 2xsmoke, 5xgrenades, 4xaspirin, 4xbandages, British uniform w/ a Brodie helmet.
                  • John Patrick Kenneally (1921)
                    Location - Phase 2, eastern flank near the captured point.
                    Loadout - Bren, ammo box, 3xsmoke, 2xgrenades, 4xaspirin, 4xbandages, British uniform w/ a Brodie helmet.
                  • John Oscroft (1920)
                    Location - Phase 3, behind British lines.
                    Loadout - Sten, PIAT, dynamite, smoke, grenade, 4xaspirin, 2xbandages, British uniform w/ a Brodie helmet.

                • Takrouna Summit
                  • Gastone Giacomini (1913)
                    Location - Phase 1, canyon behind the first cap point.
                    Loadout - Thompson M1928A1 w/ box mags, Beretta M34, 3xgrenades, 8xaspirin, 2xbandages, Italian uniform w/ a Sunhelm helmet.
                  • Haane Manahi (1913)
                    Location - Phase 2, first cap point.
                    Loadout - Thompson M1928 w/ drum and box mags, Enfield No. 2 Mk 1, ammo box, syringe, scissors, splinter pliers, smoke, grenade, 8xaspirin, 4xbandages, New Zealand uniform w/ a Brodie helmet.
                  • Mario Leonide Politi (1913)
                    Location - Phase 5, west of ruins cap point.
                    Loadout - MAB38, Enfield No. 2 Mk 1, 2xsmoke, 3xgrenade, 4xaspirin, 5xbandages, Italian uniform w/ a Sunhelm helmet.

                • Cavalry at Mateur

                  • Bizerte's Flank
                    • Geo Andre (1889)
                      Location - Phase 3, behind the French lines.
                      Loadout - FM 24/29, M1A1 Bazooka, smoke, grenade, 8xaspirin, 2xbandages, British uniform w/ a Brodie helmet.

                  • Battle for Bizerte
                    • Miguel Buzia (1898)
                      Location - Phase 4, eastern flank, near the coast.
                      Loadout - FM 24/29, Mauser C96, 2xMolotov cocktails, 3xsmoke, 8xaspirin, 4xbandages, British uniform w/ a Soviet Pilotka cap.
                    • Georg Neuffer (1895)
                      Location - Phase 5, western flank.
                      Loadout - Gewehr 41, Walther P38, ammo box, 2xdynamite, 2xAT grenade, grenade, 4xaspirin, 2xbandages, German uniform w/ an officer cap.

                  • Battle for Tunis

                    • El Aouina Airfield
                      • Rudolf Witzig (1916)
                        Location - Phase 2, defending northern cap point (barracks).
                        Loadout - MP 40, Mauser C96, 2xAT grenade, 2xsmoke, grenade, 4xaspirin, 2xbandages, German Fallschirmjager uniform w/ a helmet.

                    • Pont Du Fahs

                      • Zaghouan Holdout
                        • Gustavo Camerini (1907)
                          Location - Phase 3, east of the village captured by the French forces.
                          Loadout - MAS 36 w/ a bayonet, Ruby Model 1914, ammo box, smoke, 3xgrenade, 12xaspirin, 2xbandages, British uniform w/ an Adrian helmet.
                      Stalingrad DLC
                      Battle for Stalingrad
                      1. Main Residential Invasion
                        • Vasily Kvachantiradze (1907)
                          Location - Phase 3, near the capture point.
                          Loadout - SVT-40 w/ a PU Scope, Obrez Pistol, 4 RGD-33 grenades, Soviet Amoeba uniform w/ a helmet.

                      2. The Railyard
                        • Maksim Passar (1923)
                          Location - Phase 2 (for Germans), behind the wooden barrier between the wagons.
                          Loadout - Mosin Nagant 91/30 w/ a PU Scope, MP 40, Soviet uniform w/ a helmet.

                      3. Southern Assault
                        • Erwin Konig (1891)
                          Location - Phase 4, near the phase 3 capture point
                          Loadout - Kar 98k w/ a GLR scope, P38 Walther, 8 aspirin, 5 smoke grenades, M41 German uniform w/ a Feldmutze.

                      4. Volga River Crossing
                        • Vasily Zaitsev (1915)
                          Location - Phase 3, left capture point between ruined houses
                          Loadout - Mosin Nagant 91/30 w/ a PU Scope, TT-33, 2 RGD-33 grenades, 3 smoke grenades, M43 Soviet uniform w/ a Pilotka cap.

                      5. Taking Mamayev Kurgan

                      6. Encircling the Grain Elevator
                        • Mikhail Panikakha (1914)
                          Location - Phase 5, left capture point behind sandbags
                          Loadout - Mosin Nagant M91/30 w/ a bayonet, 1 RGD-33 grenade, 1 smoke grenade, Soviet uniform w/ a Pilotka cap.

                      7. Block by Block
                        • Günter K. Koschorrek (1923)
                          Location - Phase 4, behind 2nd line of german defences.
                          Loadout - MG 34, Luger P08, 1 grenade, 2 smoke grenades, 4 bandages, 8 aspirin tablets, German uniform w/ a helmet.

                      8. Suburb Encirclement

                      9. Pavlov's House
                        • Yakov Pavlov (1917)
                          Location - Phase 1, the first capture point in the house.
                          Loadout - PPSh-41, PTRD-41 w/ a bipod, 3 RGD-33 grenades, Soviet uniform w/ Ushanka hat (too heavy loadout to run).

                      10. Streets of Hell
                        • Herrmann Barnbeck (1894)
                          Location - Phase 3, somewhere in the trenches
                          Loadout - PPSh-41, Luger, 2 AT grenades, 2 grenades, 2 smoke grenades, German uniform w/ an officer cap.

                      11. Industrial Roundabout
                        • Ivan Kharchenko (1918)
                          Location - Phase 2, right capture point near the Flak 88 gun.
                          Loadout - PPSh-41, Obrez Pistol, 1 RGD-33 grenade, 1 smoke grenade, 1 AT mine, 1 dynamite, Soviet NKVD uniform w/ an NKVD hat.

                      12. Retaking the Train Station

                      13. Fallen Fighters Square
                        • Adolf Baum (1916)
                          Location - Phase 3, middle capture point next to the Flak 88.
                          Loadout - Gewehr 41 w/ a ZF-41 Scope, Walther P38, 3 AT grenades, 3 grenades, German uniform w/ an officer cap.

                      14. Red October Steelworks

                      15. Struggle for Mamayev

                      16. Univermag Department Store

                      17. Gumrak Airfield

                        - thanks to Man of Krieg for helping with finding the new Stalingrad campaign dogtags!
                      Normandy DLC
                      Operation Overlord
                      1. Omaha Beach
                        • Walter Mitty (1919)
                          Location - Phase 1, left side of the beach, near the tank barge.
                          Loadout - Thompson M1A1, Colt M1911A1, American uniform w/ a helmet.
                        • Norman Cota (1883)
                          Location - Phase 3, near the Flak 38 positions.
                          Loadout - Thompson M1A1, Colt M1911A1, American uniform w/ a helmet.

                      2. Gold Beach

                      3. Juno Beach
                        • Marc Böttcher (1916)
                          Location - Phase 1, central cap point.
                          Loadout - FG 42, Luger, German uniform w/ an officer hat.

                      4. Sword Beach
                        • Stanley Hollis (1912)
                          Location - Phase 2, near the right cap point.
                          Loadout - Lee Enfield No. 4 Mk I, bayonet, S&W Revolver, British uniform /w a helmet, a lot of aspirin tablets and bandages.
                        • Ken Russel (1920)
                          Location - Phase 3, near the right cap point, close to the outskirts of Ouistreham.
                          Loadout - M1A1 Thompson, Colt M1911A1, American paratrooper uniform /w a helmet.

                      5. Utah Beach
                        • Richard Winters (1918)
                          Location - Phase 2, behind you on left side of the beach.
                          Loadout - M1 Garand, Colt M1911A1, American paratrooper uniform /w a helmet.

                      6. Pointe du Hoc

                      7. Pointe du Hoc counterattack
                        • Josef Porta (1915)
                          Location - Phase 2 (first phases need to be won by the Germans), near the main road.
                          Loadout - PPSh-41, 2 AT grenades, German uniform w/ a helmet.

                      8. Sainte-Mère-Église
                        • Robert Cole (1915)
                          Location - Phase 2, near the drop zone when attacking the town.
                          Loadout - M1A1 Thompson, Colt M1911A1, American paratrooper uniform /w a helmet.
                        • John Steele (1912)
                          Location - Phase 2, near the drop zone when attacking the town.
                          Loadout - M1A1 Thompson, Colt M1911A1, American paratrooper uniform /w a helmet.
                        • Jack Agnew (1922)
                          Location - Phase 3, after taking the Sainte-Mère-Église town.
                          Loadout - M3A1 Grease Gun, American uniform /w a helmet.

                      9. Taking Pegasus Bridge
                        • John Howard (1912)
                          Location - Phase 2, north to the Pegasus Bridge.
                          Loadout - Sten Mk V, S&W Revolver, British paratrooper uniform /w a beret, a lot of aspirin tablets and bandages.

                      10. Holding Pegasus Bridge
                        • Heinrich Severloh (1923)
                          Location - Phase 3 (first phases need to be won by the Germans), near the Flak 88 gun.
                          Loadout - MG 34, 2 AT grenades, German uniform w/ a helmet.

                      11. Up through Vierville
                        • Jullian Eddings (1920)
                          Location - Phase 2, right flank of the American forces.
                          Loadout - M1 Carbine, Colt M1911A1, syringe, splinter pliers, scissors, American uniform /w a medic helmet.

                      12. Through the marshlands

                      13. Saint-Laurent-sur-Mer

                      14. Encircling Carentan
                        • Harrison Summers (1918)
                          Location - Phase 3, near the crashed C-47 plane.
                          Loadout - M1A1 Thompson, Colt M1911A1, American paratrooper uniform /w a helmet.

                      15. Battle for Carentan
                        • Kurt Beigang (1915)
                          Location - Phase 3, defending the other bank of the river on the entrance to Carentan.
                          Loadout - MP 44, Luger, 1 AT grenade, German SS uniform w/ an SS helmet.

                      16. Battle of Saint-Lô

                      17. Road to Creully
                        • Léo Major (1921)
                          Location - Phase 2, behind the central cap point,
                          Loadout - Owen Mk I/43 (camo), S&W Revolver, Canadian uniform w/ an ANZAC slouch hat.

                      18. Battle through Creully

                      19. Liberating Bayeux

                      20. Battle for Caen
                      Ardennes 1940 & 1944 DLC
                      Invasion of France
                      1. Donchery Blitz
                        • Pierre Beaugrand (1910)
                          Location - Phase 4, when attacking Donchery. Southern point in the town.
                          Loadout - Lebel Mle 1886 w/ a bayonet, Ruby M1914, syringe, scissors, splinter pliers, 4xaspirin, 6xbandages, French uniform w/ a helmet.
                      2. Sedan Blitz
                        • Walther Rubarth (1913)
                          Location - Phase 2, on the top of the hill
                          Loadout - MP 40, Walther P38, 2xAT Mine, AT grenade, German uniform w/ a helmet.
                      3. Blitz on Stonne
                        • Pierre Bes De Berc (1914)
                          Location - Phase 4, defending one of the cap points.
                          Loadout - Lebel M1886 w/ a bayonet, MAS 38, 2xMle 1916 Smoke Grenades, French uniform w/ a helmet.
                      4. Reinforcing Stonne
                        • Hermann Balck (1893)
                          Location - Phase 4, behind repair station located in the southern point.
                          Loadout - MP 28, Luger, 4xsmoke grenade, German uniform w/ a helmet.
                      5. Taking Back Stonne
                        • François De Salaberry (1917)
                          Location - Phase 2, French left flank, near the northern point.
                          Loadout - Boys Mk I, MAS 36 w/ a bayonet, 2xAT mine, 1xTNT, 2xbandages, 4xaspirin, French tank uniform w/ a helmet.
                      6. Securing Stonne
                        • Karl Schwappacher (1914)
                          Location - When attacking Stonne, south of the town.
                          Loadout - Kar 98k w/ a bayonet, Mauser C96 w/ a stock, German uniform w/ a helmet.

                      Battle of the Bulge
                      1. Burning Noville
                        • William R. Desobry (1918)
                          Location - Phase 2, behind the American lines
                          Loadout - M1 Carbine, Colt M1911A1, 2xdynamite, toolbox, 2xgrenade, 1xsmoke, 4xbandages, 8xaspirin, American uniform.

                      2. Mageret Assault
                        • Jack Edwards (1920)
                          Location - Phase 2, Northern point of the town, American left flank.
                          Loadout - BAR M1918 w/ a bipod, dynamite, 2xgrenade, 2xsmoke grenade, American winter uniform w/ a helmet.

                      3. Cutting off Bastogne

                      4. Armored Echoes of Bastogne

                      5. The Siege of Bastogne

                      6. Marvie Counterattack
                        • C.E. Jones (1911)
                          Location - Phase 2, when attacking the centre of Marvie town, American right flank.
                          Loadout - M1A1 Thompson, Colt M1911A1, 2xsmoke grenade, 2xgrenade, American standard uniform w/ a helmet.

                      7. Through Flamierge
                        • James Richard Hendrix (1925)
                          Location - Phase 5, when attacking a small town north of Flamierge. North of the town.
                          Loadout - M1 Garand w/ a bayonet, M1A1 Bazooka, American winter uniform w/ a helmet.

                      8. Battle at Foy
                        • Ronald Speirs (1920)
                          Location - Phase 3, American push, American right flank, when entering town centre.
                          Loadout - Thompson M1928A1, Colt M1911A1, 2xgrenade, 2xsmoke grenade, 4xbandage, American winter uniform w/ a helmet.
                        • Arthur Otto Beyer (1909)
                          Location - Phase 1, American entrenched positions in the forest south of Foy.
                          Loadout - M1 Carbine, Colt M1911A1, 1xdynamite, 2xgrenade, 8xaspirin tablets, American tank crew uniform w/ a helmet.

                      9. Clearing Villeroux's Hills
                        • Hubert Mickley (1918)
                          Location - Phase 3, defending the hill entrenchements.
                          Loadout - MP44 w/ a ZF-4 scope, Luger, a bayonet, AT grenade, grenade, smoke grenade, 12 aspirin tablets, German winter uniform w/ a helmet.
                        • UNKNOWN
                          Location - UNKNOWN
                          Loadout - UNKNOWN

                      10. Retaking Noville
                        • Anton Becker (1915)
                          Location - Phase 3, when attacking the town of Noville, near the town centre.
                          Loadout - MP40, Mauser C96 w/ a stock, 2xAT grenade, grenade, 8xaspirine tablets, German winter uniform w/ a helmet.
                        • UNKNOWN
                          Location - UNKNOWN
                          Loadout - UNKNOWN
                      Shanghai-Nanking DLC
                      Battle of Shanghai
                      1. Towards the SNLF Barracks

                      2. Barrack's Iron Line

                      3. Luodian Shoreline

                      4. Baoshan Siege

                      5. Luodian Struggle

                      6. Luodian Charge

                      7. Market District

                      8. Outskirts Counterattack

                      9. Sweeping the Suburbs

                      10. Train Station Push

                      11. Sihang Warehouse Defense

                      12. Surrounding Shanghai

                      13. South of Jinshanwei

                      14. Jinshanwei Takeover

                      15. Huangpu River Crossing

                      Battle of Nanking
                      1. Storming West
                      Conclusion
                      Special thanks to ASIA and jrandiny who made a big guide for ER2 with a dog tags section I used myself. You can check it out here. I wasn't fully satisfied with the state of the guide that became a bit outdated with time so that's why I decided to make my own complete Dog Tags Guide.

                      I hope I helped some of you in collecting all the dog tags for this amazing game :) Let me know if I missed sth in the comments!
                      46 Comments
                      Galahad  [author] 14 Jul @ 3:15am 
                      It should be there if you follow the instructions. However this campaign is currently being reworked and for Betausers it is already different. So I can't help you if you're on Beta, need to wait for the official release
                      AAchao 13 Jul @ 11:02pm 
                      I can't find Robert Mccard in Counter Attack!
                      Galahad  [author] 13 Jul @ 5:24am 
                      Updated the guide with all dogtags for the Tunisia campaign and new refreshed Battle of the Bulge DLC campaign
                      LibraUtoo 10 Jul @ 6:23am 
                      for Blitz on Stonne, he definitely will appear during phase 4 (which is the last phase) but may not at the left flank and I just found him in the middle cap point
                      Galahad  [author] 9 Jul @ 2:47am 
                      thanks! I was in the middle of playing throught the missions and finding them :) Will update it in a while
                      LibraUtoo 8 Jul @ 9:17pm 
                      El Aouina Airfield
                      Germans - Rudlf Witzig : appear during Phase 2 seem to always defend the barracks the right cap point

                      Zaghouan Holdout
                      French - Gustavo Camerini : appear during Phase 3 on the far left of Phase 2 village

                      Here are my finding for the last two missions of Tunisia and thanks for the previous sharing:steamthumbsup:
                      大道无形调茶学 21 Apr @ 10:35pm 
                      Thank you for sharing!~
                      Man of Krieg  [author] 26 Nov, 2024 @ 10:40am 
                      Ok, gave invite.
                      Galahad  [author] 26 Nov, 2024 @ 10:34am 
                      Thank you! If you wanna be a coauthor of this guide add me to friends ;)
                      Man of Krieg  [author] 26 Nov, 2024 @ 10:24am 
                      I am done.